Journey with Confidence RV GPS App RV Trip Planner RV LIFE Campground Reviews RV Maintenance Take a Speed Test Free 7 Day Trial ×
Sunline RV Forum
Sunline User Photos

Go Back   Sunline Coach Owner's Club > Technical Forums > Repairs and Maintenance
Click Here to Login

Join Sunline Club Forums Today


Reply
 
Thread Tools Search this Thread Display Modes
Old 09-25-2022, 06:59 PM   #1
Moderator
 
JohnB's Avatar
 
Join Date: Nov 2006
Location: Ohio
Posts: 12,654
SUN #89
JohnB is on a distinguished road
Replacing an Atwood water heater, with Dometic heater (Pic Heavy)

Over the winter of 2021/2022, I was restoring a Sunline 2007 T89SR camper that needed a new water heater, and finding a new drop-in like-for-like water heater, created a few challenges. First off, a little background. Almost all the Sunlines back into the 70s came with an Atwood water heater.

Atwood Mobile sold part of the business to Dometic in 2014. By 2017 Atwood products were being sold under the Dometic brand. https://www.dometic.com/en-us/outdoo...branded-atwood

Since Covid started in early 2020 and its share of RV part supply problems, combined with when Dometic discontinued building the last Atwood design water heater as a complete water heater, getting a new water heater has been a challenge. Parts are still available for many Atwood models now made under the Dometic brand. And some of the older Atwood parts have fallen into the discontinued situation.

Finding a completely new Atwood water heater was nearly nonexistent from early to mid-year 2021 to fall 2022. Only dealers with older left-over stock had any, and it was hard to find them. Things started to break free in late 2021 when the new Dometic redesigned heater became available. Anyone with a Sunline camper, this post may help you the day you need to do a total water heater replacement.

In Dec. 2021 and Jan 2022, I bought two new Dometic WH-6GEA water heaters (6 gal, combo gas, and electric), one to install and another to have a spare on hand for one of my project campers. The pricing was nuts, pending where you were looking to buy. The cost ranged from $350 to over $800 on sale, and at some places, close to $1,000 for the same water heater. I was fortunate to find the first one at the $350 price and the second two months later for $365 at a retailer on Amazon. I can't find that price anywhere now that inflation has gone up. It appears $450 is the lowest current price at this post's time, but some retailers still offer them at $800.

Here is a link to the three water heaters offered by Dometic as of this post. It shows all the discontinued models also. https://www.dometic.com/en-us/outdoo...vance&count=48

I'll do the rest of this post mainly in pictures, as seeing this change out is where the most help can come in. Here are some overall pics of the new first generation WH-6GEA bought in Dec. 2021. Some parts since have changed, and more on this later.


For comparison, here is the last vintage of the Atwood combo gas & electric water heater used in some of the later 2004 to 2007 model Sunlines.


Here is the new Dometic water heater placed inside the opening of the old Atwood.
The old Atwood opening in the side of a 2007 T289SR


Below is a picture of the new Dometic in the camper opening as a test fit. Thankfully, the heater fits the height of the camper opening, but we have to space in the sides.


They sell a door kit that will convert the new style heater into a retrofit older opening. It is called "Dometic 94016 6 Gallon Water Heater Door Conversion Kit #34 18"W x 14-3/4" White." I bought mine here, which is in Ohio and about an hour away. I get free shipping; not sure if they do it for all outside of OH. The cost of this kit is all over also https://www.boatandrvaccessories.com...n-kit-34-white

You get an oversized door to mimic the original Atwood and two side filler plates. They sell a standard smaller door for new camper installs.

I cut down a 2 x 4 to fit equally on both sides to create the correct opening and screwed them in place flush with the outside wood framing. Note: You must include the thickness of the retrofit side plates when cutting the boards to close in the opening.


The side panel filler plates. NOTE: The picture below shows four screws in these panels. I created lineup holes to ensure these plates return the same way once all the butyl tape etc., is in place. If these plates shift position up or down in relation to each other, the heater will not fit in the hole correctly. The door hinge holes must align with the side plates and the heater flange.


NOTE 2: Due to the mounting location of the T289SR, the top of the heater mounting flange runs into a high ridge bump in the siding. This large bump does not let the heater set flush to the frame wood. I used a large C clamp and 2 x 4 to flatten the large siding bumps flat. Then the heater will be set flush with the wood frame. The old Atwood did not matter as much, as there were no side filler plates. If your floor plan has the water heater pass through this large set of siding ribs, I suggest you flatten them.

Next was to deal with the water piping changes needed. Dometic flipped the inlet and discharge from being stacked to being side by side and from female thread sockets in the tank to male threads on a pipe that hangs out beyond the tank. On a new camper, this is not a problem; on a retrofit, it can create some piping opportunities to overcome. Each camper floor plan may have different issues to work through when dealing with the piping tie back into the existing camper piping. The newer Sunline campers often have a deeper cabinet where the water heater is so I could accommodate the added depth. However, tying into the existing hot and cold piping created a few revisions to get it correct.

Here is the first version. I thought this looked good outside the camper, and I'm using the two-valve heater bypass setup instead of the one 3-way valve and check valve of the older version.


While it looked nice and neat, the hookup inside the camper was not good; it would not work. Here is version 2; it did not work either… a bummer.


So here is the "third" version that did work. Yeh! This piping should be self-draining into the tank, not creating a natural water trap. The water needs to drain back into the heater, not stagnating when not used, the camper drained, and to help with winterization.


More in the next reply.
__________________

__________________
Current Sunlines: 2004 T310SR, 2004 T1950, 2004 T2475, 2007 T2499, 2004 T317SR
Prior Sunlines: 2004 T2499 - Fern Blue
2005 Ford F350 Lariat, 6.8L V10 W/ 4.10 rear axle, CC, Short Bed, SRW. Reese HP trunnion bar hitch W/ HP DC

Google Custom Search For Sunline Owners Club
JohnB is offline   Reply With Quote
Old 09-25-2022, 07:01 PM   #2
Moderator
 
JohnB's Avatar
 
Join Date: Nov 2006
Location: Ohio
Posts: 12,654
SUN #89
JohnB is on a distinguished road
Any time now that I have a water heater out, it gets a drip pan installed before it goes back in. From my prior water heater pan system, I have evolved it into something less costly for the material on the last three I have made and faster to make. The first one was aluminum. The previous three were galvanized steel. See here for more about a first drain pan. https://www.sunlineclub.com/forums/f...hem-19997.html

I start with this galvanized sheet from our local Menards lumber yard. The Hillman steel rack is common in other lumber yards, also. It is a piece of 26-gauge, 24 x 24 steel sheet. Cost $18 + tax https://www.menards.com/main/hardwar...903-c-9215.htm


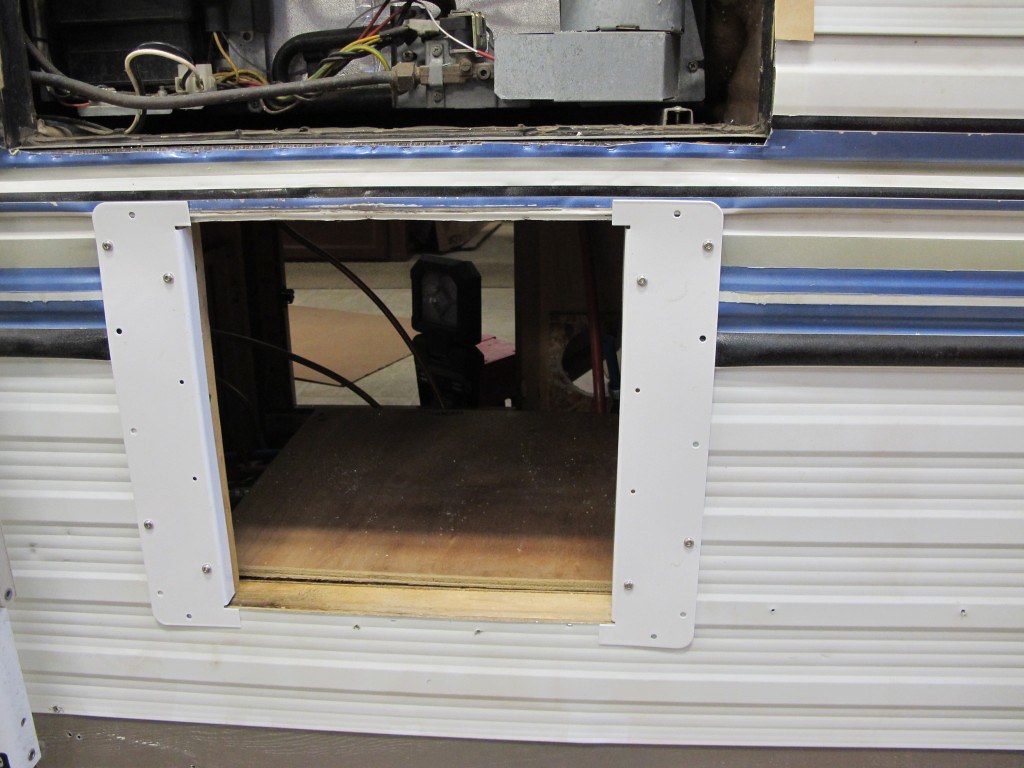
Determine the exact size left to right of the opening in the camper. This drip tray folded up will fit tight/snug to the camper opening. Measure 3 times, cut and fold once. I measured and marked out a 3/4" lip that will be bent up on three sides and down on the front. Trim out the corner joints. These will be caulked with Proflex RV later at the seam line.


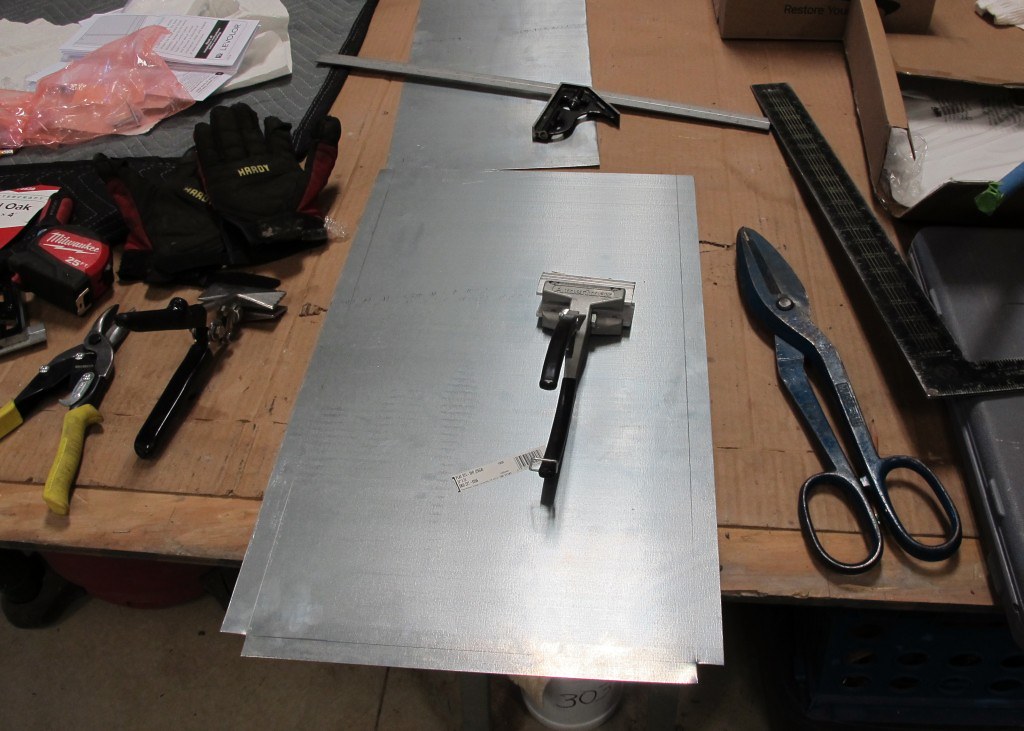
Start the bend with hand seamers and a sharp corner worktable edge with clamps.


Finish the first bend and do the other three sides. After the first long side bend, check the width of where the second bend will be. You can tweak the second long bend line a little if needed, so the fit is correct for the opening.


Do a test fit in the camper. I make the pan as long as it can be to reach inside the camper and be under the piping fittings to help catch a leak from them. Each camper will have a slightly different length, pending fittings, and how much room you have inside the cabinet.


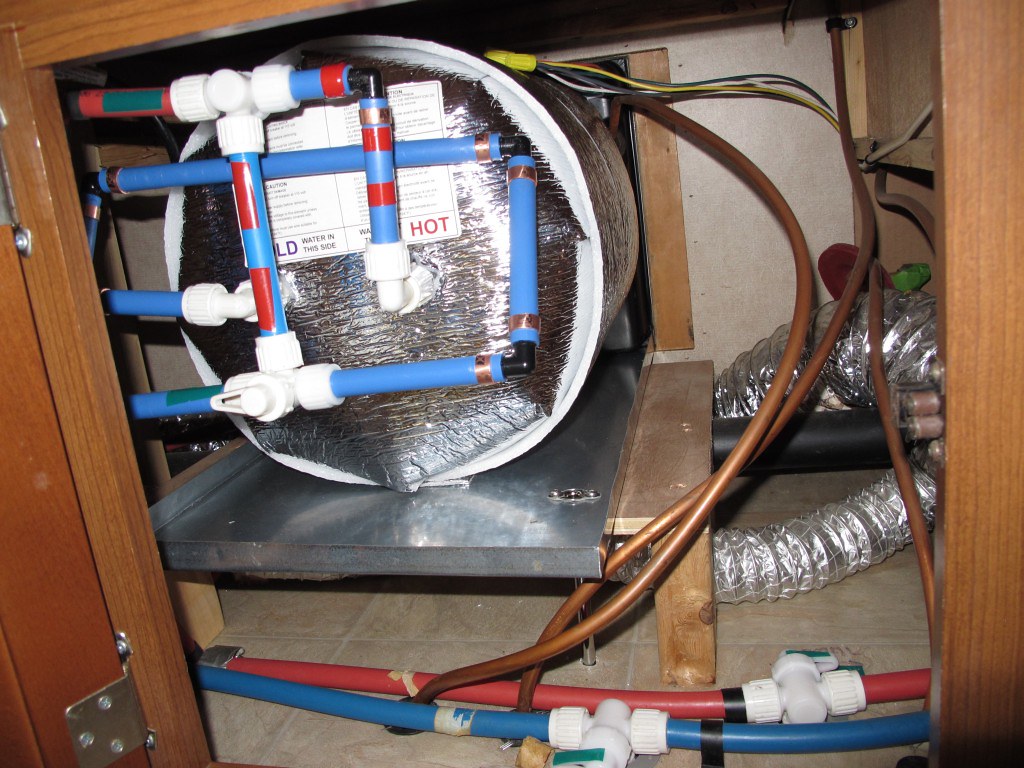
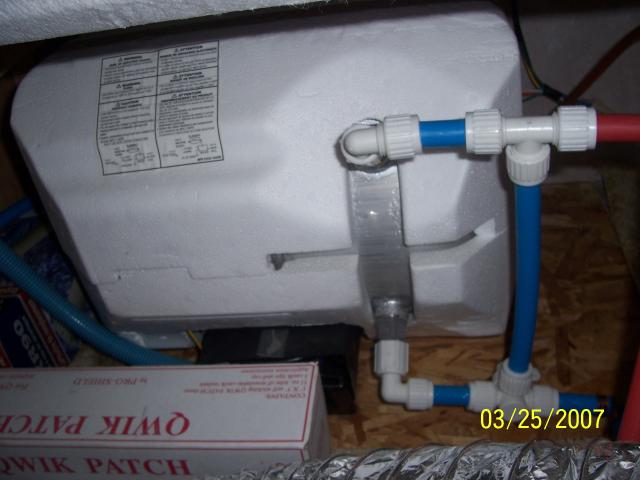
Test fit the pan and water heater flush to the side of the camper. Check that everything will work out on the hot and cold-water lines, and you can reach where you need to with the pan in place.


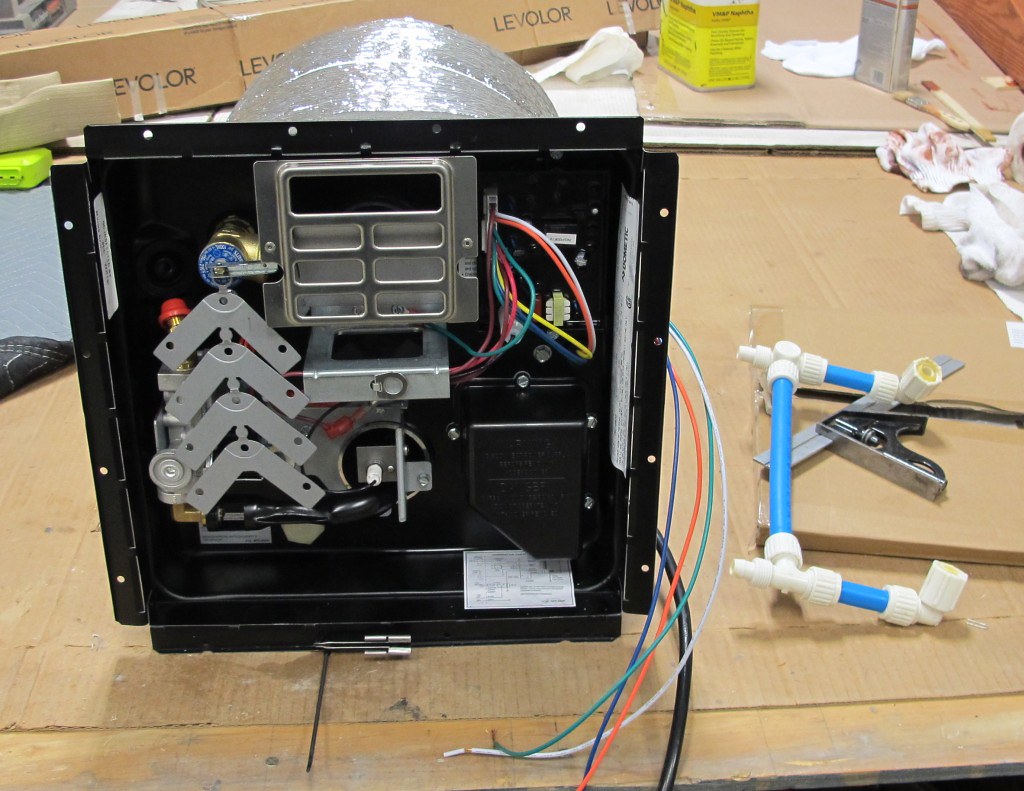
I installed a 120 VAC outlet for the water heater plug since they do not leave you a junction box anymore as the older Atwood's had.


Before going much further on the installation, I prebend the gas line to reach the new gas valve location; I had enough copper line to make this installation work without adding any new line.


Now that you have tested fit the tray and heater, I install high-quality commercial steel building butyl tape at the siding seals. The butyl brand I use is GSSI Sealants PN MB-10A 1" wide x 1/8" thick. GSSI Sealants, Inc. I buy it from Best Materials https://www.bestmaterials.com/detail.aspx?ID=19987

I cut strips to fill in the valleys of the siding. And I install the butyl on the full-length edge of the side plates.


The mounting flange of the water heater also gets a full lining of butyl tape.

The bottom siding where the drip pan bent down lip also gets a lining of butyl tape. I use an ice pick to line up the pre-installed holes to line up the side plates now pressed into the butyl.


Check that the drain pan fits between the side plates and install the outer screws in the side plates. Double check with the lineup holes the side plates did not shift before installing all the outer screws. The inner screws will be installed when the water heater is set in place.

You also install a drain line from the pan to the outside. I suggest drilling the drain holes at this stage now that you know the drain pan will no longer move. You must install the drain line before the heater as there is no room to work after the heater is in place. See the link above to the first water heat pan post on my toilet supply pipe. You can see the drain installed in the pan in this pic. The drainpipe must be flush with the pan and be butyl tape sealed. Drill a relief hole in the board/floor under the heater so the toilet fill tube sits flat on the tray.


After checking the drain pan fit and the pan drain tube, remove the release paper on the siding where the pan front lip edge goes and press the pan in place. Complete the drain tube mounting.

Place the water heater part way into the opening. Route the heater wires inside the camper opening and route the gas line into the correct area to fit into the hole before the gas valve. Slide the heater into the camper opening. Note that the release paper is still on the butyl tape on the water heater mounting flange. Check the wires and gas line fit up.


Once the fit-up looks correct, back the heater up a few inches, remove the release paper from the water heater flange, and insert the heater into the opening. A heat gun can help with colder temperatures to make the butyl flow into all voids. Trim off excess butyl around the edges with a plastic scraper.


Go inside and hook up the wires, water, and gas line outside.


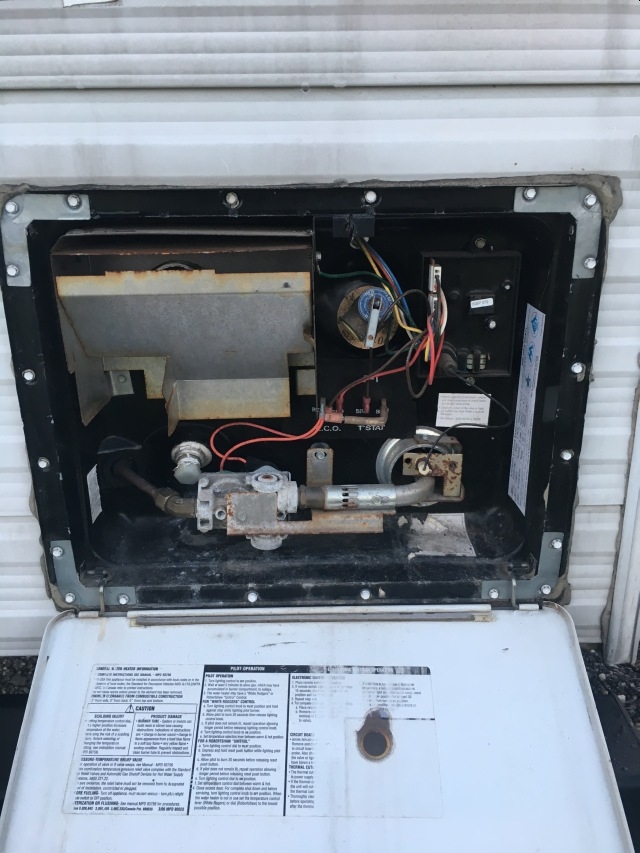
NOTE: By the directions from Dometic, they recommend installing wood blocks to hold the tank from moving. Not sure why, as the older Atwood heater never used them. I suspect it may be to reduce stress on the tank and front flange when towing down bumpy roads. They are not shown in this install nor installed. This camper will be on a seasonal site and will not be moved for the foreseeable future.

I installed a drain valve on a hose to allow easy draining of the heater. Dometic now gives you a nylon drain cap in place of the Atwood drain plug. Look like this


I used a 1/2" NPT lead-free 90-degree elbow to adapt to the tank drain and the drain hose. You can see the setup. It would be best to find a potable water hose rated at 150 psi and a temperature rating of at least 150F. Both Valterra and Camco make this hose. The standard vinyl hose you find at the local hardware store is likely not potable water or temperature rated. If you need help sourcing the hose, let me know I'll get the spec for it. An RV dealer more than likely has this hose in their shop. You can try them too. I installed a lead-free boiler drain valve (ball valve) on the end of the hose with potable water-rated nylon hose fittings—the green cap on the drain valve to not scratch up the water heater model label.


I use Proflex RV sealant around the exposed butyl tape to the siding, adding double protection against siding leaks. And to caulk the corners in the drip pan.

A battery-operated water alarm was added to the drain pan to alert a leak was occurring. I know I have pics of the water alarm, but they are missing in action. This one was a simple contact alarm near the drain tube.

Here is the manual for the new Dometic heater that I bought. I have uploaded it to the FILES section. You have to be logged into the forum to download a copy.
https://www.sunlineclub.com/forums/d...o=file&id=5644

I hope this helps,

John
__________________

__________________
Current Sunlines: 2004 T310SR, 2004 T1950, 2004 T2475, 2007 T2499, 2004 T317SR
Prior Sunlines: 2004 T2499 - Fern Blue
2005 Ford F350 Lariat, 6.8L V10 W/ 4.10 rear axle, CC, Short Bed, SRW. Reese HP trunnion bar hitch W/ HP DC

Google Custom Search For Sunline Owners Club
JohnB is offline   Reply With Quote
Old 10-06-2022, 12:03 PM   #3
Member
 
Join Date: Jan 2017
Location: Tennessee
Posts: 34
SUN #9070
Stubborn1 is an unknown quantity at this point
WOW, how best to save this post? I love hot water and fear the day it has such a huge need for replacement. Search term to narrow to this post? You amaze, John! We are fortunate to have this forum!
__________________
Stubborn1 is offline   Reply With Quote
Old 10-06-2022, 02:27 PM   #4
jgt
Junior Member
 
Join Date: Oct 2017
Location: Ontario
Posts: 6
SUN #10020
jgt is an unknown quantity at this point
We have the same heater as in pic 4 (2004 to 2007) units. It appears to have electronic ignition rather than a pilot light,
The instructions on the door are now illegible. How does the propane burner start?
__________________
jgt is offline   Reply With Quote
Old 10-06-2022, 06:29 PM   #5
Moderator
 
JohnB's Avatar
 
Join Date: Nov 2006
Location: Ohio
Posts: 12,654
SUN #89
JohnB is on a distinguished road
Quote:
Originally Posted by Stubborn1 View Post
WOW, how best to save this post? I love hot water and fear the day it has such a huge need for replacement. Search term to narrow to this post? You amaze, John! We are fortunate to have this forum!

Thanks Stubborn, Your kind words are greatly appreciated. Yes, we are very glad to have this forum. Since the factory closed up , we are the self help group.
__________________
Current Sunlines: 2004 T310SR, 2004 T1950, 2004 T2475, 2007 T2499, 2004 T317SR
Prior Sunlines: 2004 T2499 - Fern Blue
2005 Ford F350 Lariat, 6.8L V10 W/ 4.10 rear axle, CC, Short Bed, SRW. Reese HP trunnion bar hitch W/ HP DC

Google Custom Search For Sunline Owners Club
JohnB is offline   Reply With Quote
Old 10-06-2022, 06:56 PM   #6
Moderator
 
JohnB's Avatar
 
Join Date: Nov 2006
Location: Ohio
Posts: 12,654
SUN #89
JohnB is on a distinguished road
Quote:
Originally Posted by jgt View Post
We have the same heater as in pic 4 (2004 to 2007) units. It appears to have electronic ignition rather than a pilot light,
The instructions on the door are now illegible. How does the propane burner start?
Hi jgt,

If your have a heater that looks like this, yes that is electronic ignition.


The propane burner lights off of an electrode right after the gas burner in the water heater heat exchanger tube. It you look in the pic above, there is a white round porcelain insulator with a wire going to it just at the entrance of the lower heater heat exchanger tube. That is the electrode in the center of the porcelain insulator that lights the flame.

This link will take you to my Flickr photo hosting site that has a short video showing the gas burner running. https://flic.kr/p/2ktz7Vv Click the run arrow in the center of the screen to start the video.

To start the gas burner, first there must be water in the heater, make sure it is full. Then inside the camper is a red toggle switch that turns on the water heater in LP gas mode. Not sure what year your camper is, on the 2004 to 2007's there is a tank panel with push button indictors for tank levels and then water pump and water heater lighted toggle switches.

In some of 2003 built Sunlines (2004 models) they had a 2 panel setup, like this


The tank panel has the LP gas mode switch for the water heater. The top switch called Atwood, was for the electric element.

In early 2004 to 2006 when the last Sunline was made, they used a 3 switch tank panel. Like this, LP gas and electric heat for the water heater was in the tank panel.


With battery power on or you are plugged into shore power, then flip the LP gas mode switch and the heater should start to try to light about 1 to 2 seconds after the switch is flipped.

If you are having trouble getting the water heater to work, create a post just for your heater, tell use the model, year of the camper and the model number on the tag of the water heater. The tag is in the outside panel on your right facing it. The tag looks like this


And tell us what you have tried and what does not happen when you turn the heater on gas when outside listening. Listen for clunks and clicks about 1 or 2 seconds after the heater is turned on. If you hear nothing, tell us that too.

Hope this helps

John
__________________
Current Sunlines: 2004 T310SR, 2004 T1950, 2004 T2475, 2007 T2499, 2004 T317SR
Prior Sunlines: 2004 T2499 - Fern Blue
2005 Ford F350 Lariat, 6.8L V10 W/ 4.10 rear axle, CC, Short Bed, SRW. Reese HP trunnion bar hitch W/ HP DC

Google Custom Search For Sunline Owners Club
JohnB is offline   Reply With Quote
Old 10-07-2022, 01:24 PM   #7
jgt
Junior Member
 
Join Date: Oct 2017
Location: Ontario
Posts: 6
SUN #10020
jgt is an unknown quantity at this point
I had downloaded the instructions from the internet, and it only showed the pilot light models, so I got fixated on that and missed the obvious switch beside the stove. Mine (2003 T2753) also has a switch to prevent using the electric water heater and the microwave at the same time.
It took about 15 minutes to get the water temp over 100 degF.
Thanks.
__________________
jgt is offline   Reply With Quote
Old 10-08-2022, 06:34 AM   #8
Moderator
 
JohnB's Avatar
 
Join Date: Nov 2006
Location: Ohio
Posts: 12,654
SUN #89
JohnB is on a distinguished road
Hi jgt,

Sounds like you have your water heater situation under control. Great!

15 minutes to get to 100F is about right. Part of this also stems from how cold the water was from the start of heating. A cold well water fill up (50F) might take a good 45 to 50 minutes to reach full temperature (140F as set by Atwood). While a heater that was shut off at say, 9:00pm after the last shower, then come next morning doing dishes, might only take 20 to 25 minutes as the water may have only dropped down to the 80 to 90F area.

Happy camping

John
__________________

__________________
Current Sunlines: 2004 T310SR, 2004 T1950, 2004 T2475, 2007 T2499, 2004 T317SR
Prior Sunlines: 2004 T2499 - Fern Blue
2005 Ford F350 Lariat, 6.8L V10 W/ 4.10 rear axle, CC, Short Bed, SRW. Reese HP trunnion bar hitch W/ HP DC

Google Custom Search For Sunline Owners Club
JohnB is offline   Reply With Quote
Reply


Currently Active Users Viewing This Thread: 4 (0 members and 4 guests)
 

Posting Rules
You may not post new threads
You may not post replies
You may not post attachments
You may not edit your posts

BB code is On
Smilies are On
[IMG] code is On
HTML code is Off
Trackbacks are Off
Pingbacks are Off
Refbacks are Off


Similar Threads
Thread Thread Starter Forum Replies Last Post
Atwood Gas Furnace and Atwood Water Heater GalacticSton Accessories, Parts, Etc. For Sale 4 08-02-2022 05:59 AM
Maintaining an older camper tow vehicle (pic heavy) JohnB Towing and Tow Vehicles 95 06-24-2020 06:14 PM
Advice for replacing Atwood hot water heater kkeduda Repairs and Maintenance 6 07-03-2019 06:30 PM
replacing my Atwood 6 gallon l.p. water heater with a new Atwood with l.p. and electr sallyforth Repairs and Maintenance 19 05-08-2018 10:47 PM
A bit of excitement on Sunday morning (Pic heavy) EMD_Driver Sunline Community 14 03-03-2017 08:44 AM


» Featured Campgrounds

Reviews provided by

Disclaimer:

This website is not affiliated with or endorsed by Sunline RV or any of its affiliates. This is an independent, unofficial site.


All times are GMT -6. The time now is 12:26 PM.


×