 |
 08-26-2022, 03:03 PM
|
#1
|
|
Senior Member
Join Date: Sep 2007
Location: New York
Posts: 101
SUN #402
|
Moisture Meter
2005 Sunline #2753
I finally took JohnB's advice and purchased a Moisture Meter. Ahh ignorance is bliss. I discovered 5% around the sides of both doors near the top. So I suspect the roof caulk. So I plan on doing a recaulk.
How do I dry these areas out without having to do a major job - or are there no minor jobs - they're all major.
Maybe not the roof since it's around both doors. Door Caulk?
flbradjr "Brad"
__________________
__________________
|

|

|
|
08-28-2022, 06:58 PM
|
#2
|
|
Moderator
Join Date: Nov 2006
Location: Ohio
Posts: 12,651
SUN #89
|
Hi Brad,
H'mm, need some more info to back into what you found. Some questions to start with,
1. Which brand and model moisture meter are you using? Once I know what you have, we can better sort out what 5% means on the meter, as 5% without knowing what meter it came from can mean very different things.
2. On the meter you used, what mode was the meter in when you did the scanning? Different meters have different scales relating to the mode it is in. For example, if the meter is in concrete mode, those numbers are different then if you on in percent mode and so on.
3. You said above the entry doors, explain where you placed the meter to get the 5% readings? Like outside the camper on the siding, or inside the camper on the wall board just above the entry doors and scanned up to the ceiling line. etc.
4. Did you scan the ceiling starting at the wall and moving towards the center of the camper near the entry doors? and if so what was those numbers?
5. Did you scan anywhere else at the entry doors? and if so what where the readings?
6. On the roof, we need help to see what you are looking at. Pictures of the roof caulking good focus at both entry door area helps tell a story.
The above will get us started, and I'm sure there will be more questions after those answers come.
Hope this helps
John
__________________
__________________
Current Sunlines: 2004 T310SR, 2004 T1950, 2004 T2475, 2007 T2499, 2004 T317SR
Prior Sunlines: 2004 T2499 - Fern Blue
2005 Ford F350 Lariat, 6.8L V10 W/ 4.10 rear axle, CC, Short Bed, SRW. Reese HP trunnion bar hitch W/ HP DC
 Google Custom Search For Sunline Owners Club
|
|
|
|
|
08-29-2022, 02:58 PM
|
#3
|
|
Senior Member
Join Date: Sep 2007
Location: New York
Posts: 101
SUN #402
|
Moisture Meter #2753
Hi John,
#1 General #MM8,
#2 Wall, Soft or Hard - made no difference,
#3 Inside RV - started at ceiling 5% - scrolled down about a foot + - then went to zero
both sides of FR & RR door.
Update- Front door Right side looking out - 2'+ down - 15 - 20%
#4 ceiling = zero near doors
#5 any and all places I could think of - all exterior walls
#6 Back Door in shade Front Door in Sun
__________________
|
|
|
|
|
08-29-2022, 06:47 PM
|
#4
|
|
Moderator
Join Date: Nov 2006
Location: Ohio
Posts: 12,651
SUN #89
|
Quote:
Originally Posted by flbradjr

Hi John,
#1 General #MM8,
#2 Wall, Soft or Hard - made no difference,
|
Hi Brad,
I know of the MM8, it is a little different then the MMD7NP I use and have a lot of data on what the % readings in Wall mode mean.
Going forward, stay in the Wall mode when reporting numbers. I read the manual on the MM8 and it appears the wall scale is close to or is the same as the Wall mode in the MMD7NP I use.
That said, 5% in the wall mode of the MMD7NP is not a lot, and we have to make sure that metal in the wall is not tricking the meter and the meter is working like we need it to.
See this PDF I created stored in our Files area of the forum. On page 2, I list what the % numbers mean for the MMD7NP while in Wall mode
https://www.sunlineclub.com/forums/d...o=file&id=5638
Just to see if your meter is working right, while in wall mode, put the palm of your hand over the end of the sensor. It will see moisture in your body and should jump way up in very high numbers, well above 75% close to 100%. If yours does not do that, then we have to sort out why not.
The 2 pics you posted on the roof. Sorry they are hard to see what I was looking for. The lighting is so bright things get light saturated to tell the cracks in the sealant I'm looking for.
This pic, I'm not sure but this is what I "think" I see. Need a better pic without so much sun bleached effect. You look and see if it is doing what I'm going to describe.

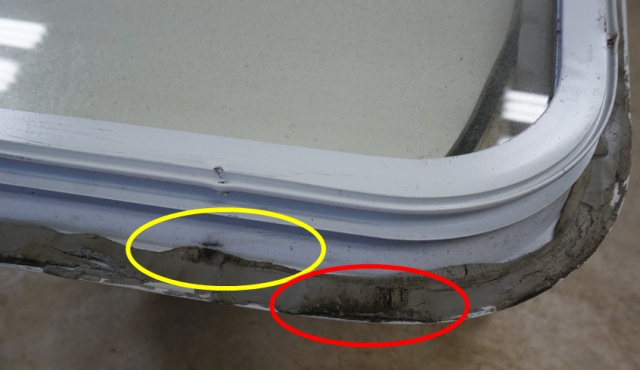
It looks like the caulk is not bonded or touching the very top of the aluminum gutter rail. There should be a good overlap of caulk covering the top of the gutter rail molding over onto the rubber membrane. If the caulk is not touching the top of the rail, that is not good. It means water can seep behind the gutter. Over time water can get to the screws, rust them out then wick into the attic.
See these pics. Does your look like this? See the red circle area. The caulk just missed the top of the gutter rail molding. And the caulk shrunk some and opened a crack.

Here I am scraping the old caulk off to remove the gutter rail on a roof replacement. You can see the faint grey line which is dirt wicking down behind the molding.


See here when I removed the molding. The water was working it's way down almost to the screws. In this case the water did not yet hit the screws but showing how it can get there. In your case, this may not be your leak area, but if your caulk is missing from the top of the gutter rail, it should be addressed before a leak does start.

To this statement you said,
Quote:
#3 Inside RV - started at ceiling 5% - scrolled down about a foot + - then went to zero
both sides of FR & RR door.
Update- Front door Right side looking out - 2'+ down - 15 - 20%
|
This Red highlighted area is concerning. We first have to make sure your meter is pegging close to 100% reading the palm of your hand, but 15- 20% in wall mode, if the meter is working right, means something is going in the wall. Or we hit metal or a wire. Take a pic inside where this 15 - 20% area is. Ideally put masking tape tabs or something on the wall to show how big or small this area is. Water is never a blip of high readings then back to 0%. Water is normally a several inches or larger area. And it will taper down close to 0% when the area goes to a dry wall.
Also, FYI, wall leaks near a siding opening, meaning a door or window or any hole in the siding, can come from leaking siding joints where the putty tape sealing the door or window etc. to the siding failed. This is very common. The leak does not have to come down from the roof to get in the wall.
John
__________________
Current Sunlines: 2004 T310SR, 2004 T1950, 2004 T2475, 2007 T2499, 2004 T317SR
Prior Sunlines: 2004 T2499 - Fern Blue
2005 Ford F350 Lariat, 6.8L V10 W/ 4.10 rear axle, CC, Short Bed, SRW. Reese HP trunnion bar hitch W/ HP DC
Google Custom Search For Sunline Owners Club
|
|
|
|
|
08-30-2022, 11:35 AM
|
#5
|
|
Senior Member
Join Date: Sep 2007
Location: New York
Posts: 101
SUN #402
|
Moisture Meter 2005 Sunline #2753
Hi John,
I have some roof pics and interior MM pics. Let see how I do...
look like I have to label them after I send them
Brad
1 Back Door 2 BD Right Side 3 BD RS 4 BD Left Side
5&6 Back Door Roof #6 off by 180 degrees
__________________
|
|
|
|
|
08-30-2022, 11:41 AM
|
#6
|
|
Senior Member
Join Date: Sep 2007
Location: New York
Posts: 101
SUN #402
|
Moisture Meter sunline 2753 pics
More Pics
# 1,2, 3 Front door roof. #2 180 off #4 Front door
__________________
|
|
|
|
|
08-30-2022, 12:02 PM
|
#7
|
|
Senior Member
Join Date: Sep 2007
Location: New York
Posts: 101
SUN #402
|
moisture meter #2753
John
& More 1 Front Door Right side 2 FD Left S 3 FD 4 FD
Brad
__________________
|
|
|
|
|
08-30-2022, 12:46 PM
|
#8
|
|
Moderator
Join Date: Nov 2006
Location: Ohio
Posts: 12,651
SUN #89
|
Try testing the meter on Wall mode on the palm of your hand and tell me the reading number.
Will be back later with more.
John
__________________
Current Sunlines: 2004 T310SR, 2004 T1950, 2004 T2475, 2007 T2499, 2004 T317SR
Prior Sunlines: 2004 T2499 - Fern Blue
2005 Ford F350 Lariat, 6.8L V10 W/ 4.10 rear axle, CC, Short Bed, SRW. Reese HP trunnion bar hitch W/ HP DC
Google Custom Search For Sunline Owners Club
|
|
|
|
|
08-31-2022, 05:34 AM
|
#9
|
|
Senior Member
Join Date: Sep 2007
Location: New York
Posts: 101
SUN #402
|
Hi John Sorry I forgot to mention. My hand does register 100%
When I have the welding done I'm going to ask for a Roof Caulk Check. Brad
__________________
|
|
|
|
|
08-31-2022, 07:43 PM
|
#10
|
|
Moderator
Join Date: Nov 2006
Location: Ohio
Posts: 12,651
SUN #89
|
Hi Brad,
OK I think I created a possible, maybe what is happening with your wetness.
Lets talk each area separate, and you tell me/confirm to me, what I am going to state is correct.
It appears your meter on wall mode is reading very similar to the same as my meter. Your palm hand test at 100% helps confirm this. Now I can better interrupt the readings you are getting.
The rear door. Inside facing out.
The top "rear of the camper" part of the door on the right side facing out the door is showing 9%

A few inches down the 9% tapers off to 3%

On the top of the "front of the camper" part of the door, facing out the left side of the door, we see 26% next to the mirror.

Now to the front door, inside facing out.
The top "front of the camper" part of the door near the window on the left side facing out the door is showing 17%

The top "rear of the camper" part of the door near the dinette and inside grab handle on the right side of the door facing out, the door is showing 10%

Those numbers indicate a level of moisture trapped in the wall. 26% and 17% are big enough, something is going on. I needed to put the larger numbers into relation to the front of the camper as they add to a possible cause. Make sure I have the orientation correct.
Also, confirm these items below that I have them correct.
1. Above both doors, the scanning the ceiling from the wall inward toward the center of the camper, scans at 0% or less the 3% across the entire width of the door?
2. On the walls above the doors, scanning starting the ceiling scanning down to the top of the door where the fabric over the door is at, which is about 4 to 6" or wall approx, Was the wall at zero at the ceiling line then slowly increased to 26% at the rear door and 17% at the front door when you got below the fabric header area? Or did the 26 and 17 just show up in a very small area there? If so define small (how big a spot, 1" 4" diameter etc. ) the meter can see the 26 and 17 real easy, but it should taper off to 0% if it finds a dry wall. I'm trying figure out the 0% to 26 or 0% to 17% distance above and below those readings.
3. On both the front and rear door, did you scan the wall close to the door all the down to the floor on both the front and rear side of each door? Was it 0% all the way down to the floor except the higher numbers on top? This is a big deal to know if there is no moisture at the floor line. Or if there is, what are the numbers?
With knowing the answers to those 3 areas and confirming I have the locations called out with the 26% and the 17% correct for front or rear of camper, I can tell you where I suspect the water is getting in and how to patch it to stop the leak.
If your camper is stored outside, not under any kind of cover all winter, we need to help you seal up those potential leak spots before winter comes.
Hope this helps
John
__________________
Current Sunlines: 2004 T310SR, 2004 T1950, 2004 T2475, 2007 T2499, 2004 T317SR
Prior Sunlines: 2004 T2499 - Fern Blue
2005 Ford F350 Lariat, 6.8L V10 W/ 4.10 rear axle, CC, Short Bed, SRW. Reese HP trunnion bar hitch W/ HP DC
Google Custom Search For Sunline Owners Club
|
|
|
|
|
09-01-2022, 03:05 PM
|
#11
|
|
Senior Member
Join Date: Sep 2007
Location: New York
Posts: 101
SUN #402
|
Moisture Meter
Hi John,
Hopefully I can make this coherent. All from inside Trailer.
Front Door
@ Ceiling 0%, Above fabric 4-6% left to right
Left Side 0% top to bottom
Right side 6" 25%, 12" 18%, 18" 18%, 24" 17%, 36" 20% & 20% to the bottom.
2' down-1' to the right 7%=under storage cabinet & next to dining room window (nail?)
Back Door
@ Ceiling 0%, Above fabric 6% left to right
Left Side 6" 3%, 12" 9%, 18" 0%, 24" 1%, 30" down to bottom 0%
Right Side 6" 18%, 12" 20%, 18" 20%, 24" 21%, 30" 14%, 36" 18%, 42" 26%, 48" 12%, 54" 14%, 60" 18%
0% on ceilings.
I'm going out on a limb here - Doors need recaukling??
Any discrepancies = operator error
Brad
__________________
|
|
|
|
|
09-02-2022, 03:56 PM
|
#12
|
|
Moderator
Join Date: Nov 2006
Location: Ohio
Posts: 12,651
SUN #89
|
Hi Brad,
You have done well with the moisture scans. You get an A+! 
You do have moisture in the walls. 
The good news, at this point, unless I understood it wrong, you do not have any scans showing the ceiling above 0%. This helps show that there is no excess moisture in the attic. The insulation holds water like a wet mop. The only thing the meter cannot find is dry rot or frozen moisture. Those two extremes the meter cannot see. The dry rot in its advanced stage leaves no moisture, yet the wood is close to dust. The frozen wetness the meter cannot see, once it turns liquid it can see it. So do not trust a scan when it is freezing out.
At this stage, there are no glaring signs of a roof leak, at least over the doors. Now to your latest readings.
Quote:
Originally Posted by flbradjr
Hi John,
Hopefully, I can make this coherent. All from inside Trailer.
Front Door
@ Ceiling 0%, Above fabric 4-6% left to right
Left Side 0% top to bottom
Right side 6" 25%, 12" 18%, 18" 18%, 24" 17%, 36" 20% & 20% to the bottom.
2' down-1' to the right 7%=under storage cabinet & next to dining room window (nail?)
|
As I thought, the water is down the wall starting up high. This can mean a leak source is all up high, or all along the way down the door frame. It will not matter, the repair is the same for both, the key is, that those %'s numbers you scanned are real and there is moisture in the wall.
You said this and I'm not 100% sure what you mean, please clarify.
Quote:
|
2' down-1' to the right 7%=under storage cabinet & next to dining room window (nail?)
|
Is this an additional area of wetness other than the entry door? Here is a picture of a 2004 T2753 from Rogec who just sold his camper. Their 2004 is slightly different than your 2005, yours has no window in the bedroom next to the door I do believe.

The floor plan

Do you mean you are getting 7% moisture under the outside pegboard storage cabinet and next to the large dinette window? Please confirm.
Quote:
Originally Posted by flbradjr
Back Door
@ Ceiling 0%, Above fabric 6% left to right
Left Side 6" 3%, 12" 9%, 18" 0%, 24" 1%, 30" down to bottom 0%
Right Side 6" 18%, 12" 20%, 18" 20%, 24" 21%, 30" 14%, 36" 18%, 42" 26%, 48" 12%, 54" 14%, 60" 18%
0% on ceilings.
I'm going out on a limb here - Doors need recaukling??
Any discrepancies = operator error
Brad
|
This area is showing the same thing, moisture down the side of the walls next to the door frame.
For the doorway issue, this points to the putty tape seal between the siding and the door frame itself. This is a common leak path, I call this a siding leak. Siding leaks can happen at any opening created in the siding and they can be as bad as roof leaks, sometimes worse pending the camper roof maintenance history.
Here is the problem. The putty tape used to seal the door frame to the siding, or any item installed in a hole in the siding, deteriorates over time from the sun's UV rays and time exposure outside. The putty tape shrinks and it will crack in the thickness of the tape, it will shrink and release from the siding or the door/window/ cargo hole door, etc. flange, or all of them in the same seal. Over time, water wicks in the crack along with dirt and mold. As time progresses, the crack/separation gets deep enough that it reaches the inside of the camper. Next is your luck, good or bad. Good luck, water never finds the leak path to the inside, or very little water is exposed to that area. This leak path may not leak very much into the camper.
The bad luck, water is abundant in the leak path and you end up with a water infection. By your 20% numbers, this leak is semi-new. It may only be 1 to 2 years old. By the time 3 to 5 years go by, the water is more, the %'s get higher and soon you can see water damage inside the camper.
Here is the above siding leak I described in action. This is from the front window leak, but any siding penetration can fail in this manner.
The window was removed. The putty tape peeled off the siding. It is semi-stuck to the window flange. This is a classic picture of putty tape siding seal failures for many reasons. The putty tape released from the siding instead of tearing itself in half. While not a leak yet, that is part of the long-term industry-wide problem in the sealing tape they use.

Close up and circled is an active leak to the inside of the camper. The black is dirt and mold driven into the crack with water into the putty tape separation.

Now, how to fix this, part of this comes down to your choice on how far to take the correction.
I'll be back later with the fix. Have to eat dinner now.
__________________
Current Sunlines: 2004 T310SR, 2004 T1950, 2004 T2475, 2007 T2499, 2004 T317SR
Prior Sunlines: 2004 T2499 - Fern Blue
2005 Ford F350 Lariat, 6.8L V10 W/ 4.10 rear axle, CC, Short Bed, SRW. Reese HP trunnion bar hitch W/ HP DC
Google Custom Search For Sunline Owners Club
|
|
|
|
|
09-02-2022, 06:05 PM
|
#13
|
|
Moderator
Join Date: Nov 2006
Location: Ohio
Posts: 12,651
SUN #89
|
Here are a few options on how to fix the leaks.
Option 1: You remove the door frame from the camper, remove all the old putty tape, clean up the camper and door frame, then install new high-quality commercial building butyl tape, and reinstall install the door unit. This will be followed up with a double sealing process, which is Option 2 method below.
The door removal and installation process can be seen in this post. This post dealt with a door frame out of square, but you can see the door butyl tape resealing process. You can also access the water damage in the walls an determine if and how to fix it.
https://www.sunlineclub.com/forums/f...ics-11717.html
When I do a camper total restoration, every door, window, cargo door, furnace, etc. gets pulled from the camper and the old putty tape is removed and new high-quality butyl gets installed. This process takes a good amount of time but, it allows you to address any water damage that may have occurred, dries out the wall, allows for resin treatment sometimes in the affected area to stop future dry rot in that area, and it creates high confidence you are not going to get a leak again. It is part one of a double seal process I use.
Option 2: This method adds exterior caulking to the exposed putty tape joint or to the new butyl tape if you do option 1 above. I have used this method over old putty tape when time is not on my side and I need to stop or prevent a leak to later come back and take the area apart. Others have used it also as they do not have the ability to do option 1.
Doing this as a stand-alone repair to a known leak area will stop the leak. It does not address any water in the wall or create as high a confidence a leak may not return. However, if you can check all caulking on an annual basis and touch up the tiny splits when they first start, this is as an added level of insurance against future leaks. The wet wall will take a good deal of time to dry out. Hot summer days once the leak is stopped helps accelerate the drying process. There is the chance that dry rot will form as years go by. The wet wood may have mold on it and when it dries, sometimes it feeds the dry rot process. I have no good data to prove when you get dry rot or if you will get dry rot. I just know it happens as I have seen it on roofs that the owner sealed up the leak, just they did not open up the roof to address the mold/wetness etc. The roof dried out, the dry rot came and rafters turned into dust.
The caulking process basically goes like this.
1. Scrape 100% of the door flange putty tape joint with a plastic scraper. You want to get any overhanging old putty tape off that is exposed beyond the flange of the door frame. It is OK to dig in a little behind the molding, it is preferred to do this as it will give the caulk a place to fill in. And it gets the dirt and mold off too.
2. Clean the joint totally. This starts with a detergent an scrub to clean to and get most of the dirt off. Then follow with a bleach/water solution to treat the exposed putty tape, let it soak 10-15 minutes and not dry, then scrub, then rinse well. The black mold/dirt should turn grey which is the color of the putty tape used on your year camper. Retreat suborn areas until all mold/dirt is gone.
3. Apply one of two types of caulking sealant. This caulk has to touch the siding and the flange of the door frame and will totally seal over the putty tape.
The two types of sealant I recommend are,
Dicor non-sag/non-leveling lap sealant.
Proflex RV tri-polymer sealant made by Geocel.
Here is a post on how to apply the Dicor. The Proflex works the same way.
https://www.sunlineclub.com/forums/f...ons-17713.html
Here is a post adding some more when using the Proflex RV. It is part of a front window leak post, but it talks to putting the Proflex on
https://www.sunlineclub.com/forums/f...tml#post153263
I have pumped a lot of Dicor and it does work well, it however has a slight dirt stick issue with it. I have converted to the Proflex RV now as my go-to siding caulking. Shop price, prior to Covid I could buy either product for about $7.50 a tube. Now the cost is all over the map. Proflex RV can be found at some places for about $11.50 a tube, Dicor is close to that. And some places were selling a tube at $33 a tube, it is totally nuts.
Both of those caulks are made to deal with the flexing of the camper and are rated to bond to the aluminum siding and plastic parts on the side of the camper. You can also remove both with a heat gun and scraper and mineral spirits the day you have to remove the door, window etc.
A heads up, do not use silicone house or gutter caulking on the camper siding. The bond is just not long-term. Sooner or later the silicone will let go of the siding or the door etc. While the glob of silicone will last, the leak can sneak around the cured glob.
Doing options 1 and 2 is close to bulletproof and will last a good long time. You can see the caulk when a tiny shrink split shows up, but you know you have good butyl behind it. Odds are favorable that it will last as long as you want to use the camper and you keep checking all seams caulking once a year and touch up and tiny splits soon after finding them.
There is nothing wrong with only doing option 2, as a stand-alone repair. This also comes down to, how many more years am I going to use this camper? If you are looking at 5 to 10 years, option 2 can get you by as long as dry rot does not create a big problem. Method 1 and 2, 20 plus years is conceivable.
Ideally, you treat every siding seam to a flange that has putty tape to prevent leaks. It takes about 9 tubes to do a whole camper. This does not have to be done all at once. Suggest doing the 4 corner moldings right after your entry doors and the front window if yours has one. Then keep working in caulking every hole in the siding sealed with putty tape.
Think this over and feel free to ask for more detail as needed.
Hope this helps
John
__________________
Current Sunlines: 2004 T310SR, 2004 T1950, 2004 T2475, 2007 T2499, 2004 T317SR
Prior Sunlines: 2004 T2499 - Fern Blue
2005 Ford F350 Lariat, 6.8L V10 W/ 4.10 rear axle, CC, Short Bed, SRW. Reese HP trunnion bar hitch W/ HP DC
Google Custom Search For Sunline Owners Club
|
|
|
|
|
09-03-2022, 07:31 AM
|
#14
|
|
Senior Member
Join Date: Sep 2007
Location: New York
Posts: 101
SUN #402
|
Hi John,
I certainly appreciate the time you're spending with me and sharing your knowledge.
Referring to the 2753 pic - my rear door - no window.
Between my Front door and large dining room window. That's my 2' down & 1' over from the front door. Only one spot -hopefully a nail. No other readings in the area.
I also have an additional comment in Dry Rot.
Brad
__________________
|
|
|
|
|
09-03-2022, 07:33 PM
|
#15
|
|
Moderator
Join Date: Nov 2006
Location: Ohio
Posts: 12,651
SUN #89
|
Quote:
Originally Posted by flbradjr
Hi John,
I certainly appreciate the time you're spending with me and sharing your knowledge.
Referring to the 2753 pic - my rear door - no window.
Between my Front door and large dining room window. That's my 2' down & 1' over from the front door. Only one spot -hopefully a nail. No other readings in the area.
I also have an additional comment in Dry Rot.
Brad
|
Hi Brad,
You are very welcome.
Now to the "spot" that is 2' down & 1' over from the front door. Not sure 2' from where? But, this may explain it
Look at this pic. Look outside between the front door and the large dining window. Look for the cover over the top of the 120 VAC outside outlet. It is just above the gold siding and about 1' from the door by the window. I suspect your camper has an outlet in that same location.
The romex power cable that feeds the 120 volt outside outlet, traditionally runs from the attic down the wall and some times left to right across studs in the wall on most floor plans. 120 VAC wires normally do not come up from the floor unless there is a very special need with that floor plan.
In your case with a dinette table by the window, I suspect the power cable comes down the wall from the attic in the wall cavity that the power outlet is mounted in. The moisture meter will scan about 5/8" - 3/4" deep into the wall and if it sees a copper cable, it will give a high reading on the meter. You can almost use the meter as a wire finder if one wants to. If you scanned over the actual outlet box on the inside of the wall, it will scan through the plastic box and find the metal in the receptacle.
BUT, if it is a wire, the wire is a blip, it's only as wide as the cable in the cross wise direction (~ 5/8 - 3/4"). You may get a long reading up and down the wall from the cable, but again it is very narrow like the width of the cable.
Water is usually wide, never a blip, water can be as narrow as 1" wide maybe but again, never a blip. There is normally a wider pattern when water is involved that then can (might) taper down to zero over a distance. Not like metal which can be 80% then go to 0% when you move the meter a little. Water has never yet did that for me.
As FYI, if the 120 volt cable can also goes left to right through wall studs if the power arrangement called for it. Sunline would drill the hole large enough in each stud and insert about ~ 1 1/4" to 1 1/2" long piece of 1/2" EMT conduit pipe into the stud. Then ran the romex cable through the pipe. This was to prevent/lower the odds, for staples from be shot through the cable when installing the siding. The moisture meter will find every one of those conduit pieces, but again it's a blip not a large water infected area.
See if your spot might be the cable or the actual receptacle.
Hope this helps
John
__________________
Current Sunlines: 2004 T310SR, 2004 T1950, 2004 T2475, 2007 T2499, 2004 T317SR
Prior Sunlines: 2004 T2499 - Fern Blue
2005 Ford F350 Lariat, 6.8L V10 W/ 4.10 rear axle, CC, Short Bed, SRW. Reese HP trunnion bar hitch W/ HP DC
Google Custom Search For Sunline Owners Club
|
|
|
|
|
09-07-2022, 01:41 PM
|
#16
|
|
Senior Member
Join Date: Sep 2007
Location: New York
Posts: 101
SUN #402
|
Moisture Meter
Hi John,
Probably removing the doors is to big a project for me but I'm going to use the Proflex RV caulk around doors to reseal the joint. I printed out your instructions to help me.
And my other comment is in regards to the 2' down and 1' over is probably a power wire because the light switch that controls the outside light and one of the inside overhead lights by the front door is right in a straight line and I also have the 120v outlet next to the front door as you described in the picture.
Brad
__________________
|
|
|
|
|
09-08-2022, 11:53 AM
|
#17
|
|
Senior Member
Join Date: Sep 2007
Location: New York
Posts: 101
SUN #402
|
Moisture Meter
Hi John,
All kinds of plastic scrapers out there. One similar to your orange one displayed in 11717 or??
Even found a plastic scraper that looks like a metal razor blade. See Amazon.
And plastic because an actual razor blade might dig in to deep?
Thanks Brad
__________________
|
|
|
|
|
09-08-2022, 03:38 PM
|
#18
|
|
Moderator
Join Date: Nov 2006
Location: Ohio
Posts: 12,651
SUN #89
|
Hi Brad,
Going the Proflex RV method is a good one. It is not as bullet proof as changing the putty tape to butyl, but the caulking is effective. This will do you well. Also caulk the dinette window near the front entry door, that seal can be causing the high readings on the side closest to the door. And over time, do the rest of the camper wherever the siding has something screwed to it; corner moldings, cargo doors, windows, power cord door, etc. any hole in the siding that have something mounted to it.
If you have a front window, the kind with the rock guard above the LP tanks, that window can especially use the help of removing it and changing the old putty tape to new butyl, then caulking. If time is not on your side, caulk it now, but plan in the future to remove it and reset to the butyl and caulk. That window when towing in the rain gets hit badly with water. And roof runoff water even when standing still. Sunline has stopped putting the front windows in I think around 2005/2006 models, with the exception of certain floor plans that almost had to front window to make the floor plan work. The leak rate over time was just high with complaints. I'm not sure if yours has one or not.
Scrapers, this is what I use, Harbor Freight non marring scrapers. https://www.harborfreight.com/4-piec...set-95832.html
They work very well. I have not had to use the most wide one yet, but the other 3 sizes, I use a lot. I find after using them, over time the cutting/scraping edge gets dulled up. I take it to the bench grinder or sander, and re-sharpen them. It is amazing how much easier it is to push when it is sharp.
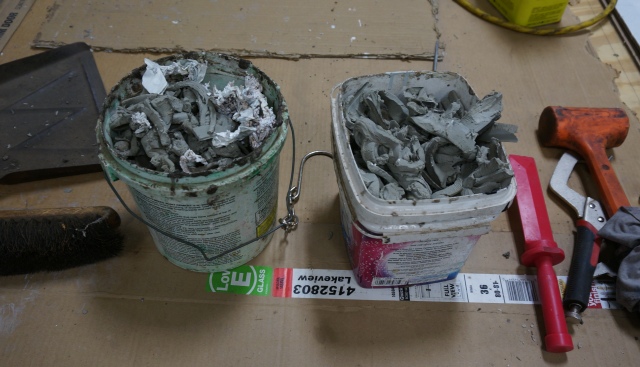
2 tubs of old putty tape
Cleaning a window frame, some times a little heat helps, then scrape. Sometimes no heat works better. It all depends on the room temperature you are doing the cleaning at. After scraping, the frames and the siding get a chemical clean with mineral sprits followed by Naphtha to get any left over bits of old putty tape off. This is, IF, you pull out a door or window.

A campers worth of windows scraped and cleaned up (T1950)

Let us know how you make out.
John
__________________
Current Sunlines: 2004 T310SR, 2004 T1950, 2004 T2475, 2007 T2499, 2004 T317SR
Prior Sunlines: 2004 T2499 - Fern Blue
2005 Ford F350 Lariat, 6.8L V10 W/ 4.10 rear axle, CC, Short Bed, SRW. Reese HP trunnion bar hitch W/ HP DC
Google Custom Search For Sunline Owners Club
|
|
|
|
|
|
Currently Active Users Viewing This Thread: 1 (0 members and 1 guests)
|
|
|
 Posting Rules
|
You may not post new threads
You may not post replies
You may not post attachments
You may not edit your posts
HTML code is Off
|
|
|
|
 » Recent Sunline Discussions
 |
|
|
|
|
|
|
|
|
|
|
|
|
|
|
|
|
|
|
|
|
|
|
|
|
|


 Linear Mode

