 |
 12-22-2019, 02:07 PM
|
#1
|
|
Senior Member
Join Date: Sep 2010
Location: Michigan
Posts: 854
SUN #1546
|
 Holding Tank Leaking!
Its my grey tank. Just noticed it. Leaking from where the drain pipe meets the tank. Have no idea how to fix it? 😨
I usually keep it open however I closed it because of the leak but decided to open it again to make sure all the water was out. So when I opened it again, water came out and leaking stopped??
Last photo you can see the water under the leak area
__________________
__________________
 Joan & Miss Emme Lu Who
Full Timing in T-1950 2005 Anniversary Model
1997 6.5L Chevy Turbo Diesel Truck
"Pure Michigan"
Facebook: Apackof2 for the Rd
|

|

|
|
12-22-2019, 03:49 PM
|
#2
|
|
Senior Member
Join Date: Apr 2011
Location: Maine
Posts: 3,357
SUN #2097
|
Epoxy, but it has to be really clean and dry. I repaired mine (bit different design but the same ideal) a few years ago still holding. One thing I did do was to support the pipe with a strong home made bracket. I jacked the trailer up to make sure all of the water drained to the far side for several days. It is a bad design there is just not enough support for the pipe. On mine the entire valve assembly from both tanks was just hanging from the tank with no connection to the framework.
__________________
__________________
|
|
|
|
|
12-22-2019, 04:01 PM
|
#3
|
|
Senior Member
Join Date: Nov 2018
Location: Pennsylvania
Posts: 328
SUN #10986
|
I'd think ABS glue would stand a better chance than epoxy.
One trick I've used with residential PVC/ABS lines is to plug them all except for one location. Hook a shop vac to that, and run it while applying glue to the problem joint so that the glue gets sucked into it.
__________________
|

|
|
|
12-22-2019, 04:19 PM
|
#4
|
|
Senior Member
Join Date: Sep 2010
Location: Michigan
Posts: 854
SUN #1546
|
Thanks!
What is weird though is that after I opened the grey tank valve and ran water it did not leak?
__________________
Joan & Miss Emme Lu Who
Full Timing in T-1950 2005 Anniversary Model
1997 6.5L Chevy Turbo Diesel Truck
"Pure Michigan"
Facebook: Apackof2 for the Rd
|
|
|
|
|
12-22-2019, 06:03 PM
|
#5
|
|
Senior Member
Join Date: Sep 2010
Location: Michigan
Posts: 854
SUN #1546
|
Well I am a full time RVer living in my Sunline so I am not sure I could jack it up for several day. I might just have to crawl under it :-O
Quote:
Originally Posted by mainah

Epoxy, but it has to be really clean and dry. I repaired mine (bit different design but the same ideal) a few years ago still holding. One thing I did do was to support the pipe with a strong home made bracket. I jacked the trailer up to make sure all of the water drained to the far side for several days. It is a bad design there is just not enough support for the pipe. On mine the entire valve assembly from both tanks was just hanging from the tank with no connection to the framework.
|
__________________
Joan & Miss Emme Lu Who
Full Timing in T-1950 2005 Anniversary Model
1997 6.5L Chevy Turbo Diesel Truck
"Pure Michigan"
Facebook: Apackof2 for the Rd
|
|
|
|
|
12-22-2019, 10:57 PM
|
#6
|
|
Moderator
Join Date: Nov 2006
Location: Ohio
Posts: 12,654
SUN #89
|
Joan,
The black pipes are ABS plastic, they can be repaired with ABS solvent cement. I have done this myself several times repairing fender skirts and doors trim parts. I learned this from FRANK, (screen name) here on SOC a while ago and it does work. A downside to the repair, water cannot be in the joint while the cement is still curing. The repair application is repeated for 3 days as the cement is built up and cures, but it will be a permanent repair.
Since you are building up the material each day, the joint may be water tight after the first day of curing, meaning you only need to not use the tank for 1 day, but still do the build up on day 2 & 3.
Here is my write up on the process
http://www.sunlineclub.com/forums/f7...air-18665.html
Here is Frank's original on his black tank
http://www.sunlineclub.com/forums/f7...air-10514.html
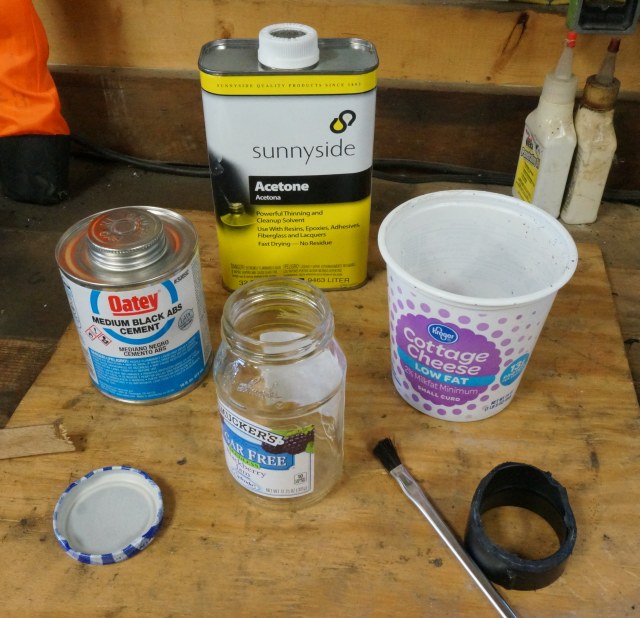
The materials are cheap for this method, but it does take some tools to do the job. The one area that may be the hardest for you to do, is make the ABS sawdust chips to add to the solvent mixture. While I used a Dremel tool, a coarse hand file or a hand saw can create chips/slivers of ABS and they will work well too. Note: remember to put the lid back on the glass jar asap after using it each day or the cement mix will cure in the jar. I have it last 3 days no problem, but 4 to 5 days even with the lid on, it will cure in the jar.
Others here on SOC, have bought a kit that used a fiberglass mesh I believe and the the ABS cement over large areas of missing plastic. I'm not sure on the cure time of those kits if they are quicker. Others may chime in on it.
To your leak stopping, you said
Quote:
|
I usually keep it open however I closed it because of the leak but decided to open it again to make sure all the water was out. So when I opened it again, water came out and leaking stopped??
|
Quote:
|
What is weird though is that after I opened the grey tank valve and ran water it did not leak?
|
Odds are favorable the pipe is cracked, and the crack may be a fine line, short length. When you wiggled the pipe to pull the drain valve open to drain the tank, that motion may have pinched the pipe back tight enough the leak stopped. This is also most likely temporary. The pipe wiggling again, may open the crack back up. Once repaired, you may need to add a pipe strap to help reduce some of the pipe flexing at the tank connection.
Hope this helps
John
__________________
Current Sunlines: 2004 T310SR, 2004 T1950, 2004 T2475, 2007 T2499, 2004 T317SR
Prior Sunlines: 2004 T2499 - Fern Blue
2005 Ford F350 Lariat, 6.8L V10 W/ 4.10 rear axle, CC, Short Bed, SRW. Reese HP trunnion bar hitch W/ HP DC
 Google Custom Search For Sunline Owners Club
|
|
|
|
|
12-23-2019, 07:04 AM
|
#7
|
|
Senior Member
Join Date: Sep 2010
Location: Michigan
Posts: 854
SUN #1546
|
John,
So when you say “ Since you are building up the material each day, the joint may be water tight after the first day of curing, meaning you only need to not use the tank for 1 day, but still do the build up on day 2 & 3.”
Do you mean not use any or run any water (black tank excluded) for a day?
I also have to figure out how to get to it! I probably could crawl under it because I do not have a way to jack it up and I am living in it! :-O
However, I did find this but it states to mix with acetone
Icon 01518 RV Holding Tank Adhesive - 1 lb Bag, Black
https://www.rvupgradestore.com/RV-Ho...SABEgKyTPD_BwE
Thanks!
__________________
Joan & Miss Emme Lu Who
Full Timing in T-1950 2005 Anniversary Model
1997 6.5L Chevy Turbo Diesel Truck
"Pure Michigan"
Facebook: Apackof2 for the Rd
|
|
|
|
|
12-23-2019, 01:29 PM
|
#8
|
|
Member
Join Date: Aug 2019
Location: Massachusetts
Posts: 42
SUN #11457
|
Mine was cracked in the exact same spot. I removed the holding clamp, pulled it apart and used flex seal glue, pressed it back and supported with a 2×4 wedged to the ground. After it dried I hit it with black flex seal spray over the top. Its completely solid and leak proof now.
__________________
|
|
|
|
|
12-23-2019, 02:18 PM
|
#9
|
|
Moderator
Join Date: Nov 2006
Location: Ohio
Posts: 12,654
SUN #89
|
Quote:
Originally Posted by apackoftwo
John,
So when you say Since you are building up the material each day, the joint may be water tight after the first day of curing, meaning you only need to not use the tank for 1 day, but still do the build up on day 2 & 3.
Do you mean not use any or run any water (black tank excluded) for a day?
I also have to figure out how to get to it! I probably could crawl under it because I do not have a way to jack it up and I am living in it! :-O
However, I did find this but it states to mix with acetone
Icon 01518 RV Holding Tank Adhesive - 1 lb Bag, Black
https://www.rvupgradestore.com/RV-Ho...SABEgKyTPD_BwE
Thanks! |
Hi Joan,
For the ABS cement (or most other glues) the joint must be totally dry during the application and until the water exposed layer is cured. If not, many times the glue cannot bond with the pipe correctly and you end up with a leak.
And yes, I did mean that once you start the glueing process, you need to wait until the first applied layer dries/cures. The other 2 layers will be added over the top of the 1st layer on the outside of the tank to build extra strength. In your case, you are only sealing this from the outside. Which is why I thought you may be able get away with a full cure on the 1st layer.
I know this can create problems if your full timing in the camper. However, thinking on this, there may be a few ways to make it more bearable. If you start the drying out and preparing the crack to be sealed later in the afternoon, (as opposed to first thing in the AM) say maybe 3 to 4:00pm pending how much daylight you have, then you could have use the water up until that time. If this is a concern.
A good part of the curing then occurs overnight when your freshwater use is lower. Using a dishpan in the sink to trap drain water for hand washing vrs letting it go down the drain is a way to help get by too. Then dump the dish pan in your sewer dump hole. Doing dishes in tubs out on the picnic table like tent camping can help too. A shower, if the campground has a shower, that may fill that need. Think going back in time to tent camping.
The correct prep work really needs to be done before applying the cements for this to work right and be permanent. You need to find the crack, ideally drill a small hole (1/8") in both ends of the crack to help stop the crack from spreading. Then file or grind the crack about 50% deep into the pipe thickness so the solvent cement can actually bond to the side walls and not just lay on the top surface.
The surface must be dry. To help dry out the inside of the pipe, once the tank is drained, unhook the dump hose and open the drain valve to the gray tank. Let air go up the pipe and out the tank vent to help evaporate the water off the inside of the pipe. Fan force it if needed, if the crack keeps bleeding wetness. This drying may take a hour of more. Your in the right state (AZ) to have it evaporate faster.
Then comes the chemical cleaning like the process I linked talked to. Then start the solvent weld layering up process. It can take a fair amount of time (think 1.5 to 2.5 hrs for your first time ever) to prep the surface for the solvent welding process, make the cement mix, then once you start dabbing on the ABS cement mixture, in 5 minutes or less you will be done and waiting for it to cure.
If you read the can of ABS cement, for pipe fittings the cure time is a lot less. The difference is, you are not glueing pipe fittings, you are making a liquid plastic mixture with ABS cement in it. It's a lot thicker then a pipe fitting solvent weld. I have gone back after a few hours and I can tell with a push on the thick buildup, it's still soft. I do not have any data on what 12 hours of cure time is in total cure verses 24 hours. 12 hours is not that hard to do over night, but 12 hours is a good amount. 24 hours is known to be cured. Your drying conditions in AZ is a lot better then back east here in MI or OH.
If you can wait 24 hours, that is best, if you can only deal with 12 hrs, then check with your finger nail etc of the glue is hard or still soft. If still semi soft, wait some more. The bad news is, if you rush it and it is not cured enough, it will fail in time.
The ICON ABS product you find. Interesting https://www.icondirect.com/holding-t...ve-1-lb-black/
I suspect what that is, is just ABS chips made easy. If you get that bag of chips, then there is no need to create ABS sawdust chips for the solvent weld glue makeup. A 1 1/2" ABS pipe fitting at the lumber yard may only cost less then $3, but then you have to turn part of it into chips. https://www.homedepot.com/p/NIBCO-1-...D112/100343780
The ICON bag of chips costs more at $20 plus freight, but then you do not have to figure out how to make the chips. This is cost of premade chips verses tools to make chips, it all depends on what you have access to.
They are using Acetone to melt the chips into a glue. The method Frank and I were talking about used ABS cement. Which is made from MEK, ABS plastic and Acetone. There is already some ABS plastic in the cement which is why we picked the Oatey brand. The MEK is a very powerful solvent liquid that will melt the plastic as well as the Acetone.
Both methods are the same concept, just the ABS premade cement method and chips is a step above I would say over just using acetone and chips as the cement is already a liquid with ABS in it. You are adding extra chips to make a thicker consistency.
Getting under the camper, yeh... that pipe leak if your 1950 is like my 2004 T1950, the gray tank connection is about 4" forward of the rear axle tube. Thankfully, it is not in the dead center of the 2 axles. Putting a tarp on the ground and crawling under my work. We were just under mine this past weekend dropping the black tank down and we did not raise the camper.
If you find yours is just not doable without raising the camper, try this. Get some 2 x 8 boards or the plastic lego blocks etc for leveling the camper. Drive up on the blocks and lift all 4 wheels higher off the ground. You will need to unhitch and level out the camper. Do not run the fridge very long off level, it can damage the cooling unit. The fridge does not like running off level for the time you need to fix this leak. Yes, dealing with the blocks is time consuming. This is going to come down too, which is more pain to deal with, crawling under with less space or dealing with raising the camper and getting it back down again?
Hope this helps. Let us know how you make out.
John
__________________
Current Sunlines: 2004 T310SR, 2004 T1950, 2004 T2475, 2007 T2499, 2004 T317SR
Prior Sunlines: 2004 T2499 - Fern Blue
2005 Ford F350 Lariat, 6.8L V10 W/ 4.10 rear axle, CC, Short Bed, SRW. Reese HP trunnion bar hitch W/ HP DC
Google Custom Search For Sunline Owners Club
|
|
|
|
|
12-23-2019, 05:52 PM
|
#10
|
|
Senior Member
Join Date: Sep 2010
Location: Michigan
Posts: 854
SUN #1546
|
Thanks John. I am going to think on all of this to gear myself up for the repair
Merry Christmas!
Joan
__________________
Joan & Miss Emme Lu Who
Full Timing in T-1950 2005 Anniversary Model
1997 6.5L Chevy Turbo Diesel Truck
"Pure Michigan"
Facebook: Apackof2 for the Rd
|
|
|
|
|
12-23-2019, 05:55 PM
|
#11
|
|
Senior Member
Join Date: Sep 2010
Location: Michigan
Posts: 854
SUN #1546
|
I cant tell exactly where the leak is, the pipe or the tank until I can crawl under and get closer
Thanks
Merry Christmas
Quote:
Originally Posted by Yellowjacket
Mine was cracked in the exact same spot. I removed the holding clamp, pulled it apart and used flex seal glue, pressed it back and supported with a 2×4 wedged to the ground. After it dried I hit it with black flex seal spray over the top. Its completely solid and leak proof now.
|
__________________
Joan & Miss Emme Lu Who
Full Timing in T-1950 2005 Anniversary Model
1997 6.5L Chevy Turbo Diesel Truck
"Pure Michigan"
Facebook: Apackof2 for the Rd
|
|
|
|
|
12-28-2019, 03:43 PM
|
#12
|
|
Senior Member
Join Date: Sep 2010
Location: Michigan
Posts: 854
SUN #1546
|
I got my chips today. I need to run to Home Depot and pick up tarp, cement, application brush. The good news is there is NO leaking with the grey tank valve OPEN.
However, there are several different kinds of cement? Which one is correct?? https://www.oatey.com/126494/Category/Oatey-ABS-Cements
I won’t know exactly where the leak is until after I crawl under my rig
I won’t be doing that until after the 1st of year as we have had some rain but forecast ahead is for sunny skies as usual here
__________________
Joan & Miss Emme Lu Who
Full Timing in T-1950 2005 Anniversary Model
1997 6.5L Chevy Turbo Diesel Truck
"Pure Michigan"
Facebook: Apackof2 for the Rd
|
|
|
|
|
12-29-2019, 10:45 PM
|
#13
|
|
Moderator
Join Date: Nov 2006
Location: Ohio
Posts: 12,654
SUN #89
|
Quote:
Originally Posted by apackoftwo
I got my chips today. I need to run to Home Depot and pick up tarp, cement, application brush. The good news is there is NO leaking with the grey tank valve OPEN.
However, there are several different kinds of cement? Which one is correct?? https://www.oatey.com/126494/Category/Oatey-ABS-Cements
I wont know exactly where the leak is until after I crawl under my rig
I wont be doing that until after the 1st of year as we have had some rain but forecast ahead is for sunny skies as usual here |
This is the ABS cement you want
This Home Depot link should take you to it. https://www.oatey.com/2372464/Produc...d-Black-Cement
You do not need a can that big, it will for sure be enough. The smaller 8 oz can if they have it will work for the one pipe crack. It may even be able to do 4 or 5 leaks.
__________________
Current Sunlines: 2004 T310SR, 2004 T1950, 2004 T2475, 2007 T2499, 2004 T317SR
Prior Sunlines: 2004 T2499 - Fern Blue
2005 Ford F350 Lariat, 6.8L V10 W/ 4.10 rear axle, CC, Short Bed, SRW. Reese HP trunnion bar hitch W/ HP DC
Google Custom Search For Sunline Owners Club
|
|
|
|
|
01-04-2020, 01:45 PM
|
#14
|
|
Senior Member
Join Date: Sep 2010
Location: Michigan
Posts: 854
SUN #1546
|
I have NO idea where the leak is coming from! :-O
I took some pictures with my special close up lens but I can’t tell?
It appears to be leaking from the bottom where the pipe meets the tank
Are these hair line cracks (circled in red) I can’t recognize as cracks?
There is a tiny pin hole looking thingie at the very bottom ( circled in yellow) but I can’t tell if its a hole or not?
Is there a fitting inside the tank that the pipe screws into to?
It does not leak when the valve is open only if there is water in the tank??
__________________
Joan & Miss Emme Lu Who
Full Timing in T-1950 2005 Anniversary Model
1997 6.5L Chevy Turbo Diesel Truck
"Pure Michigan"
Facebook: Apackof2 for the Rd
|
|
|
|
|
01-05-2020, 10:04 AM
|
#15
|
|
Moderator
Join Date: Nov 2006
Location: Ohio
Posts: 12,654
SUN #89
|
Quote:
Originally Posted by apackoftwo
I have NO idea where the leak is coming from! :-O
I took some pictures with my special close up lens but I cant tell?
It appears to be leaking from the bottom where the pipe meets the tank
Are these hair line cracks (circled in red) I cant recognize as cracks?
There is a tiny pin hole looking thingie at the very bottom ( circled in yellow) but I cant tell if its a hole or not?
Is there a fitting inside the tank that the pipe screws into to?
It does not leak when the valve is open only if there is water in the tank??
|
Hi Joan,
From your pics, the red circle area is hard to tell from here if they are cracks. I suspect what it might be is the a sealant patch line with some dirt in it.
See your pic where I circled in yellow. The yellow appears it may be the slight raised bump of plastic sealant bonded to the tank/fitting. I may not be a crack as it is the end of the raised bump of sealant. It's just the edge of the sealant. You have to look real close at it when the tank is full.

However, that pic did have and area that is suspect to look at further. See the blue circle area. That may be a crack, needs to be looked at closer. See a blow up of it circled in blue. The white pit is in the center of it and the white may be the build up of soap etc dried up on the leak.

To these 2 questions,
Quote:
Is there a fitting inside the tank that the pipe screws into to?
It does not leak when the valve is open only if there is water in the tank??
|
The drain pipe fitting does not screw into the tank. There are no threads involved. At the factory they use a solvent weld cement that melts the plastic tank fitting to a hole in the tank. The solvent melts/welds fitting to the tank and it become one fused part.
To it not leaking when the drain valve is open, that could very well be pending on how large the crack is. A very fine tiny crack that is just forming may need more water pressure OR tank flexure or both to open the crack/pin hole to start dripping.
When the tank is empty and the dump valve open, water is just flowing through the tank. The is very little to no weight on the bottom of the tank and very little water pressure force as the weight of water is almost nothing.
Here is a suggestion to try to make it leak so you can then find it.
1. Close the gray tank dump valve. Go inside and at the kitchen or the bath sink, turn on the cold water and let the water run and fill the tank completely full. When the gray tank gets 100% full mechanically full (not by the tank sensors) water will start backing up in the shower basin. Look for the back up at the shower and then shut the faucets off.
2. Now the tank has a good 4 to 6" of water head as we call it, creating a low level of water pressure in the bottom of the tank. The tank being heavy now filled with water, the tank itself is flexing down due the heavy water weight. The tank flexing can be putting some stress on the leaking fitting area and help open the crack to leak.
3. Take some paper towels and go have a look at the leak area. Hoping it is dripping now, or at least weeping, you have at least found the big area of the leak. Then take a paper towel and dry the area with a quick wipe and look again. Do this as much as needed.
The water drip/leak will be flowing down by gravity and may make it hard to see the source. Odds are high the leak spot may be a at the top of the water flowing area, not the bottom. If you wipe it dry fast, it may start to bleed out and you can the tell and confirm the bleeding by wiping and see if it starts bleeding again. That should help narrow down the leak spot/crack, hopefully.
If the tank is not leaking immediately when full, let it sit for a while, maybe even and hour or two. Hoping it will start to leak in time. If there is nothing, then you will have to drain the tank and start thinking back on, when it leaked was it hot out or cold outside and what was I doing inside? And what temperature is it when I'm doing the test?
Plastic easily expands and contracts with temperature. Both from the water temp inside the tank and the high heat of the day outside. If it only leaks when you take a shower or do dishes, the hot water may be expanding the crack etc and letting it leak. Of the hot AZ sun during the mid afternoon.
Hope this helps
Let us know how you make out.
John
__________________
Current Sunlines: 2004 T310SR, 2004 T1950, 2004 T2475, 2007 T2499, 2004 T317SR
Prior Sunlines: 2004 T2499 - Fern Blue
2005 Ford F350 Lariat, 6.8L V10 W/ 4.10 rear axle, CC, Short Bed, SRW. Reese HP trunnion bar hitch W/ HP DC
Google Custom Search For Sunline Owners Club
|
|
|
|
|
01-09-2020, 10:06 AM
|
#16
|
|
Senior Member
Join Date: Sep 2010
Location: Michigan
Posts: 854
SUN #1546
|
Repaired, tested and leak free thanks to all your help!
Yeah!
Now on to either replacing pigtail 7 way connector or replacing entire cord!
__________________
Joan & Miss Emme Lu Who
Full Timing in T-1950 2005 Anniversary Model
1997 6.5L Chevy Turbo Diesel Truck
"Pure Michigan"
Facebook: Apackof2 for the Rd
|
|
|
|
|
01-09-2020, 05:57 PM
|
#17
|
|
Moderator
Join Date: Nov 2006
Location: Ohio
Posts: 12,654
SUN #89
|
Good job Joan!!! 
Glad it worked out for you. Thanks for reporting back
__________________
Current Sunlines: 2004 T310SR, 2004 T1950, 2004 T2475, 2007 T2499, 2004 T317SR
Prior Sunlines: 2004 T2499 - Fern Blue
2005 Ford F350 Lariat, 6.8L V10 W/ 4.10 rear axle, CC, Short Bed, SRW. Reese HP trunnion bar hitch W/ HP DC
Google Custom Search For Sunline Owners Club
|
|
|
|
|
01-09-2020, 06:05 PM
|
#18
|
|
Senior Member
Join Date: Sep 2010
Location: Michigan
Posts: 854
SUN #1546
|
Could not have accomplished it without my Sunline friends! Thank you!
Quote:
Originally Posted by JohnB
Good job Joan!!!
Glad it worked out for you. Thanks for reporting back |
__________________
Joan & Miss Emme Lu Who
Full Timing in T-1950 2005 Anniversary Model
1997 6.5L Chevy Turbo Diesel Truck
"Pure Michigan"
Facebook: Apackof2 for the Rd
|
|
|
|
|
|
Currently Active Users Viewing This Thread: 1 (0 members and 1 guests)
|
|
|
 Posting Rules
|
You may not post new threads
You may not post replies
You may not post attachments
You may not edit your posts
HTML code is Off
|
|
|
|
 » Recent Sunline Discussions
 |
|
|
|
|
|
|
|
|
|
|
|
|
|
|
|
|
|
|
|
|
|
|
|
|
|


 Linear Mode

