 |
|
 07-08-2020, 08:37 PM
|
#1
|
|
Junior Member
Join Date: Jul 2020
Location: North Carolina
Posts: 25
SUN #12056
|
From optimism to reality
I thought this might be a good place to post pics and/or videos of the progress and possible setbacks we have in restoring our Sunline. This is not going to be a six month thing, I'm thinking more like a couple of years? Once I got it home and did a quick walk though, it didn't take me long to realize this was going to be a complete gut job as you will see in the video. I didn't realize the video was ten minutes long, I apologize for that.
Jay
__________________
|

|

|
|
07-09-2020, 06:25 PM
|
#2
|
|
Moderator
Join Date: Nov 2006
Location: Ohio
Posts: 12,654
SUN #89
|
Hi Jay,
Congrats on your Sunny, and your new "project"!!
I looked at your video, that is quite the chicken coop!
The camper, yes you have a project. And it can be fun, and it will take an amount of time. All you need is some basic wood working skills, the tools and a lot of want to do this, and you can fix all of the camper. 
A few things,
Yes, cover the 2 roof tank vents (the black pipes coming out of the roof) as they can leak in water around the pipe and into the camper. For now, any kind of patch job will work to seal over the whole thing. I'm assuming you are not using the camper until after you restore it. Later when you get to fixing the roof, you can take all the old bad caulk off and fix it permanent. Odds may exist you have the roof off fixing rotted rafters. Do not get up on the roof, it will not hold your weight without precautions in place and a rater may be rotted out. Work from the side.
By the looks of the ceiling and the floor, you have had some water damage going on for a good while. Years worth. The rest of the camper may also have wall and floor damage that you have not yet found. Ideally before you start into the restore effort, you do a good inspection to see how good or bad the rot situation is. We can help on how to do the inspection as that will then set the stage for the best way to start the take it apart and fix it work.
To help inspect the camper on the non obvious rot areas, there is a tool I'll mention that can really help. It is a moisture meter. See this post on the meter. https://www.sunlineclub.com/forums/f...per-17613.html
With the meter you can scan the inside of the camper and see into the walls, ceiling and floor for wetness and how much. Once you know what is wet and what is not, then you can formulate a "how to "approach the rebuild.
For the amount of water damage that can be seen in your video, odds are high the front ceiling and the rafters above it have some heavy rot. These campers are not built like a house, they are built from the outside in. The cabinets are screwed to the wall board from the outside in and from the ceiling down.
The entry door can be rebuilt, no need to replace. Many have rebuilt those doors.
Once you access the how bad, bad is, I suspect you will be into a wall, floor and ceiling structural wood rebuild. In these cases it is better to take the camper apart from the outside and work your way in. This means taking the siding off and maybe the roof. The siding and windows/door etc. are not that hard to get off once you know how they are put together. With the siding off, it gives clear access to the water damage and you can replace all rotted wood and make good splices into any saved wood.
Here are a few rebuilds including total roof and wall correction. Some are completed campers, others are still ongoing. This will help show you might have sooner or later on your camper when you go to start fixing it. The 79 and 80s' campers below have metal roofs like yours. The 2004 through 2007 campers below have the rubber roof which is different then yours, but they are still helpful in how to fix the camper. All these posts help add something to a camper restoration as we all do them a little different.
A 79 Sunline restoration in process by Sunline Fan https://www.sunlineclub.com/forums/f...-mc-18647.html
A 87 camper restoration by YellowJacket https://www.sunlineclub.com/forums/f...ion-19403.html
Another 87 camper restoration by Thomascine https://www.sunlineclub.com/forums/f...air-17458.html
This is an ongoing truck camper rebuild by Kxracver704 on his 70's vintage camper. He is doing a total rebuild. While it is a truck camper, the process for a travel trailer is similar and can be helpful.
https://www.sunlineclub.com/forums/f...ild-19616.html
A 2006 T264SR complete post on rubber roof replacement, back and front wall repair on BenB's camper. https://www.sunlineclub.com/forums/f...avy-16834.html
This is one of my project campers, a 2004 T2475 that is a work in progress. This has the front wall repair in a step by step description. This is one of my project campers. In time this will be completed. https://www.sunlineclub.com/forums/f...2-a-18706.html
And another one of my project campers. A 2004 T1950 that is a work in progress until the Covid 19 situation stopped work this spring. This is a total camper restoration. It shows how the camper comes apart and is in the process of being rebuilt. Lots of pic https://www.sunlineclub.com/forums/f...avy-17684.html
Here are 2 other project campers of mine in the take it apart and let it dry out stage. Again more to help show how they are built and come apart.
https://www.sunlineclub.com/forums/f...avy-19318.html
https://www.sunlineclub.com/forums/f...ics-19473.html
These may question what you are getting into... but these campers are all fixable. It will take time, but it is doable if you have common wood tools and the want to fix it. Feel free to ask away with questions.
Hope this helps
John
__________________
Current Sunlines: 2004 T310SR, 2004 T1950, 2004 T2475, 2007 T2499, 2004 T317SR
Prior Sunlines: 2004 T2499 - Fern Blue
2005 Ford F350 Lariat, 6.8L V10 W/ 4.10 rear axle, CC, Short Bed, SRW. Reese HP trunnion bar hitch W/ HP DC
 Google Custom Search For Sunline Owners Club
|
|
|
|
|
07-12-2020, 08:53 PM
|
#3
|
|
Junior Member
Join Date: Jul 2020
Location: North Carolina
Posts: 25
SUN #12056
|
The camper will not be used until all the repairs are done. For the time being I have the roof covered with a tarp. Once I start removing the siding, etc I will buy a tarp big enough to cover the entire trailer and then some. I wish I had a building to do the repairs inside but I don't. Everything will be done where it sits. I'm trying to be optimistic and hoping the metal roof can be saved and reused? It's going to be slow trying to remove all the roof cement, caulking, etc without damaging the roof any farther.
One of the things the wife wanted to do was to add a rooftop AC unit? Even if I reinforce the roof structure during the repair process I'm not sure it will hold an AC unit? Even if it held a unit I'm not sure it's doable then because of having to add new wire, etc and I have no idea if the camper could handle the extra electrical load?
I was under the impression the siding would come off from the top down. However after reading the links you provided, I now know differently. In a perfect world I would be able to remove the siding on one wall, repair it and then move onto another wall. I saw where someone had taken the camper down to nothing. If I have any wood that is good enough to be saved I'm going to be amazed. The previous owner told me it had been leaking at least two years. I'm thinking quite a bit longer?
At the moment I'm cleaning out my garage so I will have a place to store everything after I take it apart and document every piece. I am rereading the links you provided, especially on how to start the process of removing the siding. It will be a long and tedious job to restore it but it will make me appreciate it even more when I finally get done. I'm already off to a good start just by having this site to learn from! 
Jay
__________________
|
|
|
|
|
07-16-2020, 10:03 PM
|
#4
|
|
Moderator
Join Date: Nov 2006
Location: Ohio
Posts: 12,654
SUN #89
|
Hi Jay,
Quote:
Originally Posted by CSXFAN

One of the things the wife wanted to do was to add a rooftop AC unit? Even if I reinforce the roof structure during the repair process I'm not sure it will hold an AC unit? Even if it held a unit I'm not sure it's doable then because of having to add new wire, etc and I have no idea if the camper could handle the extra electrical load?
|
Once you get to the roof and ceiling repair, you and we can see what rafter setup exists. Odds are favorable you can add a non-ducted roof AC unit. And you can run new wire when the siding is off if it is not already pre-wired. Some had wire already pulled stored in the wall/ceiling to add at a later date.
When you get to it, post some pics of the breaker box/fuse box setup that is in the camper now. You may need to upgrade some of that area. The AC unit will need a 20 amp separate 120 VAC breaker. And we need to check the shore line cord is setup for 30 amp 120 VAC. It may already be that way.
Quote:
|
I was under the impression the siding would come off from the top down. However after reading the links you provided, I now know differently. In a perfect world I would be able to remove the siding on one wall, repair it and then move onto another wall. I saw where someone had taken the camper down to nothing. If I have any wood that is good enough to be saved I'm going to be amazed. The previous owner told me it had been leaking at least two years. I'm thinking quite a bit longer?
|
Yes, the siding comes off starting at the bottom. And you start at a front or rear wall. The way the siding is installed, they inside the long sides of the camper first. Then they fold the edges of the siding that hangs over the corner wall studs about 1". Then the end wall sheets install, front and rear sheets installed over those folded over edges.
If you need to remove one of left or right side walls, (odds are high both will come off) the front and rear will/may need to come off first. I say "may" as on the door side, the door way breaks up the long siding runs and sometimes you luck out and the wall damage is before the door allowing one small section of siding to stay on. You will know when you start into it. The first bottom piece of siding sets the stage sort of. If it is rotted behind it, you just keep taking off siding on the way up until the rot stops.
You may also end up taking the roof off. With the ceiling looking as bad as it is, odds are favorable there is rafter damage and depending on how bad the walls top plate is rotted, that may forced you to lift the roof or at least one side it it to repair the bad wood.
Quote:
At the moment I'm cleaning out my garage so I will have a place to store everything after I take it apart and document every piece. I am rereading the links you provided, especially on how to start the process of removing the siding. It will be a long and tedious job to restore it but it will make me appreciate it even more when I finally get done. I'm already off to a good start just by having this site to learn from!
Jay
|
That is good to have room to store all the parts, windows, doors etc. Also take "lots" of pictures before you start, during and at the end of the tear down. Make sure you have pics of everything, even the stuff you think you don't need. There will be a time in the rebuild when you will refer back to them to see how it was originally setup.
The big tarp, yes, I had to do use a big tarp to repair my rotted slide floor on the T310SR long ago before the new pole barn came along. I even had some light snow in early spring to deal with. Others here in the club have done some major rebuild work using only a large tarp to cover the camper. It works, it does not cost that much, but it does take some time putting it on and off. Figure out a way to tie/bungee it on so it can go on and off fairly easy.
The 2 years the prior owner knew of leaks, it was leaking long before the 2 years. He may have only noticed it 2 years before as it takes a while(years in some cases) for the damage to show up inside the camper where you can see it in the living space. It rots in the walls, ceiling and floor undetected and eventually rots to the inside and you see it.
This will be a fun project and when you are all done, you can sit around the campfire and stare at your hard work with pride. And I'm sure there will be many campfire stories to tell on the restoration process too.
John
__________________
Current Sunlines: 2004 T310SR, 2004 T1950, 2004 T2475, 2007 T2499, 2004 T317SR
Prior Sunlines: 2004 T2499 - Fern Blue
2005 Ford F350 Lariat, 6.8L V10 W/ 4.10 rear axle, CC, Short Bed, SRW. Reese HP trunnion bar hitch W/ HP DC
Google Custom Search For Sunline Owners Club
|
|
|
|
|
07-19-2020, 08:38 PM
|
#5
|
|
Junior Member
Join Date: Jul 2020
Location: North Carolina
Posts: 25
SUN #12056
|
Quote:
Originally Posted by JohnB
Once you get to the roof and ceiling repair, you and we can see what rafter setup exists. Odds are favorable you can add a non-ducted roof AC unit. And you can run new wire when the siding is off if it is not already pre-wired. Some had wire already pulled stored in the wall/ceiling to add at a later date.
|
A non ducted AC unit sounds perfect for what I need. I will know a lot more once I get into it and see what I have to do to reinforce it and wire it?
Quote:
Originally Posted by JohnB
When you get to it, post some pics of the breaker box/fuse box setup that is in the camper now. You may need to upgrade some of that area. The AC unit will need a 20 amp separate 120 VAC breaker. And we need to check the shore line cord is setup for 30 amp 120 VAC. It may already be that way.
|
There should be a pic of the breaker box at the bottom of this post. I'm ashamed to say I know very little about electrical work and will probably have to hire all the electrical work out? I'm assuming the shore line is the one that pulls out of the camper? I will get a pic of that as soon as I can. While on the subject of electrical work, when I need to pull new wire or replace existing wire, will regular residential wire work or do I need a special kind of wire for a camper?
Quote:
Originally Posted by JohnB
Yes, the siding comes off starting at the bottom. And you start at a front or rear wall. The way the siding is installed, they inside the long sides of the camper first. Then they fold the edges of the siding that hangs over the corner wall studs about 1". Then the end wall sheets install, front and rear sheets installed over those folded over edges.
|
The way you explained the siding makes perfect sense. I can tell the worst part will be removing all the staples in it. I am curious about the laps in the siding. What is the easiest way to get under the lap and does it have tape? The second pic shows what I am talking about. I feel a lot better about the process now.
I am taking a lot of pics and video. I can see my biggest problem is going to be time to work on it. I might get a day here then go a week without touching it. That's where the pics are going to play a major role.
Jay
__________________
|
|
|
|
|
07-21-2020, 08:26 PM
|
#6
|
|
Moderator
Join Date: Nov 2006
Location: Ohio
Posts: 12,654
SUN #89
|
Quote:
Originally Posted by CSXFAN
There should be a pic of the breaker box at the bottom of this post. I'm ashamed to say I know very little about electrical work and will probably have to hire all the electrical work out? I'm assuming the shore line is the one that pulls out of the camper? I will get a pic of that as soon as I can. While on the subject of electrical work, when I need to pull new wire or replace existing wire, will regular residential wire work or do I need a special kind of wire for a camper?
|
The pics showed up. When the time comes to put the AC in, we will need to revisit what is inside that electrical box. If you have a friend who is an electrician, they can do this for you or if needed you can hire it out.
The wire that will go inside the camper for the AC unit is the same romex cable that is used in a home. But, if the cable is not already run, there is a need to insert small pieces of 1/2" EMT steel conduit in the wall studs that the romex goes through as protection for the wire. The steel conduit serves to protect the cable from being accidentally stapled when the siding goes on or other ill events that can break into the cable. It is hard to see in this pic, but all the 120 VAC cables that passes through a wall stud has that small steel sleeve inserted in the stud before the cable goes through. Odds are high, you older camper is setup the same way, at least I think they did that practice back when your camper was built. When you take the siding off you can see these sleeves on the 120 VAC wires that are there now. They did do not do that on the 12 Volt DC wiring as the hazard is not as great as on the 120 VAC.

Quote:
Originally Posted by CSXFAN
The way you explained the siding makes perfect sense. I can tell the worst part will be removing all the staples in it. I am curious about the laps in the siding. What is the easiest way to get under the lap and does it have tape? The second pic shows what I am talking about. I feel a lot better about the process now.
|
On this pic with where your arrows are pointing,

You so not start where the arrows are. You start by taking the corner molding off, then any door, windows or other items mounted in the siding you want to take off.
Then, go under the camper and look up. The bottom piece of siding on the long left and right walls have the siding folded under the bottom of the camper and then stapled up into the floor in the short fold. Once all those staples in the bottom are out, and the moldings, doors etc are out, the bottom sheet of siding will literally fall out of the joint on the sheet above it.
OR, or it needs a little tug and it will come out.
See here, on this Sunline the bottom sheet is gold and you can see the flap folded over the bottom of the camper and the rusted staples in it.

This is what the siding joints look like. The top of the sheet below, pushed up into the bottom of the sheet above it creating and overlap and covering the staples on the bottom of the sheet above it. There are no staples on the top edge of a sheet, just the overlap holds it in, and the moldings, doors etc.


Also a tip, when removing the siding, if any wall studs remain intact, draw a pencil line at the bottom of the sheet on each wall stud. This helps big time when you go put the camper back together as all the windows,doors etc. are already cut out and the sheet has to go back on the same place they came off so the openings line up. You can see the pencil lines to go by when putting the siding back on.

Hope this helps
John
__________________
Current Sunlines: 2004 T310SR, 2004 T1950, 2004 T2475, 2007 T2499, 2004 T317SR
Prior Sunlines: 2004 T2499 - Fern Blue
2005 Ford F350 Lariat, 6.8L V10 W/ 4.10 rear axle, CC, Short Bed, SRW. Reese HP trunnion bar hitch W/ HP DC
Google Custom Search For Sunline Owners Club
|
|
|
|
|
07-31-2020, 08:09 PM
|
#7
|
|
Junior Member
Join Date: Jul 2020
Location: North Carolina
Posts: 25
SUN #12056
|
A couple of random pics. I pulled out the front window
and was surprised to see it wasn't as bad as I thought.
However I do know for a fact that above the window is
going to be quite a bit of rotten wood.
A closer view of the corner showing the worst place where
the window was. I was just happy to actually be working
on it finally!
__________________
|
|
|
|
|
08-01-2020, 09:25 PM
|
#8
|
|
Moderator
Join Date: Nov 2006
Location: Ohio
Posts: 12,654
SUN #89
|
Hi Jay,
Yeh!!! You made it to the take apart stage. It's the beginning of more to come.
On the stuck on old putty tape on the siding and the window frame, I have found these stiff non marring scrapers work well and do not scratch the siding.
https://www.harborfreight.com/4-piec...set-95832.html
The are hard enough, but not brittle. When the tips get dull, I go the bench grinder and sharpen them and scrape some more.
Keep up the good work! Looking forward to seeing more pics of your progress.
John
__________________
Current Sunlines: 2004 T310SR, 2004 T1950, 2004 T2475, 2007 T2499, 2004 T317SR
Prior Sunlines: 2004 T2499 - Fern Blue
2005 Ford F350 Lariat, 6.8L V10 W/ 4.10 rear axle, CC, Short Bed, SRW. Reese HP trunnion bar hitch W/ HP DC
Google Custom Search For Sunline Owners Club
|
|
|
|
|
08-02-2020, 09:46 PM
|
#9
|
|
Junior Member
Join Date: Jul 2020
Location: North Carolina
Posts: 25
SUN #12056
|
Thank you John for the scraper info, I appreciate it! I told the wife that
is going to be her job.  I was able to work on it for an hour or so this afternoon.
Pics are below and I hope I posted them in this order?
Top left - Front of the camper
Top right - Front of the camper, left side
Bottom left - Front of the camper, bottom left side
Bottom right - Front of the camper, right side
It has gone just as John said with no surprises as far as removing the siding.
The damage is about what I expected, so no big surprises there...
Jay
__________________
|
|
|
|
|
08-03-2020, 06:20 PM
|
#10
|
|
Moderator
Join Date: Nov 2006
Location: Ohio
Posts: 12,654
SUN #89
|
Hi Jay,
You are on a roll now! Full speed ahead!
As you keep going up the front on taking the siding off, we/you can start to tell where the water damage started up higher. Gravity works really well in a camper. Any leak from above, wants to run down....
There "appears" to be corner molding leak issues from failed putty tape seals, but, that could be masked by a higher up leak running down from above. If you actually find good solid no water stained wood up by the roof, then a corner molding seal failure is more likely. Or in addition to roof corner leaks. Odds are high, there are more then just one leak entry location. Many times 3 or 4 leaks all leading into one area.
You are doing great! Looking forward to your progress.
John
__________________
Current Sunlines: 2004 T310SR, 2004 T1950, 2004 T2475, 2007 T2499, 2004 T317SR
Prior Sunlines: 2004 T2499 - Fern Blue
2005 Ford F350 Lariat, 6.8L V10 W/ 4.10 rear axle, CC, Short Bed, SRW. Reese HP trunnion bar hitch W/ HP DC
Google Custom Search For Sunline Owners Club
|
|
|
|
|
08-03-2020, 09:58 PM
|
#11
|
|
Junior Member
Join Date: Jul 2020
Location: North Carolina
Posts: 25
SUN #12056
|
If I find any wood near the roof that's good and solid with no water stains, I'm going out and by myself a lottery ticket! LOL I will be amazed if that even comes close to happening. It's like playing detective, looking for clues. Thanks John!
Quote:
Originally Posted by JohnB
If you actually find good solid no water stained wood up by the roof
|
Does anyone have a good way to remove the corrugated fasteners shown in the pic? I have used a screwdriver and needle nose pliers in the past but it's not that fast or great. I would like to screw the pieces back together when the time comes. I'm not a huge fan of those fasteners.
Jay
__________________
|
|
|
|
|
08-03-2020, 11:24 PM
|
#12
|
|
Moderator
Join Date: Nov 2006
Location: Ohio
Posts: 12,654
SUN #89
|
Quote:
Originally Posted by CSXFAN
Does anyone have a good way to remove the corrugated fasteners shown in the pic? I have used a screwdriver and needle nose pliers in the past but it's not that fast or great. I would like to screw the pieces back together when the time comes. I'm not a huge fan of those fasteners.
Jay
|
Jay,
Do you mean these corrugated wood joiners? Like this https://www.homedepot.com/p/Everbilt...1794/204274055
If so, Sunline stopped using them at some point. I'm not sure of the model year. I agree with you, I do not like them, especially on a camper in a vibrating and flexing situation that the entire camper goes though. Getting them out is not pretty. The newer campers I have restored never used them, thankfully so I have no good tricks for you in attempts to save the board.
But, on joining camper wood.
I use 2 methods depending on where it is and how many I'm doing.
Pocket hole screws. Look up Kreg jig. These guys https://www.kregtool.com/ Yopu can join the entire wall without a problem, it is just slower but no question on strength.
I have 3 of their pocket hole jig kits, but this two hole one is simple and effective. https://www.kregtool.com/store/c13/k...reg-jigreg-r3/
They sell them at many of the lumber yards and the screws.
I also have a 1 hole one to fit in tight add on places. Like this,


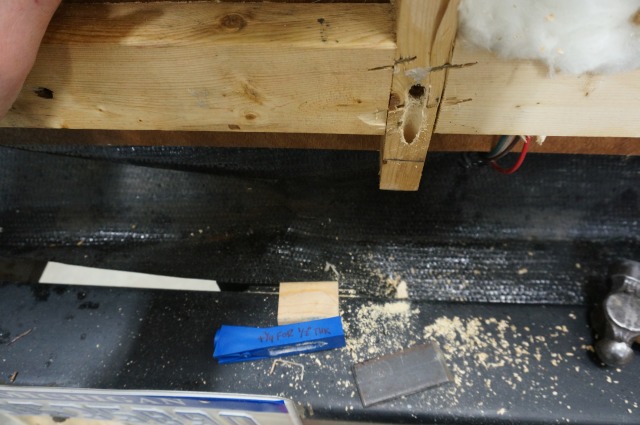
For 1 1/2" thick wood, use 2 1/2" long screws
 Staples.
 Yes, believe it or not, they do work and work well. Sunline converted to this I'm not sure when. They are big staples though and you need to buy the gun to shoot them. If you are building a lot of walls, this is a fast and sound method.
You staple both sides. These 16 gage, 1" wide by 1" long galvanized staples in 1" wide by 1 1/2" wood studing. Your thinner 3/4" walls would be 1" wide by 1/2" long staples

Layout the whole wall, and staple the pieces in place. It makes a strong frame that can flex if needed and not affect the joint.

John
__________________
Current Sunlines: 2004 T310SR, 2004 T1950, 2004 T2475, 2007 T2499, 2004 T317SR
Prior Sunlines: 2004 T2499 - Fern Blue
2005 Ford F350 Lariat, 6.8L V10 W/ 4.10 rear axle, CC, Short Bed, SRW. Reese HP trunnion bar hitch W/ HP DC
Google Custom Search For Sunline Owners Club
|
|
|
|
|
08-16-2020, 09:29 PM
|
#13
|
|
Junior Member
Join Date: Jul 2020
Location: North Carolina
Posts: 25
SUN #12056
|
Those would be the fasteners John. I never have liked those things and still don't. I saw the Kreg jigs at Lowes the other day, I see some in my future. They look like what I need.
I was able to get in some camper time today for the first time in two weeks. The first photo shows more siding removed and getting into the roof. I hope the roof will just roll up to a certain point where I want it to stop, then start from the back side doing the same thing?
The second photo shows the door removed as well as the window and some of the siding. So far I have patterns to go by when replacing the wood so it's all good. If someone can tell me an easy way to remove the two battery boxes in that pic I would greatly appreciate it! A screwdriver won't budge the screws in them that go into the metal. I'm thinking about drilling them out?
The third photo shows the rotten threshold with the electrical and water lines. I'm pretty sure I'll replace the water lines since they are 42 years old. Maybe the wire as well, I haven't decided on that part yet?
The fourth photo shows the inside window is removed as well as part of the top bunk. I have been told the top bunk isn't going back which doesn't hurt my feelings at all! We might put cabinets back where the bunk was, we shall see?
The only part I'm not enjoying is the taking pics/videos of everything and documenting it. That takes some time but in my case it has to be done or I'll never remember where anything went. I have been leaving for work before daylight and getting home after dark. Sunday afternoon is really the only time I have to work on it to date. Slowly but surely...
Jay
__________________
|
|
|
|
|
08-17-2020, 12:09 AM
|
#14
|
|
Senior Member
Join Date: Sep 2016
Location: Virginia
Posts: 814
SUN #8893
|
The Kreg tool was a lifesaver! It was definitely worth the purchase for me.
__________________
|
|
|
|
|
08-17-2020, 11:26 PM
|
#15
|
|
Moderator
Join Date: Nov 2006
Location: Ohio
Posts: 12,654
SUN #89
|
Hi Jay,
You are for sure on a roll now!
To roof roll up, well you may have to flatten out the formed over side edges of the roof some to get it to roll up nice. They bend the long camper sides over the top side wall to make a better seal. That bend will not want to roll well without some kind of crinkle to it.
You may be able to just leave the roof tin loose and on the camper until you want to lift the whole roof off. Lift it up the roof at the side wall, take the long side wall off, (the siding may be stapled along the top, ) then put the roof tin back down and go to the back and do your work. Once all the left and right side is off, then take the whole roof off, just maybe not rolling it.
I found using a hand metal seamer tool, works well at straightening out and rebending the siding. I have an older Wiss one I use, similar to this one
https://www.homedepot.com/p/Wiss-3-1...WS3N/301293863
Harbor freight has 2 sizes.
https://www.harborfreight.com/3-inch...t+metal+seamer
https://www.harborfreight.com/6-inch...BoCeisQAvD_BwE
The hand seamer may help on the roof and any siding that needs flattening back out. Like where the staples pulled on it and leave ragged edges, I flatten them out with the hand seamer.
__________________
Current Sunlines: 2004 T310SR, 2004 T1950, 2004 T2475, 2007 T2499, 2004 T317SR
Prior Sunlines: 2004 T2499 - Fern Blue
2005 Ford F350 Lariat, 6.8L V10 W/ 4.10 rear axle, CC, Short Bed, SRW. Reese HP trunnion bar hitch W/ HP DC
Google Custom Search For Sunline Owners Club
|
|
|
|
|
09-09-2020, 07:55 PM
|
#16
|
|
Junior Member
Join Date: Jul 2020
Location: North Carolina
Posts: 25
SUN #12056
|
Hi John, first let me apologize for not replying sooner. My computer has been in the shop a couple of weeks, maybe longer. I've lost track of time but hopefully everything is good now and it will be fine? Thank you for the links on the seamers or hand tongs as we call them. I still have a pair from my roofing days. I prefer the 3" over the 6" but that is just personal preference.
I have been able to get in a little camper time here and there, not much but some. I might have posted this one? The first photo is the front and side.
The second photo is a sneak preview of a rafter. I was excited that there was something left of one! LOL
The third photo is the back of the trailer. Lots of rot as I suspected but enough is left that I have some patterns to go by, so it's all good.
The fourth photo shows what appears to be "shims"? They look to be maybe 1/16" thick and seem to be mainly under the windows?
The fifth photo shows the rear tail light base. I had to cut the wires to get them off. This is my only concern to date. Can I wire nut the wires back to them or hopefully find replacements?
Finally can anyone tell me of a place I can find a 25' X 30' tarp or I'll take a 30' X 30' tarp. I prefer a 9 mil. It's not going to be long before I'm going to have to untarp the camper and put the tarp back on the chicken coop where I "borrowed" it from.
Jay
__________________
|
|
|
|
|
09-09-2020, 07:58 PM
|
#17
|
|
Junior Member
Join Date: Jul 2020
Location: North Carolina
Posts: 25
SUN #12056
|
Thank you for letting me know, I appreciate it!
Jay
Quote:
Originally Posted by Thomascine
The Kreg tool was a lifesaver! It was definitely worth the purchase for me.
|
__________________
|
|
|
|
|
09-10-2020, 10:27 PM
|
#18
|
|
Moderator
Join Date: Nov 2006
Location: Ohio
Posts: 12,654
SUN #89
|
Hi Jay,
No worries getting back to us or the camper. Life, seems to have a way of alerting all good camper rebuild plans. Trust me, I know....
Quote:
Originally Posted by CSXFAN
snip...
Thank you for the links on the seamers or hand tongs as we call them. I still have a pair from my roofing days. I prefer the 3" over the 6" but that is just personal preference.
|
Yes, I agree the 3" ones, like mine, are more vestital.
Quote:
Originally Posted by CSXFAN
I have been able to get in a little camper time here and there, not much but some. I might have posted this one? The first photo is the front and side.
The second photo is a sneak preview of a rafter. I was excited that there was something left of one! LOL
|
These pics are great. They show the methods of years back on how Sunline built the campers. They changed methods as the years went by. Your camper looks like a flat roof camper with 2 x 4 (or maybe 2 x 3) laying flat as a rafter. The newer campers (not sure what year the arched roof came) have arched roofs to help with water run off. Have you decided if you are going to reuse the metal roof or change to a EPDM, PVC or TPO roof? If you change roof membrane, you couple put in the arched roof and still use all the old siding. Something to think on.
Quote:
Originally Posted by CSXFAN
The third photo is the back of the trailer. Lots of rot as I suspected but enough is left that I have some patterns to go by, so it's all good.
The fourth photo shows what appears to be "shims"? They look to be maybe 1/16" thick and seem to be mainly under the windows?
|
Yes, the windows often had shims. On the newer campers, the windows clamp in place with a clamp ring inside. No screws outside. The 1/8" shims on these where to create the right wall thickness so the window would clamp. In your case, the windows are screwed in from the outside, but the wall trim may need a shim so the window frame is flush inside with the wall. Does it look like 1/8" luan in some places or is is all 1/16"? More curious on the old camper building process.
Quote:
Originally Posted by CSXFAN
The fifth photo shows the rear tail light base. I had to cut the wires to get them off. This is my only concern to date. Can I wire nut the wires back to them or hopefully find replacements?
|
That light fixture looks just like mine. Someone must of upgraded your lights along the way. And yes that fixture is still sold. Look for a Bargem part number embossed in the plastic. And yes, Sunline used wire nuts on many of the camper to connect the wires. And they pump silicone into the nut to help keep corrosion out once it is tight and then stuff the nuts and connection in the wall cavity.
Quote:
Originally Posted by CSXFAN
Finally can anyone tell me of a place I can find a 25' X 30' tarp or I'll take a 30' X 30' tarp. I prefer a 9 mil. It's not going to be long before I'm going to have to untarp the camper and put the tarp back on the chicken coop where I "borrowed" it from. Jay
|
I have found the "heavy duty" ones at Harbor Freight at not that bad. They are 9 mil, look for the silver heavy duty with the reinforced corners. https://www.harborfreight.com/search...20duty%20tarps
I had one of the 19' x 29 ft ones to cover my flatbed trailer outside all winter. I used it for 3 winters until there was enough room inside the new barn to keep it inside. It was still good living outside in the winter with snow and ice for 6 months for 3 years. Then we used it on my son's roof when we re-roofed his house this year.
I have not found them any cheaper than HF. Check if you can use a 20% off coupon with them. I cannot recall if I did or not.
John
__________________
Current Sunlines: 2004 T310SR, 2004 T1950, 2004 T2475, 2007 T2499, 2004 T317SR
Prior Sunlines: 2004 T2499 - Fern Blue
2005 Ford F350 Lariat, 6.8L V10 W/ 4.10 rear axle, CC, Short Bed, SRW. Reese HP trunnion bar hitch W/ HP DC
Google Custom Search For Sunline Owners Club
|
|
|
|
|
09-13-2020, 01:50 PM
|
#19
|
|
Senior Member
Join Date: Jul 2012
Location: Colorado
Posts: 242
SUN #4081
|
John, all of your links here have been wonderful and instructive. I am rebuilding parts of my T1850 after being hit by a tree in the last hurricane. The major damage was a direct hit to the AC unit on the roof, breaking a a few rafters, as well as three places where the roof was penetrated. I have repaired with permanent bond tape and just yesterday, I hoisted up the AC and repaired a small hole that caused leaking into the cabin. I also installed a new frig vent and cover (camco). I need a source to replace AC unit as the fan is bent and the compressor damaged. I disconnected and removed interior AC parts and am getting ready to lift it off to inspect any other damage, as well as removal of unit for long drive home from NJ to Colorado next week. I plan to post photos soon.
__________________
 Happy Trails from Colorado. 1995 Sunline Saturn T1850. 2012 Ford E350
|
|
|
|
|
09-13-2020, 09:22 PM
|
#20
|
|
Junior Member
Join Date: Jul 2020
Location: North Carolina
Posts: 25
SUN #12056
|
Mine is a flat roof camper John, and it looks to have the 2 X 3 laying flat for the rafters. I'm still undecided on the roof for now? I'll know more as I get into it. I remember from doing a ton of EPDM roofs back in the day that I hated doing the white EPDM roofs. They were a major pain to work with. Granted the white roofs do reflect the sun and are cooler but I still prefer the black version. Plus on the EPDM roof I would have to have a termination over the side and would want something that would look good. However I'm speaking from doing commercial roofs so a camper might be different?
I tried to get a better picture of the window shims. They look to be 1/8" thick? It should be the first photo below. I looked on the light bases and did see the number you mentioned, so that's a good thing that I can order them. I'll probably replace them all, as well as the wires and plumbing but that's a good way on down the road. I'll try Harbor Freight soon, I still have about a month before I have to give the chickens their cover back.
A couple more photos. The first one shows a closer look at the window shims. The second one shows more progress being made. I have three sides off now and the door side roof is completely loose. Slowly but surely it's getting there!
Jay
__________________
__________________
|
|
|
|
|
|
|
Currently Active Users Viewing This Thread: 1 (0 members and 1 guests)
|
|
|
 Posting Rules
|
You may not post new threads
You may not post replies
You may not post attachments
You may not edit your posts
HTML code is Off
|
|
|
|
 » Recent Sunline Discussions
 |
|
|
|
|
|
|
|
|
|
|
|
|
|
|
|
|
|
|
|
|
|
|
|


 Linear Mode

