 |
 05-26-2022, 06:52 AM
|
#1
|
|
Senior Member
Join Date: Jun 2016
Location: Pennsylvania
Posts: 186
SUN #8473
|
EPDM roof sealant
Good morning All
Just wondering what product is recommended to coat the EPDM roofs?
I've seen lots of different products online and have watched way too many YouTube videos on the process. I am leaning towards the Dicor 2 part but thought that there might be something out there better. Has anyone used RV Armor services? Suppose to be a good company. Well at least that's what they say in their online video.
__________________
__________________
Roger
2001 T320SR
2021 Ram 2500 Big Horn SLT
|

|

|
|
05-30-2022, 10:37 AM
|
#2
|
|
Moderator
Join Date: Nov 2006
Location: Ohio
Posts: 12,651
SUN #89
|
Hi Roger,
I know of the RV Roof Armor, it is hands down a good guaranteed process that they install. I just had a camping buddy have this done to his 2004 Sunnybrook Titian TT. It is guaranteed for life and his 30 ft camper cost about $6,000 for materials and labor to have it done. There was no wood rot to repair, that costs extra
There are other choices less expensive, but have different warranties and costs that you can do yourself.
In the high end of cost, but with 50 year to life time warranty, that you can do yourself, is 2 products that I have tested and used.
Crazy Seal high solids silicone roof coating at 50 years. They are a sister company with RV roof armor but for the DIYer
Then there is Henrys Tropi-Cool high solids silicone roof coating you do yourself with a lifetime on the product warranty. I have done 2 camper roofs with with the Henry 885 on the seams and 887 products on the large open areas. I can post pics etc if wanted.
Lower in cost but good coating is the Dicor acrylic coating used to resurface the shedding white layer of the EPDM. We have several Sunline owners use this. I have seen 2 of them myself they did it, and there is member wannabes here on the forum who posted on it.
The Dicor is good for the main open areas, I would recommend other treatments for the seams that flex better though. I know 2 of them used the Eternabond treatment on the seams.
If the camper lives outside all the time the coating needs to be redone every so many years. Im not sure if it is 5 years or more. It may depend on wear
I have heard some have used Hengs. It is similar to the Dicor, and requires recoating as needed also.
I would suggest before any roof coating is done, any roof water damage needs to be repaired. Spot repairs are doable on the EPDM roofs. I have done several and can help with how to if needed
To help make a decision on which coating to use, it becomes a cost versus return situation and do you have the ability to get up on the roof for frequent recoatings if you plan to keep the camper?
Folks who plan to keep the camper a good long time can better justify the higher cost of the silicone coatings with 50 plus year life and not have to deal with getting back up there for recoating. These coating systems have the ability to deal with all the seams appropriately and not need other sealing.
If you are going to sell the camper in 3 to 5 years, then dealing with the seams and lower cost coatings may make more sense.
Regardless of brand coating, the roof must be cleaned and demolded for any coating to have a chance of working. They do not stick long term to dirt or mold
Think this over and ask more questions to flush out the details on what may be best for your situation
Hope this helps
John
__________________
__________________
|
|
|
|
|
05-30-2022, 04:19 PM
|
#3
|
|
Senior Member
Join Date: Jun 2016
Location: Pennsylvania
Posts: 186
SUN #8473
|
Thanks John.
The roof membrane is actually still in really good shape. We plan on keeping it for as long as possible but 6k for a sealant is quite a bit when you can get a new membrane installed for just as much. I'd like to do this myself but it seems like there would be a lot of up and down the ladder to move the plywood to be able to walk on the roof. Not unless you know of a different or easier way.
__________________
Roger
2001 T320SR
2021 Ram 2500 Big Horn SLT
|
|
|
|
|
05-31-2022, 06:17 AM
|
#4
|
|
Senior Member
Join Date: Jun 2016
Location: Pennsylvania
Posts: 186
SUN #8473
|
Hi John.
Checked out crazy seal. Seems pretty straight forward. I have a question about the front and rear seams. If I reinstall the Dicor sealant how long should I wait before I install the crazy seal? Dicor I believe states it could take up to a month for the product to totally cure. If it off gases like paint does then it wouldn't cure properly if top coated to early. Just trying to get my mind right before I drive myself crazy ��
__________________
Roger
2001 T320SR
2021 Ram 2500 Big Horn SLT
|
|
|
|
|
05-31-2022, 09:54 PM
|
#5
|
|
Moderator
Join Date: Nov 2006
Location: Ohio
Posts: 12,651
SUN #89
|
Hi Roger,
I'm back to my PC again, the $6K cost was only for the RV Roof Armor that they install. Not for the Henry's or the Crazy Seal coatings. They are much cheaper and you do all the work.
As I have said, I have done two Sunlines with the Henry's coating and tested the Crazy Seal extensively. I will be doing a Crazy Seal roof also in the semi near future. And one of these campers had the bud board non walk on roof. I have not made it yet to a full post on how to do these coatings, but I will in time, especially if someone needs help on it.
The price of the Henry's last summer was close to half the cost of the Crazy Seal. You can buy the Henry's from some local Home Depots, they do not all offer it, but many do. I had to drive 2 hours to find it at the right Home Depot in stock.
BUT, something in the cost of manufacturing went nuts in the last few months on the Henry's and it is now almost the same cost as the Crazy seal. Not sure when the prices will come back to normal as the Crazy Seal also went up, just not as much as the Henry's. Both are good, both have pro's and some con's.
As I said, the Henry's and the Crazy Seal materials will cost more then the Dicor acrylic and the Heng's, but they offer lasting results and both Henry's and the Crazy Seal deal with all the seams. Even over old Dicor. In fact one of the main reasons for the Henry's 885 or the Crazy seal Patch is to deal with the seams over the top of all the caulk.
I go above and beyond the Crazy Seal video's on the gutter rails. They just caulk the top seam. I deal with all the screws and water issues in the gutter rail screws. More on this if you opt for the Henry/Crazy Seal route.
To your Dicor roof sealant question, yes, wait a month for gas off before you cover it with anything. Eternabond or other covering.
To the plywood issue, I came up with a coating method using 24" x 48" x 3/8" plywood pieces and old bath towels. It worked great, better then I had hoped for. I place the towels down on the membrane, then the plywood on top. The old bath towels are just a little bigger then the plywood. I get on the roof at the back wall. I have these plywood sheets/towels placed end to end on the full length of the camper from back wall to front seam as a walk way.
I start applying the roller coating or the mastic at the front. Then work towards the back. I pull the towel and the plywood comes with it back over the top of the plywood sheet behind it. And keep working this way until I get to the back wall. Remove them as needed. Then you have to do the last 4 ft from a ladder or scaffold.
See the basics of the roller process here. This is after all the seams are done and cured. This takes 3 days to install with the cure time. Sometimes I wait a extra day between the 2 coat main open area process.
I get on at the back wall.


Then walk down to the front seam

I start rolling at the front, a full 8 feet wide and 4 feet in running length. I do this to control the right application rate per 4 x 8 ft of roof, all in the paint tray (pre-measured) has to go on that 4 x 8 area.

Then I start working towards the back, removing plywood and towels as I need to.

You do the second coat the same way. This is after the first coat cures.

When you are all done, it looks like this

See this link. It has many of the pics of the first camper I did with the Henry's last summer. I just finished the 2nd camper about 3 weeks ago and do not have those pics uploaded yet. These are the pics for the post I did not get to yet... I'm sure they may raise some questions. They are not in order, so keep that in mind. This is a link to my Flickr photo hosting site with the Henry's application.
https://www.flickr.com/photos/camper...7720295784623/
There is also the cleaning prep needed for any coating, but especially the Henry's and Crazy Seal.
Hope this helps
John
__________________
Current Sunlines: 2004 T310SR, 2004 T1950, 2004 T2475, 2007 T2499, 2004 T317SR
Prior Sunlines: 2004 T2499 - Fern Blue
2005 Ford F350 Lariat, 6.8L V10 W/ 4.10 rear axle, CC, Short Bed, SRW. Reese HP trunnion bar hitch W/ HP DC
 Google Custom Search For Sunline Owners Club
|
|
|
|
|
06-01-2022, 05:03 AM
|
#6
|
|
Senior Member
Join Date: Jun 2016
Location: Pennsylvania
Posts: 186
SUN #8473
|
Thank you John. I plan on doing this myself. I would like to start this in September after our last camping excursion for the year as long as the weather will cooperate. Our local home Depot carries the Henry's. For the 5 gallon bucket of 887 is $445.00 and the 885 is $135.00 for I believe a gallon. So if I read your comments correctly there is no reason to remove all of the caulk around the roof mounted items or the protrusions? Just apply the 885 over the caulk once it's all cleaned of course then apply the 887. What quantity of each would you recommend for my application? I do want to do the gutters like you did sealing the gutter screws.
__________________
Roger
2001 T320SR
2021 Ram 2500 Big Horn SLT
|
|
|
|
|
06-01-2022, 02:29 PM
|
#7
|
|
Moderator
Join Date: Nov 2006
Location: Ohio
Posts: 12,651
SUN #89
|
Hi Roger,
Yes, you did understand correct, you can use the Henry 885 or the Crazy Seal Patch over all the roof seams that have caulk on them now. This is the intent of the heavier material, deal with all the roof seams which are the leak spots.
BUT, the caulk has to be clean and it has to be sound, meaning is it not crumbling/loose. The caulk can have small splits just not deep splits if you are waiting until fall. If it is in the crumbling stage, deep splits, you can remove the crumbles/fill the deep splits now, add fresh Dicor, wait a month or more and later use the Henry/Crazy seal treatment. If you are in the crumble/deep split stage now, deal with it, do not want until fall. There is not time to wait if a leak is active or pending.
And yes, Henry 887 or Crazy Seal roof membrane goes over the top of the 885/patch to make it look better and more smooth.
I can estimate the quantity you will need, but tell me these dimensions for your roof.
1. Running length down the camper roof from the front EPDM to front siding seam to the rear back wall. What is the feet and inches of that length? I use 8 feet wide so I do not need the width, but do on the length.
2. Are you going to coat the slide roof? Confirm the length of the slide and the roof width. The last Sunline camper with a slide that I coated, I used 4 ft wide by 12' 6" lg but confirm in case you have the longer slide.
3. Did your camper have a slide topper on it all it's life or at least before you owned it? Pending that answer may help answer to coat the slide or not.
Let me know and I will work you up and estimate and you can compare the Crazy Seal and the Henry's. And the differences between the two products so you can decide which is better for you. They are both good products, just there are slight differences which may favor one brand over the other.
In case you did not find the Henry links, here they are
https://henry.com/retail/white-roof-...e-roof-coating
Expand the bottom for more details under Installation and Maintenance for spec sheets and more.
It sounds like you found the Crazy Seal site. https://www.crazyseal.com/
Also, do you have any known roof water damage spots? These would be rubber band bouncing feel to them verses the rest of the roof which is more stiff but still flexible. We can/you should, address these spots before the coating goes on.
Thanks
John
__________________
Current Sunlines: 2004 T310SR, 2004 T1950, 2004 T2475, 2007 T2499, 2004 T317SR
Prior Sunlines: 2004 T2499 - Fern Blue
2005 Ford F350 Lariat, 6.8L V10 W/ 4.10 rear axle, CC, Short Bed, SRW. Reese HP trunnion bar hitch W/ HP DC
Google Custom Search For Sunline Owners Club
|
|
|
|
|
06-01-2022, 08:06 PM
|
#8
|
|
Senior Member
Join Date: Jun 2016
Location: Pennsylvania
Posts: 186
SUN #8473
|
Hi John the camper is a 320 so without measuring the actual roof I would say go with the 32. If it's a little extra that is better than too little. I have looked at the roof several times and there are no soft spots. The slide out has had a cover from new as far as I can tell. Nothing but a little dust on it. I know that the refrigerator vent is good as I changed out the entire thing last year because of sun damage. Bathroom skylight is good but will be sure to double check it. I will have to pull the vent covers off and inspect those areas. I'll get the ladder out and get some good pictures of the roof.
__________________
Roger
2001 T320SR
2021 Ram 2500 Big Horn SLT
|
|
|
|
|
06-04-2022, 07:53 AM
|
#9
|
|
Moderator
Join Date: Nov 2006
Location: Ohio
Posts: 12,651
SUN #89
|
Hi Roger,
I have not forgotten you, been tied up but I will be back with the material sizing.
Thanks,
John
__________________
Current Sunlines: 2004 T310SR, 2004 T1950, 2004 T2475, 2007 T2499, 2004 T317SR
Prior Sunlines: 2004 T2499 - Fern Blue
2005 Ford F350 Lariat, 6.8L V10 W/ 4.10 rear axle, CC, Short Bed, SRW. Reese HP trunnion bar hitch W/ HP DC
Google Custom Search For Sunline Owners Club
|
|
|
|
|
06-05-2022, 09:25 AM
|
#10
|
|
Moderator
Join Date: Nov 2006
Location: Ohio
Posts: 12,651
SUN #89
|
Hi Roger,
I have part of the info I wanted to give you. I'll give this to you now and comment more later in the week. This will give you a look at the roof coating material needed.
Here is the summary,

Here is the breakdown of how I came up with the summary. I wrote it all out so you can see how it all adds up.


Will be back with more later in the week.
Hope this helps
John
__________________
Current Sunlines: 2004 T310SR, 2004 T1950, 2004 T2475, 2007 T2499, 2004 T317SR
Prior Sunlines: 2004 T2499 - Fern Blue
2005 Ford F350 Lariat, 6.8L V10 W/ 4.10 rear axle, CC, Short Bed, SRW. Reese HP trunnion bar hitch W/ HP DC
Google Custom Search For Sunline Owners Club
|
|
|
|
|
06-05-2022, 11:25 AM
|
#11
|
|
Senior Member
Join Date: Jun 2016
Location: Pennsylvania
Posts: 186
SUN #8473
|
Thank you John.
Greatly appreciated.
__________________
Roger
2001 T320SR
2021 Ram 2500 Big Horn SLT
|
|
|
|
|
06-06-2022, 03:47 PM
|
#12
|
|
Senior Member
Join Date: Nov 2018
Location: Pennsylvania
Posts: 328
SUN #10986
|
Quote:
Originally Posted by JohnB

I have done 2 camper roofs with with the Henry 885 on the seams and 887 products on the large open areas.
|
John, what's your opinion on skipping the 885 and just using 887 over Dicor lap sealant (in excellent condition, less than a year old) as well as the large areas?
I've lucked into a free ride of sorts--a friend just bought a used truck camper, has a 5 gallon bucket of 887 he's going to use on it, and has offered me what's left over. Should be plenty for my T-1950.
__________________
|
|
|
|
|
06-09-2022, 09:46 PM
|
#13
|
|
Moderator
Join Date: Nov 2006
Location: Ohio
Posts: 12,651
SUN #89
|
Quote:
Originally Posted by Tinstaafl
John, what's your opinion on skipping the 885 and just using 887 over Dicor lap sealant (in excellent condition, less than a year old) as well as the large areas?
I've lucked into a free ride of sorts--a friend just bought a used truck camper, has a 5 gallon bucket of 887 he's going to use on it, and has offered me what's left over. Should be plenty for my T-1950.
|
Hi Tin,
A few things that may help, both the 885 and 887 are moisture cure products. Meaning the minute the can is opened and air and moisture rush in, the product starts curing. Regardless if you put the lid back on. Timing is a need from the time the can is opened until you are done with the application. And then there are 5 gallon bucket things to work through.
I'm telling you this so if your buddy gives you some 887, it will still be usable when you want to use it. This is how I learned to deal with the issue and I have been able to store the Henry or the Crazy Seal for now up to 18 months so far, after the can has been opened, and reopened and reopened.
First the 5 gallon bucket issue or even the 1 gallon of 887. Once you open it, it has to be totally mixed well before you start using it. There is liquid on the top that settles up their from the time it was made and that has to be all blended well before use, or else the product will not work right across the whole can.
Your friend is going to need a 5 gallon bucket mixer. A big one. See here on mine and the slow drill motor (650 rpm max) to turn it. You have to clamp the bucket with your feet to not have it spin and trigger the drill motor on an off to keep it in control. It gets better as it is mixed, but to start it is more solid.

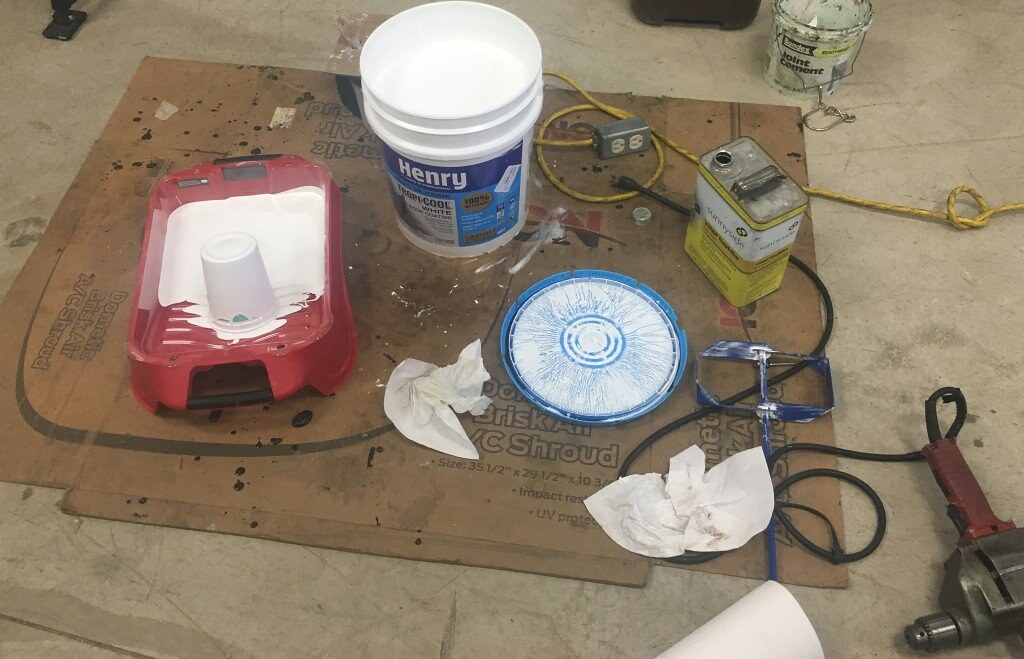
I measure out what is needed into a roller pan, then put the lid back on the 5 gallon bucket to help not have the bucket start curing any worse then it already is. You will have time to use the whole bucket, but the time is limited.
Each time I come back to the bucket, about 20 to 30 minutes later, I use a smaller mixer, still a big one, to remix to make sure the remaining is still all mixed.

So if your buddy used say, 3 1/2 gallons or 4 gallons, then there is still close to 1 gallon or so left that you can have. I would not leave that in the 5 gallon bucket. It is going to cure in that bucket which has a lot of head space of air and moisture in it that after about a week or more, you might have 2 inches thick of solid silicone.
Get a new empty gallon and or quart can. They sell them in the lumber yards, Shop for price they are nuts right now on what they want for an empty 1 gallon can.
And you buy a can of KBS Paint Saver. This product. https://www.kbs-coatings.com/KBS-Paint-Saver.html
It is argon in a can. You are basically re-gassing the head space in the gallon or quart can. The directions show how many seconds for the gallon and the quart can. You wipe the can seal 100% clean with a paper towel etc, Then place the can lid over the top of the can, lift one end to just stick the straw in, press the can sprayer to let the argon go in the can for the number of seconds, then pull out the straw and snap the lid down and hammer it down. I add a second or so more to make sure it is purged enough. The argon sinks to the liquid line and blankets the air and moisture from touching the coating. It just plain works. Every time you use some, when done, you re-gass again.
You will need to have this all pre-arranged when your buddy opens the 887 or 885 for the first time. You do not mix the 885 but have to on the 887, but Paintsaver gas both. I tried to gas the 5 gallon bucket, it was too large or I did not have the right seconds, it still skinned over, but never had an issue in the gallon and qt cans,
Now that you have the product saved, can you do what you asked to do, coat the seams with 887 to help protect the Dicor? This is a side topic from a total roof coat, just doing the seams and not the open area. More on this shortly.
To your direct question, after you do the "right" cleaning process, (more on this later) you can do all the horizontal seams with the 887 to help protect the Dicor from sun damage. You cannot do the gutter rails with only 887, it is too thin, it will all run into the gutter. But the other seams it will create a 22 mil coating per coat if you apply it correctly. You really want more then one coat, 2 coats is 44 mil. But there is more to this, using only 887 on the seams alone may not work long term.
Now to why am I using the 885 thicker then with a thin coat of 887 over the 885, wouldn't the 887 be enough?
The combo of 885, with 887 over it and how to do the gutter rails is a JohnB creation from a lot of testing I did a year ago before I ever did my friends first camper with the Henry's or Crazy seal. If you follow the Henry instructions they talk about using the 885 or the 884, (the caulk version) over all intersections of dissimilar materials. Camper roof seams are intersections between different materials, any of them on the roof. The front and rear siding seam, the roof vents, etc.
Here is an excerpt from the Henry instructions. Go to here for the original, https://henry.com/retail/white-roof-...e-roof-coating. Scroll down and expand Install and Tech Literature, then down load 887 Tropi-cool data sheet. Under prep on the first page you will find this
Quote:
PREP: Repair defects, such as splits, cracks, blisters, deteriorated flashing, cracked metal edging, and any other defects affecting the water tightness of the roof. As a preventative measure, seal all roof penetrations, curbs, flashings, transition areas, areas where dissimilar materials intersect, and other areas that could leak with Henry® 884 Tropi‐Cool® 100% Silicone Roof Sealant or Henry® 885 Tropi‐Cool® 100% Silicone
Seam & Repair Roof Sealant.
Ensure all roof drains and gutters are clean and clear, and cut back any vegetation that is growing above the roof which may cause debris to fall on the roof and clog drains and gutters in the future. On metal roofs, remove rust by wire brushing.
|
They are telling you to use the 885 as a preventive measure. The thicker 885 (1/8" thick, not 0.040" thick) is one tuff coating that is bonded over all those seams that are the weak areas of the camper roof system. I have a sample I created that is about 1/4" thick and this stuff is really tuff. Granted you do not need it that thick, but I myself have a lot more confidence there will not be an issue in the future with the seams using the 885 being down first.
Now back to can you use your buddies 887? If you follow the above with the 5 gallon bucket mixing and the Paintsaver gassing into smaller new paint cans, the product will be usable. If you want to keep the camper a good long time, suggest buying a gallon can of 885 do the seams and coat over the 885 with the 887 to make is smoother. Versus just using 887 only. More on this application technique and why later.
The 885/887 combo will give you a solid foundation to later come back and coat the large open areas with only 887 when the white layer has shed to the point it needs recoating. Granted you have to go all through the cleaning process again, but you can just do all the seams and come back at a future time and complete the rest as needed. You gain the positive effect of no longer relying on Dicro caulk as your first line of defense against a roof leak.
I have no good data to tell you the 887 alone on the seams will hold up by itself long term. Nor does Henry tell you that it will on an RV. The flexing may be more then the thin coating can handle at the seams. They did tell me in a call to tech service, the Tropi-cool system is the "only" Henry silicone product that they rate for an RV. They make other high solids coatings for building roofs, they are just not rated for RV use.
That is the long answer to your short question.  I needed to get all that out anyway. 
There is also a topic I wanted to post to Roger too, once you convert to the high solids silicone roof coatings, you are committed to stay with them. The Dicor caulking or Eternabond products etc. will not stick to Henry's, Crazy Seal or any other brand silicone roof product. You have to stay with silicone roof products and there are other good brands out there too. More on this in the next post in a day or so. The conversion process is not to be feared, but should be understood. I have figured out how to service the roof, change a shower dome etc once you convert to the high solids silicone coatings. It is not that hard to do, again you just have to understand how to do it, then go do it.
Will be back in a day or some on the next topic. Should I convert to a high solids coating and what does this mean? Are there other options?
Hope this helps
John
__________________
Current Sunlines: 2004 T310SR, 2004 T1950, 2004 T2475, 2007 T2499, 2004 T317SR
Prior Sunlines: 2004 T2499 - Fern Blue
2005 Ford F350 Lariat, 6.8L V10 W/ 4.10 rear axle, CC, Short Bed, SRW. Reese HP trunnion bar hitch W/ HP DC
Google Custom Search For Sunline Owners Club
|
|
|
|
|
06-10-2022, 07:22 PM
|
#14
|
|
Senior Member
Join Date: Nov 2018
Location: Pennsylvania
Posts: 328
SUN #10986
|
John, thanks so much for your response in excruciating detail as usual.
Much of what you posted was already churning in my noggin. The buddy with the bucket of goop mostly sets tile for a living, so I suspect he knows how to use a mixer. I also had in mind the time factor between his use of it and mine. Coordination will be fairly critical if we wind up doing it.
My takeaway from your post is that there's no inherent incompatibility between Dicor and Henry's, just that you have reservations about the coverage on non-level surfaces--which could be addressed with multiple coats on those surfaces s needed. I can live with that.
One blindingly obvious thing (in retrospect) is that there's no going back once you go this route. Don't know why I didn't think of that. Not a problem as far as I'm concerned, but a great thing to point out.
Much appreciated, as always.
__________________
|
|
|
|
|
06-10-2022, 09:19 PM
|
#15
|
|
Moderator
Join Date: Nov 2006
Location: Ohio
Posts: 12,651
SUN #89
|
Quote:
Originally Posted by Tinstaafl
My takeaway from your post is that there's no inherent incompatibility between Dicor and Henry's, just that you have reservations about the coverage on non-level surfaces--which could be addressed with multiple coats on those surfaces s needed. I can live with that.
One blindingly obvious thing (in retrospect) is that there's no going back once you go this route. Don't know why I didn't think of that. Not a problem as far as I'm concerned, but a great thing to point out.
Much appreciated, as always.
|
Hi Tin,
You are welcome and glad it helped.
Yes, Henry's 887 will bond to, properly cleaned, Dicro caulk and the EPDM rubber next to the Dirco. BUT the caulk has to be cured for at least 30 days. Since your was new last year, no problem on the age.
And yes, the 887 on that Dirco will help stop the UV damage which is what does breakdown the caulk over time.
What I do want to give you the head up is, the Henry Tropi-cool "system" is warranted for life on the product if installed correctly per application. The Tropi-cool "system" is made up of 3 of their products, 884 (caulk), 885 seam repair, and 887, roof membrane coating.
Henry's recommends using the 885 over joint areas that can leak. The Dicor is one of those areas. If you only use the 887 without the 885, you will still gain from using the 887 and helping prolong the life of camper. That said, I can't say 5 or 10 years from now, after towing the camper you may have a split at a seam. If you see one, then you need to repair that split, you can use the 885 then and or use the Henry reinforcing fabric and 885/887 over the split. Or other brand of high solids silicone repair material.
As to the thinness at the gutter rails, lets talk about that, it is a side topic. While the 885 Henry's product is very thick and will not run, there are ways to do that with thinner product. I created the gutter rails with the Crazy Seal product they call Patch, also, but it took 4 thin coats to make it work. That is 4 days with cure times in-between each coat. And there is a learning curve on how thin you have to apply it. I have sample and pics of all this, but it can done, it just will take more time. When I tested the Henry's, it worked on the gutter rails right from the word go.
There is also another option to thicken either Henry's or Crazy Seal I recently learned when doing my last camper with the Henry's. Carlisle roofing system makes fiber you can add to silicone roof coatings to change the viscosity and add strength. Since this is a brand change, going this route and may alter any warranty from Henry's or Crazy Seal if not preapproved, but it is an option to thicken up thin silicone coatings.
Bottom line: If you use the 887 on the seams it will help, it just may not help as good as the 885/887 combination will/would. Just want to point that out going into this. Regardless of any brand roof system or coating, you still want to look at the roof in details inspection, at least once a year. Too many things can happen to create a leak and the roof coating may not be part of the issue.
Let us know how you make out with this endeavor.
Hope this helps,
John
__________________
Current Sunlines: 2004 T310SR, 2004 T1950, 2004 T2475, 2007 T2499, 2004 T317SR
Prior Sunlines: 2004 T2499 - Fern Blue
2005 Ford F350 Lariat, 6.8L V10 W/ 4.10 rear axle, CC, Short Bed, SRW. Reese HP trunnion bar hitch W/ HP DC
Google Custom Search For Sunline Owners Club
|
|
|
|
|
06-11-2022, 06:45 PM
|
#16
|
|
Senior Member
Join Date: Nov 2018
Location: Pennsylvania
Posts: 328
SUN #10986
|
With a reputable company/product and user recommendations, I usually don't pay too much attention to warranties. Particularly with something like this, it can be pretty difficult to prove that you adhered rigorously to the installation instructions, and there's often fine print that can betray you anyway. Good information for those who do, though.
Frankly, I don't anticipate using the camper for too many years to come--wife and I aren't spring chickens. Just trying to be pre-emptive with all the bigger maintenance stuff while I'm still able. Of course it won't hurt if it's in good shape when we finally decide we're done and want to sell it.
I'll definitely report back if I go this route. That's one of the values of forums like this. Thanks again!
__________________
|
|
|
|
|
06-12-2022, 12:03 PM
|
#17
|
|
Moderator
Join Date: Nov 2006
Location: Ohio
Posts: 12,651
SUN #89
|
Hi Tin,
I hear you, and understand too. Your reasoning "while I'm still able" is a reality we all face. And by you redoing all your old caulk with new, and if you go forward with the seam coating, that will help a lot extend the life of the caulk and lower the risk of leaks later on.
You understand the situation, and it will come out well for you.
Thanks
John
__________________
Current Sunlines: 2004 T310SR, 2004 T1950, 2004 T2475, 2007 T2499, 2004 T317SR
Prior Sunlines: 2004 T2499 - Fern Blue
2005 Ford F350 Lariat, 6.8L V10 W/ 4.10 rear axle, CC, Short Bed, SRW. Reese HP trunnion bar hitch W/ HP DC
Google Custom Search For Sunline Owners Club
|
|
|
|
|
06-14-2022, 03:16 PM
|
#18
|
|
Moderator
Join Date: Nov 2006
Location: Ohio
Posts: 12,651
SUN #89
|
Quote:
Originally Posted by roger66ogden
Hi John the camper is a 320 so without measuring the actual roof I would say go with the 32. If it's a little extra that is better than too little. I have looked at the roof several times and there are no soft spots. The slide out has had a cover from new as far as I can tell. Nothing but a little dust on it. I know that the refrigerator vent is good as I changed out the entire thing last year because of sun damage. Bathroom skylight is good but will be sure to double check it. I will have to pull the vent covers off and inspect those areas. I'll get the ladder out and get some good pictures of the roof.
|
Hi Roger,
Getting back to you on some things to think about as you sort out which roof coating system you want to use. This may also help others following along.
If I understood correctly, you were looking to do the coating work sometime in September when your camping winds down, and the weather is still nice out. This gives you some time to sort out details on the coating options and plan if needed doing any roof pre-work before the coating time comes.
For most any coating you choose, the roof system itself should be checked for water damage and corrected in advance of the coating stage. Same goes for all roof mounted items, especially any plastic items. If you go with the high solids silicone treatments, those treatment will last all the time you will be using the camper. If you have roof plastic that is already 18 to 20 years old, it will not make it another 10 years such as tank vents, fridge vents etc. I think you said the shower dome and fridge vent was not that old, so they may be OK.
An inspection should be done to look for signs of active or prior water damage. If you find any signs of damage, then think about a plan when to address them. Water damage can still be repaired once the roof is coated, just you will be undoing a lot of the coating work you will be putting down. The same goes for roof plastic parts. I had thought you noted you looked a several times and you did not notice any soft spots. This is a good start but lets talk on how you did that inspection. You indicated when you get some time you can get some pics and will check the roof vents. Great! Get some good shots of the caulking on these areas:
- Front and rear roof seam
- Left and right gutter rail
- Tank vents and the fridge vent, the lower base at the roof line.
- Crank up roof vents with any Maxx air covers off.
- And a few general over all roof shots. Include a few close ups of the actual EPDM membrane so we can see the membrane texture. Take pics of some good and worse looking areas.
You mentioned you want to do the gutter rails as I have done. This is a wise choice as the gutter rail area is prone to leaking as the camper ages. I am going to recommend you think about prepping them for coating in this manner:
-Remove the vinyl screw cover on each gutter rail. It most likely is sun baked and deteriorated unless you changed it along the way. Odds are high it is going to be ugly behind that vinyl strip with mold and rusted screw heads. Rusted heads are to be expected, but beyond the head is an unknown at this point.
- Clean up the whole screw area. You can use soap and water.
- Remove each screw, inspect it for thread rust, deteriorated threads, or goo (active rot) on the threads.
- On the main awning rail side of the camper, pull the awning out about 6 to 8. Unhook the lower arms from the camper and extend the leg to the ground and stop about 6 off the ground. Hang onto the arm as the tube will come down. The roller tube will then be lower at the gutter area to give you more room to work.
- If you find rusted threads, deteriorated threads, or goo on the threads, place the screws on the top of the roof and take pics of the location they are at on the camper. This will help you sort out if you need to address anything. Light rusted threads are not as much a concern as deteriorated threads, or goo on the threads.
- After inspection and understanding what you find means, replace the screws with stainless steel # 8 x 1 lg pan head screws in place of the hex head, # 8 x 1 lg steel screws Sunline used. This entire screw area will later be sealed with the coating including the screw heads. You can add new screw cover if there is going to be months of time before the coating. If the coating is one month or less, then you do not have to add the screw cover.
Here is what the gutter rail will turn into with the Henrys. The Crazy Seal is similar.
These pics are from my roof Henrys test samples before I did this on a camper. It was used to develop the coating process. I have pics too of the Crazy Seal if wanted which uses a different application process.
The gutter rail will look like this with the new screws in place, just you may have your old Dicro caulk at the top of the gutter to roof membrane and that is OK to leave, we will coat over it if it is in good enough shape.

Then a coating of 885 to fill the screw channel and over the screw and the joint above the gutter rail up onto the roof top membrane. There will be no more vinyl screw cover used at the gutter rail.


To make the 885 more smooth for appearance, I use a light coat of 887 as a topcoat right on top of the wet 885. This be the final appearance. For this test, I only did the 887 on the very ends of the test sample, the mid-section was left with only the 885 so you can see the contrast. You can see the 887 ends circled in red. You do not have to add the 887, but it helps in appearance as you will not be coating the gutter rail itself again when you do the roof membrane


And it will look like this on the camper
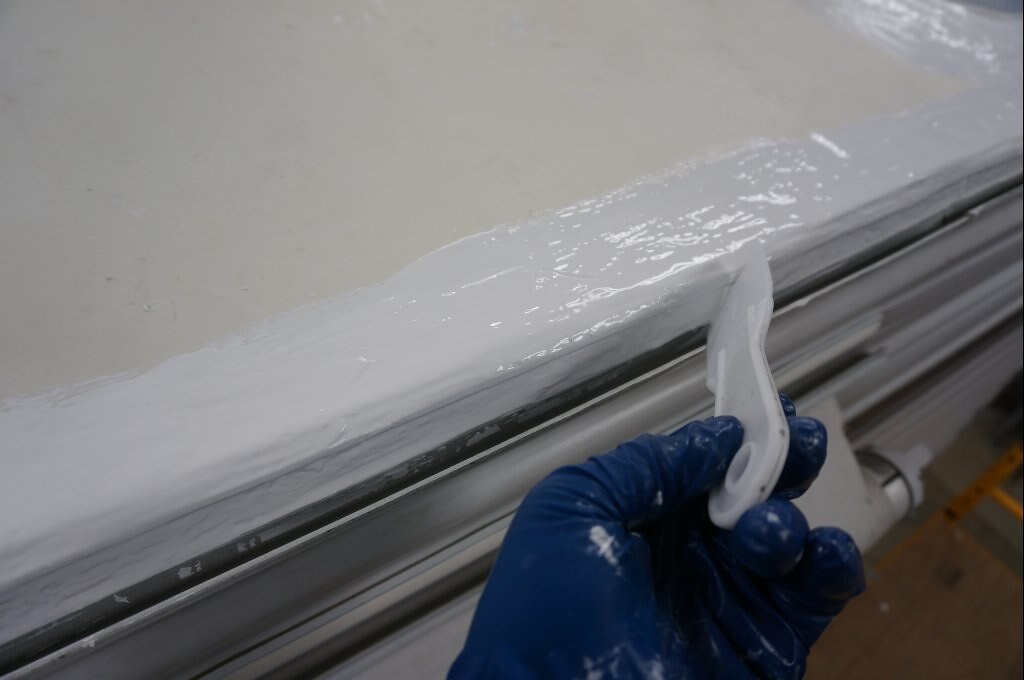

Here is the tie in with the front roof seam

This will get you going on the pre-inspection work for any type of coating. Ill add more big picture items in the next reply about cost and other things to talk about when going to a roof coating. The next reply may take a little time as I'm semi tied up for the next week or so.
Hope this helps
John
__________________
__________________
Current Sunlines: 2004 T310SR, 2004 T1950, 2004 T2475, 2007 T2499, 2004 T317SR
Prior Sunlines: 2004 T2499 - Fern Blue
2005 Ford F350 Lariat, 6.8L V10 W/ 4.10 rear axle, CC, Short Bed, SRW. Reese HP trunnion bar hitch W/ HP DC
Google Custom Search For Sunline Owners Club
|
|
|
|
|
|
Currently Active Users Viewing This Thread: 1 (0 members and 1 guests)
|
|
|
 Posting Rules
|
You may not post new threads
You may not post replies
You may not post attachments
You may not edit your posts
HTML code is Off
|
|
|
|
 » Recent Sunline Discussions
 |
|
|
|
|
|
|
|
|
|
|
|
|
|
|
|
|
|
|
|
|
|
|
|
|
|


 Linear Mode

