 |
 07-24-2016, 12:06 PM
|
#1
|
|
Junior Member
Join Date: Jul 2016
Location: Vermont
Posts: 8
SUN #8642
|
Another slide adjustment issue
I have an issue with my slide that has been with us since new. (2003) The slide is not centered in the hole such that the gap on the front is much smaller than the gap at the rear. Other than that the adjustments and sealing are fine. The brackets that connect the slide to the rails are adjusted as far as the horizontal slots will allow.
The most serious downside I have found to this condition is that the slide rear window rubs heavily on the rubber seal and has occasionally pushed the seal out of position. This is a pain to put back in place!
Can anyone suggest how to move my slide forward ? I thought about elongating the slots or repositioning the brackets. Would this be a reasonable fix? I need to move about one half inch.
Thank you.
__________________
__________________
George & Jan
Southern Vermont
2002 Solaris T-260 SR
2012 Ford F250
|

|

|
|
07-24-2016, 01:48 PM
|
#2
|
|
Junior Member
Join Date: Jul 2016
Location: Vermont
Posts: 8
SUN #8642
|
Slide photos
the bracket is the front bracket. The gap is 1 1/2" in front, 5/8" in rear. I would like to move slide about 1/2"
__________________
__________________
George & Jan
Southern Vermont
2002 Solaris T-260 SR
2012 Ford F250
|
|
|
|
|
07-25-2016, 11:05 AM
|
#3
|
|
Moderator
Join Date: Nov 2006
Location: Ohio
Posts: 12,649
SUN #89
|
Hi George,
I agree, your slide if off center by a large amount. I also see you have the Lippert slide system. I can help with this unit
This pic, I need more info on it to help. I see 3 things

1. There is a rust witness line at the top of the bracket that is on the slide floor itself. It is at the top of the slots. That rust line "appears" to have been made by the actual slide arm bracket at one point in it's life. Did the slide use to be lower on this bracket and is the other slide arm bracket the same way, the same distance way up? Please post a pic of the other slide arm just like the one above.
2. Your tape measure marks are great. They clearly show a problem. A question, when the slide is closed, is that gap parallel at the top of the slide (up by the roof) and the bottom of the slide (down by the bottom of the camper)? If it is not true parallel, what is the dimension at the top and then the bottom?
3. The pic shows you are just about out of slot to be able to move the slide in one direction. We cannot tell which direction that is. By chance, does the slide have to move in the direction of the large amount of available slot you can use? (A much easier correction) Or does the actual slide room have to move ever further in the direction where there is no slot? ( a much more complex issue)
Give us some feed back on those 3 areas so I can help understand your situation to give better ways to work through this.
While you are working on those 3 questions, I have moved our slide room fore and aft of the camper. There are several ways to do this, in my case I had a flat concrete floor and 2 good floor jacks on casters. Loosen the slide arm left to right bolts, only enough to allow the 2 bracket parts to freely slide on each other. With the slide out only as far as needed to work, in my case about about 18", using wood block cribbing as short as possible (jack almost full up) on each floor jack, lift each end of the slide approx 1/4" to 1/2". It will go up. No need to go much further. It will stop at about 3/4" up. Have all the casters aligned in the direction you want to go, and push. The room will walk on the jacks. You might need a helper. (do not lift the slide in the center area of the floor, there is no strength in the slide floor, the walls (front/back and long side wall) of the slide is where all the rigidness comes from. )
Also look if your slide arms are bent any. Put a straight edge up against them with the slide out. This is odd this is this far messed up since new. But that does not mean it was not wrong since day one. Have seen other things that some how snuck past.
This winter I have to pull my slide out of the camper. The opening in the camper is no longer a square, rectangular hole. More like a parallelogram. I had to totally pull out both entry door units and reset them for being out of square and now the slide seems to have the same problem. Do not know what exactly changed to create this, but it was very evident the camper walls moved. The only thing that made any kind of sense, the camper has flexed backwards from the towing drag. This extreme parallelogram creates the same seal issue of being pulled out and I cannot adjust my way out of this with out affecting another slide problem. I can see that my slide opening no longer very much parallel to the sides of the slide. Ether the slide room itself is a parallelogram or the camper or both. While the system can handle a good deal of out of parallel, I'm at the extreme limit.
Hope this helps
John
__________________
Current Sunlines: 2004 T310SR, 2004 T1950, 2004 T2475, 2007 T2499, 2004 T317SR
Prior Sunlines: 2004 T2499 - Fern Blue
2005 Ford F350 Lariat, 6.8L V10 W/ 4.10 rear axle, CC, Short Bed, SRW. Reese HP trunnion bar hitch W/ HP DC
 Google Custom Search For Sunline Owners Club
|

|
|
|
07-25-2016, 04:08 PM
|
#4
|
|
Junior Member
Join Date: Jul 2016
Location: Vermont
Posts: 8
SUN #8642
|
Hello John
Thank you for your reply.
First I too saw the rust witness line. My only guess is that if this wasn't there since new then when I had service in 2004( by the original dealer Farnsworth RV, Elysburg, Pa., a very reliable shop) they may have made an adjustment.
Second the slide and opening both seem square, the gap at both ends is consistent within 1/8" top and bottom.
Third unfortunately the direction I need to move is in the direction of no more slot. Also I checked the rails with a straight edge and they are not bent.
Is there is anything on the TT floor (like a keyway) that will prevent it from moving front to back?
Thanks again
George
__________________
George & Jan
Southern Vermont
2002 Solaris T-260 SR
2012 Ford F250
|
|
|
|
|
07-25-2016, 06:31 PM
|
#5
|
|
Moderator
Join Date: Nov 2006
Location: Ohio
Posts: 12,649
SUN #89
|
Hi George,
OK you gave some good info to help. The good news, if your top to bottom is parallel within 1/8" then that is pretty good. These slide rooms are not cabinet grade precise and 1/8" is very much in line with correct.
Here are a few thoughts to help confirm you have no adjustment left and maybe what to do about it.
To your question on a keyway to hold the slide in place. No, not on this Lippert rack and pinion system. My 2004 camper was made in Nov 2003 and your 2003 model may be early 2003 or late 2002 and they both have the Lippert rack and pinnion slide drive. Before the Lippert slide drive, Sunline used a brand called a Barker slide drive, and the stopped using it around ~ 2001 to 2002 camper model year to the Lippert.
You can look, your slide inside has a rug flap over the inside edge of the slide. There is a metal slide trough you can see part of under the flap. The slide floor just rests on top of that metal trough. See here for some pics of mine


Looks like this outside. It is a cam actually to raise the slide up off the carpet.

And here looking without a chuck of floor in place


The slide arms themselves actually contain the slide left to right from moving. There are plastic wear pads on the side of the arms that act as guides. See here. Check if yours are totally worn out.


The pad itself looks like this
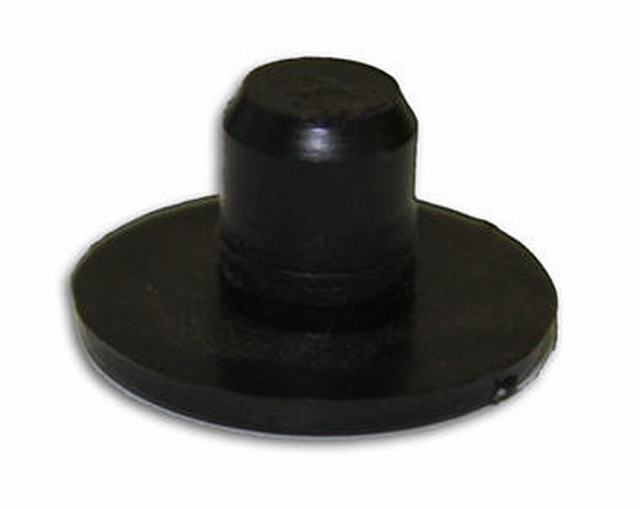
If yours are wore out, that can allow the slide arms to have excess moment left to right. In your case, a worn pad is not all of your problem but may be how you where able to use it for so long and now it is worse.
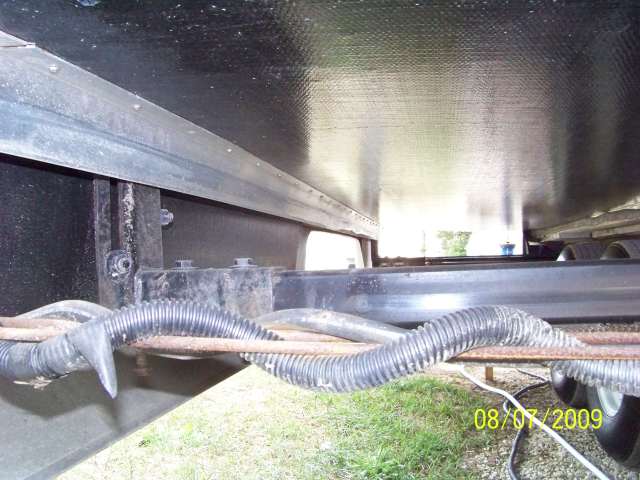
The next thing is to just check how the slide arms mount to the main frame rails. Mine they cut the frame, poked the slide arms in and welded a flange plate to the main frame rails to hold the location. See here
Here is the master rack with the drive motor. The rack plate is welded to the main frame.


And here on the slave rack, they also welded on the arm flange plate
By any chance on yours are those slide arm mounting flanges bolted to the frame? If so we may have an option to change the slide arm location. If it is welded like mine, then they are fixed that way from the day it left Sunline most likely.
The next area of "maybe" an adjustment is the slide room bracket on the end of the slide arm.
Yours looks like this, has 2 way slots, up and down and left to right.

Now look at mine. On the 2004 models Sunline and Lippert changed the slide room arm bracket. See mine, the up and down adjustment is separate from the left to right
My slave slide arm
An end view

The slide room bracket off the arm in my floor repair

In my slide, there are slots on the bracket that bolts to the floor. Carriage bolts down through the wood and nuts on the bottom. I loosen up the bolts from below and then I can move the slide fore and aft. See here. Hard to see the slots, but they are between the bottom of the slide floor and the slide arm bracket. They are in the steel bracket.

Your slide room brackets some how bolt to the floor. If they by chance have slots, that might be the trick for you on how to fix your problem. Loosen them up and move the slide. The only real issue may be if you have carriage bolts, the heads do not strip out in the wood and you cannot unscrew the nuts. Put some PB blaster or other penetrating oil on the exposed threads if there are any before trying to loosen the nuts. There are other tricks of the heads spin to hold the bolt but hopefully you do not have to use them...
Check and let me know how yours is built. Both the metal trough, the slide arms flanges welded to the frame and then how the slide arm bracket bolts to the slide floor. If they do not have slots in the slide floor bracket at the floor, then I have another option I will have to type some more to explain. It is creating a spanner plate off your slide arm to allow the whole slide to move and bolt it to the slide arm.
Hope this helps
John
__________________
Current Sunlines: 2004 T310SR, 2004 T1950, 2004 T2475, 2007 T2499, 2004 T317SR
Prior Sunlines: 2004 T2499 - Fern Blue
2005 Ford F350 Lariat, 6.8L V10 W/ 4.10 rear axle, CC, Short Bed, SRW. Reese HP trunnion bar hitch W/ HP DC
Google Custom Search For Sunline Owners Club
|
|
|
|
|
07-26-2016, 08:21 AM
|
#6
|
|
Junior Member
Join Date: Jul 2016
Location: Vermont
Posts: 8
SUN #8642
|
Hi John,
I have the same setup as you for the rails coming through the frame, cut out then a plate welded on. I would not try to move any of that.
I have a different bracket to slide connection, section of box beam with a single bolt hole at each end. (see pic) unfortunately no slot.
I might want to remove the bracket, move it about an inch,(the 1/2" I need plus 1/2" to recenter the adjustment slot) and then rebolt the bracket to the slide.
Do you think lag bolts would take the strain of moving the slide? I worry that the weight and pressure to move the slide would eventually loosen a lag. I do not know about the nut end of the current bolts but I am not sure I want to remove siding etc to get at them.
Also are new wear pads available? If so how do you replace them?
Thanks again...
George
__________________
George & Jan
Southern Vermont
2002 Solaris T-260 SR
2012 Ford F250
|
|
|
|
|
07-26-2016, 07:49 PM
|
#7
|
|
Moderator
Join Date: Nov 2006
Location: Ohio
Posts: 12,649
SUN #89
|
Hi George,
I agree with this, that will work well. Remove the bracket, drill new holes in the bracket square tube and reuse the old holes. If it would work that easy.
Quote:
Originally Posted by geojan

I might want to remove the bracket, move it about an inch,(the 1/2" I need plus 1/2" to recenter the adjustment slot) and then rebolt the bracket to the slide.
|
The hard part is getting the screws out, maybe they will come out and then hoping they put a threaded tapped plate up in the wall so you can screw back into it and not putting a nut on it. It looks in the pic, that may be the head of a 5/16 or 3/8 bolt. Do not know what is up in the wall for it to screw into.
The lag screws, in this case I would be weary of them. They might be OK but they may also aggravate the small wall sill plate to crack. My wall sill plate is nothing more then a 1 1/2 x 1 1/2 piece of wood. Like a 2 x something ripped to 1 1/2" wide. Those brackets take some pulling on them and that might aggravate a lag tear out. This is a pre-conceived notion but it would not shock me seeing it happen. You will have to make the call on going lags. If you do, drill a pilot hole for sure. Just keep it small enough so you get full wood threads

Pulling the 2 slide corners and taking the gold and the 1st white piece of siding off will for sure work. I know, that is a lot of work for 4 bolts. Call it your last choice.
A thought, pending the outcome of the 4 slide room bolts issue, I had was to start with a piece of 1/4" thick 3" or 4" wide flat bar as long as needed ~ 6 to 8". Down at the slide arm connection, unbolt the 2 way slot joint, slide the plate between the 2 parts, shift the slide and drill and bolt to back together. Add extra bolts as needed. If you go this route, you will need to adjust the master rack ACME screw cylinder rod and the stop can to compensate for that 1/4" you added. The slide on the way out will self compensate and clutch out. But on the way in, the stop can needs to move away from the trailer 1/4" and the actuator threaded rod nuts adjusted out a 1/4" too. I can help with the adjustments if needed. You need to adjust to get the right seal compression again when closed.

The wear pads, yes they sell them. A bear to change, but they sell them.
Lippert direct https://store.lci1.com/wear-tab-blac...o-d-1-16-thick
Or on Etrailer https://www.etrailer.com/Accessories.../LC103480.html
Or Amazon, but they cost more there
https://www.amazon.com/Lippert-10348...ponents+103480
You have to pull the slide arms out to change them. Only do this if your really have to.
Hope this helps and let us know how you make out. Piece by piece we learn how Sunline built each model year and the differences.
John
__________________
Current Sunlines: 2004 T310SR, 2004 T1950, 2004 T2475, 2007 T2499, 2004 T317SR
Prior Sunlines: 2004 T2499 - Fern Blue
2005 Ford F350 Lariat, 6.8L V10 W/ 4.10 rear axle, CC, Short Bed, SRW. Reese HP trunnion bar hitch W/ HP DC
Google Custom Search For Sunline Owners Club
|
|
|
|
|
07-27-2016, 02:11 PM
|
#8
|
|
Junior Member
Join Date: Jul 2016
Location: Vermont
Posts: 8
SUN #8642
|
Hi John,
Good news. After soaking in penetrant I pulled one of the bolts only to find that the original TT came with 5/16" x 4" lag bolts! If they worked this long I guess that they will be ok.
1) I opened the slide about 10"
2) Put a floor jack as you suggested and just took the weight off the brackets
3) removed all four lag bolts, freeing up the slide to move fore and aft
4) moved the slide forward until it was in the position I wanted it to end up at
5) loosened the horizontal slot bolts freeing up the brackets to move
6) moved the brackets (without moving the slide) to center the bolt in the horizontal adjusting slot and retightened the slot bolts
7) used the lag bolt holes in the bracket as the templet to drill the pilot holes at this position. I had to get a 12 inch long 1/4" drill bit so as not to have interference from the skirt.
__________________
George & Jan
Southern Vermont
2002 Solaris T-260 SR
2012 Ford F250
|
|
|
|
|
07-27-2016, 02:24 PM
|
#9
|
|
Junior Member
Join Date: Jul 2016
Location: Vermont
Posts: 8
SUN #8642
|
Continued...
The "F" and "S" on the pic show where we started and finished moving the bracket
 put the lag bolts back in the new holes
9) removed jack and tested
The slide moved great, no more rubbing the seal on the window. Slide alignment is all good and the slide is now in the center of the opening.
John, Thank you so much for all your help. You are a great asset to this forum! I doubt I would have tried this without your help!
George
__________________
George & Jan
Southern Vermont
2002 Solaris T-260 SR
2012 Ford F250
|
|
|
|
|
07-27-2016, 07:18 PM
|
#10
|
|
Moderator
Join Date: Nov 2006
Location: Ohio
Posts: 12,649
SUN #89
|
Hi George,
WOW, that looks great!!!
You have done real good and we all learned something! 4" lag bolts.... who would of thought.... They must of doubled up the wall sill plate above the floor to be able to use them that long. Mine only has 1, 1 1/2" thick board on the sill above the floor.
Glad this all worked out for you. Good Job!!!
Thanks for reporting back, the pics and the good words. Your very welcome. This will help others in the future.
Happy camping
John
__________________
Current Sunlines: 2004 T310SR, 2004 T1950, 2004 T2475, 2007 T2499, 2004 T317SR
Prior Sunlines: 2004 T2499 - Fern Blue
2005 Ford F350 Lariat, 6.8L V10 W/ 4.10 rear axle, CC, Short Bed, SRW. Reese HP trunnion bar hitch W/ HP DC
Google Custom Search For Sunline Owners Club
|
|
|
|
|
|
Currently Active Users Viewing This Thread: 1 (0 members and 1 guests)
|
|
|
 Posting Rules
|
You may not post new threads
You may not post replies
You may not post attachments
You may not edit your posts
HTML code is Off
|
|
|
|
 » Recent Sunline Discussions
 |
|
|
|
|
|
|
|
|
|
|
|
|
|
|
|
|
|
|
|
|
|


 Linear Mode

