 |
 06-20-2009, 01:13 PM
|
#1
|
|
Senior Member
Join Date: Aug 2008
Location: Georgia
Posts: 177
SUN #680
|
AAHH!! ROOF LEAK!!
Just when I thought it was safe to spend money and time on the hitch re-install, I find another more immediate problem to deal with.
I opened up the coach to let some heat buildup out (it's been 100+ degrees every day for almost a week now... no rain) and I see water stains along the seam in the bedroom ceiling. The white ceiling panel is sagging down just a bit along the seam. There are water stains on the bedding under this section of ceiling. There are stains in the bathroom on top of the cabinet counter. The ceiling light fixture in the bedroom is done. It will have to be replaced.
I HAVE A ROOF LEAK!!!  
The roof itself seems to be OK with no damage, splits or punctures. But I found 5 or 6 places along the edge of the rubber roof above the awning where the material is no longer attached to the edge. And there are cracks in the sealant all along the front half of the roof edge, from the leading edge all the way down to what I believe is the vent for the fridge.
The remaining back half of that side of the roof looks OK. The leading edge of the roof (front of camper) looks OK. The rear edge and curb-side roofing edge looks OK, too. It's just the front portion of the roof edge above the awning.
I am thinking of using a two stage repair. First, Dicor #501 self leveling sealant. Then eternabond WebSeal over that to reinforce the joint.
And how do you keep that little boot on the coax cable feed at the antenna inplace and not riding up the cable?
Any suggestions would be wonderful...
__________________
*************************************
Dave & Cindy
'99 Chevrolet 2500 ext. cab (2WD)
5.3 liter V8, 3.73LS, Prodigy, Hensley Arrow
2004 Sunline Solaris SE T-2499 #5527

|

|

|
|
06-20-2009, 09:50 PM
|
#2
|
|
Moderator
Join Date: Nov 2006
Location: Ohio
Posts: 12,651
SUN #89
|
Hi Dave
Oh boy
. Sorry to hear this. We know you use your camper often so this must be something new that happened recently. That is the good news as maybe no frame damage has started yet.
As I reread your post a few times I then even went out to my T2499 and tried to visualize where the water went.
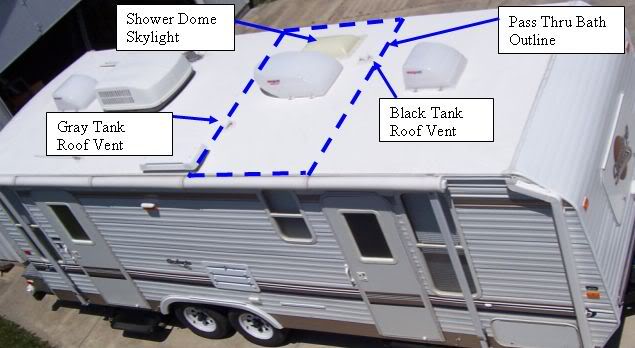
Here are some visual aids for those following along.

A few roof shots.


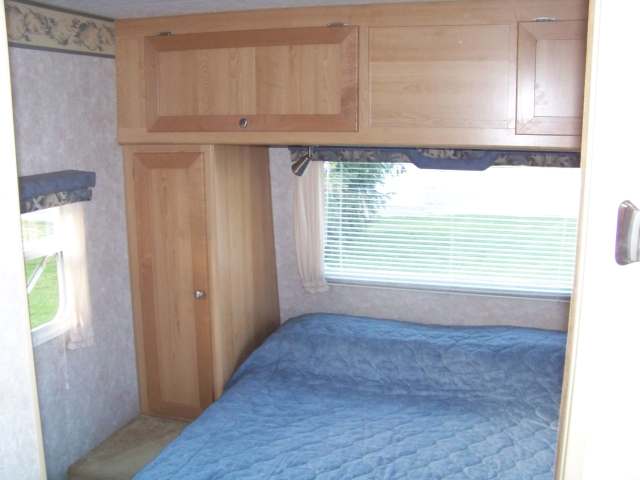
Here is the light. Is this the bedroom light you are referring to that is shot?

If that is the light, and maybe even if it isnt, it may be a good idea to take the roof vent interior shroud off and gently pop the ceiling board loose and look above the ceiling line. If your insulation is all wet and soggy, well
.better to know now so you can deal with it.
Pulling the AC ducts and lifting that area may help explore the area as well.
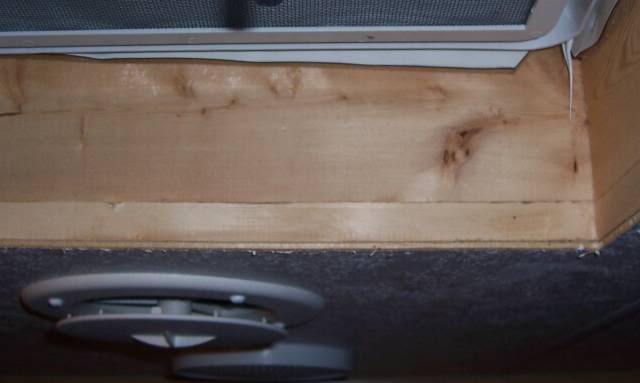
When you pull that vent shroud down it will look like this. From here you can go fishing.
The roof fix your described, I would add this to it. On the cracked area, take a rounded nose stiff paint scraper or old dull chisel, a heat gun or hair dryer and lightly soften up the old Dicro. Heck if it is 100 deg, out you may not need any extra heat
But lightly dig out some of the old Dicro first. It comes up pretty easy when warmed. Then once you have it cleaned out, then put some new fresh on. This will be a better fix then putting it over the top if you have a real leak to the inside.
The Eternabond, yes I see this as good too once the Dicro dries. Actually I have seen some use the 2 Eternabond over the entire length of the edge seems on the camper to not have to worry about the cracked Dicro. And on the front lap seal I thick they used 4 or 6 over the top of that joint. The Eternabond will not crack open like the caulk. Actually I bought 2 rolls of 2 Eternabond and a 6 roll with thoughts of doing this to my T310.
I am a stickler for keeping an eye on the roof and I really look good every time I wash it. Which is about every 2 months in the non winter season. So it gets looked at 4 to 6 times a year. If I seen any crack even starting, out comes the dull chisel and the Dicro. On my T2499 fine cracks started showing slightly after the 3 year mark. Mine was not really even cracks, more of a fine slit. And as I dig into it, it was just an air pocket. So I cleaned out the air pocket and covered over it. Oddly enough the T2499 sleeps inside my garage and the T310 is outside most all its life. And I have not hasd any yet on the T310, even fine cracks on it. So I do not know if there is a definite age/being in the sun timing to this.
But, both of my TT's are aluminum sided and it flexes a lot. Yours is the hard side. I do not know if the hard side accelerates the cracking or not as the entire side may be stiffer and the flex occurs at the joints up on the roof line. It may not mean anything, but it is something different.
You can fix the roof no problem. The inside, well after you investigate further may turn out to the bigger headache.
There is a favor you could do for the club, is take pictures of the cracks and post what to look for. If folks have not been looking at the seams on a regular basis, now is the time to start. I had some pics of mine and the patching but I searched tonight and cannot find them. They are buried in my hundreds of my camper and hitch pics. I will dig again and a great post by it self is, roof seam inspection and repair.
Please keep us posted on the progress. I feel for ya. Oh Man, ouch.
Hope this helps
John
__________________
Current Sunlines: 2004 T310SR, 2004 T1950, 2004 T2475, 2007 T2499, 2004 T317SR
Prior Sunlines: 2004 T2499 - Fern Blue
2005 Ford F350 Lariat, 6.8L V10 W/ 4.10 rear axle, CC, Short Bed, SRW. Reese HP trunnion bar hitch W/ HP DC
 Google Custom Search For Sunline Owners Club
|

|
|
|
06-21-2009, 05:27 AM
|
#3
|
|
Senior Member
Join Date: Aug 2008
Location: Georgia
Posts: 177
SUN #680
|
Yes, this is a royal pain to be sure. 
I had looked at the roof when we bought it last September, of course not knowing a whole lot about rubber roofing. I knew to be sure there were no punctures or tears in the flexible material up there and there were none. I knew from our popup days to check the seams for gaps in the caulking and there were none... then.
This has changed. It looks like the caulking along the edge of the roof seam has split in 4 places that I can see. The splits in the Dicor are maybe 1/2-inch to around 2.5 inches long. These splits are only along the front portion of the roof edge (awning-side), forward of the fridge vent (over the bathroom) to just above the bedroom door. There ARE more fine cracks in the Dicor all along the awning-side of the roof edge.
The largest split in the caulking is pretty much in a straight line to that bedroom ceiling light fixture you show in that pretty picture. Yes, this is the light fixture I believe may be toast. BTW, I wish my roof was as clean as YOURS is in those pictures. I'm thinking the previous owners did no maintenance on the roof caulking at all, much less cleaning and re-treating that rubber roofing like the Dicor website suggests.
After my initial reactions to the discovery were behind me (the wife was concerned about my blood pressure!), I spent some time on the Dicor website reading the care & maintenance info as well as doing a search on our forum which gave me more info to read about other owners' roof adventures. And then I returned to the coach.
The wife had already checked the bedding. It was dry, but you could see where the wet HAD been. The mattress was NOT stained so the wet was absorbed by the sheet and one light weight bedspread. Those are in the laundry room now to be washed.
There was still water in the lenses of the light fixture. The ceiling panel you mentioned has separated from whatever it's glued to... about 8-10 inches wide and from one side of the bedroom to the other. The seam in that panel with the white plastic moulding has NOT broken or separated. It looks like the water found a place to drain out and that was the light fixture. When I push the panel up into place, I feel hard surface up there and it does not feel soft anywhere along the sag.
I am going to remove the light fixture. I will do this AFTER I locate and pull the 12-volt fuse that powers that light. I suspect I will find it blown. I will also remove the interior shroud on the roof vent as you suggest and see what I can see.
Yeah, I agree that stopping the leaks on the roof will be the easier part of this adventure. And yes, I will be glad to take pictures and post them so others can see what to look to look for when checking their own roofs.
Stay tuned... 
__________________
*************************************
Dave & Cindy
'99 Chevrolet 2500 ext. cab (2WD)
5.3 liter V8, 3.73LS, Prodigy, Hensley Arrow
2004 Sunline Solaris SE T-2499 #5527
|
|
|
|
|
06-22-2009, 12:28 PM
|
#4
|
|
Senior Member
Join Date: Aug 2008
Location: Georgia
Posts: 177
SUN #680
|
It's WAY hot outside right now. 100 degrees - heat index over that. Had to take a break from the ladder and caulk gun. Drink more water.
Here are some pictures of what I've been doing. First, the awning-side roof seam towards the front. No visible cracks.

As I move towards the rear of the coach and over the awning, you begin to see hairline surface cracks in the darker gray sealant.
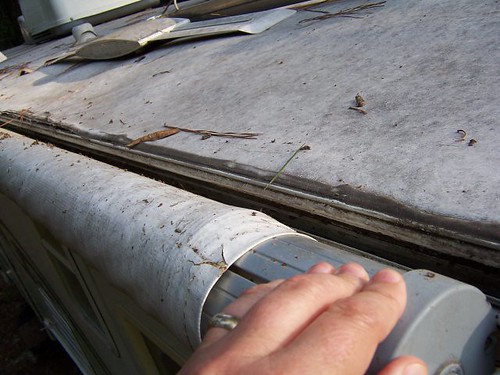
And then you get to this...
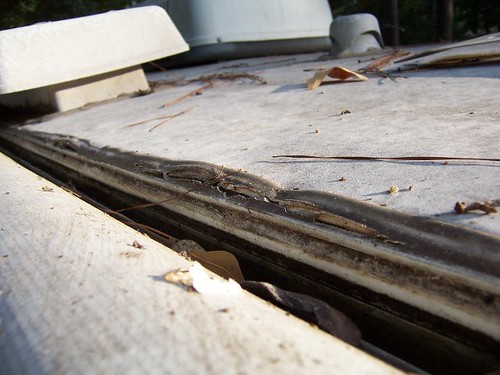
And then this... ouch
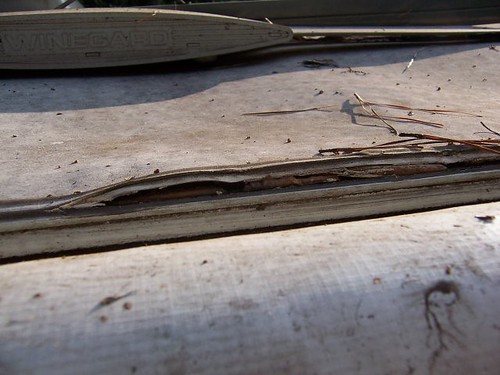
This is what I get for NOT monitoring this roof as often as I should. I cleaned out these gaps in sealant and discovered dirt and pine needles, so it's likely this was open to the weather for a month or two.
I bought 2 tubes of DICOR 501 sealant in Dove white from the Camping World down in Midway, FL... just outside Tallahassee... and home I went. Round trip, about 65 miles.
I'm going to go out and check the roof... maybe take some AFTER pictures. I'll post them after I get finished.
__________________
*************************************
Dave & Cindy
'99 Chevrolet 2500 ext. cab (2WD)
5.3 liter V8, 3.73LS, Prodigy, Hensley Arrow
2004 Sunline Solaris SE T-2499 #5527
|
|
|
|
|
06-22-2009, 07:42 PM
|
#5
|
|
Senior Member
Join Date: Mar 2008
Posts: 351
SUN #549
|
Quote:
|
Originally Posted by dkasten39828
And then this... ouch
This is what I get for NOT monitoring this roof as often as I should. I cleaned out these gaps in sealant and discovered dirt and pine needles, so it's likely this was open to the weather for a month or two.
I bought 2 tubes of DICOR 501 sealant in Dove white from the Camping World down in Midway, FL... just outside Tallahassee... and home I went. Round trip, about 65 miles.
I'm going to go out and check the roof... maybe take some AFTER pictures. I'll post them after I get finished. |
Dave,
Dicor is not going to "fix" spots where the rubber has lifted, like in the picture above.
On these rubber roofs, the rubber should wrap over the corners and extend down the coach sides about an inch. Then the trim (which is usually flat in the front, 90* in the rear and flat/rain gutter on the sides) is attached with putty tape over the "flap" of the membrane. THEN the dicor is applied to the edges of the trim and screwholes for extra protection.
It appears you have one of two problems there. Either the roofing material was cut too short and did not extend enough down the sides (pretty much the problem that caused the leak in the rear of mine) OR, it did extend down the side and something caused it to crack/split/tear at the trim.
IMO, the best way to fix your problem is fresh rubber. That's a big, expensive job. So, the second best way to fix that is with some eternabond tape.
The best way to eternabond it is to remove the trim from that side, clean the roof and about 2 inches down the side of the coach as per Eternabond's directions. Then apply the tape on the roof and wrap the tap so you have about an inch of tape extending down the side of the coach. I would personally try for one solid piece down the length of the side of the coach. You can then reinstall the trim (with fresh putty tape, or better, butyl) and either cap it with more eternabond, or some dicor. It will be a real pain with the awning on that side, but if it was mine, that's how I'd fix it.
And that's how I repaired my "short" roof in the rear, after I fixed the rotten wall and floor. My repair thread has some pictures of the roof & eternabond in it here: http://www.sunlineclub.com/forums/ph...pic.php?t=1824 It's been a little over a year and I just checked the roof last week through the rear speaker hole with a borescope. No signs of water ingress, so the eternabond works.
BTW, stay away from camping or rv places if you buy eternabond. Go to a supply house that services commercial roofing contractors. Same stuff, 1/4 of the price. There's also a supply place online that sells eternabond at reasonable prices. I dont recall the name, but it's probably been mentioned on here, and I know it's been talked about over on rv.net.
- Frank
__________________
|
|
|
|
|
06-23-2009, 11:25 PM
|
#6
|
|
Moderator
Join Date: Nov 2006
Location: Ohio
Posts: 12,651
SUN #89
|
Dave
WOW. WOW 2 times, maybe even 3 times....
I'm with Frank on this one. It sure looks like the rubber is some how, short or cracked off right there at the edge.
And the Eternabond wrap over it should help.
Have you made it inside yet digging? With a hole that big, it allmost has to be wet in there somewhere.
Here is where I bought my last roles of Eternabond. Shipped right out quick and the cheapest I could find. http://www.bigrocksupply.com/roofing...-c-13_104.html
Wish you where closer, would come over and help.
Good luck
John
__________________
Current Sunlines: 2004 T310SR, 2004 T1950, 2004 T2475, 2007 T2499, 2004 T317SR
Prior Sunlines: 2004 T2499 - Fern Blue
2005 Ford F350 Lariat, 6.8L V10 W/ 4.10 rear axle, CC, Short Bed, SRW. Reese HP trunnion bar hitch W/ HP DC
Google Custom Search For Sunline Owners Club
|
|
|
|
|
06-23-2009, 11:31 PM
|
#7
|
|
Moderator
Join Date: Nov 2006
Location: Ohio
Posts: 12,651
SUN #89
|
Re: AAHH!! ROOF LEAK!!
Quote:
|
Originally Posted by dkasten39828
And how do you keep that little boot on the coax cable feed at the antenna inplace and not riding up the cable?
|
Ok this one is easier to fix. Make sure there is Dicor under that boot to seal the wire into the alum casting pocket. Then slide boot over the alum. and put a stainless steel hose clamp at the boot to the alum. casting. That was what I did as ever time the antennas went up and down, the boot would lift.
John
__________________
Current Sunlines: 2004 T310SR, 2004 T1950, 2004 T2475, 2007 T2499, 2004 T317SR
Prior Sunlines: 2004 T2499 - Fern Blue
2005 Ford F350 Lariat, 6.8L V10 W/ 4.10 rear axle, CC, Short Bed, SRW. Reese HP trunnion bar hitch W/ HP DC
Google Custom Search For Sunline Owners Club
|
|
|
|
|
06-24-2009, 09:26 PM
|
#8
|
|
Senior Member
Join Date: Aug 2008
Location: Georgia
Posts: 177
SUN #680
|
Frank, I agree... the sealant is NOT going to be enough to FIX this. I always planned to add Eternabond tape to reinforce the seam. The rush to get sealant into and onto this area of roof was to prevent any new water intrusion since I have no way to cover the coach right now.
I read about your repair of your Sunline. Great job. I did a similar rebuild myself about 20 years ago on a truck camper. Took me FOREVER as I am not not what you'd call a carpenter, but it worked and we used that camper for quite some time after that. Hope I don't have to go that far on this coach.
John, yes I have got a peek and while there is signs of WET, the roof truss I checked and the side wall top plate are dry. The bud board was damp but the heat will dry that.
I cannot see enough insulation to be sure but it's probably still a bit wet. The sealing of the gaps with DICOR will stop additional water from getting in. The hot weather should help dry what is still wet. It's still pushing 100 every day.
Since I plan to slightly overlap the gutter edging with the Eternabond tape and then wrap the tape over the edge onto the roof membrane, I am thinking the 4-inch tape would be a better choice than the 2-inch. And I plan to run this all the way down both long sides of the coach roof.
__________________
|
|
|
|
|
06-27-2009, 11:47 AM
|
#9
|
|
Senior Member
Join Date: Aug 2008
Location: Georgia
Posts: 177
SUN #680
|
OK, it's the weekend and I can spend some more time peering around in the camper.
Good news: the white interior ceiling panel is detached about 4 inches along either side of the seam, but the amount of sag is much less than when we first found the leak. When I press the panel up, I feel SOLID material there. No softness. I will remove the interior trim on the ceiling vent in the bedroom tomorrow along with the damaged 12-volt light fixture to see whatever it will allow me to see.
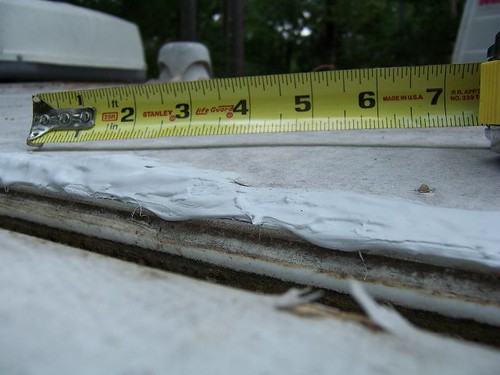
The lap sealant did a GREAT job flowing into the places I applied it along the roof edge. I think I may have applied it rather heavily, but I wanted to STOP THE LEAK.
Even though the leaks are on the awning or street side, you can see where I also went around the curb side, caulking as I went. Any spot that looked questionable, I caulked it! Just trying to be proactive! 
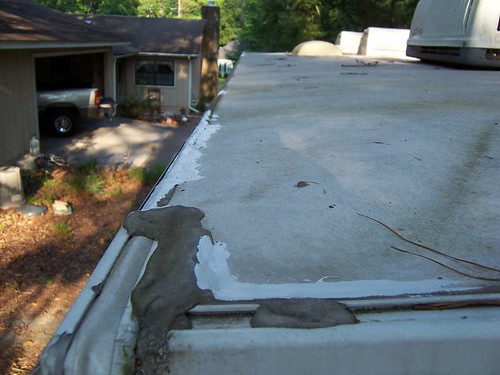
This smaller seam repair did a bit better than the larger one...
This larger repair sealed up OK but before I move the coach, I'll be applying the EternaBond...

__________________
*************************************
Dave & Cindy
'99 Chevrolet 2500 ext. cab (2WD)
5.3 liter V8, 3.73LS, Prodigy, Hensley Arrow
2004 Sunline Solaris SE T-2499 #5527
|
|
|
|
|
|
Currently Active Users Viewing This Thread: 1 (0 members and 1 guests)
|
|
|
 Posting Rules
|
You may not post new threads
You may not post replies
You may not post attachments
You may not edit your posts
HTML code is Off
|
|
|
|
 » Recent Sunline Discussions
 |
|
|
|
|
|
|
|
|
|
|
|
|
|
|
|
|
|
|
|
|
|
|
|
|
|


 Linear Mode

