Journey with Confidence RV GPS App RV Trip Planner RV LIFE Campground Reviews RV Maintenance Take a Speed Test Free 7 Day Trial ×
Sunline RV Forum
Sunline User Photos

Go Back   Sunline Coach Owner's Club > Technical Forums > Repairs and Maintenance
Click Here to Login

Join Sunline Club Forums Today


Reply
 
Thread Tools Search this Thread Display Modes
Old 05-11-2018, 07:13 PM   #1
Senior Member
 
j52wf's Avatar
 
Join Date: Jun 2011
Location: New Jersey
Posts: 544
SUN #2366
j52wf is an unknown quantity at this point
257sr slide floor issue

Noticed a few gouges in outside coated bottom of slide floor. See pic if it posts Looks like floor is possibly swelling due to humidity/water exposure and catching on the edge when retracting/extending. JohnB turned me to a thread on this issue with a drip edge as a remedy. My thought is to have my metal shop friend cut two pieces of very thin aluminum about 5" wide and as long as the slide is when open, then bend it at 2". If I slide the 2" under the side wall. covering the exposed edge of the floor it will leave a 3" bottom edge which I can attach to the bottom of the slide with VHB tape, making sure the drip edge is far enough into the camper that it doesn't catch when the slide is retracted. Any thoughts?
Attached Images
File Type: jpg slide floor.jpg (31.5 KB, 8 views)
__________________

__________________
j52wf is offline   Reply With Quote
Old 05-15-2018, 05:31 PM   #2
Moderator
 
JohnB's Avatar
 
Join Date: Nov 2006
Location: Ohio
Posts: 12,649
SUN #89
JohnB is on a distinguished road
Hi Jim,

What you are describing is very close to what I have seen on other brands of campers as a OEM fix to the cracking slide floor end problem. Just they used a plastic molded part in place of your aluminum. I will see if I can find those pics I took of it. It is buried in my pile of never ending other camper pics of ideas if I can find them. Key is what year did I take them??

What you are proposing is good, just I will add a few things.

1. The length, you mentioned

Quote:
. My thought is to have my metal shop friend cut two pieces of very thin aluminum about 5" wide and as long as the slide is when open.
My thoughts are you need it longer than just the length with the slide open. Reason being is, the weight of the slide is mostly supported by the wall ends, meaning the front wall and the rear wall of the slide. When the slide is open there is still weight on the slide wall ends.

When the slide retracts in, my preconceived notion is there is a chance the new angle strip can "catch" the edge of the strip on the embed slide system supporting the floor and over time do it some damage.

My thought would be this. Do as you described but make the angle shaped strip longer, it will need to go up under the floor and inside as far as practical that is still inside the camper. This way the strip will never have a "bump" edge to catch on the new aluminum strip when the slide comes in.

I have found I can lift my slide at least 1/2" up vertical when the slide is full open. I use a jack at the wall end and lift. It will go up easy. You only need to raise it say 1/8", then slide the new angle strip in. Ideally you can fasten it on the inside. When the slide is full in, hoping you can get to that area to at least put a fastener or staple that will not get hit on the way out.

Here is how I lifted mine.
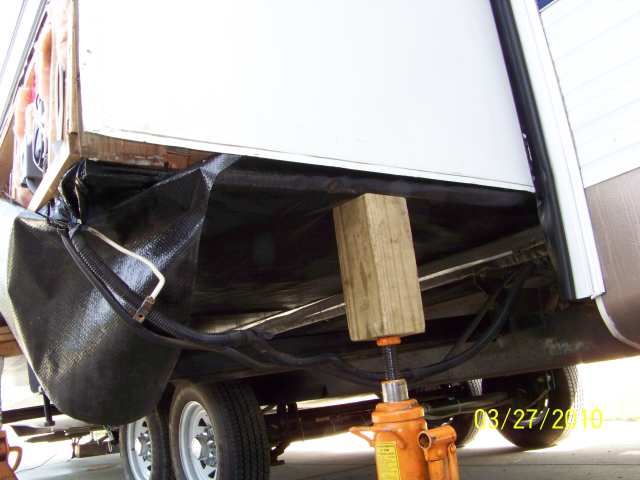

Once it is lifted you can support it along the long outside wall. Like this as you need to get the lifting jack out of the way to put your angle strip in place.
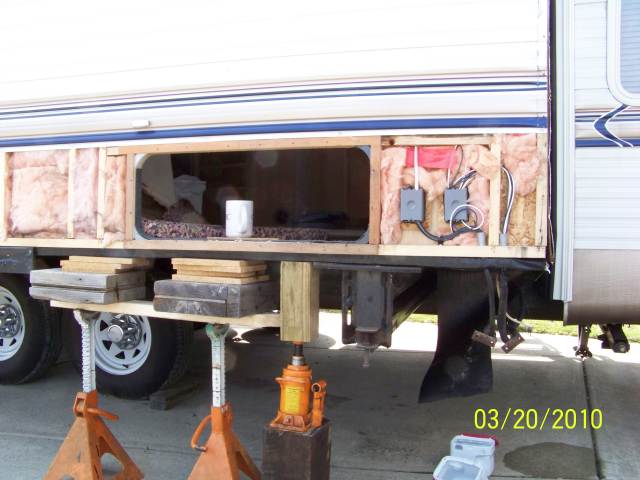

2. Where to install the angle on the wall. You did not mention this but may be thinking it, I will just suggest my view on how I would do it.

Remove the molding at the bottom of the slide end walls. It will look something like this when you take it off. Once you take the screws out, the strip will come off. If it is stuck on well, using a heat gun or hair dryer, warm the strip and that will soften the putty tape and it will come off with a little gently prying.
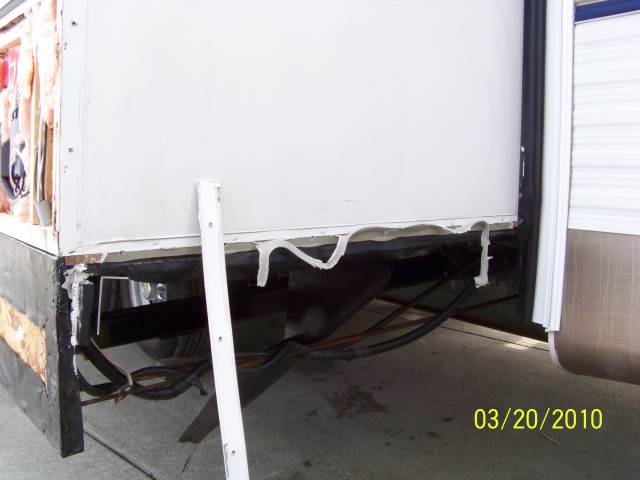

Then there may be a few staples holding the wall white aluminum that you will need to pull out. My point is, slide your angle strip up "behind" the wall aluminum so that no water will want to get in behind it running down the wall. Like this. This is my drip edge being installed.
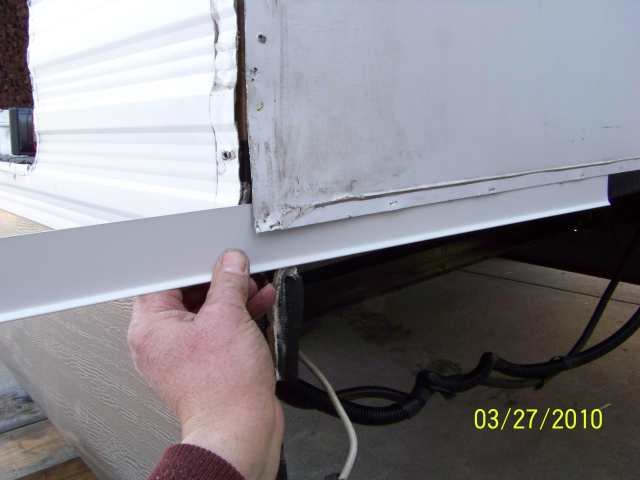

In my case I did not want the slide seal to "catch" the edge of the drip edge so I made the drip edge long enough to go all the way inside. I had to trim it in height to fit under my molding inside. Yours may be a little different then this.
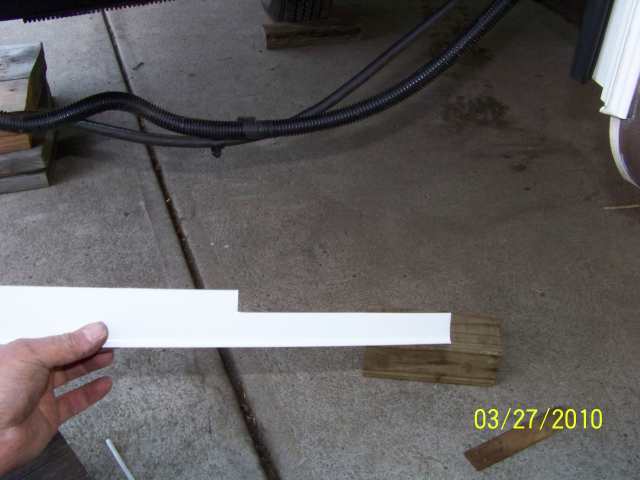

It is attached well inside beyond the slide seals
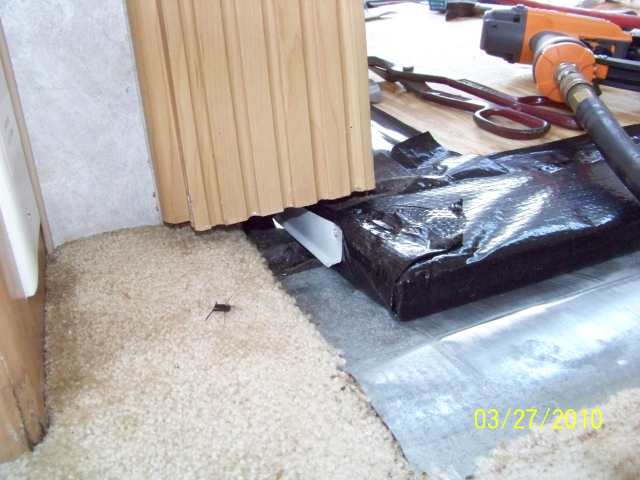


And a final look with the molding put back on. The slide front wall end
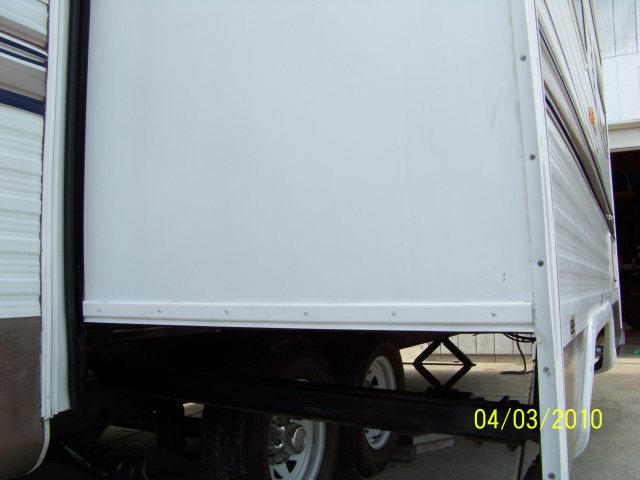

The rear wall of the slide showing water being diverted off the wall now.
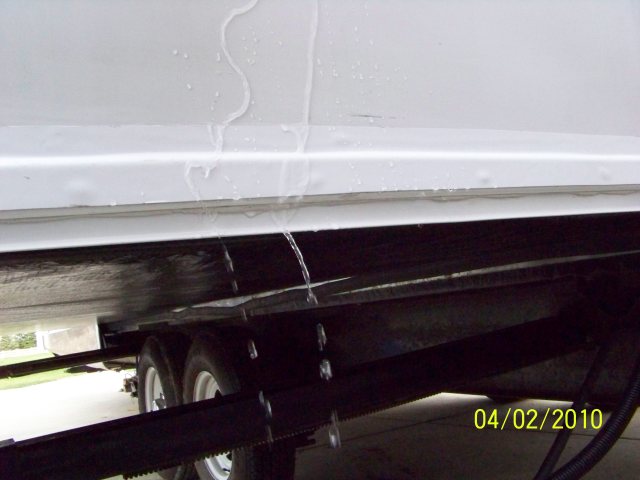

Use butyl sealing tape on the molding before you put it back on. The screws then will go through the new angle strip and hold the strip when the slide goes in and out.

3. Sealing up the now exposed floor end that is cracking.

Clean that cracked end up good when you have the molding off. Make sure it is dried out. Then before sliding up the new angle strip, apply a strip of butyl sealing tape to the cracked end wall of the floor. Press it in good with the release liner still on. Then pull the release liner and carefully slide the new angle strip up behind the wall siding. Hold it at a slight angle to the wall so the new strip does not touch that butyl until it is fully inserted up and about to touch the bottom of the slide floor.

That butyl tape sandwiched in there will seal out any water/moisture from ever getting back up into that end wall area.

4. The exposed OSB of the floor where the black coating chipped off.

Ideally you can do something to the bare OSB before putting the angle shape on. Even if this is a good oil based paint. Something to seal the bare wood to protect it from moisture. Leaving bare OSB is not great when it comes to outdoors.

4. Your foam tape. I have never used the 3M VHB tape. By the looks of the 3M site, this has great promise. https://www.3m.com/3M/en_US/company-...94857497&rt=r3

Find one of them that is outdoor rated and that should help do what you want it too. Make sure the floor is very clean.

5. Your 3" leg under the floor is a good length. The wall drips should break tension and fall to the ground by then. See this pic showing what mine did before the drip edge. I needed the drip edge to keep the water out of the holes in the Darco bottom floor.
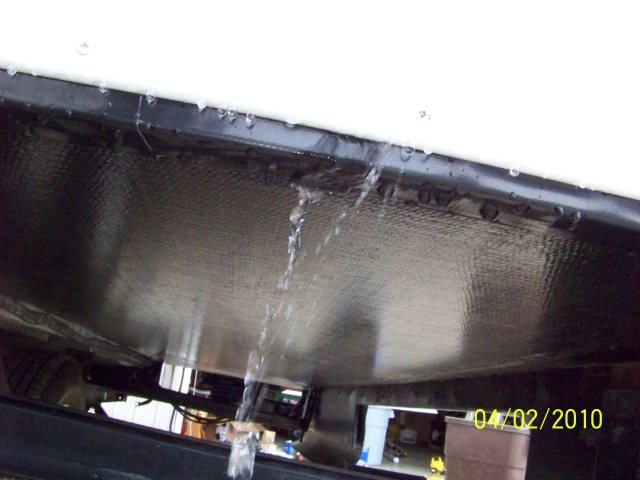

Try and takes some pics of your process and add to your post. This is a good topic as no one with a 2005 or newer has posted about this that I can recall.

Hope this helps

John
__________________

__________________
Current Sunlines: 2004 T310SR, 2004 T1950, 2004 T2475, 2007 T2499, 2004 T317SR
Prior Sunlines: 2004 T2499 - Fern Blue
2005 Ford F350 Lariat, 6.8L V10 W/ 4.10 rear axle, CC, Short Bed, SRW. Reese HP trunnion bar hitch W/ HP DC

Google Custom Search For Sunline Owners Club
JohnB is offline   Reply With Quote
Old 05-15-2018, 06:29 PM   #3
Moderator
 
JohnB's Avatar
 
Join Date: Nov 2006
Location: Ohio
Posts: 12,649
SUN #89
JohnB is on a distinguished road
For folks following along, I will provide some background on the problem Jim has.

In model year 2005 Sunline changed the slide floors to a plastic coated OSB board. The prior years had a Dacro plastic membrane wrapped and stapled to an OSB board. All 2005 to 2007 slide floors have this concern.

The prior 2005 generation had issue with drilled holes at the end of the slide to attach the floor were left as an open hole. As time went on, water running down the wall would wick into those holes and then not get out. In time slide floor rot occured. This problem existed across the RV industry on many brands. See this post for more info on this issue. http://www.sunlineclub.com/forums/f7...eck-11086.html

For a fix to the 2004 and older slides see this post http://www.sunlineclub.com/forums/f7...age-10695.html

In the 2005 slide floor redesign which was to correct the issues of the past with the holes in the floor, Sunline was one of the first to use the new flooring. Other RV manufacturers also tried it. The new slide floor solved the water getting in under the Darco problem. However with any new design, they did not know there would be new issues that showed up in a few years.

Here is a pic of the new slide floor end on a 2005 T264SR. At the time this was taken, the black ends of the approx 3/4" high exposed floor had not yet started.


You can see the bottom floor attaching screws exposed and a small chip of the plastic coating around the screw. The large black approx 3/4" tall exposed floor is the problem. Over time the plastic cracks I think due to the end grain of the wood and the fact it is exposed to the sun and water.

This is a pic of Jim's showing in the red circle the problem area. His also has some chipped away plastic coating on the bottom ends of the slide floor.


On Jim's camper, Sunline put the molding strip lower. It almost covered up the floor end problem. However there was no exact standard way they put that molding strip on. Some had the modeling very high, others had it lower. Originally if the entire molding was wider and lower, it could of helped some of the problem.

The fix Jim presented is one method. I feel it is a good one, just never doing it before, it might need an adjustment of something to make it final.

There are other ways, the goal is to stop water and sun from getting to the exposed end of the slide floor. If you have nothing much to work with, getting it dried out and clean, and using Gorilla tape pressed on well will be a temporary fix. It may only last a year and would consider this a short term fix.

Taking the Gorilla tape method one step further is to use flex mend belly repair tape. You remove the molding and insert the flex mend up behind the white aluminum siding and then down the side and under the bottom. The unknown is will the flex mend stick well to the bottom of the floor? I would try and see if the flex mend will stick to the floor before trying this approach.

You can also do what I did to fix mine with the drip edge and using butyl tape behind it to seal to the end of the slide floor. This however does not address the chipped bottom if you have that problem. Jim's is the first I have seen with that much bottom chiping. If you have that issue then Jim's approach would be better.

Hope this helps

John
__________________
Current Sunlines: 2004 T310SR, 2004 T1950, 2004 T2475, 2007 T2499, 2004 T317SR
Prior Sunlines: 2004 T2499 - Fern Blue
2005 Ford F350 Lariat, 6.8L V10 W/ 4.10 rear axle, CC, Short Bed, SRW. Reese HP trunnion bar hitch W/ HP DC

Google Custom Search For Sunline Owners Club
JohnB is offline   Reply With Quote
Reply


Currently Active Users Viewing This Thread: 1 (0 members and 1 guests)
 
Thread Tools Search this Thread
Search this Thread:

Advanced Search
Display Modes

Posting Rules
You may not post new threads
You may not post replies
You may not post attachments
You may not edit your posts

BB code is On
Smilies are On
[IMG] code is On
HTML code is Off
Trackbacks are Off
Pingbacks are Off
Refbacks are Off


Similar Threads
Thread Thread Starter Forum Replies Last Post
Another slide adjustment issue geojan Repairs and Maintenance 9 07-27-2016 07:18 PM
T-330sr slide issue sthill Sunline Slide Room Travel Trailers 21 07-10-2013 05:40 AM
Water issue with slide out SE model jakebrake Sunline Slide Room Travel Trailers 8 11-22-2012 04:31 PM
Slide Issue to tough? Poqprince Sunline Slide Room Travel Trailers 16 08-15-2012 08:45 PM
Slide Floor Water Damage JohnB Repairs and Maintenance 64 04-06-2010 09:03 AM


» Featured Campgrounds

Reviews provided by

Disclaimer:

This website is not affiliated with or endorsed by Sunline RV or any of its affiliates. This is an independent, unofficial site.


All times are GMT -6. The time now is 04:21 AM.


×