 |
|
 08-26-2022, 03:44 PM
|
#1
|
|
Senior Member
Join Date: Sep 2007
Location: New York
Posts: 101
SUN #402
|
2005 Sunline Solaris #2753 Crack in "I" beam
I have a small crack in the front to back beam - passenger side - that I can see between the tires. It's the rusty line about the middle of the picture
I'm attributing that to tire changing and plan to have the crack welded.
So any help available will be greatly appreciated.
Foster "Brad" Bradley flbradjr
ps latest posting - thanks to JohnB suggestion
__________________
__________________
|

|

|
|
08-27-2022, 08:08 AM
|
#2
|
|
Moderator
Join Date: Nov 2006
Location: Ohio
Posts: 12,651
SUN #89
|
Hi Brad,
I have seen that type of crack before on the larger weight (8,600# to 10,000# GVWR) Sunlines, just not "yet" on the 2005 and newer 7,000# rated frames from Sunline. Before I type more on the issue, and possible corrections, we need some more info to help confirm what is going on.
Take a flash light and look at the main frame rail web section at "each" spring hanger for anything that looks like the faint signs of a crack. Some may just be starting, others well advanced like in your pic. There are 6 spring hangers on the camper, and just each spring hanger is where the I beam web crack could start. See if any of the other locations have those horizontal looking cracks or starting of them. Look with the flashlight on the inside and outside of the frame. The crack might not yet be all the way through the frame web, it depends how long it has started and been ongoing.
Please post pics of any of the other cracks you find when you report back. And please try to take pics of the inside of the frame where the crack you posted is. Need to see what you have on the inside too.
Also, lets confirm the one crack you posted above as I cannot see the tires and suspension in the pic. That crack is in the main frame rail I beam above the spring hanger between the 2 tires (passenger side)? We would call this location, a main frame rail web crack above the center equalizer area on the right side.
Hope this helps,
John
__________________
__________________
Current Sunlines: 2004 T310SR, 2004 T1950, 2004 T2475, 2007 T2499, 2004 T317SR
Prior Sunlines: 2004 T2499 - Fern Blue
2005 Ford F350 Lariat, 6.8L V10 W/ 4.10 rear axle, CC, Short Bed, SRW. Reese HP trunnion bar hitch W/ HP DC
 Google Custom Search For Sunline Owners Club
|
|
|
|
|
08-27-2022, 11:50 AM
|
#3
|
|
Senior Member
Join Date: Sep 2007
Location: New York
Posts: 101
SUN #402
|
2005 Sunline Solaris #2753 Crack in "I" beam
Hi John,
Yes, my I beam is 6 ". And pics Hopefully
IMG-0838.jpg
IMG-0838 (1).jpgy
Hope this works Brad
__________________
|
|
|
|
|
08-27-2022, 12:04 PM
|
#4
|
|
Moderator
Join Date: Nov 2006
Location: Ohio
Posts: 12,651
SUN #89
|
Hi Brad,
Yes the pics work, good job! You get an A+!
I can now see the equalizer area. Thanks
Let me know how the other hanger locations check out for cracks, then we can better talk to what to do about this.
John
__________________
Current Sunlines: 2004 T310SR, 2004 T1950, 2004 T2475, 2007 T2499, 2004 T317SR
Prior Sunlines: 2004 T2499 - Fern Blue
2005 Ford F350 Lariat, 6.8L V10 W/ 4.10 rear axle, CC, Short Bed, SRW. Reese HP trunnion bar hitch W/ HP DC
Google Custom Search For Sunline Owners Club
|
|
|
|
|
08-27-2022, 01:39 PM
|
#5
|
|
Senior Member
Join Date: Sep 2007
Location: New York
Posts: 101
SUN #402
|
Hi John,
Glad You like the pics. I am going to redo them bkz of the sun blotch.
I'm worn out - working on Dau's pool this AM. Plus 85-90 out there so...crack to follow.
You're AOK.
Brad
__________________
|
|
|
|
|
08-29-2022, 02:14 PM
|
#6
|
|
Senior Member
Join Date: Sep 2007
Location: New York
Posts: 101
SUN #402
|
2005 Sunline Solaris #2753 Crack in "I" beam
Hi John,
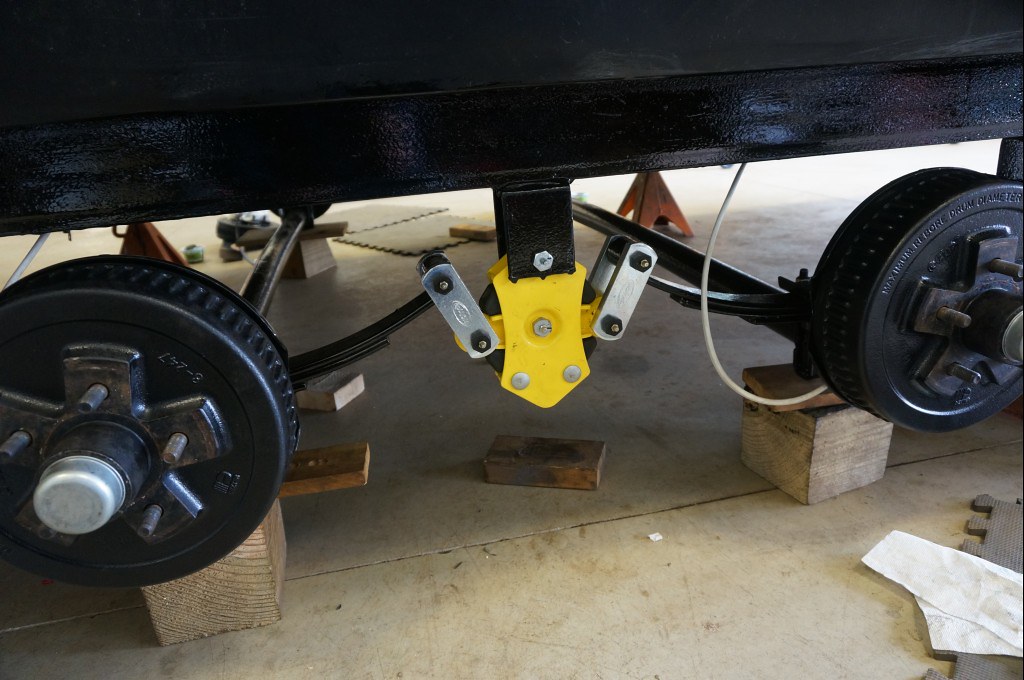
Today I noticed that the drivers side had a crack just above the equalizer - the same as the passenger side. New pics are of the passenger side - under the RV. There is a bar the spans the width of the RV and just under that bar is the same crack as the outside. Grey water tank is front side of front axle and bar. Black water tank is behind rear axle.
__________________
|
|
|
|
|
08-29-2022, 02:27 PM
|
#7
|
|
Senior Member
Join Date: Sep 2007
Location: New York
Posts: 101
SUN #402
|
Sunline #2753 pictures
After adding pictures I couldn't add to comments
So - #1 passenger side, #2 & 3 drivers side, #4 passenger side but picture gremlins made it upside down.
Brad
__________________
|
|
|
|
|
08-29-2022, 05:51 PM
|
#8
|
|
Moderator
Join Date: Nov 2006
Location: Ohio
Posts: 12,651
SUN #89
|
Hi Brad,
You have done well with your crack investigation and the pics. Cracks on both sides of the camper in the center of the I beam web, above the center equalizer hanger.
You have not reported any cracks in the I beam web at the front or rear hangers, even faint ones. Just confirming, did you check those areas and find any slight cracking or a thin rust line above those front and rear spring hangers?
I have seen this problem before, on other brand campers and on the larger Sunline campers with the I beam frame. This would be the 10" tall I beam frames that were used on the 8,600# and 10,000# GVWR Sunline campers. In fact, Lippert who is one of the frame fabricators had to issue a bulletin to a NHTSA warning on that style frame. Again, this was on the larger frames across the RV industry, not just Sunline.
Yours, so far, is the first to show up on the 7,000# 6" tall I beam frame that I recall being reported here on the Sunline forum. I'm not saying there are not others with this issue, just I do not remember anyone else coming forward and telling us. It may also be, they do not know they even may have an issue. They did not know to look.
There was a lot of 6" I beam frames made from the 2005 model year until the last of the 2007's in many different floor plans. Something that sticks out on yours which might aggravate the problem more, the T2753 is the longest 7,000# rated camper with the 6" I beam main frame rails at a brochure length of 28 ft 1".
I know of two good friends who have the T1950 with the 6" I beam frame as they fall into that 2005 to 2007 model year group, and those two folks have done a lot of cross-country towing, close to almost all over the place for multiple years. That T1950 6" I beam frame had some other cracking issues, but not at the spring hangers like yours. The T1950 is the shortest Sunline made between 2005 to 2007 models at 20 ft. 4" to 20 ft 6". These shorter campers are also a little lighter at 5,500# GVWR and that is also a factor in this.
Here is the problem that creates the cracks in your frame web section. I might use a few words you are not familiar with, and if I do, just ask I'll break it down into more simple wording to better understand.
The RV industry has made camper frames from several different steel shapes. Each steel shape has pluses and minuses about them. The RV manufactures want to keep the weight down, for cost and to make the camper lighter so it is easier to tow with a smaller vehicle. Sunline over the years has used 5" C channel iron, 6" rectangular structural tubing and the 6" I beam shape on the 7,000# class of campers that I know of. They may have had some other shapes too. If you go to the steel construction handbook, the I beam shape most always comes out to have a higher rating for strength in the vertical direction then the other shapes and the I shape has a lighter weight. So, from a vertical strength standpoint only, the I beam generally wins.
But, the issue with the RV style I beam shape is the horizontal strength direction and the top and bottom flange strength. Notice I said RV style I beam. These are not in the same league as the I beam used in buildings or bridges that have very heavy top and bottom flanges and webs. The RV I beam, also called the MH beam, came out of the manufactured housing industry when they need a lightweight frame to transport the house one trip from the factory to the house lot and then get setup. These MH beams (I shaped) have thin top and bottom flanges and thin webs.
When this RV style I beam is used in a camper frame application, the lower flange of the I beam is very weak against twisting forces compared to the higher strength of the vertical weight carrying ability. Meaning, if you put a 12 adjustable wrench on the lower flange of the I beam, it takes very little effort to twist that lower flange. This un-reinforced lower flange can allow the spring hanger to flex that flange on every turn of the camper when the tires scrub the road during the turn. When the bottom flange flexes, the web of the I beam tries to resist the flex. When the lower flange flex is large enough, the web section of the I beam also starts to flex, usually about at the center as there is no other reinforcement in place. Over time, the web flexes enough that flex starts a very fine hard to see crack. As the towing miles continue to add up, the tiny cracks keep getting bigger and bigger like what you now have.
The flexing of steel is common, it happens all the time and can be OK given the application. The issue comes when flexes go too far in the application and the stress in the steel goes beyond what we call the yield point of the steel. Once the yield point in the steel is reached, the metal deforms and will not go back to the original shape. In addition, there is mechanical fatigue stress going on with lots of bending of the spring hangers. The combo of constant flexing create fatigue, and how far the flex reaches, come close to the yield stress of the steel.
So, the flexing of the spring hangers in a turn is the start of the problem. There are a few ways to repair what you have and reinforce it to make a more lasting repair. I have done one of the repair methods on my own T310SR camper and my sons T264SR camper before the flexing started a crack. I will show this concept. I also have pictures of a different kind of repair on a T289SR where that welder used a different approach to stiffen up the hangers. And I will hunt for the Lippert repair sheet given when this problem started showing up across the RV industry back in the approx. 2008-to-2010 time frame. Ill hunt up that info and report back.
And while you are having a welder work on repairing your frame web cracks, I want to give you a heads up on another potential problem. Go back out to the camper, and look at your main frame header up front where the A frame joins to the main trailer header. Your vintage frame used 4 C channel for the A frame rails. When a weight distribution hitch is used, and many to almost all tow vehicle setups need the WD hitch on your size camper, the flexing of the 4 channel iron has known to buckle the main header at the center and crack the welds at the joints where the channel iron goes through the main header.
See this post where I show how to pull a string across the bottom of the main frame header so you can see how good or not so good the main header is. The bottom of the header is supposed to be straight for the most part. Also look at the welds where the 4 channel meets the main frame header, they crack there sometimes when the problem progresses enough. The battery tray angles also flex open almost dropping the battery too. We have a real long post on this A frame issue from years ago, but this link is the condensed version of it.
https://www.sunlineclub.com/forums/f...tml#post148050
Ill be back with your web crack repair in the near future.
Hope this helps
John
__________________
Current Sunlines: 2004 T310SR, 2004 T1950, 2004 T2475, 2007 T2499, 2004 T317SR
Prior Sunlines: 2004 T2499 - Fern Blue
2005 Ford F350 Lariat, 6.8L V10 W/ 4.10 rear axle, CC, Short Bed, SRW. Reese HP trunnion bar hitch W/ HP DC
Google Custom Search For Sunline Owners Club
|
|
|
|
|
08-31-2022, 07:08 AM
|
#9
|
|
Senior Member
Join Date: Sep 2007
Location: New York
Posts: 101
SUN #402
|
Hi John,
I checked the 6 hangers and they look Ok. And I rechecked the front A frame and main header. Both are Ok. I said recheck because I had previously checked those areas from one of your earlier posts on that subject.
Since I'm planning to get new tires in the spring I'm going to hold off on the welding since it's a 35 mile trip to the repair shop while driving on the Long Island Expressway.
Again - Thank You for all your help and advice.
Brad
__________________
|
|
|
|
|
08-31-2022, 06:47 PM
|
#10
|
|
Moderator
Join Date: Nov 2006
Location: Ohio
Posts: 12,651
SUN #89
|
Thanks Brad,
I'll still hunt up the pics for the possible fixes, if I don't get them up by the time to need to bring the camper in for repair, pester me in advance. 
__________________
Current Sunlines: 2004 T310SR, 2004 T1950, 2004 T2475, 2007 T2499, 2004 T317SR
Prior Sunlines: 2004 T2499 - Fern Blue
2005 Ford F350 Lariat, 6.8L V10 W/ 4.10 rear axle, CC, Short Bed, SRW. Reese HP trunnion bar hitch W/ HP DC
Google Custom Search For Sunline Owners Club
|
|
|
|
|
09-01-2022, 11:07 AM
|
#11
|
|
Junior Member
Join Date: May 2019
Location: Pennsylvania
Posts: 6
SUN #11236
|
Crack in beam
My approach would be drilling a small hole (3/8") at the ends of the crack to stop the progression. Grind I'm and fillet weld the crack. Grind smooth.Then use a rectangular steel flatbar, 1/4' thick mild steel (A36) plate with a few 1/2" hole drilled through to line up above and below the crack.
Clamp and weld the perimeter of the plate to the beam - stitch, not continuous. Let cool, then go back and plug weld the holes to the plate and beam. Lastly, fillet weld between the preliminary stitches. Let cool and spray coat with cold galvanizing paint.
I'm not suggesting you do this because I'm not a structural engineer- it's just how I would do it on my Sunny.
Good luck!
__________________
|
|
|
|
|
09-01-2022, 11:54 AM
|
#12
|
|
Senior Member
Join Date: Jan 2020
Location: Maryland
Posts: 143
SUN #11755
|
Drill the holes NOW, 30 miles on the L.I.Expy is tough enough on a car or truck, much less a trailer. This will help keep the crack from progressing any further, while you get it to the shop.
__________________
 2003 T-2570
2012 Silverado 1500 LT Crewcab. 9500 GTW rated.
Larry
|
|
|
|
|
09-03-2022, 07:18 AM
|
#13
|
|
Senior Member
Join Date: Sep 2007
Location: New York
Posts: 101
SUN #402
|
Hi Justaguitar &Torskdoc423,
Thanks for the drilling advance but the welding part is not something I'll try.
__________________
|
|
|
|
|
10-19-2022, 06:38 AM
|
#14
|
|
Senior Member
Join Date: Sep 2007
Location: New York
Posts: 101
SUN #402
|
Hi All,
So my Sunline is out for repairs of the "I" beam crack between the wheels and on both beams. Welding estimate is $210.
They're also telling me that I need new leaf springs and shackles and bolts and etc.
For $ 735. I'm a little concerned since the trailer axles were flipped in early 2021.
Only two almost 1K trips since the flip. 2021 & 2022. And leaf springs & etc were OK then but have deteriorated since then. Guess it's possible but - after 2 years. The trailer is a Sunline 2753 manu. 2005 & on the road since 2006. So for 16 years everything was fine. I'm just surprised that this leaf spring problem - was missed in 2021 or is a result of the axle flip. Any thoughts?
Brad
__________________
|
|
|
|
|
10-19-2022, 06:41 PM
|
#15
|
|
Moderator
Join Date: Nov 2006
Location: Ohio
Posts: 12,651
SUN #89
|
Hi Brad,
This may help you. This link will take you to the NHTSA web site with where the LCI recommended fix is listed. The frame web cracking originally showed up on heavier campers and this is not limited to Sunline, many of the RV manufactures using the I beam frame have this issue. Thus the NTHSA hosting a correction.
https://static.nhtsa.gov/odi/rcl/201...1V486-1111.pdf
Your smaller camper is now the second smaller framed camper I have seen with these web cracks above the spring hangers in the I beam frame. Yes, I found another one about 2 weeks ago, it was on a lighter camper then yours, but it has many more miles on it. I will do a post on this in the future
From what I have seen, the issue is the flexing of the hangers in a turn. Over time, the flexing creates metal fatigue in the center area of the I beam web and then the frame web cracks. Consider having your welder look into adding the "axle retro" procedure on page 2 if you plan on doing a good number of more miles with the camper. Those cross supports between the hangers help reduce the lower flange of the I beam flexing, which is the root cause in my view of the original problem.
Now to your springs and shackles. A few things to realize, the standard thin 1/4" shackle setup on any camper, any brand, do and will wear as the miles add up. Dexter recommends in their manuals that every 6,000 miles the suspension be checked for wear. They do not say how to do the check, just to check it. From what I have seen, at approx. 8,000 to 10,000 miles the standard nylon bushing will have worn through some of them, that the spring pins are grinding on the leaf springs. And the equalizer bushing center pin is grinding into the equalizer casting. All this wear then accelerates the shackle plates wear to the point the pins start to slip and then even more accelerates the wear in the shackle plates and oblong the pin holes.
The only way I have found to find this damage at the 8,000 to 10,000 mile mark, is to take the suspension apart. The 6,000 mile maintenance check would find this issue starting before the damage occurred, but you have to take the suspension part to find it. And at that 6K mark, change the nylon bushings if you are going to stay with them.
I have not seen your springs, but I surmise the wear you have was in your suspension before the axle flip, and it was not noted during the axle flip, or they did not look close enough to find it. I can't second guess what they did, they may have reasons it was not brought up. The spring eyes may be now worn to the point where the inspection found the wear and this shop is recommending new springs.
Ask what they are going to rebuild the system with? The same original suspension, just new? If they are, ask for the cost upgrade to go to heavy duty shackles (1/2" thick shackle plates) with bronze bushings and wet bolts. The wet bolt has a grease fitting in every spring pin. I also would request they put "all" the grease fittings facing outwards towards the tires. Then use 45 degree grease zerks so you do not have to crawl under the camper to grease them. They need greasing about every 3,000 miles. While the bronze is not perfect due to the way the springs are made, the bronze can crack over time due the springs not made with 100% support to the bushing, they are still many times better then the standard nylon. The labor to rebuild with the standard suspension is the same other then changing the grease fittings.
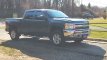
See here for the upgraded shackles with the 45 degree grease fittings on the outside. This is the same frame setup as yours. Same tire size too just a different smaller model Sunline

At the spring hangers

Here is another HD shackle upgrade and a rubber equalizer on a camper with the over/under axle. Grease fittings are on the outside. This frame is different then yours.
Bronze bushing in leaf spring. You can see how tight this spring eye curl is, it is better then most. But, the ends for the bushing are not 100% supported as the spring eye curl has a radius removing the metal.

These are still the old wheels, they have been changed since this pic
Dexter, MorRyde and Lippert all make the HD shackle kit with wet bolts. They are all good, I use both the Dexter and the MorRyde pending if I need a new rigid equalizer as Dexter makes a kit with the new equalizer and the HD wet bolt combo. I do change the center pin in the equalizer to have the grease fitting on the head of the pin, pointing outward. I have not used the Lippert kit yet.
Hope this helps
John
__________________
Current Sunlines: 2004 T310SR, 2004 T1950, 2004 T2475, 2007 T2499, 2004 T317SR
Prior Sunlines: 2004 T2499 - Fern Blue
2005 Ford F350 Lariat, 6.8L V10 W/ 4.10 rear axle, CC, Short Bed, SRW. Reese HP trunnion bar hitch W/ HP DC
Google Custom Search For Sunline Owners Club
|
|
|
|
|
10-20-2022, 12:37 PM
|
#16
|
|
Senior Member
Join Date: Sep 2007
Location: New York
Posts: 101
SUN #402
|
Hi JohnB,
The mechanics are planning on replacing my parts with parts that are equal to the original.
4 new leaf springs, shackles and the bolt kit for the $735 price. The welding is $210.
The upgrade to the wet bolt system would be about $300+.
I have at least 12K in mileage (maybe a bit more) for the 16 years the Sunline has been on the road. So I guess this repair is overdue? Is the upgrade worth it or not?
Thanks for your good explanations
Brad
__________________
|
|
|
|
|
10-20-2022, 07:36 PM
|
#17
|
|
Moderator
Join Date: Nov 2006
Location: Ohio
Posts: 12,651
SUN #89
|
Quote:
Originally Posted by flbradjr

snip..
The upgrade to the wet bolt system would be about $300+.
I have at least 12K in mileage (maybe a bit more) for the 16 years the Sunline has been on the road. So I guess this repair is overdue? Is the upgrade worth it or not?
Thanks for your good explanations
Brad
|
Hi Brad,
Thanks for the good words, greatly appreciated.
Where you overdue on your suspension? Yes, ask the shop to save the old worn parts so you can see it for yourself. If you want to read, see more on worn suspension, let me know. We have several posts showing what others have had also.
Now to, is $300+ worth it? This comes down to each of us on how we are going to use the camper. In my case, my camper weighs 1.5 to 2X more then yours, yet it came with the same pins, nylon bushings and rigid equalizer as yours. The more weight on the same system, the wear is even faster.
We now have close to 45,000 miles on our T310 and 35,000 to 38,000 of them are with my one set of bronze bushings. At the moment, I am at 35K -38K miles and counting on the cost of the HD upgrade to spread the cost over. I feel I can still get another 20K miles from them as long as I keep after the grease. I do have 2 split bushings from the lack of bushing support in the spring eye, but it still works, at least for a while. I keep an eye on them. I was lucky, my spring eyes are curled very tight and that helps.
For you, rebuilding the suspension with the standard setup will give you 6,000 miles without too much worry. And if you are preemptive and just change the bushings between 6,000 to 7,000 mile mark, and then go again, that will work. However, the cost at a shop to rebuild to the standard system at that 6 to 7K mark may be the cost of the upgrade.
This comes down to, how many more miles will you put on the camper? And when do you want to invest in the next rebuild? If you do rebuild at the 6,000 mile mark, the springs should still be good, all you should need is bushings and maybe some pins as they get rusted up and galled trying to get them apart.
It is not a bad thing to rebuild with the stock setup, just keep a log book on your camper mileage. Without the log book it is hard to be accurate. Then if and when the day the mileage gets high enough, make your decision then.
Hope that give you somethings to think through. Bottom line, long miles makes the upgrade worth it. Shorter miles, not so much.
John
__________________
Current Sunlines: 2004 T310SR, 2004 T1950, 2004 T2475, 2007 T2499, 2004 T317SR
Prior Sunlines: 2004 T2499 - Fern Blue
2005 Ford F350 Lariat, 6.8L V10 W/ 4.10 rear axle, CC, Short Bed, SRW. Reese HP trunnion bar hitch W/ HP DC
Google Custom Search For Sunline Owners Club
|
|
|
|
|
10-21-2022, 10:11 AM
|
#18
|
|
Senior Member
Join Date: Sep 2007
Location: New York
Posts: 101
SUN #402
|
Hi JohnB,
Yes I would like to read & see more on worn suspension. I found one but would like to read more.
Thanks, Brad
__________________
|
|
|
|
|
10-21-2022, 09:18 PM
|
#19
|
|
Moderator
Join Date: Nov 2006
Location: Ohio
Posts: 12,651
SUN #89
|
Quote:
Originally Posted by flbradjr
Hi JohnB,
Yes I would like to read & see more on worn suspension. I found one but would like to read more.
Thanks, Brad
|
Hi Brad,
Not sure which you found, but here are some of them with pics of others campers with worn suspension. I'm sure we have more, but this should get you started. Some of these links will drop you in the middle of a post which talks about things beyond just worn suspension.
https://www.sunlineclub.com/forums/f...ter-18529.html
https://www.sunlineclub.com/forums/f...ued-18949.html
https://www.sunlineclub.com/forums/f...tml#post157797
https://www.sunlineclub.com/forums/f...tml#post155084
https://www.sunlineclub.com/forums/f...ity-19676.html
This is one of my earlier conversions to the HD shackles from 2009. I am still running those same bronze bushings today in most all locations. One that cracked too much I replaced with a Never-Fail plastic bushing as a test. The test is still on going. The other bronze cracked bushing was, the end chipped off, I replaced with another bronze one.
https://www.sunlineclub.com/forums/f...pics-9839.html
Happy reading
John
__________________
Current Sunlines: 2004 T310SR, 2004 T1950, 2004 T2475, 2007 T2499, 2004 T317SR
Prior Sunlines: 2004 T2499 - Fern Blue
2005 Ford F350 Lariat, 6.8L V10 W/ 4.10 rear axle, CC, Short Bed, SRW. Reese HP trunnion bar hitch W/ HP DC
Google Custom Search For Sunline Owners Club
|
|
|
|
|
10-28-2022, 07:29 AM
|
#20
|
|
Senior Member
Join Date: Sep 2007
Location: New York
Posts: 101
SUN #402
|
2753 repairs
Hi JohnB,
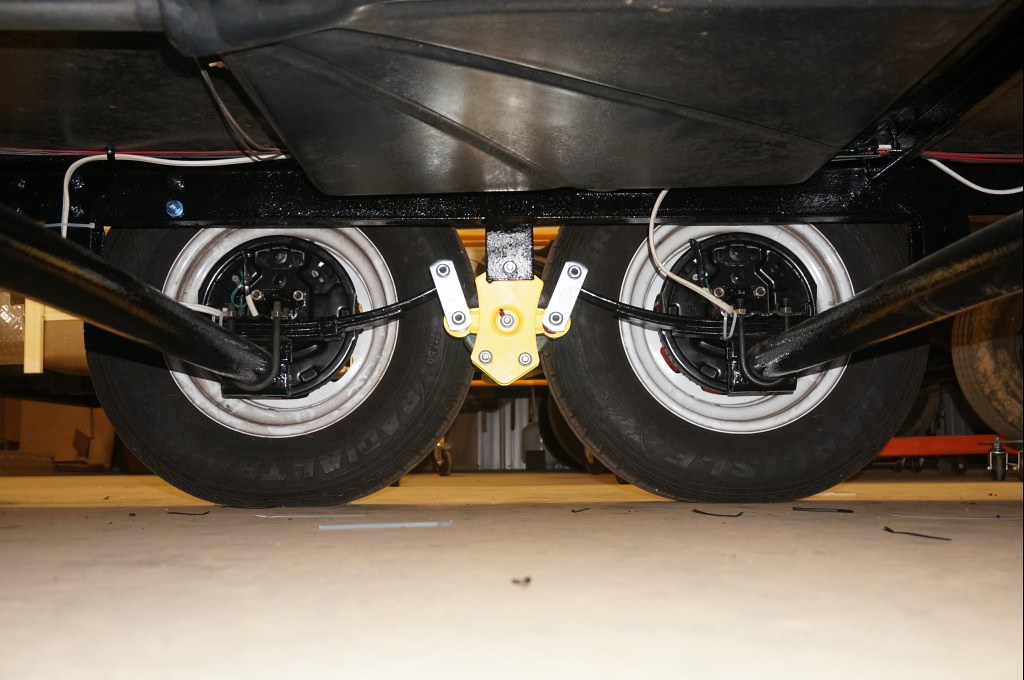
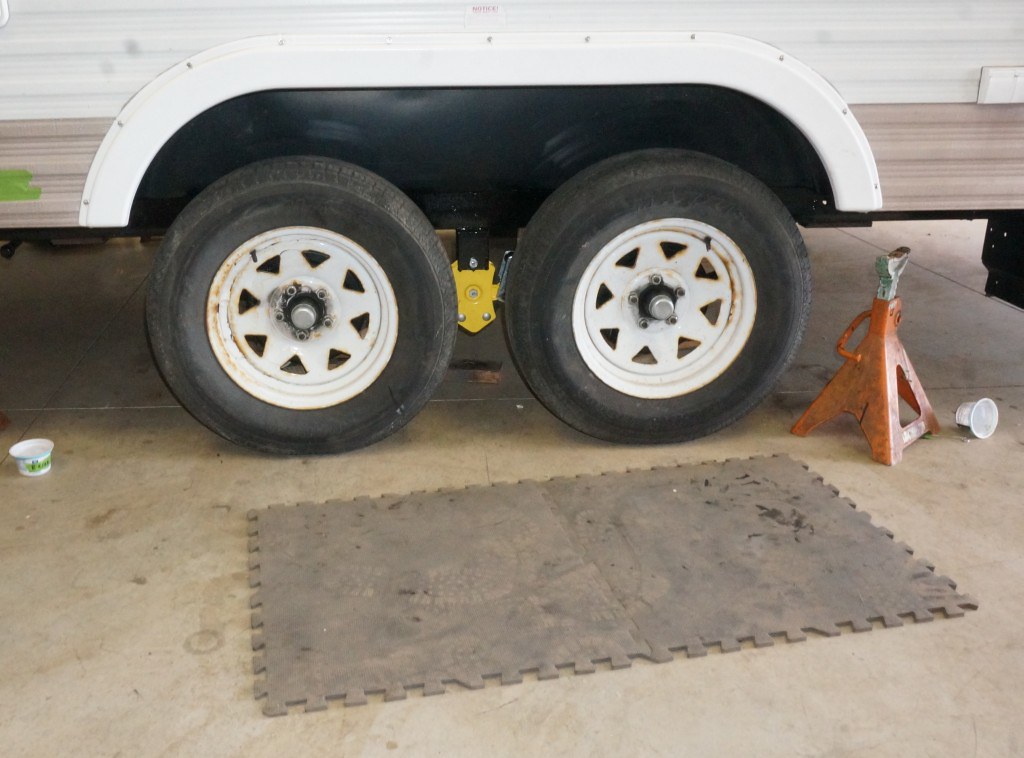
The 2753 is back home. Crack repair done with Line Weld - not a plate like I envisioned.
4 leaf springs replaced, plus shackles and bolts. See attached pics. Total $1K
IMG-0943.jpg Passenger Side not sure if this worked!!
Brad
IMG-0944.jpg Drivers Side
__________________
__________________
|
|
|
|
|
|
|
Currently Active Users Viewing This Thread: 1 (0 members and 1 guests)
|
|
|
 Posting Rules
|
You may not post new threads
You may not post replies
You may not post attachments
You may not edit your posts
HTML code is Off
|
|
|
|
 » Recent Sunline Discussions
 |
|
|
|
|
|
|
|
|
|
|
|
|
|
|
|
|
|
|
|
|
|
|
|
|
|


 Linear Mode

