 |
|
 03-29-2010, 12:54 PM
|
#1
|
|
Senior Member
Join Date: Mar 2008
Posts: 351
SUN #549
|
Homemade Travel Trailer Project
Although not really Sunline related, I figured some folks on here would be interested in my latest project.
My brother and I have been talking about building him a small travel trailer for a little over a year now. There's a few goals for the project:
- Small enough and light enough to be towed with his Nissan Xterra
- Hopefully not requiring weight distribution, just a friction bar for safety
- Comfortable for two people
- Bath facilities
- Small cooking facilities for those rainy days or late nights
- Self contained
- Climate controlled, with A/C for those hot summer nights
- Very affordable (say $2000 or less)
I've been looking on and off for a suitable donor to get us going. I found several over the past year, and no matter how quickly I called they were always already sold. Finally, the stars aligned for us and I found this for sale on craigslist:
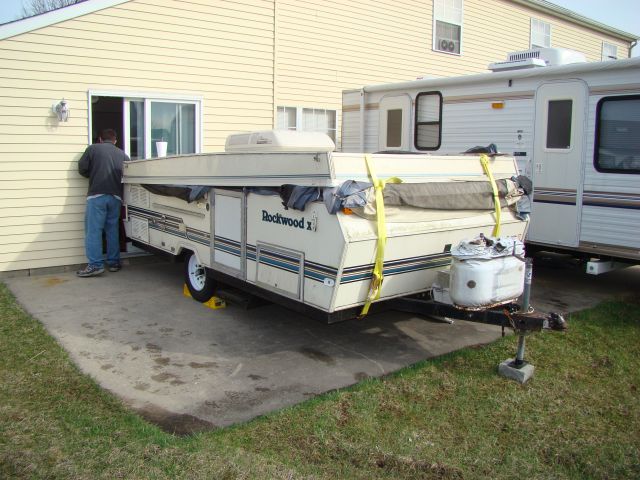
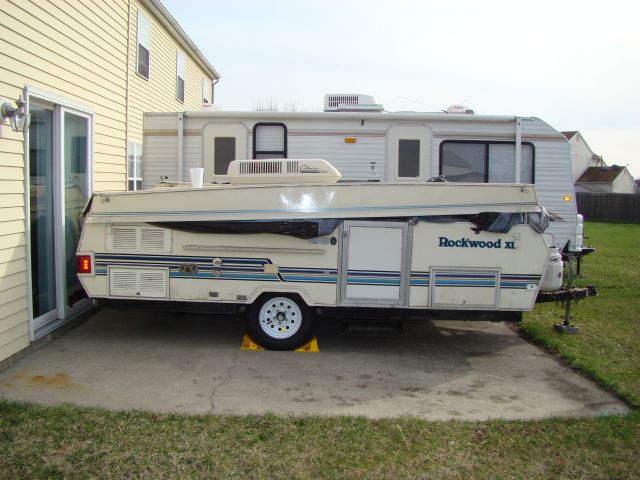
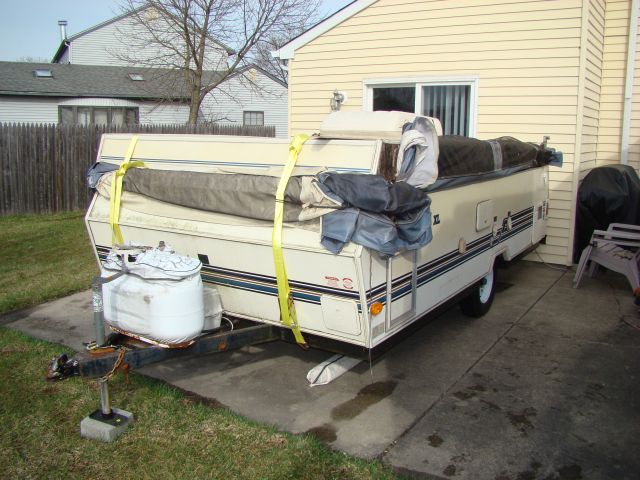
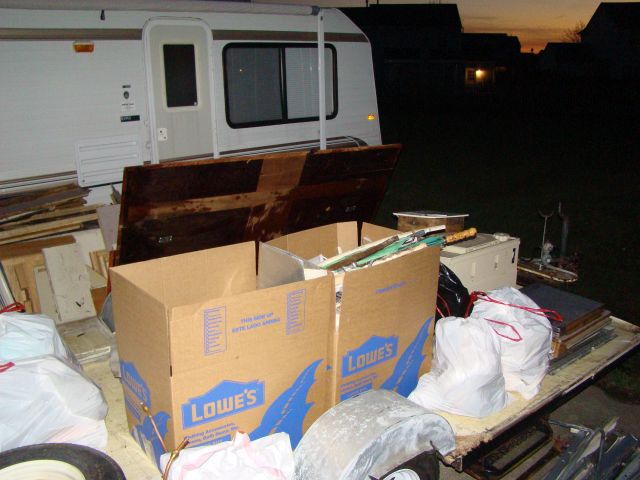
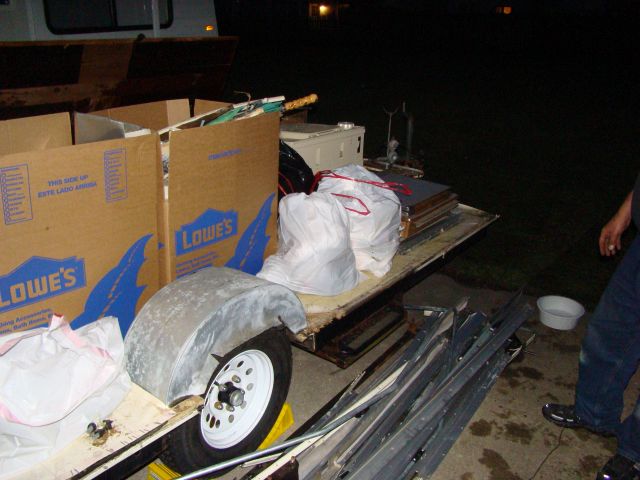
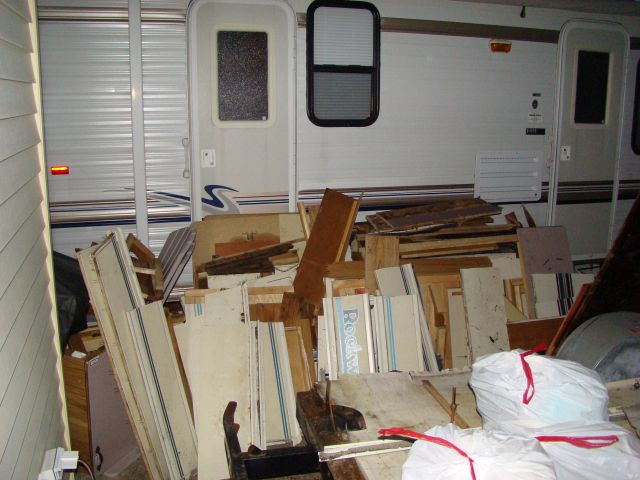
It's a 2003 Rockwood XL pop-up, fully loaded. We paid $200 for the unit and picked it up this past Saturday. As you might guess from the pictures, the roof is completely rotten and the lift mechanism has failed. We also had to pick up a pair of wheels and tires to get it home safely, as the existing tires were completely rotten.
It has a 7' wide, 16.5' long frame, with stabilizing jacks in each corner and a 3500# Torsion Axle ("rubber ride") with 10" brakes. Dual LP rack up front with an auto-changeover regulator.
The "appliances" are all in excellent mechanical condition, I don't believe this unit was used much. Thankfully the previous owner began tarping the trailer when he saw the leak, so nothing inside ever got wet. We have the following to work with:
- Coleman 13,500 BTU roof mounted A/C
- Dometic 3-Way Fridge/Freezer
- Hydro Flame Furnace
- Suburban Water Heater
- Water Pump
- Large fresh water tank (I need to calculate the volume)
The unit also has a cooktop, small sink, shower pan, cassette toilet and converter. I do not expect to use any of those parts in the new build.
The next step is to remove the appliances and then strip the body down to the bare frame. I hope we can get to that later this week. The frame will then be cleaned and painted, and we will begin building the new body.
He has not decided on a floorplan just yet, but we do have a half dozen or so possibilities lined up. At the moment, the frontrunner is a clone of the Que SE.
Here's a few more pictures of the "donor" to hold everybody over 
More pictures and details as we make some progress!
- Frank
__________________
|

|

|
|
03-29-2010, 05:37 PM
|
#2
|
|
Moderator
Join Date: Nov 2006
Location: New York
Posts: 1,920
SUN #98
|
Frank,
Very Cool  That's going to be one neat project.
Looking forward to hearing and watching the progress.
Hutch
__________________
Mary & Tom (aka Hutch)
2015 Jayco Eagle Premier 361REQS
2014 GMC Sierra 3500HD 4x4 CC D/A
Sunlines: 2005 Solaris T-280SR; 1999 Solaris T-2670; 1998 Saturn T-24A
|
|
|
|
|
03-29-2010, 07:04 PM
|
#3
|
|
Moderator
Join Date: Nov 2006
Location: Ohio
Posts: 12,649
SUN #89
|
Frank
A 2003, loaded with goodies for $200 bucks...WOW. That is a find. It is also amazing on a unit that new how miss loved it is.... My goodness.
Actually for about ~ 300 to $500 you can rebuild it as a PU. My son did on his older 78 Starcraft. Rot went thru floor, walls, etc. 5 sheets of 3/4 pressure treated plywood and we rebuilt it. It cost him $350.
There are some RV Surplus places that you can build and entire camper out of. I was in one in Elkhart last year. Wish they where closer.
Really looking foward to seeing the progress as I have seen your outstanding handy work before and it's good.
John
__________________
Current Sunlines: 2004 T310SR, 2004 T1950, 2004 T2475, 2007 T2499, 2004 T317SR
Prior Sunlines: 2004 T2499 - Fern Blue
2005 Ford F350 Lariat, 6.8L V10 W/ 4.10 rear axle, CC, Short Bed, SRW. Reese HP trunnion bar hitch W/ HP DC
 Google Custom Search For Sunline Owners Club
|
|
|
|
|
03-29-2010, 07:56 PM
|
#4
|
|
Senior Member
Join Date: Mar 2008
Posts: 351
SUN #549
|
Quote:
|
Originally Posted by JohnB
Frank
A 2003, loaded with goodies for $200 bucks...WOW. That is a find. It is also amazing on a unit that new how miss loved it is.... My goodness.
Actually for about ~ 300 to $500 you can rebuild it as a PU. My son did on his older 78 Starcraft. Rot went thru floor, walls, etc. 5 sheets of 3/4 pressure treated plywood and we rebuilt it. It cost him $350.
There are some RV Surplus places that you can build and entire camper out of. I was in one in Elkhart last year. Wish they where closer.
Really looking foward to seeing the progress as I have seen your outstanding handy work before and it's good.
John
|
Oops, my fingers got ahead of my brain earlier. It's actually a 1993, not a 2003. I don't know what I was thinking. Regardless, the body is shot, but the appliances and such are in amazing shape for their age. My '02 dometic fridge has more rust on the rear coils than this '93 does, and the A/C doesn't have as much as a bent fin.
I'm considering dragging him out to Elkhart for a couple days to hit RV Surplus & Bontragers. From what I've seen online, the prices and selection are just incredible, and we could get things there (like the paneling) that is very hard to find locally. The 10 hour one-way drive makes it a minimum 3 day deal, so we're still discussing that option.
John, once he settles on a floor plan, I will need some assistance with calculating tongue weight. I'd like to know if I need to shift that axle before we start framing.
I'm very excited for this project, it should be a lot of fun. A big plus is that it's a chance to work with my brother who I don't see often as he lives 2 hours away.
Meanwhile, parts have started to come in. Just picked up a brand new entry/screen door assembly for $140.
- Frank
__________________
|
|
|
|
|
03-29-2010, 08:24 PM
|
#5
|
|
Moderator
Join Date: Nov 2006
Location: Ohio
Posts: 12,649
SUN #89
|
Quote:
|
Originally Posted by frank
I'm considering dragging him out to Elkhart for a couple days to hit RV Surplus & Bontragers. From what I've seen online, the prices and selection are just incredible, and we could get things there (like the paneling) that is very hard to find locally. The 10 hour one-way drive makes it a minimum 3 day deal, so we're still discussing that option.
John, once he settles on a floor plan, I will need some assistance with calculating tongue weight. I'd like to know if I need to shift that axle before we start framing.
I'm very excited for this project, it should be a lot of fun. A big plus is that it's a chance to work with my brother who I don't see often as he lives 2 hours away.
- Frank
|
Yes RV Surplus has the paneling and the thin diamond plate stone shield material too. They have windows, cargo hatches, doors out the ying yang, fresh tanks, black tanks, sinks, you name it. My kind of goodie store. Have not been to Bontragers. Will put that on the list for next time.
I know you are probably rushed, but if it works out we are near Columbus Ohio and sort of in-between MD and Elkhart. Bring the camper and camp on the way. I can point you to a camp grounds 20 minutes from the house here and join you and where you can get a nice CG about 20 minutes from Elkhart. And the RV hall of Fame is there too. If you are trying to do all this in 3 days
Well leave real early and tag team drive.
You will be at the Surplus stores at least a good day to 3/4 of one for sure. Cindy kept pestering, arent you done yet
. LOL
The tongue weight calc's no problem. All you need is the distance the tow ball is from the axle and then what each object weighs and the distance from either the axle or to ball of that object. The rest is a math exercise. A bath scale will work for weighing. If youre handy with an Excel spread sheet this can be make it easier for moving things around then doing it long hand and over again.
Let me know when your ready.
Good luck
John
__________________
Current Sunlines: 2004 T310SR, 2004 T1950, 2004 T2475, 2007 T2499, 2004 T317SR
Prior Sunlines: 2004 T2499 - Fern Blue
2005 Ford F350 Lariat, 6.8L V10 W/ 4.10 rear axle, CC, Short Bed, SRW. Reese HP trunnion bar hitch W/ HP DC
Google Custom Search For Sunline Owners Club
|
|
|
|
|
04-04-2010, 08:18 AM
|
#6
|
|
Senior Member
Join Date: Mar 2008
Posts: 351
SUN #549
|
Some progress to report for this week.. nothing too exciting just yet, but progress is progress.
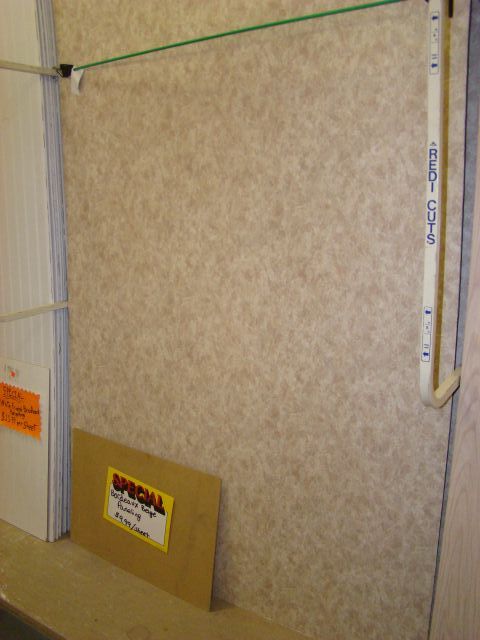
Most of the parts and materials are pretty easy to source. Paneling is the one big exception. Three hours of non-stop phone calls chasing leads and I finally found a surplus building materials store with some paneling in stock. Took a ride there Wednesday after work and was pleasantly surprised to find a large pile of this 1/8" luann based stuff at $9.99/sheet:
That should cover us for the walls, I still need to locate something decent in white for the ceiling.
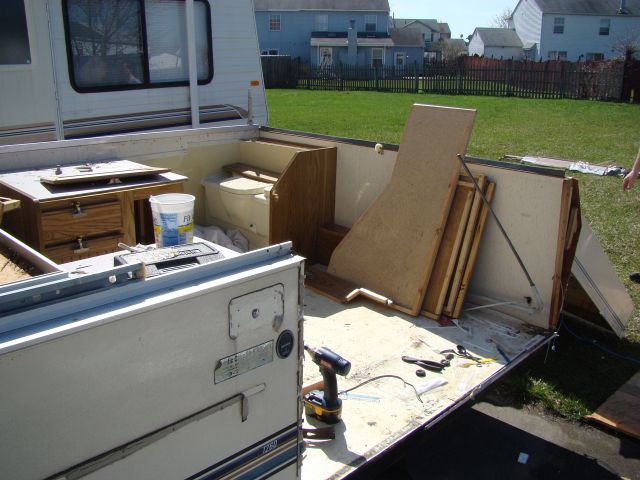
Time for some real work - On Thursday, my brother and my father came down and we started disassembly.
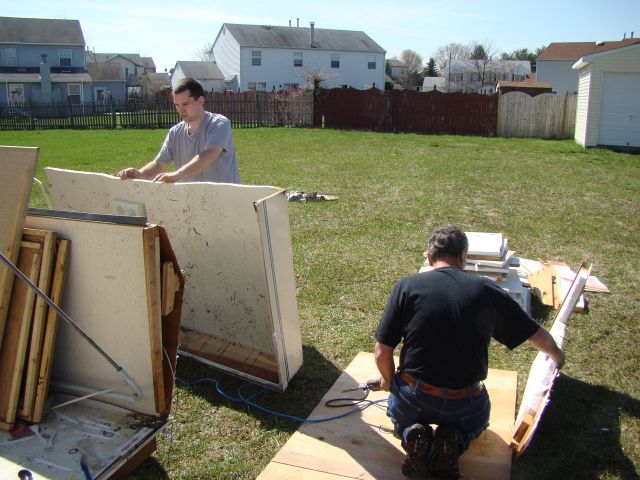
..and a few hours later
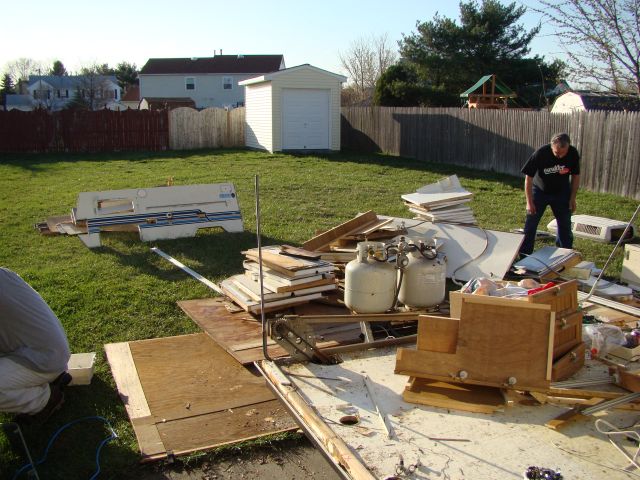
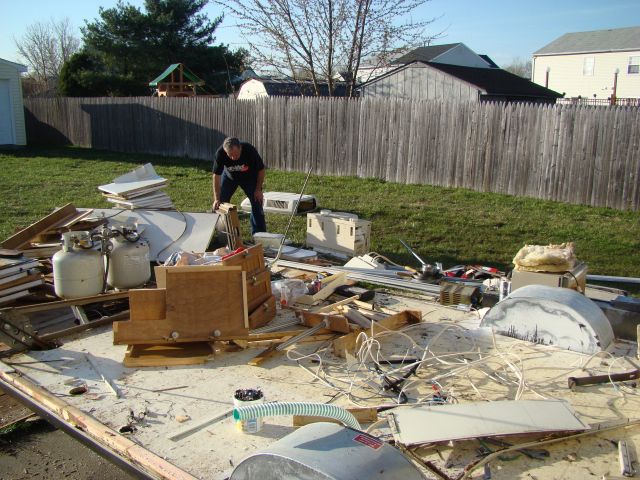
By nightfall, we had it down to the floor and quite the pile of junk stacked up
The scrappers will love me this week for the big pile of metal we wound up with.. Hopefully the garbage men will take the old cabinet hunks and the trailer sides. Hoping to get rid of about half of it this week, and the rest next week.
Fast forward to Saturday, and it's time for more work. Rolled the carcass around front into the driveway where I have access to compressed air and more outlets. First we removed the floor and the under-floor fresh water tank, then dropped the axle and put the frame up on saw horses
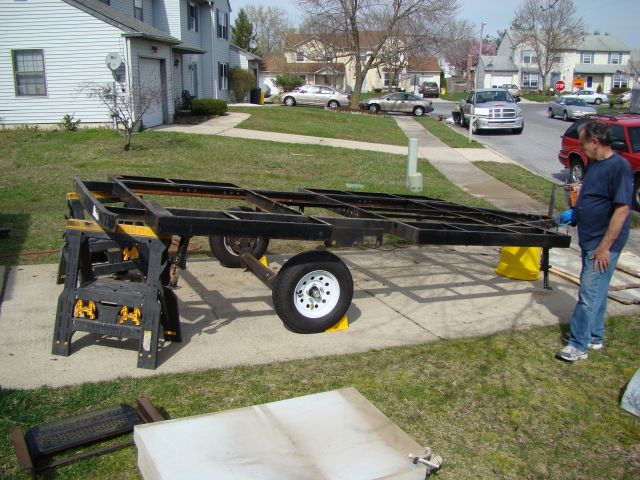
The water was leaking into the body a lot more than it appeared. Apparently it worked it's way through some holes in the floor and was accumulating in the left side frame rail. Some nasty rust going on here, and depending on how it looks when all cleaned up, this area may need a reinforcement welded in. In this picture you can also see where the rearmost cross-member has been removed to make room for a grey water tank.
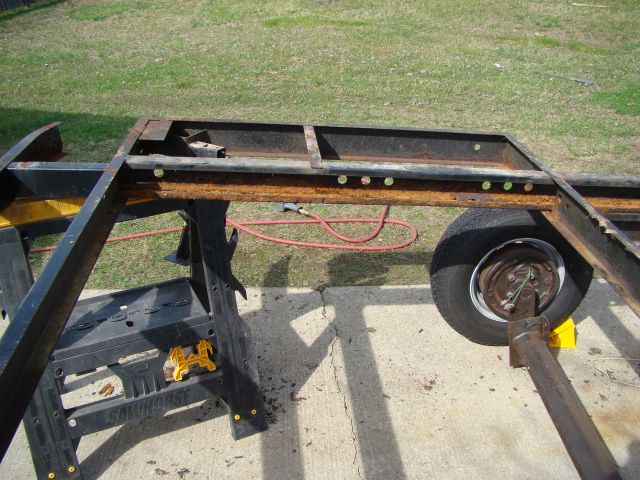
Three guys, three angle grinders plus six hours of grinding, sanding and wire wheeling gets a little less than half of the frame cleaned up and primered:

Getting inside those frame rails is a real bear and chews up a lot of time.
One more good day of work should get the rest of the frame cleaned up and in primer. We also need to remove the rear bumper and possibly reinforce that rear frame section, although once cleaned a bit, it appeared better than it initially looked. We'll see.
Once he decides on his floor plan I will know if I need to shift the axle. I'm hoping we can arrange things to work as-is, since moving all those cross members will take a bunch of work. Also thinking of giving it a 1-1.5" lift.
With a little luck, we'll get this frame buttoned up on Thursday.
- Frank
__________________
|
|
|
|
|
04-04-2010, 08:45 AM
|
#7
|
|
Moderator
Join Date: Nov 2006
Location: Ohio
Posts: 12,649
SUN #89
|
Frank
WOW, Cool!. This is my kind a project
. Can I come play too?
As I saw your pile it brought back memories on how Cindy and I got into RVing. Son brings home a 25 year old Starcraft PU from his fiancés parents and it had a soft spot in the floor
. He said, Dad Im just going to fix soft spot
. I said Ben, do you know how they build these things? No problem Dad. OK. OK
. Well 3 hours later he had a pile like yours in the shed. Just in bigger chucks as he was reusing the cabinets etc. The rot went everywhere. Up the walls, all over the floor
So he had it down to the bare frame. I said Ben, go to the lumber yard and get 5 pieces of 3/4 pressure treated plywood and we will start over. And he did. He had like ~ $300 in materials and 3 months later we rebuilt the entire thing. It looked good. DW and I used it twice that year and well, the rest is history. That was 3 campers ago
Amazing you can tear it down in less then a day
. And take months to put it back together.
Good luck and keep that camera handy. Im excited just to see the progress.
White Paneling, RV Surplus in Elkhart had some last summer. 2 sheets would do ya. http://www.rvsurplus.net/ There web site does not have a fraction of what is in that building. It is odds and ends of most everything so its hard to list as a normal for sale item.
John
__________________
Current Sunlines: 2004 T310SR, 2004 T1950, 2004 T2475, 2007 T2499, 2004 T317SR
Prior Sunlines: 2004 T2499 - Fern Blue
2005 Ford F350 Lariat, 6.8L V10 W/ 4.10 rear axle, CC, Short Bed, SRW. Reese HP trunnion bar hitch W/ HP DC
Google Custom Search For Sunline Owners Club
|
|
|
|
|
04-04-2010, 09:09 AM
|
#8
|
|
Moderator Emeritus
Join Date: Aug 2006
Location: West Virginia
Posts: 2,289
SUN #17
|
Not sure if they still carry it but check in LOWES ( ) in the bathroom section. They used to carry 4 x 8 sheets of white slightly pebble textured stuff. It is not wood paneling, more like a plastic panel. Used for shower/tub surrounds. That would probably make a pretty good ceiling.
Kitty
__________________
Sunny #18 2003 F-344SR #8157
Sunny #19 1997 T-2653 #5485
1999 Ford F350XLT DRW Crew Cab, Long bed 7.3 PSD
2002 VW Jetta TDI.. AKA: Kitty's Kruiser

|
|
|
|
|
04-05-2010, 08:10 AM
|
#9
|
|
Senior Member
Join Date: Mar 2008
Posts: 351
SUN #549
|
Quote:
|
Originally Posted by JohnB
Frank
WOW, Cool!. This is my kind a project
. Can I come play too?
As I saw your pile it brought back memories on how Cindy and I got into RVing. Son brings home a 25 year old Starcraft PU from his fiancés parents and it had a soft spot in the floor
. He said, Dad Im just going to fix soft spot
. I said Ben, do you know how they build these things? No problem Dad. OK. OK
. Well 3 hours later he had a pile like yours in the shed. Just in bigger chucks as he was reusing the cabinets etc. The rot went everywhere. Up the walls, all over the floor
So he had it down to the bare frame. I said Ben, go to the lumber yard and get 5 pieces of 3/4 pressure treated plywood and we will start over. And he did. He had like ~ $300 in materials and 3 months later we rebuilt the entire thing. It looked good. DW and I used it twice that year and well, the rest is history. That was 3 campers ago
Amazing you can tear it down in less then a day
. And take months to put it back together.
Good luck and keep that camera handy. Im excited just to see the progress.
White Paneling, RV Surplus in Elkhart had some last summer. 2 sheets would do ya. http://www.rvsurplus.net/ There web site does not have a fraction of what is in that building. It is odds and ends of most everything so its hard to list as a normal for sale item.
John |
John,
Better be careful what you offer or I'll volunteer you for some work!
With a little luck, they will be back on Thursday so we can finish getting the frame all cleaned up. Then I can make a judgement call on the state of that left side main rail.
I'm hoping we can have this all buttoned up by June. It would be really nice if he could drag this out for the weekend at Buttonwood. Not sure just yet how realistic that is, but I certainly want him camping in it this summer.
Should also have some drawings this week. He's still a bit indecisive on the floorplan.
Still working to try to find a way to get us out to Elkhart for a shopping spree. I'd love to make one trip and grab a big majority of the parts we need. I know at a minimum that I would need to borrow a larger truck for that trip, since my short bed can't take a sheet of ply without the tailgate down. 
More soon!
- Frank
__________________
|
|
|
|
|
04-05-2010, 08:14 AM
|
#10
|
|
Senior Member
Join Date: Mar 2008
Posts: 351
SUN #549
|
Quote:
|
Originally Posted by kanyonkitty
Not sure if they still carry it but check in LOWES ( ) in the bathroom section. They used to carry 4 x 8 sheets of white slightly pebble textured stuff. It is not wood paneling, more like a plastic panel. Used for shower/tub surrounds. That would probably make a pretty good ceiling.
Kitty
|
Thanks Kitty!
I believe you are describing what is called "FRP." I think it stands for Fiberglass Reinforced Plastic, and it's a mainstay in commercial bathrooms and other places that are often wet.
I believe we are going to use that stuff to make the shower surround. The only "catch" with it is that it needs to be glued to some sort of backing. It's pretty heavy stuff on it's own, but with the addition of the backing I think it's a bit too heavy for the ceiling. We're on a really tight weight budget
- Frank
__________________
|
|
|
|
|
04-05-2010, 05:50 PM
|
#11
|
|
Senior Member
Join Date: Apr 2007
Location: New York
Posts: 1,846
SUN #264
|
Frank,
Check with someone who supplies building materials for farm buildings. There is a version of that pebbly plastic sheeting with a backing that is used for lining stalls and other areas that need to be hosed out routinely.
That may solve your shower challenge. Don't have any info on weight of the stuff either.
__________________

'12 F250 4x4 Super Duty PowerStroke 6.7 diesel
2011 to present: '11 Cougar 326MKS
1999 to 2011: '99 Sunline T-2453
SUN264 * Amateur Radio kd2iat monitoring 146.52
|
|
|
|
|
04-05-2010, 06:30 PM
|
#12
|
|
Senior Member
Join Date: Jun 2007
Location: New Hampshire
Posts: 1,025
SUN #292
|
Shower
We added a dry shower to our small trailer.
Our walls consist of a layer of luan forming the outside of the shower walls. These three pieces each have a 1 x 1 inch piece on the bottom and top edges. Another 1 x 1 in each corner forming a laun 'U".
I than attached a layer of 3/4 inch foam to the inside surface of the laun, blue or pink foam from HD or Lowes. The foam does not absorb water. The foam is glued to the Luan using foam construction adhesive. This really stiffens the Luan.
The foam is govered with white vinyl to create the inside of the shower. I bought a tub surround from HD for $60-90, the cheapest one I could find. I cut the tub surround into pieces to cover the shower walls. The vinyl is very thin and light, probably a 1/16th.
They sell a number of different tub surrounds. I looked for the lightest, least expensive that provided enough material.
The shower floor is raised about 3-4 inches to allow the incorporation of a trap.
I also used a piece of vinyl to make the floor. To prevent it from leaking at the floor level I used right angle channel in the floor wall joint sealing it with tub caulk. This is the least clever portion of the solution. It
is a very lightweight solution; and has not leaked.
I did add a plastic bubble over the shower to provide additional head room. It truly brightens the shower. Our shower is 24x24 inches.
Hope this sparks some ideas
__________________
Norm and Ginny Milliard
1982 Sunline 15.5 SB
2004 Honda CRV 4 cyl, manual
|
|
|
|
|
04-05-2010, 06:36 PM
|
#13
|
|
Senior Member
Join Date: Jun 2007
Location: New Hampshire
Posts: 1,025
SUN #292
|
By the way I find what you're doing to be very interesting. I like small trailers. Last night we were invited into a large, 38 ft, 4 slide out, fifth wheel. The wife was complaining about the size of her kitchen.
My wife broke out in laughter and invited her down to our trailer. (Ours would have fit into their living room with space left over.) Of course they must have thought us crazy than I piled on and said we had lived in it for 10 moths last year.
I think it's neat that you're staring from the ground up. BEst of luck and have fun. I 'm sure it will be memorable, I'm sure the building will create as many memories as the trips you take in it.
safe building
__________________
Norm and Ginny Milliard
1982 Sunline 15.5 SB
2004 Honda CRV 4 cyl, manual
|
|
|
|
|
04-06-2010, 08:38 AM
|
#14
|
|
Senior Member
Join Date: Mar 2008
Posts: 351
SUN #549
|
Thanks Steve & Norm. I will look a little further into the FRP and see what else is available, aside from the big box stores.
A local dealer can get me a 24x32 acrylic pan for under $100, which seems pretty reasonable. Waiting to hear what he can do on a matching surround.
Hopefully more updates soon.
- Frank
__________________
|
|
|
|
|
04-14-2010, 04:57 PM
|
#15
|
|
Senior Member
Join Date: Mar 2008
Posts: 351
SUN #549
|
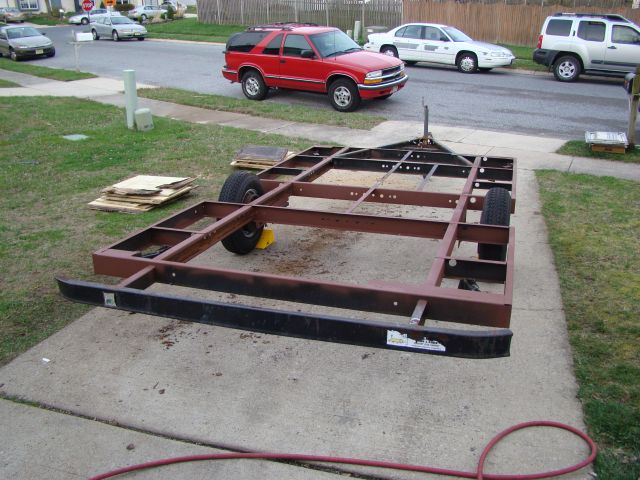
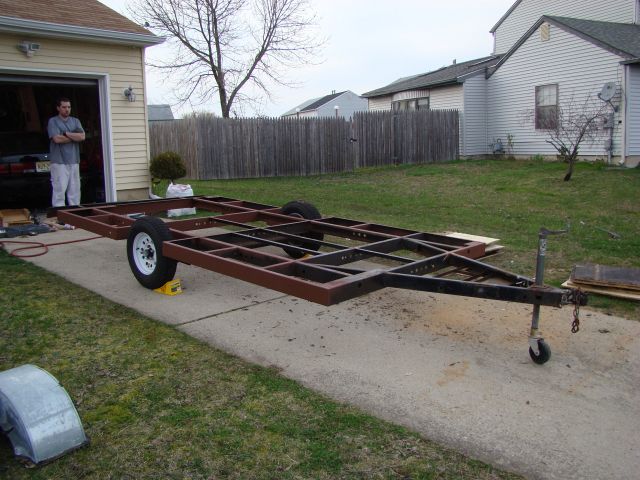
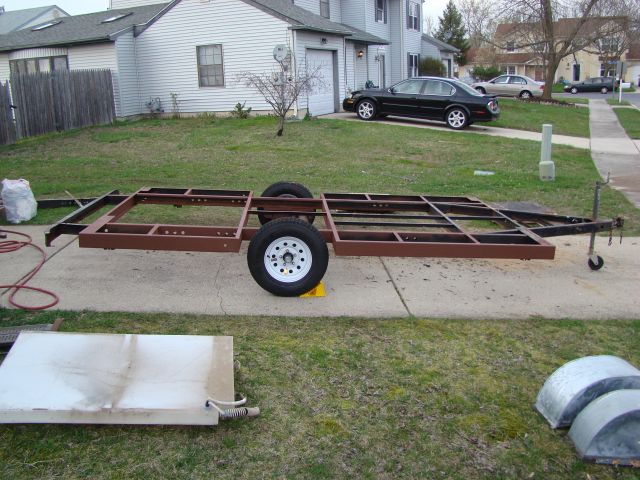
We've made some progress - the frame is nearly all cleaned up and in primer. It should be totally cleaned up by the end of the day tomorrow. In addition, tons of parts have been ordered and have begun to arrive. My dining room is starting to look like a well stocked RV Parts Warehouse More pictures coming real soon!
The floorplan has finally been decided. This will be a clone of the Que plan, which I am attempting to design a little lighter than Sunline did. This shouldn't be too difficult, there is some room to lose weight, such as eliminating the Filon exterior in favor of aluminum.
Before we start framing the body, I want to be sure the weight balance is correct. If need be, I can shift the axle's position or move some things around on the floorplan to keep the tongue weight in check. Once we start building, it's really difficult to shift that axle.
I'm a backyard mechanic, not an engineer, so I need some assistance in this department (hint, hint JohnB!)
What I do know is that I need to figure out the weight and the position of everything that makes up the trailer, so I got to work drawing:

I wanted to start with a small list to make sure my methods are correct. Starting with 5 items seemed about right. I tried to choose simple items who's center of gravity would be in their center. I also don't want to waste anybody's time by asking them to do a million calculations for everything in the trailer. I'm pretty certain that if the method is correct, this can just be expanded for every item to be included.
There's a engineering fellow named Andrew on the Teardrop building forum who has put together some information on calculating trailer balance to help the builders there ( http://www.angib.pwp.blueyonder.co.u...rop/tear83.htm). I've read his information several times, and see lots of terms I recognise from JohnB's discussions here, such as "moments" and "levers." Armed with this information, I now know just enough to be extremely dangerous! 
I put the 5 items (grey tank, black tank, water heater, battery, and LP rack) into a spreadsheet and (I think) translated Andrew's directions into formulas. Here's what I wound up with:

(For anyone wishing to play along at home, the excel file is here)
In english (I hope). I took all of my measurements from the rearmost spot on the trailer frame.
The Grey Tank (23 gallons) weighs approximately 191.82 lbs full and the center of the tank is located approximately 15.83" from the rear.
The Black Tank (9 gallons) weighs approximately 75.06 lbs full and the center of the tank is located approximately 55.88" from the rear.
Two LP tanks weigh approximately 78 lbs full and the center of the tanks is approximately 168" from the rear.
The water heater is approximately 83.3 lbs full and the center of the unit is approximately 94.45" from the rear.
Finally, the battery is approximately 53.6 lbs and the center of the battery is approximately 155.33" from the rear.
First, I multiplied the weight of each item with it's distance from the rear to calculate a moment for each item.
Then, I totaled the weight of these items and came up with 514.3 lbs.
Next I totaled the moments and came up with 35,326.49 lb-in (or is that in-lbs?).
To find the center of gravity, I divided the weight total into the total of the moments and came up with about 68.69 inches from the rear.
Then I used Andrew's equation to find the axle weight:
Axle Weight = Total Weight*(ball length-center of gravity)/(ball length-axle center)
That gave me an axle weight of approx. 481.99 lbs.
Subtracting the axle weight from the total weight left aprox. 32.31 lbs on the ball.
Now, my questions
First - Did I get any of this correct?
If so, is it safe to continue on with calculations in this manner, just adding items to my spreadsheet?
Being that this is a torsion axle, is the center of the hub the correct place to be measuring to? Or should it be forward more due to the nature of the torsion suspension? (a picture of the axle is here)
I do not yet know the weight of the bare frame. Once it is reassembled I can weigh it easily (probably Saturday). If I weigh the axle and the tongue, can I simply add those numbers to my final calculated axle & tongue weights and have an accurate number? Or do I need to calculate the moments there for an accurate figure? If the latter, is it as simple as the weight on the axle at the axle position, and the tongue weight at the ball position?
For large, symmetric assemblies (like the roof and floor) is it safe to list them as one item with their weight and use their center as the lever figure?
For more complicated assemblies (like a side wall with doors and windows and such) is it safe to run these same calculations on the items in the assembly, to find a total weight and the center of gravity for the assembly? I could then add one line to the spreadsheet for the entire assembly which would make it a little less complicated if I make changes.
I think that's all my questions (for now)! Thanks in advance for any assistance, it is *greatly* appreciated!!
- Frank
__________________
|
|
|
|
|
04-15-2010, 09:38 AM
|
#16
|
|
Senior Member
Join Date: Jun 2007
Location: New Hampshire
Posts: 1,025
SUN #292
|
Thoughts
Frank,
I think it's difficult to find the exactly correct location ahead of time.
The ideal trailer design places the major variable loads over the axle or as near to the axle as possible. In our present Sunline the grey tank is between the axle and floor,right over the axle and the black tank not far from the axle, mainly under the raised toilet. The water tank is a little further then the black tank but also certainly in the middle third of the trailer located in the base of the kitchen counter.
Interestingly the refrigerator is right over the axle, our pantry is right beside the refrigerator and the stove is close to the axle. The rest of our trailer is load balanced, an overhead cabinet on each end both filled with clothes and a bed/couch at one end and a dinette at the other. Definitely all heavy items in the center over the axle.
The front carries a battery and propane tank (we only have one and it's never turned out to be a problem even though we're not weekend campers) and the rear bumper has a black box holding all misc. hoses, cables, etc.
My Sunline has the axle 61% of the distance from hitch to rear bumper. My goal in our new design is to shoot for this as an axle position in terms of percentage but recognize it might not be ideal and to be able to move it 5 to 10%.
In looking at the drawing of your frame it appears that the axle is located at the 68% point as measured from the ball to axle. You'd have to modify your trailer's frame to move the axle. If it were me I try to load it so I didn't have to modify the frame.
If you're cautious you could widen the opening around the tire so you could move it a half foot in either direction though I think it would be easier to mover some part of the variable load.
There are some unpositioned loads in our design like the spare tire location. I intend to mount it under the trailer because in three years I've never touched it. I feel I can locate it any where from the axle to the hitch without concern. By the way I am flipping my axle to get a little more clearance in the longer design since we are adding 7 feet to the length.
Locating your gray tank (or is it a water tank) at the rear will means you will have potential for very variable front to back loading (170lbs).
We are very careful about the volume of fluids in our tanks, typically driving with the grey and black tanks loaded with swish around volumes (we put a few gallons of clean water in to help clean the tanks while moving.) The water tank is filled with about 8 gallons when we travel. (Our reason is not that it changes trailer trim but rather we don't want to tow water. In your case with the tank at the rear it would effect trailer trim.)
We once loaded a 41 pound generator on the bumper and could notice it immediately.
We only vary from carrying a lot of fluids when going into a boondocking situation and coming from a boondocking situation, looking to empty our tanks as soon as possible after exiting.
In our case one solution to locating the axle is to mount the spring mounts to a sub plate and bolt it into the appropriate spot later. Under any condition to move the axle you have to change the tire's opening in the frame. My suspicion is that if you could get your grey/water tank closer to the axle you would probably be close to the ideal solution.
We find your project interesting and gave me pause to think about our little Sunline's layout in more detail.
__________________
Norm and Ginny Milliard
1982 Sunline 15.5 SB
2004 Honda CRV 4 cyl, manual
|
|
|
|
|
04-15-2010, 12:27 PM
|
#17
|
|
Moderator
Join Date: Nov 2006
Location: Ohio
Posts: 12,649
SUN #89
|
Hi Frank
Good post, here are some quick comments. Unfortunately timing is not great for me to do a more in-depth post here for you but I can next Monday. We are leaving Friday AM for a camping trip and will not be back until later Sunday, YEH!!! but here goes
I followed your link to the guy with the tear drop. I skimmed it and yes that is the same stuff Im talking about but I may explain your end objective differently.
This is the approach I would use. And once thru it
I may change it but we have to start somewhere. First what are the needs and then how do we accomplish them?
Needs: (some of them)
1. The GVW of the loaded camper must be at or under the combined axle and tire ratings.
2. Each separate wheel must be at or under its rating. Both the tire itself and the axle stub.
3. The tongue weight must be in check in both the dry and loaded state. Im a fan of the 13 to 15% crowd of GVW. 1 drained LP tank can take you down into low % if you are too close to the 10% area.
Ideals, thoughts to keep in mind: (Some of them)
Place the always heaviest items over the axle or slightly forward. This puts the most load on the axle.
Left to right balance is very important for equal loading of tires and axle stubs. Camping items are not equal in weight so you have to be creative here, a fridge on one side of the camper has to be offset on the other side with some heavy permanent object.
Holding tanks. Fresh water ideally is right over the axle or slightly forward. Then you can carry fresh water and not mess up the TT balance. No add or subtract of tongue weight.
I caution even gray tanks being at the back of the camper. The camper is so light a 23 gal tank filled is 191 lbs. Unless you can mount something real heavy up front to always offset this, heads up here. And the tanks are mounted on the center of the camper to keep tire loads equal. The one tank looks to the left side of the camper.
Your spread sheet.
I myself would take a little different approach to maybe give more usable info. While some of us get hung on what a moment is
the need is what does the GVW, tire loads grow by and what does it do to tongue weight. And how is the left to right side loading being balanced out. What is each tire taking? When we talk actual pounds of weight gain or loose it is easier to relate too in ones brain then in. lb.s
I would start with the frame and axle as a base line. It must weigh less then 400 ish # so a bath scale will get you close. Put the scale under each tire, (1 at a time) record then put it under the ball coupler. Add all 3 and that is the GVW bare frame and axle and you now know the tire loads for each wheel which should be equal on just the frame
. Then figure the % of tongue weight and what it is from the GVW. That all goes in the spread sheet. Now everything else ads or subtracts from tongue and axle loads.
Now add an object. Say a fridge. Fridge weighs say 40# empty and you place it on the wall of the left side. Need to do 2 weight sets, front to back and left to right on the camper.
What it does to tongue weight and what it does to tire loads.
For (front to back). For tongue weight, I would calculate the moments about the axle and the tongue as everything is in relation to axle and tongue. Plug into the spread sheet and it updates automatically what weight is added to GVW and tongue. Move fridge back a foot and watch the tongue change, GVW stays the same and axle loads change.
(For left to right) Then you need to do the tire loads left to right on the fridge. Here use the center of the camper front to back as the pivot line to figure from. Use the center of the tire tread as the reaction to the ground. Figuring the moments here about the center of the camper now telld how much each tire is gaining or loosing by putting that fridge on the wall.
Now to an example. I myself would measure everything from the tow ball back. You seemed to pick the rear wall. Yes you can do the rear wall but it is tongue weight your trying to determine so it is less math to do the calculation that way. Both give the same end result.
Lets take that 23 gallon tank on center in the back. 23 gallons x 8.3#/gallon = 190.9# for the water itself. Have to find the tank physical weight but for this exp Ill use the gallons of water. Since you mounted it on the center of the camper, both tires share equal load. Easy example.... You use the centroid of the object to calculate off of, or it's center of gravity. For the tank centroid it is dead middle left to right and front to back assuming it is a normal flat tank. If not a flat tank, a tapered tank, then this gets more math busy
So the tank centoid is: 188 tow ball to rear wall 15.83 rear wall to tank center = 172.17 from the tow ball.
The axle is: 188 tow ball to rear wall 60.69 rear wall to wheel center = 127.31 from the tow ball. Again measuring from the tow ball makes this 1 step easier for me anyways.
And the tank to the axle is 172.17 127.31 = 44.86
The tank filled will change axle and tongue loads as follows:
Summating moments about the tow ball where . X = axle loads:
0 = (127.31)( X) - (190.9)(172.17) Solving for X, X = 258.17# added to the rear axle.
Summating moments about the axle where Y = tongue weight:
0 = (127.31)( Y) - (190.9)(44.86) Solving for Y Y = - 67.27# removed from the tow ball.
A cross check. Forces up = forces down. 258.17 added to axle 67.27 removed from ball = 190.9 # total added. Check, I did the math right...
So that tank adds 258.17# to the rear axle, subtracts 67.27# from the tongue and adds 190.9# to the GVW. Now you know why I did not recommend putting that tank back there. Then add this to your spread sheet. If you are excel fluent you can create cells and formulas to do this math for you since everything is always off the tow ball and axle, just need to keep track of what is rear of the axle and forward of it as to if you are adding tongue weight or loosing it.
If I have confused you on how I did the math, let me know and Ill do up a hand sketch tonight before I leave. Being short on time I didnt get to it during lunch.
Good luck
John
PS this gets you close to the fixed objects. Then add the not fixed like food in the fridge, pots and pans in the cabinets etc. You can do both dry and loaded.
Edit: 11:48 PM Frank here is a hand sketch. Hopfully this does not confuse you more. I'll be back late Sunday night. Mr. Tweety may help answer a question on this too. I'm sure he remembers. Good luck

Edit: 4-16-10 Fixed some jumbled words.... 
__________________
Current Sunlines: 2004 T310SR, 2004 T1950, 2004 T2475, 2007 T2499, 2004 T317SR
Prior Sunlines: 2004 T2499 - Fern Blue
2005 Ford F350 Lariat, 6.8L V10 W/ 4.10 rear axle, CC, Short Bed, SRW. Reese HP trunnion bar hitch W/ HP DC
Google Custom Search For Sunline Owners Club
|
|
|
|
|
04-15-2010, 02:46 PM
|
#18
|
|
Senior Member
Join Date: Jun 2007
Location: New Hampshire
Posts: 1,025
SUN #292
|
Frank,
As I read John's post, I began to recognize that you have a easy way to determine the effects of loading. It seems you own most of the stuff you're concerned about or can simulate what you might not have.
Common stuff like walls and floor really don't matter except as they add to the total weight and will generally be linear to the respective wheel loading.
As well as calculating loading you could put a scale under the nose and inflate each tire to 30 pounds. (The lower the inflation, the greater the change in patch length per pound of loading.)
By the way we have used the tire patch area times the tire pressure to determine the weight of the trailer. It is surprisingly accurate.
The length of the tire patch on the ground will be equal to the load on the tire. We use a $10 Walmart scale to measure ball(nose) loading. We put a small piece of plywood on the scale to protect it from the front jack.
Lay a few sheets of plywood on the frame and place the fridge, and tanks, fill them if you like. You can than watch the effect of the load on the ball (jack) and the increase in tire patch length from side to side. It will give you a practical view of the effect of loading.
I assume that you have a 3500 pound axle, 1750 pounds per tire. This is important to verify.
__________________
Norm and Ginny Milliard
1982 Sunline 15.5 SB
2004 Honda CRV 4 cyl, manual
|
|
|
|
|
04-15-2010, 09:53 PM
|
#19
|
|
Moderator
Join Date: Nov 2006
Location: Ohio
Posts: 12,649
SUN #89
|
Frank
I edited my post with a hand sketch. If I confused you more, let me know I'll break it down and explain again/different. I know you can do this. Hope this helps.
Be back Late Sunday night.
John
__________________
Current Sunlines: 2004 T310SR, 2004 T1950, 2004 T2475, 2007 T2499, 2004 T317SR
Prior Sunlines: 2004 T2499 - Fern Blue
2005 Ford F350 Lariat, 6.8L V10 W/ 4.10 rear axle, CC, Short Bed, SRW. Reese HP trunnion bar hitch W/ HP DC
Google Custom Search For Sunline Owners Club
|
|
|
|
|
04-17-2010, 05:37 PM
|
#20
|
|
Senior Member
Join Date: Jun 2007
Location: New Hampshire
Posts: 1,025
SUN #292
|
Frank
I was just reading thru the Que forum and noticed that the factory changed the location of the axle after beginning production, or at least so it sounds from reading the site.
__________________
__________________
Norm and Ginny Milliard
1982 Sunline 15.5 SB
2004 Honda CRV 4 cyl, manual
|
|
|
|
|
|
|
Currently Active Users Viewing This Thread: 1 (0 members and 1 guests)
|
|
|
| Thread Tools |
Search this Thread |
|
|
|
| Display Modes |
 Linear Mode Linear Mode
|
 Posting Rules
|
You may not post new threads
You may not post replies
You may not post attachments
You may not edit your posts
HTML code is Off
|
|
|
|
 » Recent Sunline Discussions
 |
|
|
|
|
|
|
|
|
|
|
|
|
|
|
|
|
|
|
|
|
|


