 |
|
 11-27-2011, 02:18 PM
|
#1
|
|
Senior Member
Join Date: Aug 2006
Location: Maryland
Posts: 838
SUN #37
|
Applying stripes
I received my striping from Jan and Dave King a few days ago (thanks for the tip Kitty and Gary!) and will be installing them as the weather permits. Has anyone ever done this? All I see online are instructions for applying to a flat surface like fiberglass, but I don't have that option. As many here know, I had renovated my 92 Solaris with the 2007 stripe theme and had to closely approximate it with paint.That was quite a masking and spraying process and I consider myself very fortunate to have the actual striping now. The paint, after a few years has begun to peel off with the old striping that was such a pain to remove I left it. I'm hoping the 3M "eraser wheel" l I ordered will get it off this time.
I doing it this way should be an adventure. I'll document it with pictures as I go, but again, if anyone has any tips from having done it already, I'd like to hear it!
Thanks,
Rich
__________________
__________________
 1992 T-2470 (now residing in South Carolina)
Current Sunline-2007 Solaris 2499
2018 Silverado 1500 w/Max Trailering pkg.
|

|

|
|
11-27-2011, 03:55 PM
|
#2
|
|
Moderator
Join Date: Dec 2006
Location: Michigan
Posts: 6,155
SUN #123
|
The original stripes were applied on the aluminum while still flat and then it was crimped into the design it is in now.
I've never done striping before, on an uneven surface like that.
__________________
__________________
2007 T-286SR Cherry/Granola, #6236, original owner, current mileage: 9473.8 (as of 6/18/21)
1997 T-2653 Blue Denim, #5471
1979 12 1/2' MC, Beige & Avocado, #4639
Past Sunlines: '97 T-2653 #5089, '94 T-2251, '86 T-1550, '94 T-2363, '98 T-270SR

|
|
|
|
|
11-27-2011, 06:22 PM
|
#3
|
|
Senior Member
Join Date: Aug 2006
Location: Maryland
Posts: 838
SUN #37
|
Neither have I Jon, but I like a challenge!
Rich
__________________
1992 T-2470 (now residing in South Carolina)
Current Sunline-2007 Solaris 2499
2018 Silverado 1500 w/Max Trailering pkg.
|
|
|
|
|
11-27-2011, 07:16 PM
|
#4
|
|
Moderator Emeritus
Join Date: Aug 2006
Location: West Virginia
Posts: 2,289
SUN #17
|
In the past I have pin striped lots of cars, but like Jon said, never a bumpy surface.
Maybe if you could somehow make a jig, or Gary suggested a really stiff brush.
Good Luck, please keep us posted
Kitty
__________________
Sunny #18 2003 F-344SR #8157
Sunny #19 1997 T-2653 #5485
1999 Ford F350XLT DRW Crew Cab, Long bed 7.3 PSD
2002 VW Jetta TDI.. AKA: Kitty's Kruiser

|
|
|
|
|
11-27-2011, 07:27 PM
|
#5
|
|
Senior Member
Join Date: Aug 2006
Location: Maryland
Posts: 838
SUN #37
|
Yes, I've applied pinstripes and graphics to cars and trucks too, so this will be different. I'm hoping that, since the striping is available (for as long as it lasts anyway) others will benefit from finding out what NOT to do as I'm sure I'll find that out along the way. Sooner or later, someone's going to need to restripe at least some of their Sunline.
Rich
__________________
1992 T-2470 (now residing in South Carolina)
Current Sunline-2007 Solaris 2499
2018 Silverado 1500 w/Max Trailering pkg.
|
|
|
|
|
11-27-2011, 07:56 PM
|
#6
|
|
Moderator
Join Date: Nov 2006
Location: Ohio
Posts: 12,649
SUN #89
|
Rich,
I too have some of that pin strip, and from the same source.... but have not yet applied.
Here are some things to think through.
I did replace my large rear "Sunline" now about 2 years ago. The siding on the top rear of the trailer is segmented and curved slightly. When I put it on I tried real hard to make it flow right to the end of the curve before the crease and start of the next curve. This year I can see it starting to lift at that creased area. What I suspect is happening is the decal is shrinking and as such it is pulling away in that area. Now I have to figure out what to do with it... or how to prevent it even if I put another one on.
After seeing this the side pin strip may be more of a challenge. As Sunline Fan stated at the factory Sunline put that strip on flat aluminum and then ran it through a forming roll to create the rippled pattern. That rolling action created a perfect pressure adhesion process of the decal to the aluminum.
The question now is, how can we get that decal over all those curves and for that length of the camper?
The Poppy part of Nana and Poppy use to do a lot of decal work. Maybe he can shed some light on this for us. Kathy, can you ask Leo if he has any words of wisdom on how to do this?
Hope this helps
John
__________________
Current Sunlines: 2004 T310SR, 2004 T1950, 2004 T2475, 2007 T2499, 2004 T317SR
Prior Sunlines: 2004 T2499 - Fern Blue
2005 Ford F350 Lariat, 6.8L V10 W/ 4.10 rear axle, CC, Short Bed, SRW. Reese HP trunnion bar hitch W/ HP DC
 Google Custom Search For Sunline Owners Club
|
|
|
|
|
11-27-2011, 07:58 PM
|
#7
|
|
Senior Member
Join Date: Apr 2007
Location: New York
Posts: 1,846
SUN #264
|
Rich,
It is possible to put on striping or other vinyl or similar materials to surfaces using a wet method. This allows the object to be precisely positioned.
The method is pretty simple. Mix up a solution of soap and water. (The craftsman I learned this from recommended using a very simple soap without a lot of additives.) After thoroughly cleaning the surface, apply the soapy solution (a spray bottle works great) liberally and then roughly position your sticker and apply it. Since there is a layer of soapy water under the sticker, it can be easily moved about to precisely position it as needed.
Once you've got it where you want it, it is time to work the soapy water out from under the sticker. First use a damp sponge, working from the center to the outside edges. When most of the solution is gone, on smooth surfaces, a brayer (rubber roller) works great to finish getting the rest of the liquid out. (I've also done this with a smooth plastic flat edge instead of a roller.) Work from the center to the outside edges in all directions. Air bubbles can be easily pushed to the edge while there is still liquid under the sticker. Eventually, the water will be totally gone from behind the sticker.
At this point, let the whole thing dry for at least 24 hours, preferably in a warm, low humidity environment.
I have successfully used this method to apply large and small emblems and lettering to a wide variety of vehicles. Probably the most demanding were ambulances, but properly done, the work held up for at least 10 years.
One thing we did with many of these applications was to clear coat the entire sticker, overlapping the edges onto the painted surface. Here in the northeast with all the road salt in the winter, the extra protection prevents damage from starting.
__________________
'12 F250 4x4 Super Duty PowerStroke 6.7 diesel
2011 to present: '11 Cougar 326MKS
1999 to 2011: '99 Sunline T-2453
SUN264 * Amateur Radio kd2iat monitoring 146.52
|
|
|
|
|
11-27-2011, 08:00 PM
|
#8
|
|
Senior Member
Join Date: Apr 2007
Location: New York
Posts: 1,846
SUN #264
|
Quote:
Originally Posted by JohnB

The question now is, how can we get that decal over all those curves and for that length of the camper?
The Poppy part of Nana and Poppy use to do a lot of decal work. Maybe he can shed some light on this for us. Kathy, can you ask Leo if he has any words of wisdom on how to do this?
|
I am pretty certain Leo is going to recommend the wet method, too. (We've had this conversation before...  )
__________________
'12 F250 4x4 Super Duty PowerStroke 6.7 diesel
2011 to present: '11 Cougar 326MKS
1999 to 2011: '99 Sunline T-2453
SUN264 * Amateur Radio kd2iat monitoring 146.52
|
|
|
|
|
11-28-2011, 05:22 AM
|
#9
|
|
Senior Member
Join Date: Nov 2006
Location: New York
Posts: 2,909
SUN #93
|
Quote:
Originally Posted by Steve Collins
I am pretty certain Leo is going to recommend the wet method, too. (We've had this conversation before... ) |
Yup Leo said what Steve said!!!! 
__________________
Kathy & Leo SUN 093
Central Adirondacks of New York
2013 Rubicon 2900 Toy Hauler
We loved our 2007 T-2499
2010 Ford F-350 4x4 Lariat Super Crew Dually Diesel

|
|
|
|
|
11-29-2011, 05:41 PM
|
#10
|
|
Senior Member
Join Date: Aug 2006
Location: Maryland
Posts: 838
SUN #37
|
Thanks for the tips Steve! Yes, I think the wet method is the only way to go in this situation.
John, I also applied those decals to that upper siding onthe rear of my trailer and the same thing has happened; it lifts in the valleys. Everything else still looks good after a few years, but eventually, I'm sure with the sun here in Maryland, it will start lifting at the edges. I think you are right that the film shrinks and pulls away from the low points and I doubt anything will prevent that as long as it's exposed to any heat. I do wax my decals, but I was thinking maybe they need to be covered to block the sun from them.
Rich
__________________
1992 T-2470 (now residing in South Carolina)
Current Sunline-2007 Solaris 2499
2018 Silverado 1500 w/Max Trailering pkg.
|
|
|
|
|
04-22-2012, 05:57 PM
|
#11
|
|
Senior Member
Join Date: Aug 2006
Location: Maryland
Posts: 838
SUN #37
|
OK, the weather is finally complying, so I've begun my striping project. I have the R/S stripes in place. and will (weather permitting) be tackling the other side this week.
I tried first to use the 3M rubber stripe removal wheel but since I had painted over the original stripes (about 16 year old at the time) and the wheel wasn't designed to remove paint, I found the wheel wearing faster than the stripes. Next, I tried a wire brush and then a wire brush with a propane torch. This worked, but took a long time. Finally, I went to a wire wheel, but then I re-discovered some areas I had done "body" work to b/c of a hole and some dents. I finally decided the corrugated aluminum would have to go. Well, it's still there, but my solution is to cover it altogether with new aluminum. True, there's no corrugations as with the original, but I'm very pleased with the result. Besides, this isn't a concours level '63 Corvette I'm working on!
I'm posting pictures with descriptions since I'm thinking since some of you are in possession of factory striping from the King family and have a trailer that will sooner or later be in need of new striping, you might want to avoid some of the mistakes I made.
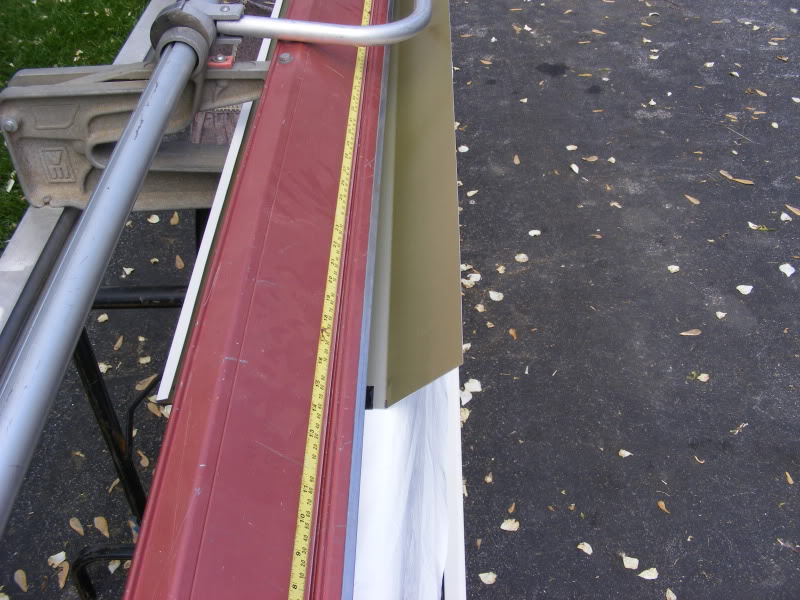
I bought .027 ga. white aluminum which is about 12" wide from a seamless gutter supply store, then rented a 10' bending brake, the kind used for house exterior trim work. Since 10' was the longest brake they had, each piece had to be cut to that length. This wasn't a problem on the R/S since no piece measured more than 8' long, but I will have two joins on the L/S as there is a 22' run on that side. My plan is to mount the pieces first and then add the stripe in one piece over the three pieces of aluminum. The seams will be visible, especially where the white painted part shows, but it will have to be that way.
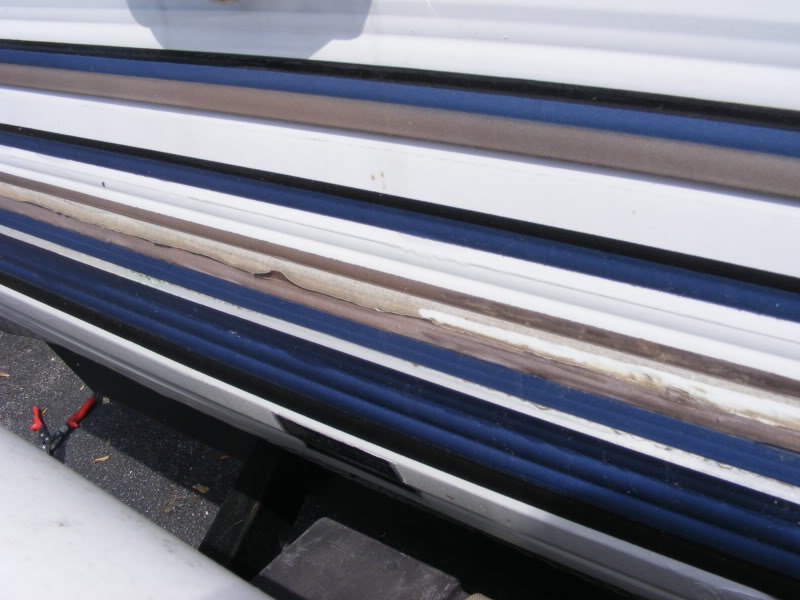
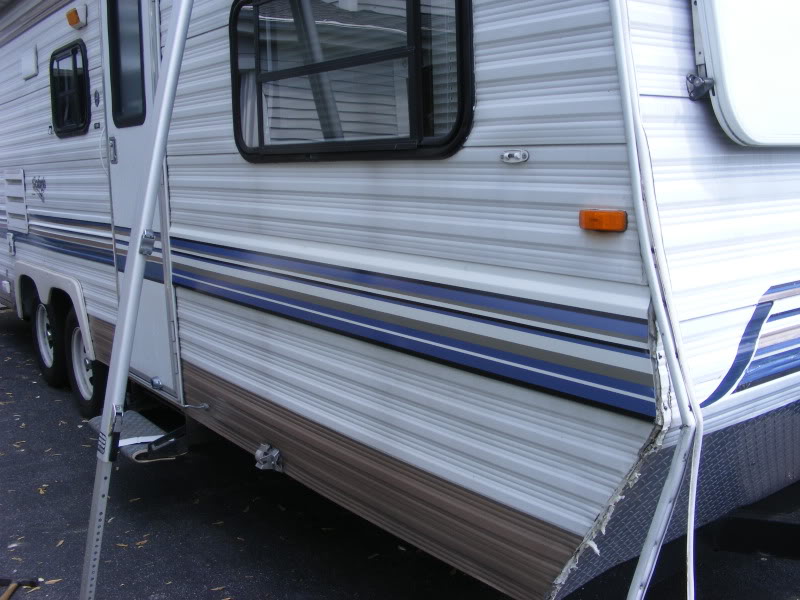
Here's my painted and now peeling stripes;
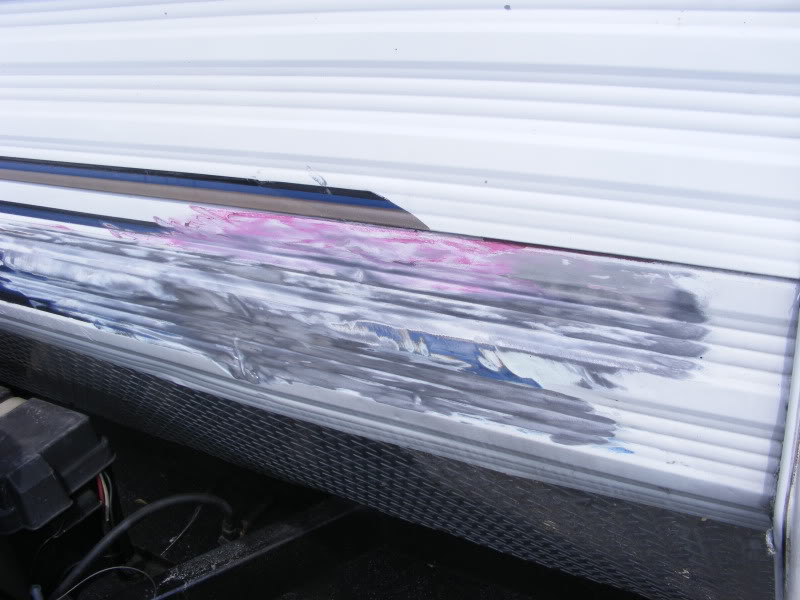
 Here it is after wire wheeling to bare metal;
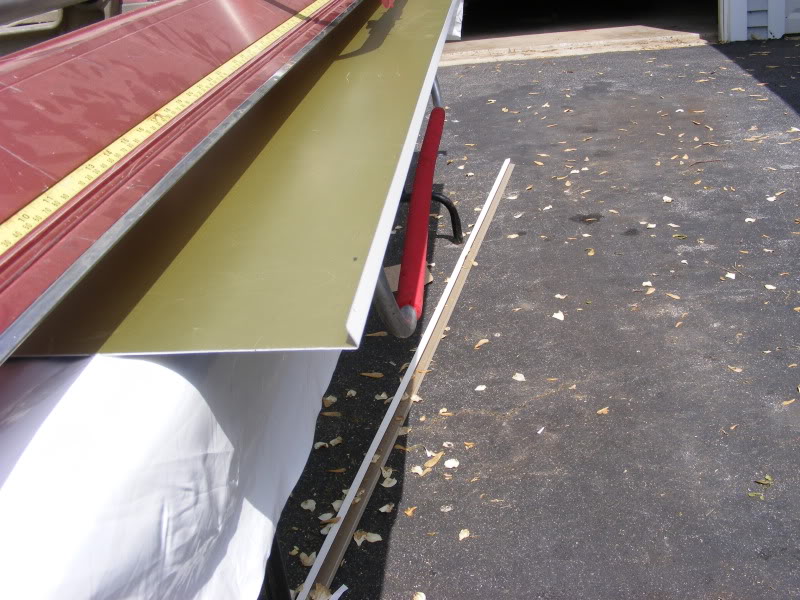
 With the stripe applied to the aluminum cut to a 10-7/16" width (at least that's what worked on mine), I make the first bend which will be the bottom lip that slides under the old panel. After this, I made the second bend that completes the bottom "hook". See my note on this part below.
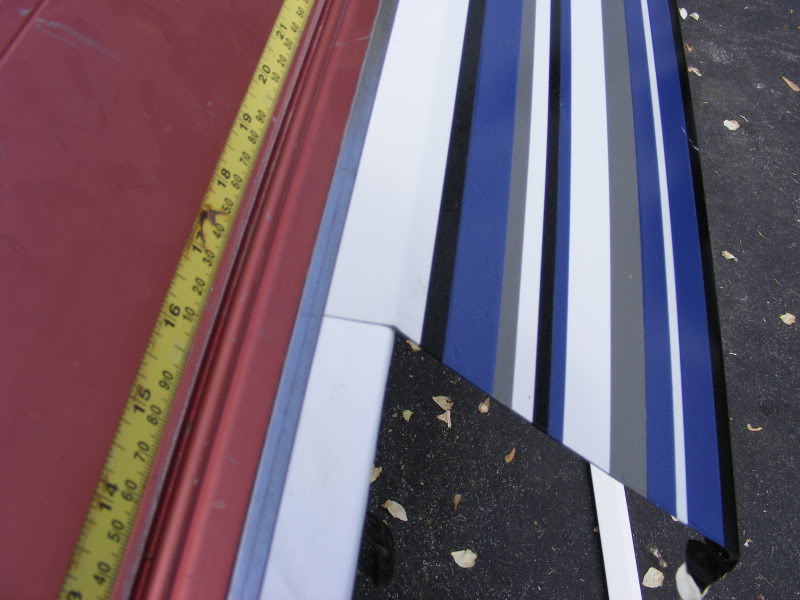
 This shot shows the completed lower "hook" to the left and the lower of the two top bends to the right;
 The second top bend is made by flipping to the white side and aligning the lower bend with the edge of the bending bar;
 The top bend is made by bringing the main panel face parallel with the face above the top bend;
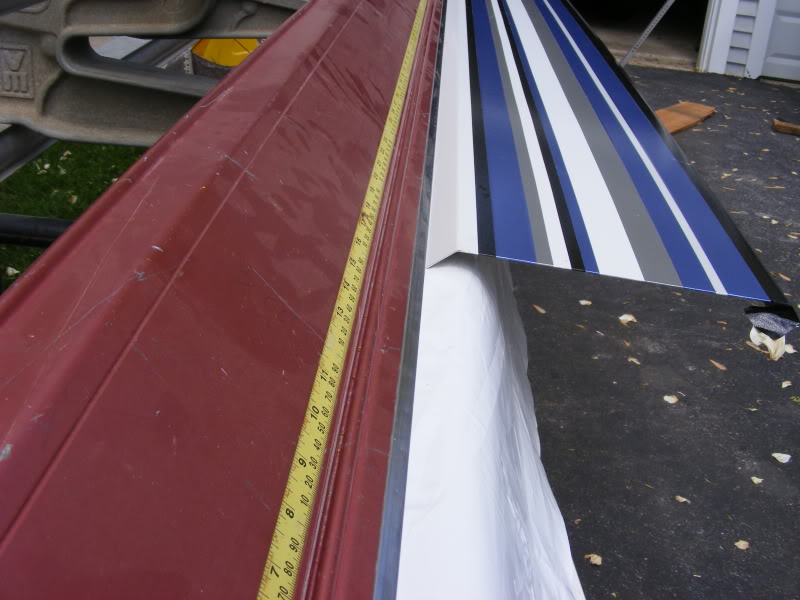 Here's the front panel complete although the front of the stripe will later be trimmed back and the "swooshes" added;
The biggest problem I encountered was on the two bends that form the lower "hook". Since I didn't want the panel to stand out too far from the side of the camper, I chose to make the second bend 1/2" past the first, BUT, the bender is designed to make two bends no closer than 3/4" apart. What was happening was that the bending bar was grabbing the aluminum past the first bend and pushing the panel further into the brake instead of bending the aluminum. Don't try to make any bends less than 3/4"! If I were to do this again, I'd make the bends 3/4" apart and use a tighter angle. Actually 45 degrees, which is what I used at the top would do it. Live and learn!
If anyone is interested in the exact measurements I used, just ask.
I'll post more photos when I do the other side.
Rich
__________________
1992 T-2470 (now residing in South Carolina)
Current Sunline-2007 Solaris 2499
2018 Silverado 1500 w/Max Trailering pkg.
|
|
|
|
|
04-22-2012, 06:19 PM
|
#12
|
|
Moderator
Join Date: Nov 2006
Location: Ohio
Posts: 12,649
SUN #89
|
Rich,
That looks good from the pic's!!
I have used the house siding breaks before. Do not know if yours is like ours was but there was a hinge on the handle side. The handle being the part of the break you fold over. That hinge is pretty fat and is where the 3/4" requirement most likely comes in. A sheet metal break like used on HVAC ducts has a much tighter pivot action. And also much heavier and not as portable.
Thanks for sharing and looking forward to see the rest.
John
__________________
Current Sunlines: 2004 T310SR, 2004 T1950, 2004 T2475, 2007 T2499, 2004 T317SR
Prior Sunlines: 2004 T2499 - Fern Blue
2005 Ford F350 Lariat, 6.8L V10 W/ 4.10 rear axle, CC, Short Bed, SRW. Reese HP trunnion bar hitch W/ HP DC
Google Custom Search For Sunline Owners Club
|
|
|
|
|
04-22-2012, 06:21 PM
|
#13
|
|
Senior Member
Join Date: Aug 2006
Location: Maryland
Posts: 838
SUN #37
|
I left out one photo I meant to include with the last post which shows that I applied a bead of Liquid Nails near the top so I wouldn't have to worry about aluminum panels flying off the camper at highway speed 

Oh and if you'd like to see these photos in a larger size, go to the Photobucket link in my signature.
Rich
__________________
1992 T-2470 (now residing in South Carolina)
Current Sunline-2007 Solaris 2499
2018 Silverado 1500 w/Max Trailering pkg.
|
|
|
|
|
04-22-2012, 06:24 PM
|
#14
|
|
Senior Member
Join Date: Aug 2006
Location: Maryland
Posts: 838
SUN #37
|
Guess I should've read the note on the bar above the photos!
Rich
__________________
1992 T-2470 (now residing in South Carolina)
Current Sunline-2007 Solaris 2499
2018 Silverado 1500 w/Max Trailering pkg.
|
|
|
|
|
04-22-2012, 06:30 PM
|
#15
|
|
Senior Member
Join Date: Aug 2006
Location: Maryland
Posts: 838
SUN #37
|
Hi John, you're an engineer so maybe you can answer this question I was discussing with the rental store guy when I brought the brake back. It seems all of the brakes used for this purpose are made with the hinge located about a 1/4" forward of the hold down bar. I know that the heavy, industrial brakes used in the sheetmetal trades have the two located in vertical alignment and you can make an extremely close arrangement of bends with them. There was no way of adjusting this on the brake I rented and I'll give the designers the benefit of the doubt by saying that they had a good reason for designing it this way, but their logic is lost on me.
Rich
__________________
1992 T-2470 (now residing in South Carolina)
Current Sunline-2007 Solaris 2499
2018 Silverado 1500 w/Max Trailering pkg.
|
|
|
|
|
04-22-2012, 07:41 PM
|
#16
|
|
Moderator Emeritus
Join Date: Aug 2006
Location: West Virginia
Posts: 2,289
SUN #17
|
Looks good Rich I guess replacing striping/logos is one time it's best to have a smooth sided RV.
I saw in one of your posts where you mentioned "waxing" your decals, please read your bottle of wax, because "IF" it contains "petroleum distillates" that will compromise your decals.
It's best to use "Aero 303" on your decals not wax. I know that can be a challenge, but I think I'd just Aero 303 the entire rig.
If your rig has the "crystal coat" finish on it, it really does not require waxing.(From what I've heard & read).
Gary has a relative that is willing to wash & Aero 303 the Sunny for 200 bucks, I told him he's got the job. We will provide the products.
Also, when using Aero 303, you don't want to apply it generously, thin application is better.
Plus the Sunny Port comes a week from tomorrow, so that will help a lot also.
Kitty
__________________
Sunny #18 2003 F-344SR #8157
Sunny #19 1997 T-2653 #5485
1999 Ford F350XLT DRW Crew Cab, Long bed 7.3 PSD
2002 VW Jetta TDI.. AKA: Kitty's Kruiser
|
|
|
|
|
04-22-2012, 11:33 PM
|
#17
|
|
Moderator
Join Date: Dec 2006
Location: Michigan
Posts: 6,155
SUN #123
|
Looking great Rich!
__________________
2007 T-286SR Cherry/Granola, #6236, original owner, current mileage: 9473.8 (as of 6/18/21)
1997 T-2653 Blue Denim, #5471
1979 12 1/2' MC, Beige & Avocado, #4639
Past Sunlines: '97 T-2653 #5089, '94 T-2251, '86 T-1550, '94 T-2363, '98 T-270SR
|
|
|
|
|
04-23-2012, 04:56 AM
|
#18
|
|
Senior Member
Join Date: Aug 2006
Location: Maryland
Posts: 838
SUN #37
|
Thanks Jon.
Kitty, I've never used Aero 303, I'll check the label on my wax though!
The claims that you shouldn't wax the crystal coat might not have accounted for 20 years out in the weather. I have waxed mine and it helped the appearance somewhat, but overall, I'm thinking it might be time to repaint the whole rig. Some areas are wearing thin and you can see aluminum showing through the finish.
Rich
__________________
1992 T-2470 (now residing in South Carolina)
Current Sunline-2007 Solaris 2499
2018 Silverado 1500 w/Max Trailering pkg.
|
|
|
|
|
04-25-2012, 05:24 PM
|
#19
|
|
Moderator
Join Date: Nov 2006
Location: Ohio
Posts: 12,649
SUN #89
|
Quote:
Originally Posted by vcrt
Hi John, you're an engineer so maybe you can answer this question I was discussing with the rental store guy when I brought the brake back. It seems all of the brakes used for this purpose are made with the hinge located about a 1/4" forward of the hold down bar. I know that the heavy, industrial brakes used in the sheetmetal trades have the two located in vertical alignment and you can make an extremely close arrangement of bends with them. There was no way of adjusting this on the brake I rented and I'll give the designers the benefit of the doubt by saying that they had a good reason for designing it this way, but their logic is lost on me.
Rich
|
Hi Rich,
I'm going to "speculate" on this one as I do not know 100% but can surmise why. The brakes used for aluminum siding need to be gentle to not scratch up the nice white aluminum. They need/want a clean 90 degree bend but do not want scratches.
If the bending edge folding over is real close to the anvil holding the work piece then you may stretch the metal a little when you bend. The stretch and bend for real tight bends comes along for the ride and comes some metal marking as a result. Bending further away is a more gentle action and there the stretching is mostly if not all reduced to only a bend.
They make what is can called a box and pan brake. Here is one I found as a hit on the web. JET Tools - BP-1248H Box and Pan Brake Floor Model
I have seen them in the fab shops that do a lot of sheet metal work. They work well on thin gage sheets and can bend short legs. I can't seem to find the limit listed but I know I have seen guys bend up 1/4" seams if needed. These types also have a large amount of anvil sections to slide out of the way to bend short work pieces and form them into boxes.
Again I am not positive on why they hinge the bend that far away but I'm make a good "guesstimate" it is to make the bend gentler and not scratch.
OR making the hinge that way is just cheaper to build.
We redid my uncles house siding and lined all the older windows with the white aluminum and then did vinyl siding on the rest. After you do and entire house worth of practice it is amazing on how good one can get at bending with that style brake. The guys at the fab shops bending 1/4, 3/8, 1/2" thick plate into all kinds of shapes, that is pure skill and knowing the machine. I bow to them as I just put what I want on the drawing and they create it...
John
__________________
Current Sunlines: 2004 T310SR, 2004 T1950, 2004 T2475, 2007 T2499, 2004 T317SR
Prior Sunlines: 2004 T2499 - Fern Blue
2005 Ford F350 Lariat, 6.8L V10 W/ 4.10 rear axle, CC, Short Bed, SRW. Reese HP trunnion bar hitch W/ HP DC
Google Custom Search For Sunline Owners Club
|
|
|
|
|
04-25-2012, 07:13 PM
|
#20
|
|
Senior Member
Join Date: Aug 2006
Location: Maryland
Posts: 838
SUN #37
|
John,
I knew you'd have the answer, that makes sense. The sheet metal bent for HVAC work and other industrial applications is usually not pre-finished as is the aluminum used in house trim. I thought of this. If you stacked a few pieces of sheet metal 4" wide on top of each other, the edges would be even. But bend each one at the center to 90 degrees and stack them again and they will form a step pattern so that each piece would extend slightly past the one below it. That means that there is a slight slipping that occurs while that bend is being formed due to the thickness of the metal. The slipping might cause a marring of the finish. Why moving the pivot further away from the clamping bar eliminates this, I don't understand, but, like I said, they must have had a good reason, and this seems probably like the most likely one.
Thanks,
Rich
__________________
__________________
1992 T-2470 (now residing in South Carolina)
Current Sunline-2007 Solaris 2499
2018 Silverado 1500 w/Max Trailering pkg.
|
|
|
|
|
|
|
Currently Active Users Viewing This Thread: 1 (0 members and 1 guests)
|
|
|
| Thread Tools |
Search this Thread |
|
|
|
| Display Modes |
 Linear Mode Linear Mode
|
 Posting Rules
|
You may not post new threads
You may not post replies
You may not post attachments
You may not edit your posts
HTML code is Off
|
|
|
|
 » Recent Sunline Discussions
 |
|
|
|
|
|
|
|
|
|
|
|
|
|
|
|
|
|
|
|
|
|


