


|
Click Here to Login | ||||||


| Musikaldave's Albums | |||
| Album Title | Pictures | Last Picture | |
|
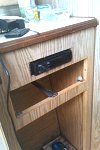
Radio Installation
Here is the 200 Watt Pioneer Stereo System I just installed in the camper.
|
2 | 07-28-2012 11:08 AM |
|
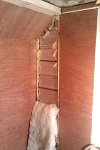
New Paneling going in! (Finally) :)
I spent the day working on installing the new paneling in the bathroom area. This is the area that had to be reconstructed (frame work and new isulation etc.) because of all the water damage.
I got a lot of it done today. I have to finish more tomorrow. After the paneling is in, I'm installing some new wallpaper and some new fiberglass panel board in the shower area to keep the water where it belongs. I made sure I siliconed the screws in the body from the clearance lights too. Something they never did in the original build which allowed a lot of water to get into that back wall. |
3 | 07-09-2012 08:23 PM |

|
Free Carpet Samples from Lowes
These free carpet samples from Lowes make perfect door mats for inside the doorway. I'm thinking about carpeting the whole camper now; don't tell the wife! :) LOL!
|
1 | 07-06-2012 12:17 PM |
|
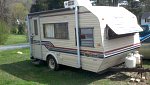
Our 1987 Sunline Saturn T-1661
A few weeks ago, I purchased our first camper. It's a Sunline Saturn T-1661.
I found this little gem on Craigslist and bought it for a $1,000.00. I was very impressed to discover that ALL of the accessories are in good working condition including the air-conditioner, refridgerator, stove, lights, furnace etc. The trailer frame was in great condition, barely any surface rust. I wire brushed the tounge and bumper and gave it a coat of glossy rustoleum black paint. I'll be using the same paint on the rails beneath. It had some damage to the rear interior due to a leaking roof. There were leaks around the roof vent, the vent pipes and I found some holes in the body. I have been reworking the damaged section by ripping out all the rot and reframing it. It was a bit of challenge at first, trying to find a place to begin the restructuring, because I wanted to build up from the base and then throughout. I began at the door jam after removing and reworking the door and then I worked my way across the ceiling to the other side, cutting away the bad material and tying in the new with the old. The bathroom area is finished, taking about two days to complete. I'm now working through the cabinet area and back over to the door jam. With a total of 4 days work I'll be finished with the framing and new insulation by the end of this weekend. Once the interior walls are completed, I'm adding a exterior cable tv connection for use with satelite tv or cable or a coaxial antenna. I also have to trade-in the 25 year old propane tanks and get a new set and a cover. Things to come; 1. New tires, possibly breaks. 2. New shut off valve behind toilet. 3. New wiring harness/adapter for towing. 4. Exterior running lights I hope you enjoy the pictures I'm posting of the work I'm doing on this camper. If you have any questions please feel free to contact me, I will share any knowledge I have. Thanks for viewing! David and Pamala |
25 | 07-04-2012 10:29 AM |
|
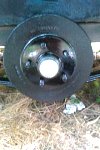
Electric Brake Assembly
This is the old original electric brake assembly which I was going to modify and replace because the parts are no longer available. After taking things apart and giving a thorough inspection of all the parts I realized the brakes still have some life in them..they just needed to be cleaned up.
|
15 | 07-04-2012 08:53 AM |
|
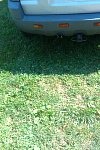
Upgraded 7 blade rv connector.
Here is the new upgraded 7 blade rv connector that I hard wired into the Escape.
It originally came with a mounting bracket but the bracket was flimsy and cheap and I thought it looked very awkward so I decided to trace the bracket like a template onto the bumper. I later drilled and cut out a section of the bumper and mounted the connector solid and flush. It looks a lot nicer and is more stable. |
2 | 07-01-2012 07:36 PM |
|
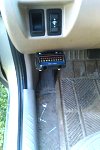
Brake Controller
Here are some photos of the late model Tekonsha Commander brake controller that I installed in my Ford Escape.
The installation was quite simple as the package came with directions and a wiring diagram. I went the extra mile to install it professionally using the proper but connectors, splice connectors and 14 gauge wiring as required. I also tied everything together in the engine compartment using plastic flume and wire ties. |
2 | 07-01-2012 07:30 PM |
Disclaimer:
This website is not affiliated with or endorsed by Sunline RV or any of its affiliates. This is an independent, unofficial site.
All times are GMT -6. The time now is 11:56 PM.