For some folks who do their own hitch adjusting, creating the proper torque on the hitch ball and hitch head can be an issue.
This post will show an alternate method that has good accuracy for what we are doing with a tow hitch using tools more common to the average RV'er.
I do happen to have a 700 ft. lb. torque wrench as I use it on things other than the camper however not every one does. There are other proven methods of obtaining the correct torque if you have a guide to go by. Here is a method that can help. This method is nick named, torque to position.
The basics are to take out all the play of the fastener and then rotate the nut only a certain amount. This amount of rotation creates the right stretch (pre-load) in the fastener to help keep it tight and to not have a fastener fatigue failure from constantly being loose and then tight and back and forth as you tow down the road from lack of being properly tightened.
Here is the procedure for a 450 ft. lb. tow ball spec and 300 ft. lb. hitch head spec. If your instructions call for these torque specs, you can use this method. If you need a different torque/bolt size, let me know I work one up for you.
I repeated this torque to position method 3 times and it repeats within an acceptable tolerance. I'll do this in pics for easier understanding.
For the 1 1/4" ball nut needing 450 ft. lb. of torque.
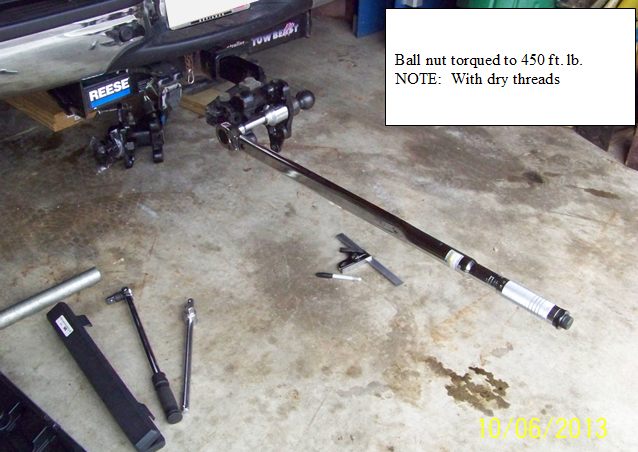
Start with dry threads. (These values will not work on lubed threads)
Pre-torque to 100 ft. lb. I picked 100 as most RV'ers should have a torque wrench for lugs nuts on the camper and most 1/2" torque wrenches go higher than this anyway.

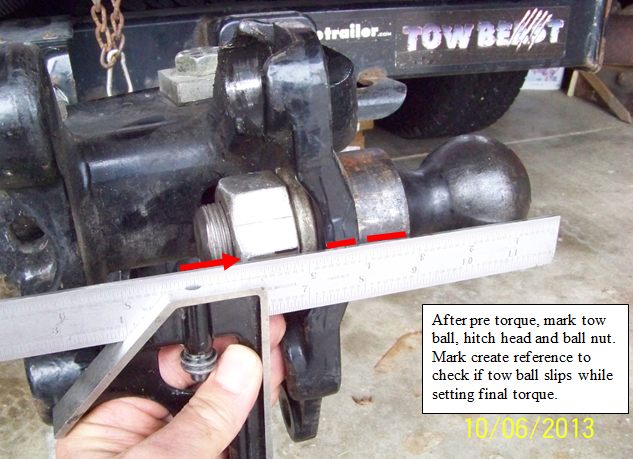
After pre-torquing we need to mark the ball shank, hitch head and the ball nut. We need to know if the ball slips any during the heavier torquing process. I used a black sharpie marker and a straight edge to draw a line across all 3. The red lines are so you can see it in the pics. If the ball does slip, start over and hold it this time from spinning.
Using a 3/4 breaker bar and socket or other tool, tighten to the following position. For this test, I used my 3/4" torque wrench to establish the position on 450 ft. lb. so we can see the rotation.
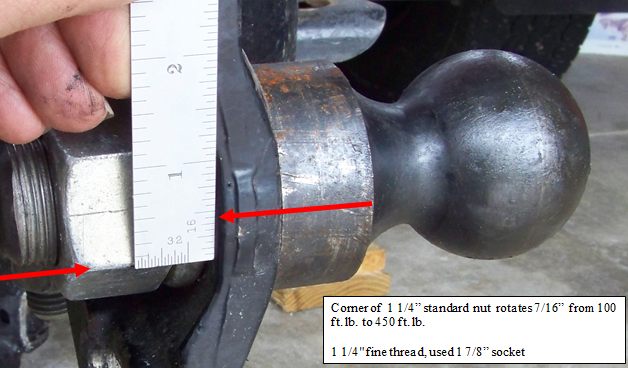
You can see the nut corner moved 7/16" to get to 450 ft lb. This repeated twice and the 3rd time it was 1/2". So between 7/16" and 1/2" will do it. Note: This was on "dry" threads.
While I was at it, I did the hitch head bolts too.
For the 3/4" grade 8 hitch head bolts needing 300 ft lb of torque.
Start with dry threads. (These values will not work on lubed threads)
Pre-torque to 100 ft. lb.

Mark the bolt head to the serrated washer and the nut to the serrated washer if you have the Reese trunnion bar trunnion head or in a way to see rotation on your brand head. We need to know if the bolt slips any during the heavier torquing process. I used a black sharpie marker.

Using a 3/4 breaker bar or other tool, torque to the following position. I used my 3/4" torque wrench to establish the position on 300 ft. lb. so we can see the rotation.

In this case the nut moved 1 1/2 flats. This diameter bolt needed more rotation from where I was measuring, so counting flats seemed to fit better to reproduce. Two of the 3 tests came out on 1 1/2 flats, the 3rd came out 1 5/8 flats. If you are between this tolerance you should be good.
This method of "torque to position" from a know pre-torque offers a better outcome over the weight of a person hanging on a length of pipe. The weight x distance in pure theory should work, however it came up short for me as compared to the torque wrench. Possibly likely due to inefficiency of a cantilevered wrench.
Also to note, there is some small error in these tests. This method is only as good as the calibration and repeatability of my torque wrench. However comparing this method to using nothing, an impact wrench, or the body weight x distance method your chances of getting adequate torque to a spec. are better.
Hope this helps and safe towing.
John


 Linear Mode


