Journey with Confidence RV GPS App RV Trip Planner RV LIFE Campground Reviews RV Maintenance Take a Speed Test Free 7 Day Trial ×
Sunline RV Forum
Sunline User Photos

Go Back   Sunline Coach Owner's Club > Technical Forums > Repairs and Maintenance
Click Here to Login

Join Sunline Club Forums Today


Reply
 
Thread Tools Search this Thread Display Modes
Old 12-11-2010, 07:30 AM   #1
Senior Member
 
awellis3's Avatar
 
Join Date: Jan 2010
Location: Virginia
Posts: 638
SUN #987
awellis3
Winterizing conundrum

We had a really cold snap here in Va. that caught me off guard. I managed to blow almost all of the water out of my lines using a portable 10gal. air tank.
However, I would like to put a water heater bypass on the tank. I have a diverter valve to allow the water pump to pick up A/F already installed (since the pump is easily accessible under my bed).
My difficulty is accessing the outlet of the WH. The tank is partly acessible from under the bed.

Here is a pic showing the small panel to the left under the swatter that is situated in front of the WH outlet.


Here is a view of the raised bed.
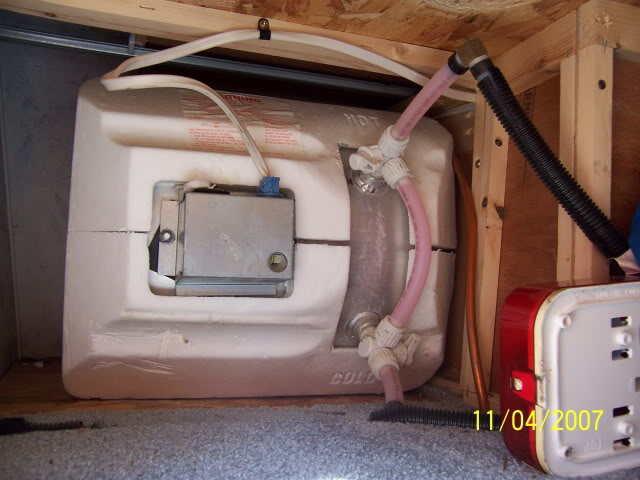
You can see the AC element. The cold water inlet is just below it and slightly to the right (hidden by the PO high-tech insulation).
I stuck my camera under the bed and pointed it to the right. This is what I can't get to.


Seems easy in the pic, but reaching under the bed, I can just touch the red fitting.

My plan at this point is to lift up the carpet next to the bed and make an access by sawing out the panel above the outlet. You can see in the above pic that someone cut a round hole as access, but it isn't large enough to get two hands and tools to the fitting. (And it's covered with a piece of cardboard - jeeze, I hate half-a$$ed work)

I found this online and think the 12" kit might do the job -
RV Winterizing Bypass on Sale

My only concern is the angle of the outlet and the rigidity of the plastic water line may be a problem.
Whatcha think?

Teach
__________________

__________________
https://thumb0.webshots.net/t/88/171/5/88/75/2165588750103096700MZYWsp_th.jpgWright Ellis and Penny Sedgley
'10 Tundra 4X4
SOB -'14 Rockwood 2604WS (Rocky)
"Life is a cruel teacher. She gives the test first; the lesson then follows."
awellis3 is offline   Reply With Quote
Old 12-11-2010, 08:10 AM   #2
Senior Member
 
Join Date: Mar 2008
Posts: 351
SUN #549
frank
Teach,

That round hole is probably factory. Mine has it and I have seen it in a few others. Once the bypass is installed, the round hole makes it easy to stick your hand in and flip the valve(s).

The bypass you linked is a 2 valve job and will work fine. The single valve ones work fine also. So do the 3 valves. My 2363 has the single valve, and I just put the same type into the build project. I chose that for simplicity, only one valve for him to move means less frantic phone calls because he has no hot water

The plastic pipes are fairly flexible, so I don't think you will have an issue with that. Now, those pipes appear to be the older polybutylene type, so you are going to want to be careful with them as they apparently do like to get brittle with age.

To get access for installation, I think the easiest way is to stand up the mattress, turn it and move it into the kitchen or whatever and get it out of the way. Then lift that carpet and you will find a bunch of screws holding the osb to the framing (on the fixed half, not the movable). Just remove the screws, move the osb out of the way and you will have a ton of room to work. May be easier to remove the screws from one half of the hinges for the movable portion so you arent wrestling a big hunk of osb. Cutting a hole obviously works too, but removing the panel and putting it back makes no sawdust.

And while you are in there you might want to cover up that exposed wiring on the electric element for the water heater. Looks like somebody removed the metal cover and did not replace it...

- Frank
__________________

__________________
frank is offline   Reply With Quote
Old 12-12-2010, 11:05 AM   #3
Senior Member
 
awellis3's Avatar
 
Join Date: Jan 2010
Location: Virginia
Posts: 638
SUN #987
awellis3
Quote:
Originally Posted by frank View Post
Teach,

That round hole is probably factory. Mine has it and I have seen it in a few others. Once the bypass is installed, the round hole makes it easy to stick your hand in and flip the valve(s).
Ah, good observation

Quote:
Just remove the screws, move the osb out of the way and you will have a ton of room to work. May be easier to remove the screws from one half of the hinges for the movable portion so you arent wrestling a big hunk of osb. Cutting a hole obviously works too, but removing the panel and putting it back makes no sawdust.
Man, that's a great idea. With the reach hole there, this is a one-time access issue, isn't it?

Quote:
And while you are in there you might want to cover up that exposed wiring on the electric element for the water heater. Looks like somebody removed the metal cover and did not replace it...
And mangled the bracket holding the therm and high temp cut off to boot. That's on the list also. Anyone have a pic of the back of an Atwood heater showing what all is supposed to be there and what it looks like?

Thanks a bunch. As soon as the weather breaks here, I'm agettin' my eelektrik screw stick and movin' me some OSB!

Teach
__________________
https://thumb0.webshots.net/t/88/171/5/88/75/2165588750103096700MZYWsp_th.jpgWright Ellis and Penny Sedgley
'10 Tundra 4X4
SOB -'14 Rockwood 2604WS (Rocky)
"Life is a cruel teacher. She gives the test first; the lesson then follows."
awellis3 is offline   Reply With Quote
Old 12-12-2010, 11:27 AM   #4
Senior Member
 
Steve Collins's Avatar
 
Join Date: Apr 2007
Location: New York
Posts: 1,846
SUN #264
Steve Collins is an unknown quantity at this point
Quote:
Originally Posted by awellis3 View Post
Anyone have a pic of the back of an Atwood heater showing what all is supposed to be there and what it looks like?
Here's the backside of mine. It has the two valve bypass but otherwise should be pretty much the same as yours.
__________________

'12 F250 4x4 Super Duty PowerStroke 6.7 diesel
2011 to present: '11 Cougar 326MKS
1999 to 2011: '99 Sunline T-2453
SUN264 * Amateur Radio kd2iat monitoring 146.52
Steve Collins is offline   Reply With Quote
Old 12-13-2010, 06:53 AM   #5
Senior Member
 
awellis3's Avatar
 
Join Date: Jan 2010
Location: Virginia
Posts: 638
SUN #987
awellis3
Yowsa!

Compared to yours, mine looks as if it has been in a demolition derby - and lost. I think since it is in essentially the under-bed, outside-accessible storage area, my WH suffered damage from something carried near it.
When I do the repairs, I'll install a partition to isolate the heater from the rest of the storage area.

Thanks for the pic,
Teach
__________________
https://thumb0.webshots.net/t/88/171/5/88/75/2165588750103096700MZYWsp_th.jpgWright Ellis and Penny Sedgley
'10 Tundra 4X4
SOB -'14 Rockwood 2604WS (Rocky)
"Life is a cruel teacher. She gives the test first; the lesson then follows."
awellis3 is offline   Reply With Quote
Old 12-13-2010, 07:15 AM   #6
Senior Member
 
Steve Collins's Avatar
 
Join Date: Apr 2007
Location: New York
Posts: 1,846
SUN #264
Steve Collins is an unknown quantity at this point
Quote:
Originally Posted by awellis3 View Post
Compared to yours, mine looks as if it has been in a demolition derby - and lost. I think since it is in essentially the under-bed, outside-accessible storage area, my WH suffered damage from something carried near it.
When I do the repairs, I'll install a partition to isolate the heater from the rest of the storage area.
Interesting as mine is under the bed as well. Luckily, it is off to the left of the rear outside hatch in the very far corner. The only thing I have ever placed there is an old Coleman stove, and and maybe a couple of little plastic tote boxes on top of the stove. Except for a couple of small dents in the foam insulation, it looks new.
__________________

'12 F250 4x4 Super Duty PowerStroke 6.7 diesel
2011 to present: '11 Cougar 326MKS
1999 to 2011: '99 Sunline T-2453
SUN264 * Amateur Radio kd2iat monitoring 146.52
Steve Collins is offline   Reply With Quote
Old 12-13-2010, 12:15 PM   #7
Member
 
matti's Avatar
 
Join Date: Sep 2010
Posts: 63
SUN #1458
matti is an unknown quantity at this point
This is my conundrum
__________________

__________________
Matt & Ginny
2004 Sunline Solaris 264SR
2008 Silverado 2500 HD LTZ 4x4 6.0L
HD Tow Package\Integrated Brake Ctrl
3.73 LS Rear
matti is offline   Reply With Quote
Reply

« Tires | New Battery »

Currently Active Users Viewing This Thread: 1 (0 members and 1 guests)
 

Posting Rules
You may not post new threads
You may not post replies
You may not post attachments
You may not edit your posts

BB code is On
Smilies are On
[IMG] code is On
HTML code is Off
Trackbacks are Off
Pingbacks are Off
Refbacks are Off


Similar Threads
Thread Thread Starter Forum Replies Last Post
Winterizing a T-1950 Downeast Campah Sunline Travel Trailers 16 08-04-2015 03:40 PM
Winterizing question Nancy G. Repairs and Maintenance 5 10-14-2009 04:29 PM
Winterizing question EMD_Driver Repairs and Maintenance 3 09-13-2009 08:19 PM
Winterizing T2753 Both2Retired Sunline Community 4 10-23-2007 09:00 PM
Winterizing Advice sunline1950 Sunline Community 4 10-18-2006 07:01 PM


» Featured Campgrounds

Reviews provided by

Disclaimer:

This website is not affiliated with or endorsed by Sunline RV or any of its affiliates. This is an independent, unofficial site.


All times are GMT -6. The time now is 08:40 AM.


×