Journey with Confidence RV GPS App RV Trip Planner RV LIFE Campground Reviews RV Maintenance Take a Speed Test Free 7 Day Trial ×
Sunline RV Forum
Sunline User Photos

Go Back   Sunline Coach Owner's Club > Technical Forums > Repairs and Maintenance
Click Here to Login

Join Sunline Club Forums Today


Reply
 
Thread Tools Search this Thread Display Modes
Old 05-21-2017, 10:32 PM   #1
Moderator
 
JohnB's Avatar
 
Join Date: Nov 2006
Location: Ohio
Posts: 12,649
SUN #89
JohnB is on a distinguished road
Winegard Antenna Repair

Hi All,

Yesterday I was pulling the camper out of the barn and did my normal walk around, twice no less, looking for, all jacks up, blocks out , steps up, all the normal things I do when taking the camper out of the barn. I slowly start pulling out and I hear a crunch… What?? backed up a foot and got out to look. Did 2 more passes around the camper and there is nothing in the way on the ground.

I am behind the camper and look up. Ohhhhh…. The antenna is still up from doing work on the roof Friday night…. Let’s just say, a 12 foot high door is not enough for a Winegard crank up antenna to pass through uncrunched… Here all these years in the campground I always check this. Always. I have even caught other folks pulling out of their site and flagged them down, Hey your antenna is up! And Cindy even has a sign we hang on the crank handle to remind us when we are in camp the antenna is up. But the barn, there is no antenna up normally and well, I goofed…

So now we have a new post on how to fix the problem… 12 years ago I bought an entire Winegard Sensor III antenna as the one we had never worked from when our prior camper was new. It seems in 2004 Winegard had a board issue in the roof head unit and they died early in their use. In our case, it never worked at all. So I bought the whole unit and just changed out the head. I kept the rest up in the rafters of 2 barns since then in case I needed the parts. Today I used them…

I will do this in pics as we do not have many antenna posts yet showing how these come apart.

I did not get a total pic of the damage, I was too flustered at the time but I did get a pic of the bent up head unit. See here. It popped the plastic covered off landing upside down on the roof and bent up the front bat wing. These pics are after I cranked it down which went really hard.


The damage to the head was not that much. The aluminum bat wing was pretty easy to straighten out and the plastic head was already off which I never knew how it came apart. Amazingly nothing in the head broke. I straightened everything out and put the head back together. Here are some pics of the plastic covers and the PC board.

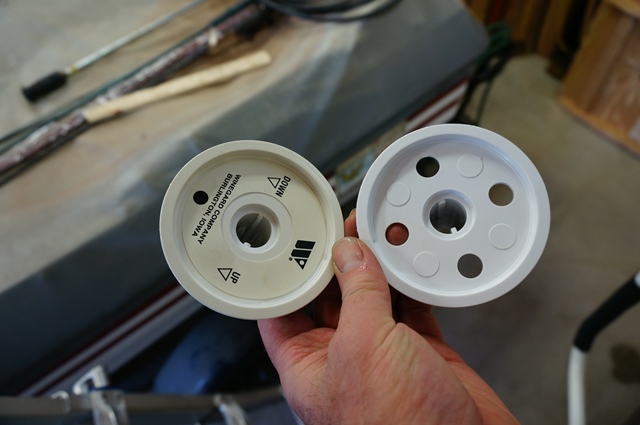
The inside of the bottom case cover


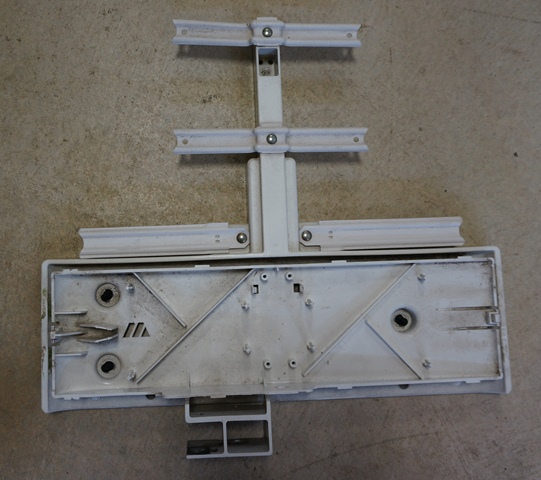
The inside of the top case cover


The bat wing straightened and installed back in the bottom case cover
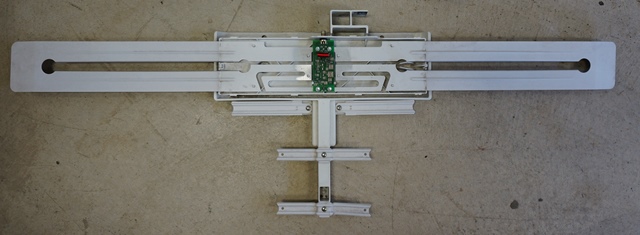

The PC board


Here is how this top cover mates with the lower cover. They slide together and lock.

Place the top on the bottom cover but hold the top back to allow the tabs inside to align. You can see in the pic, the top cover is shifted to the left.


Now slide the whole top cover until it snaps in place to the right.


Here is the back snap lock. It is in the center of bat wind


Here is the front snap lock. It is in the center of bat wind


If you press those 2 snap locks in and push the cover to the back, then the cover comes off.

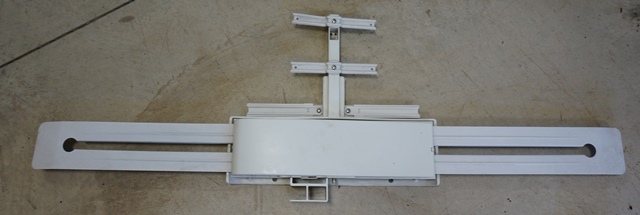
The entire head unit shot


Next was to figure out why the head cranked up and down so hard. I could see the gear on the lift arm was broke.


This gear was cracked inside


Here is the old cracked gear next to the new gear and the damaged upper arm next to a new arm. It bent the end and elongated the pivot hole.


At this point I needed to make a decision if I was going to change the cable as it is threaded through the new arm with the connectors crimped on. This was originally built with no connectors on the ends of the cables and threaded through the arm, then crimped the fitting on. The old cable is 13 ½ years old, the outside of the cable is hard from sun damage and the cable weather boots are cracked. I have brand new cable already on the new arm I need to put on and I do not have to deal with the connectors. You have this half apart now, so just change the cable arm and pivot head. So that was the route I choose. Getting the old cable out and the new cable in through the roof took more time than anything else in this repair.

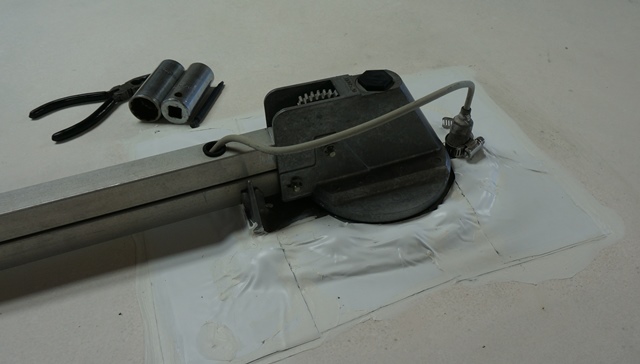
In order to take the rotating head off, you need to pull the crank arm inside and pull the worm gear out. This is not really hard, it took a few minutes.

The old ceiling crank.


You unloosen a hex head setscrew in the end of the handle and handle and the rotating knob comes out
Looks like this


Here is the ceiling portion left with the hex worm shaft sticking out.


You pull the hex worm shaft out up on the roof. Take off the black bushing nut to expose the worm shaft.


The unscrew the worm shaft up and out


Once the worm shaft is out, you go back inside and remove a plastic nut up in the bottom base of the unit to release the rotating head up on the roof. This takes a 15/16” deep socket and an extension to get up high enough. While I used a 1/2” drive socket, it was all I had deep enough to work. You really do not need one that heavy but it does work. The nut came out easy.


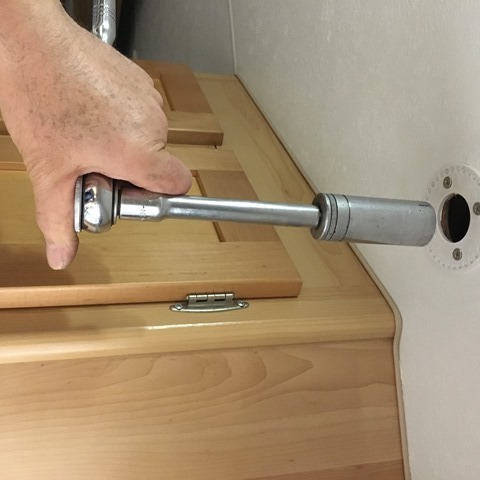
And the nut. Try and make sure you hold the socket steady so the nut come out with the socket and does not fall into the roof cavity. If it does, you need to go fishing for it. I did and caught it…


Once the nut is off, the rotating head will lift out easy.


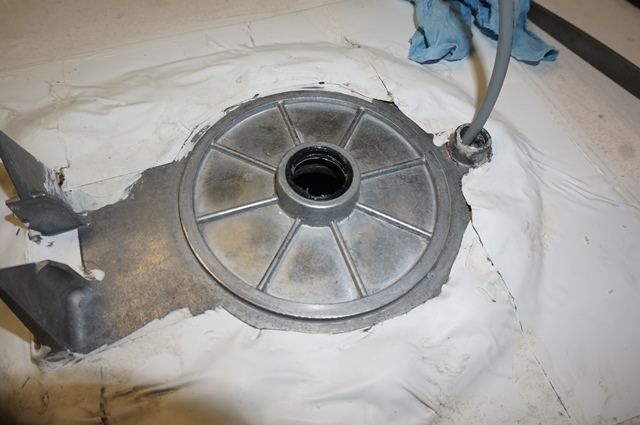
Then to get the old cable out. This area can be a water intrusion area so Sunline pumped Dicro caulk in around the cable. The boot can crack and then water can get in. With the caulk around the cable, it helps stop if from getting in the camper.


I heated the Dicor gently with a heat gun as you do not want to affect the rubber roof and in my case, I have Eternabond over the mounting flange caulking I did not want to disturb. Then dig out the old caulk. Then go inside and fish out the cable from the roof cavity, there is a splice and unhook it.


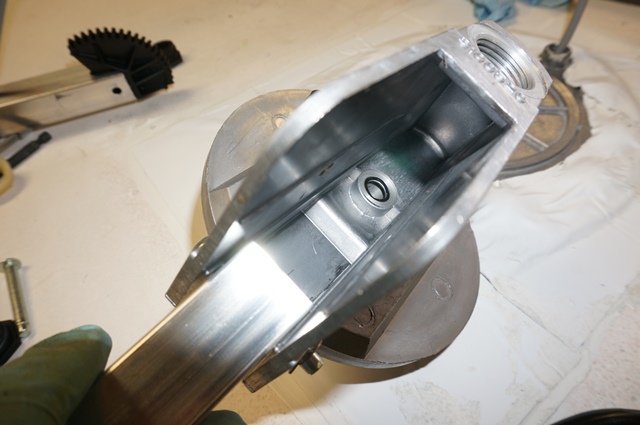
In many cases you can just pull the cable up and out through the roof. In my case this was not simple as Sunline installed the antenna all pre-assembled. They did not leave enough room in the roof pad which holds the antenna base to allow the connector to pass through. This pics shows the cable and zero clearance for the connector.


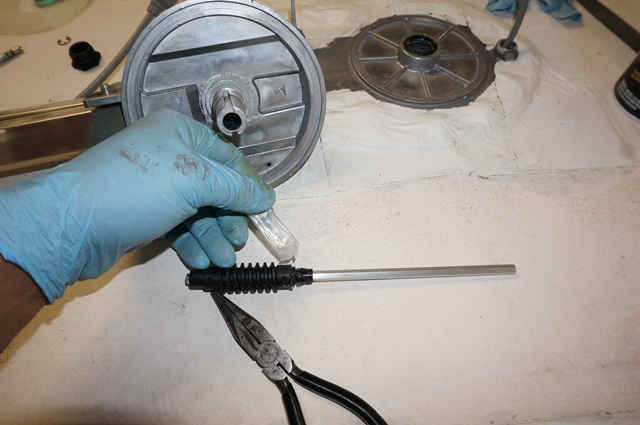
I whittle out enough clearance to get the old cable out. Then I had to make sure I could get a cable with the connector on it, down from above and into the roof cavity. So I did a test run with the old cable to check the clearance.


Once I knew I can get the new cable down into the roof cavity, the rest of the install went pretty easy once again. I decided to use the new worm. They make these extra long to fit in most any RV roof. You need to cut it to the right length.


There are also lube points on the antenna. Silicone is the lube Winegard recommends. They want you to lube the seal the worm shaft goes through and the thin thrust washer pad that the rotating head pivots on.
I used food grade (because that is what I had) silicone grease on the worm shaft seal and the pivot head seal.

This is the worm shaft seal, the black ring in the center of the housing


Lubing the worm shaft area that turns in the housing worm shaft seal


The rotating head seal. The black quad seal in the middle


And then you place the thin thrust washer pad on and I used liquid silicone spray for this


Then the rotating head goes on next and you install the plastic nut inside the camper to hold it in place. There is a small thin plastic thrust washer that goes above the plastic nut. Don’t forget it. Do not over tighten as the head will not rotate. Test it before going forward that it will spin nicely when tightened up enough.

When the new rotating head is on, then insert the new worm shaft and fully seat it. You need to turn the shaft to thread in the worm to the lift arm gears.


And all the way down. You can rotate it from the top ofrgo inside and turn it. The black bushing cap nut will not fit right if the worm is not down far enough.


Then you can install the crank and rotating knobs inside. My old one has turned somewhat yellow from the sun over the years, so I changed it out to the new one


And now it looks better inside without the yellowing.


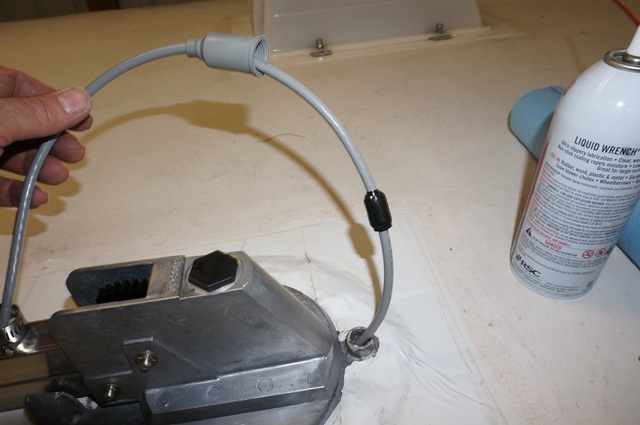
Then you can lift the arms to put the antenna head on and check the cable will flex correctly under full up and full rotation. There is this sticker on the side of the head about waterproofing of the cable connection.


I did as they stated and also wrapped a few turns of 3M Super 88 electrical tape over the cable fittings to help further waterproof it. If water gets in that connection, it is not good. My old Sensor II head had a boot over this area.

Once I know the cable lengths are good I push any excess cable back into the roof cavity. I also electrical tape built up the cable OD to create a caulk stop just below the roof line. I did not want all the caulk going down in the roof cavity as we only need it to seal the cable above the roof line.

The build up

The cable set in place with the buildup on the bottom.


Then Dicor caulked the cable


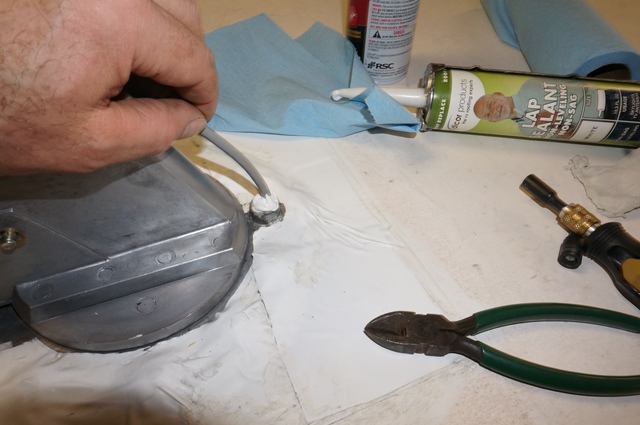
And I added a stainless steel hose clamp over the cable. That boot has popped off before over the past and the clamp stops that and from the boot splitting from sun damage.


Here are 2 maintenance lube locations for silicone spray. The gear and the rotating disk thrust washer pad. The sticker on mine says do this twice a year.


You remove the black plug and spray liquid silicone in the hole and rotate the head full travel a few times to work the lube around.


And the finished unit


Point in all this… “remember” to lower the antenna, even in the barn… And if you break it, hope this post will helps someone in the future.

Thanks for looking.

John
__________________

__________________
Current Sunlines: 2004 T310SR, 2004 T1950, 2004 T2475, 2007 T2499, 2004 T317SR
Prior Sunlines: 2004 T2499 - Fern Blue
2005 Ford F350 Lariat, 6.8L V10 W/ 4.10 rear axle, CC, Short Bed, SRW. Reese HP trunnion bar hitch W/ HP DC

Google Custom Search For Sunline Owners Club
JohnB is offline   Reply With Quote
Old 05-22-2017, 05:49 AM   #2
Member
 
Join Date: May 2017
Location: Tennessee
Posts: 39
SUN #9333
JohnByrum is an unknown quantity at this point
Awesome job John and a wonderful wright up. Me being new didn't even know it rotated. I used mine for the first time this weekend to see if an old TV I had in the closet would pick up any stations. Evidently my circuit board is good.


Sent from my iPhone using Tapatalk
__________________

__________________
JohnByrum is offline   Reply With Quote
Old 05-22-2017, 08:24 AM   #3
Senior Member
 
Join Date: Apr 2011
Location: Maine
Posts: 3,357
SUN #2097
mainah is an unknown quantity at this point
Good write up fix several for friends including mine that came that way so your not alone! That's a fairly late one has a much better amp board. I replaced my old one with a flat panel less parts razes much easier and has marginally better reception the big benefit it's a lot easier to find stations as it receives from both directions.
__________________
mainah is offline   Reply With Quote
Old 05-22-2017, 10:39 AM   #4
Senior Member
 
Relie's Avatar
 
Join Date: Jul 2014
Location: Massachusetts
Posts: 279
SUN #6579
Relie is an unknown quantity at this point
Antena

John, great write up. I wish I had seen something like this before I ripped into mine. I added that antena to mine with very little change in reception. It was only after I changed over to a different antena that I realized the cable was worn out. It had chafed the wire all the way through the leads and was shorted out. Changed the cable and all is good now. Old story, check everything so you don't have to do the job twice.

Dave
__________________
1999 Sunline Solaris T2553--SOLD--
Relie is offline   Reply With Quote
Old 05-22-2017, 11:59 AM   #5
Senior Member
 
Join Date: Apr 2011
Location: Maine
Posts: 3,357
SUN #2097
mainah is an unknown quantity at this point
The big box stores have water proof type "F" connectors. They make a tool to set the ends but you can do it with an open end wrench that will just fit over the cable a good push on the wrench will set them. Support the end so you don't mess up the center connector. They are SS and "O" ringed. The cable to the antenna is very important it injects 12 volts to the amp inside of the antenna to make it work with out that supply you would be lucky to get a signal sitting under the tower.
__________________
mainah is offline   Reply With Quote
Old 05-22-2017, 10:59 PM   #6
Moderator
 
JohnB's Avatar
 
Join Date: Nov 2006
Location: Ohio
Posts: 12,649
SUN #89
JohnB is on a distinguished road
Hi Guys,

Thanks for the good words, much appreciated.

Mainah, thanks for the tip on the waterproof F type connectors. I will look for them the next time I'm at the store to see what they look like. Mine may have had that, I never looked in the end. I have a new cable in the box the whole new antenna came in and I'll look there too. I did see that the outside of the crimp on sleeve was stainless and not plated steel.

Thanks

John
__________________
Current Sunlines: 2004 T310SR, 2004 T1950, 2004 T2475, 2007 T2499, 2004 T317SR
Prior Sunlines: 2004 T2499 - Fern Blue
2005 Ford F350 Lariat, 6.8L V10 W/ 4.10 rear axle, CC, Short Bed, SRW. Reese HP trunnion bar hitch W/ HP DC

Google Custom Search For Sunline Owners Club
JohnB is offline   Reply With Quote
Old 05-22-2017, 11:07 PM   #7
Moderator
 
JohnB's Avatar
 
Join Date: Nov 2006
Location: Ohio
Posts: 12,649
SUN #89
JohnB is on a distinguished road
Quote:
Originally Posted by JohnByrum View Post
Awesome job John and a wonderful wright up. Me being new didn't even know it rotated. I used mine for the first time this weekend to see if an old TV I had in the closet would pick up any stations. Evidently my circuit board is good.
Hi John,

Winegard came out with and add on to the older Sensar attenna's right after the switch from analog to digital. They call it a RV- Wing Wingman UHF booster. It just clips on. It really helped mine pull in more stations

Here is one on Amazon there are other places that sell them too in case yours does not have it already.

https://www.amazon.com/Winegard-RV-W.../dp/B001U2DPUE

Thanks

John
__________________
Current Sunlines: 2004 T310SR, 2004 T1950, 2004 T2475, 2007 T2499, 2004 T317SR
Prior Sunlines: 2004 T2499 - Fern Blue
2005 Ford F350 Lariat, 6.8L V10 W/ 4.10 rear axle, CC, Short Bed, SRW. Reese HP trunnion bar hitch W/ HP DC

Google Custom Search For Sunline Owners Club
JohnB is offline   Reply With Quote
Old 05-23-2017, 05:43 AM   #8
Senior Member
 
Join Date: Apr 2011
Location: Maine
Posts: 3,357
SUN #2097
mainah is an unknown quantity at this point
Yeah have a look at the connector there is a plastic end right were the cable enters the connector it is "O" ringed. Once the cable is in place the plastic end is pushed in place and makes the cable fast and seals the end. I started using them about 10 years ago for video and TV's they were way expensive when they first came out but once they were in place I never had to deal with them again. We of course had the tools both to strip the cable and press in the end but it can be done with common tools just takes a lot longer and every so often it doesn't go well. I still have a bag of them and some from the big box I could take a photo for you.
__________________
mainah is offline   Reply With Quote
Old 05-24-2017, 08:52 PM   #9
Moderator
 
JohnB's Avatar
 
Join Date: Nov 2006
Location: Ohio
Posts: 12,649
SUN #89
JohnB is on a distinguished road
Quote:
Originally Posted by mainah View Post
Yeah have a look at the connector there is a plastic end right were the cable enters the connector it is "O" ringed. Once the cable is in place the plastic end is pushed in place and makes the cable fast and seals the end. I started using them about 10 years ago for video and TV's they were way expensive when they first came out but once they were in place I never had to deal with them again. We of course had the tools both to strip the cable and press in the end but it can be done with common tools just takes a lot longer and every so often it doesn't go well. I still have a bag of them and some from the big box I could take a photo for you.
Hi mainah,

H'mm I'm not sure if mine had the O ring or not. I did not look at the inside of the female connector on the antenna. I just screwed it together and taped over the whole thing.

But, here is the old antenna head that died long ago. It had a rubber boot setup over the connector.


The head female connector


The boot


The male end of the boot cable


And extra new cable that came in the box. This was inside interconnection cable


Is the O ring part in the actual antenna head of the new one? This is the only pic I have of the new one now taped up on the camper.


I could not see an O ring inside from that not great pic, but there might be one. Does yours look like this?

Thanks

John
__________________
Current Sunlines: 2004 T310SR, 2004 T1950, 2004 T2475, 2007 T2499, 2004 T317SR
Prior Sunlines: 2004 T2499 - Fern Blue
2005 Ford F350 Lariat, 6.8L V10 W/ 4.10 rear axle, CC, Short Bed, SRW. Reese HP trunnion bar hitch W/ HP DC

Google Custom Search For Sunline Owners Club
JohnB is offline   Reply With Quote
Old 05-25-2017, 07:28 PM   #10
Senior Member
 
Join Date: Apr 2011
Location: Maine
Posts: 3,357
SUN #2097
mainah is an unknown quantity at this point
The crimp on's don't have an "O" ring the newer type F connectors do the boots are a pretty common item with many out door antenna installs. I actually use the same butal tape for the windows etc on my ham radio connections and then cover the entire thing in plastic tape. I'm 500 miles from home right now so I can't take a picture for you but if your in the big box store have a look at their F connectors.
__________________
mainah is offline   Reply With Quote
Old 05-25-2017, 07:41 PM   #11
Moderator
 
JohnB's Avatar
 
Join Date: Nov 2006
Location: Ohio
Posts: 12,649
SUN #89
JohnB is on a distinguished road
OK mainah, got it, thanks. I'll have a look the next time I'm in the store for the F connectors. I have not normally played around that much in the coaxial cable arena so learning new stuff here. Thanks.

H'mm, the butyl tape trick. That's a great idea!! Thanks!

Have a good trip.

John
__________________
Current Sunlines: 2004 T310SR, 2004 T1950, 2004 T2475, 2007 T2499, 2004 T317SR
Prior Sunlines: 2004 T2499 - Fern Blue
2005 Ford F350 Lariat, 6.8L V10 W/ 4.10 rear axle, CC, Short Bed, SRW. Reese HP trunnion bar hitch W/ HP DC

Google Custom Search For Sunline Owners Club
JohnB is offline   Reply With Quote
Old 05-25-2017, 07:55 PM   #12
Senior Member
 
Join Date: Apr 2011
Location: Maine
Posts: 3,357
SUN #2097
mainah is an unknown quantity at this point
I'm a ham radio guy and I take care of our clubs repeater gear we have 4 of them on mountains of NH two are atop Mt Washington they take extreme abuse from the weather and the butyl tape is the only thing I have found to keep the water out. Out biggest problems with them is wind driven falling ice damaging the antennas a 50# chunk of rime ice and a 130 MPH wind is pretty hard on them!
__________________
mainah is offline   Reply With Quote
Old 05-25-2017, 08:08 PM   #13
Moderator
 
JohnB's Avatar
 
Join Date: Nov 2006
Location: Ohio
Posts: 12,649
SUN #89
JohnB is on a distinguished road
Well, you have pretty good test in motion there.... I hope my camper never see your conditions.... Yes, butyl will form right over the connector perfectly and the tape over the butyl will keep the butyl from getting beat up. What a great combo!! and cheap too.
__________________

__________________
Current Sunlines: 2004 T310SR, 2004 T1950, 2004 T2475, 2007 T2499, 2004 T317SR
Prior Sunlines: 2004 T2499 - Fern Blue
2005 Ford F350 Lariat, 6.8L V10 W/ 4.10 rear axle, CC, Short Bed, SRW. Reese HP trunnion bar hitch W/ HP DC

Google Custom Search For Sunline Owners Club
JohnB is offline   Reply With Quote
Reply


Currently Active Users Viewing This Thread: 3 (0 members and 3 guests)
 

Posting Rules
You may not post new threads
You may not post replies
You may not post attachments
You may not edit your posts

BB code is On
Smilies are On
[IMG] code is On
HTML code is Off
Trackbacks are Off
Pingbacks are Off
Refbacks are Off


Similar Threads
Thread Thread Starter Forum Replies Last Post
Antenna - Winegard Sensar III or IV dtstanton Modifications 4 02-23-2014 01:21 PM
Problems with my Winegard antenna set up dicknlin Repairs and Maintenance 1 07-14-2013 03:36 PM
Older Winegard Antenna ronniewarren Sunline Truck Campers 11 03-12-2012 06:13 PM
winegard hdtv wingman Antenna curtislow1 Modifications 21 02-21-2011 05:52 AM


» Featured Campgrounds

Reviews provided by

Disclaimer:

This website is not affiliated with or endorsed by Sunline RV or any of its affiliates. This is an independent, unofficial site.


All times are GMT -6. The time now is 11:41 PM.


×