 |
|
 02-22-2017, 06:28 PM
|
#81
|
|
Moderator
Join Date: Nov 2006
Location: Ohio
Posts: 12,649
SUN #89
|
Quote:
Originally Posted by Thomascine

I may need to replace the clamps if I can't find another way to support the wires underneath.
|
If you are looking for wire holders under the camper, these type work well. Sunline used them all over on mine on the bottom.
Any hardware or lumber yard should have them. But I can't get a hit on Lowes to the right name for them. I know you can buy them in smaller qtys then a 100 pack.
https://www.amazon.com/1-nylon-cable...0cable%20clamp
__________________
__________________
Current Sunlines: 2004 T310SR, 2004 T1950, 2004 T2475, 2007 T2499, 2004 T317SR
Prior Sunlines: 2004 T2499 - Fern Blue
2005 Ford F350 Lariat, 6.8L V10 W/ 4.10 rear axle, CC, Short Bed, SRW. Reese HP trunnion bar hitch W/ HP DC
 Google Custom Search For Sunline Owners Club
|

|

|
|
02-22-2017, 06:37 PM
|
#82
|
|
Senior Member
Join Date: Sep 2016
Location: Virginia
Posts: 814
SUN #8893
|
Yep, those are the clamps that were under there. The two that were there crumbled up. If I cannot find another way of securing the wires that does not require screwing them in then I will go back to those. It looks like I may need to put a couple of screws in anyway to hold up the membrane.
Thanks,
Tommie
__________________
__________________
|

|
|
|
02-23-2017, 06:33 PM
|
#83
|
|
Senior Member
Join Date: Sep 2016
Location: Virginia
Posts: 814
SUN #8893
|
Good evening,
It ain't pretty but the insulation foam board is in.
 Didn't like working with the foam board. The regular insulation is a lot easier to work with.
Thanks,
Tommie
Didn't like working with the foam board. The regular insulation is a lot easier to work with.
Thanks,
Tommie
__________________
1987 Sunline T1550
2012 Ford Expedition EL Limited 5.4L V8, 4WD
"Twenty years from now you will be more disappointed by the things that you didnt do than by the ones you did do..." Mark Twain]
|
|
|
|
|
02-26-2017, 01:06 PM
|
#84
|
|
Senior Member
Join Date: Sep 2016
Location: Virginia
Posts: 814
SUN #8893
|
Happy Sunday!
Well, I think I may have a little bit of an issue. I put in a piece of plywood to see how it feels before it all gets glued and screwed down. When I stand on it between where the new OSB meets the existing it seems to give a little between the joists. I am not sure if it is because it is not screwed in yet or additional support will need to be added. I have seen on other posts where other owners did square grids. Any thoughts on this?

The other problem is not all of the new OSB seems to be flush with the existing when pressed down. Again, this could be because it is not screwed down.
Also, The plywood is not an exact fit. How much of a gap between old and new OSB is considered acceptable?
Thanks,
Tommie
__________________
1987 Sunline T1550
2012 Ford Expedition EL Limited 5.4L V8, 4WD
"Twenty years from now you will be more disappointed by the things that you didnt do than by the ones you did do..." Mark Twain]
|
|
|
|
|
02-26-2017, 08:55 PM
|
#85
|
|
Moderator
Join Date: Nov 2006
Location: Ohio
Posts: 12,649
SUN #89
|
Quote:
Originally Posted by Thomascine
Happy Sunday!
Well, I think I may have a little bit of an issue. I put in a piece of plywood to see how it feels before it all gets glued and screwed down. When I stand on it between where the new OSB meets the existing it seems to give a little between the joists. I am not sure if it is because it is not screwed in yet or additional support will need to be added. I have seen on other posts where other owners did square grids. Any thoughts on this?
|
When you mean give a little, do you mean between the floor joists, the new OSB flexes (bows) down between the joint of the old and new OSB?
Does the old OSB also flex the same?
Have you been able to measure the amount of bow down?
The OSB if unsupported across that joint. It will flex some. Knowing how much will help in answering what to do.
If you want to take some of the flex out, you can add a piece of the flooring OSB or 3/4" thick flat board across the old floor and the new floor underneath and screw it between both the old and new floor. It can be the full width between the joints or only about 6" long. That helps bridge the gap and helps hold each other together so they flex as one.
What is the "square grids" you have seem other do? Do you have a link?
Quote:
|
The other problem is not all of the new OSB seems to be flush with the existing when pressed down. Again, this could be because it is not screwed down.
|
If you want to "test" this, just screw down (no glue yet) the new floor at each joist and see if the problem goes away. Then you know and can take the screws back out. It might be some of the old OSB has shrunk or more so, expanded. If the floor is screwed down and the hump is still there, a hand power belt sander if you have access to one with a 60 or 80 grit belt on it will take off the hump and blend it fairly quickly.
Quote:
Also, The plywood is not an exact fit. How much of a gap between old and new OSB is considered acceptable?
|
The gap is not a show stopper, what are you putting over the top of it? vinyl tile or carpet? Pending that answer and if it is over a direct high traffic area
you may need to fix this differently. Need to know the floor covering first before we can help with the fix.
Your doing good. Keep it up! 
John
__________________
Current Sunlines: 2004 T310SR, 2004 T1950, 2004 T2475, 2007 T2499, 2004 T317SR
Prior Sunlines: 2004 T2499 - Fern Blue
2005 Ford F350 Lariat, 6.8L V10 W/ 4.10 rear axle, CC, Short Bed, SRW. Reese HP trunnion bar hitch W/ HP DC
Google Custom Search For Sunline Owners Club
|
|
|
|
|
02-26-2017, 10:39 PM
|
#86
|
|
Senior Member
Join Date: Sep 2016
Location: Virginia
Posts: 814
SUN #8893
|
Good evening JohnB,
Quote:
Originally Posted by JohnB
When you mean give a little, do you mean between the floor joists, the new OSB flexes (bows) down between the joint of the old and new OSB?
Yes, it seems like it bows down between the joists.
Does the old OSB also flex the same?
The old OSB does not appear to flex at all.
Have you been able to measure the amount of bow down?
I didn't think to measure but enough for me to notice.
The OSB if unsupported across that joint. It will flex some. Knowing how much will help in answering what to do.
If you want to take some of the flex out, you can add a piece of the flooring OSB or 3/4" thick flat board across the old floor and the new floor underneath and screw it between both the old and new floor. It can be the full width between the joints or only about 6" long. That helps bridge the gap and helps hold each other together so they flex as one.
What is the "square grids" you have seem other do? Do you have a link?
Here is kinda what I was talking about. I couldn't find the exact websites that I originally visited. I have been on so many.
http://hilandfrog.smugmug.com/Other/.../IMG0012-S.jpg
http://jasonwilliams400com.startlogi...Rot_Doctor.jpg
http://cdn.blog.rvshare.com/wp-conte...to3.jpg?de6dcd
It looks like some people put in horizontal pieces. I was thinking of putting horizontal 2x2 pieces between the joists where the new OSB meets the old to add support there, especially in the traffic area.
If you want to "test" this, just screw down (no glue yet) the new floor at each joist and see if the problem goes away. Then you know and can take the screws back out. It might be some of the old OSB has shrunk or more so, expanded. If the floor is screwed down and the hump is still there, a hand power belt sander if you have access to one with a 60 or 80 grit belt on it will take off the hump and blend it fairly quickly.
Unfortunately, I don't have one of these in my tool collection. I had considered screwing down the plywood to see but kinda got frustrated and left it alone for a while.
The gap is not a show stopper, what are you putting over the top of it? vinyl tile or carpet? Pending that answer and if it is over a direct high traffic area
you may need to fix this differently. Need to know the floor covering first before we can help with the fix.
I was thinking of both. Replacing the vinyl through out the camper. And I may put carpet on top of that under the dinette table. I hadn't really made up my mind on the carpet for the dinette but definitely going with vinyl throughout the main area.
John |
Thanks for the advice and help.
Thanks,
Tommie
__________________
1987 Sunline T1550
2012 Ford Expedition EL Limited 5.4L V8, 4WD
"Twenty years from now you will be more disappointed by the things that you didnt do than by the ones you did do..." Mark Twain]
|
|
|
|
|
02-27-2017, 03:27 PM
|
#87
|
|
Moderator
Join Date: Nov 2006
Location: Ohio
Posts: 12,649
SUN #89
|
Hi Tommie,
OK, if you are going to put vinyl tile over the joint, this pretty much sets a need in the course of correction.
The issue is the flexing between the old OSB and the new OSB. If you can feel a flexing difference between the old and new floor, odds are high that flexing will in short order start a crack in the vinyl tile. And over a year or two, the crack will rip right at the joint between the old and new floor.
Your suggestion of putting a 2 x 2, or a double stacked set of 2 x 2's screwed together, if you have a large gap between the joint of the old and new floor is a good idea. Just split the width (1 1/2") 3/4" under old floor and 3/4" under new floor. Then using flat head screws, screw into each. pilot drill the holes in the OSB so it does not split open so close to the edge. This will create a much stiffer joint and if the floor flexes, as it will, the old and new floor will flex as one and not create the crack.
If you want and you have the room, and can cut the 2 x 2 so it just fits each space, they are all most likely different, you can put 1 Kreg screw in the side to the floor joist. This is not a mandate, but will help stiffen up the floor even more in the heavy traffic area.
Now the gap, once you get the 2 x 2 in, the larger gaps needs to be filled flush with the top of the floor or else you have odds of getting a crack in the tile. You do not need to worry about a hair line gap or 1/32" gap but anything much bigger should be filled.
Now what to fill the gap with? In the carpet areas, you could use a outdoor rated house siding caulk. I am not exactly sure what will be the "right" caulk under floor tile. It needs to be flexible enough to not crack/crumble over time and Ideally not shrink majorly. Maybe another SOC member has had success before with some type of outdoor caulk that would work under a tile floor. And if you have to buy a tube of it, then use it too where the carpet is. If you can find a flooring store, they deal with flooring for a living and I'm assuming recommend the right product. Just tell them the camper lives in an unheated environment with freezing and 100 degree summer temps and can have high levels of moisture at times.
The bump difference, those sharp edges of the ends of the OSB need to be smoothed out or they will create the tile crack too. I do not know how high the difference is, 1/32", 1/16" or and 1/8". The 1/32" can be hand sanded with 60 grit sand paper stapled to a 2 x 4 block. Larger can too, it just may take a while.
If you are into "thick", do you have a buddy you can borrow a hand belt sander from? Mine looks like this and uses a 3" wide x 21 " long belt. There are several brands of them. This type of sander will grind off the 1/8" humps in about 5 to 10 minutes tops.


That one is now over 33 year old... and still going strong.
Hope this helps
John
__________________
Current Sunlines: 2004 T310SR, 2004 T1950, 2004 T2475, 2007 T2499, 2004 T317SR
Prior Sunlines: 2004 T2499 - Fern Blue
2005 Ford F350 Lariat, 6.8L V10 W/ 4.10 rear axle, CC, Short Bed, SRW. Reese HP trunnion bar hitch W/ HP DC
Google Custom Search For Sunline Owners Club
|
|
|
|
|
02-27-2017, 05:58 PM
|
#88
|
|
Senior Member
Join Date: Sep 2016
Location: Virginia
Posts: 814
SUN #8893
|
Thanks JohnB.
Quote:
Originally Posted by JohnB
The issue is the flexing between the old OSB and the new OSB. If you can feel a flexing difference between the old and new floor, odds are high that flexing will in short order start a crack in the vinyl tile. And over a year or two, the crack will rip right at the joint between the old and new floor.
This is what I was afraid of. 
If you want and you have the room, and can cut the 2 x 2 so it just fits each space, they are all most likely different, you can put 1 Kreg screw in the side to the floor joist. This is not a mandate, but will help stiffen up the floor even more in the heavy traffic area.
This is what I was thinking of doing since the Kreg is easy to use (now that I know how to use it).
Now the gap, once you get the 2 x 2 in, the larger gaps needs to be filled flush with the top of the floor or else you have odds of getting a crack in the tile. You do not need to worry about a hair line gap or 1/32" gap but anything much bigger should be filled.
I did a little research and I am going to try DAP Flexible Floor Patch and Leveler. It is supposed to remain flexible after it dries and gives as the floor flexes. I will need to check on the temperature rating.
If you are into "thick", do you have a buddy you can borrow a hand belt sander from? Mine looks like this and uses a 3" wide x 21 " long belt. There are several brands of them. This type of sander will grind off the 1/8" humps in about 5 to 10 minutes tops.
I have a standard B&D sander. I will give it a try. It will probably take longer but I will see how it does.
Hope this helps
John |
Thank you so much for your time.
Tommie
__________________
1987 Sunline T1550
2012 Ford Expedition EL Limited 5.4L V8, 4WD
"Twenty years from now you will be more disappointed by the things that you didnt do than by the ones you did do..." Mark Twain]
|
|
|
|
|
02-27-2017, 06:51 PM
|
#89
|
|
Senior Member
Join Date: Apr 2013
Location: Connecticut
Posts: 759
SUN #5039
|
Home Depot has an area/room you can rent tools (at least in my town/city does).
__________________
TT:1983 Sunline T-1550
TT:1996 Sunline T-2053
TV:2005 Toyota Tundra Double Cab 2UZ-FE i-Force 4.7 L DOHC (MFI) V8 4WD SR5 Automatic
P3 break control
"I know a lot about nothing and nothing about a lot"
|
|
|
|
|
02-27-2017, 07:51 PM
|
#90
|
|
Senior Member
Join Date: Sep 2016
Location: Virginia
Posts: 814
SUN #8893
|
Thanks Bunjin.
If the one I have does not get the job done, I will check at the Home Depot here.
Thanks,
Tommie
__________________
1987 Sunline T1550
2012 Ford Expedition EL Limited 5.4L V8, 4WD
"Twenty years from now you will be more disappointed by the things that you didnt do than by the ones you did do..." Mark Twain]
|
|
|
|
|
03-19-2017, 02:43 PM
|
#91
|
|
Senior Member
Join Date: Sep 2016
Location: Virginia
Posts: 814
SUN #8893
|
Happy Sunday to all.
I have not posted in about a month so I figured I'd do a quick update. Progress has been slow. The weather here has been up and down.
I was able to add additional support for the OSB in the traffic area. I have a temporary piece of OSB in place to stand on.


I haven't decided if I will add additional support for the storage compartment. The only thing that should be stored in there are the jacks, leveling pads and tools. Not sure how much this stuff weighs. If anyone has an estimate, please let me know.
Well, I have now started taking out the screws out of the front and the corner trims so that I can remove the corner trim and the front metal skin. Not an easy task. The screws are badly rusted.

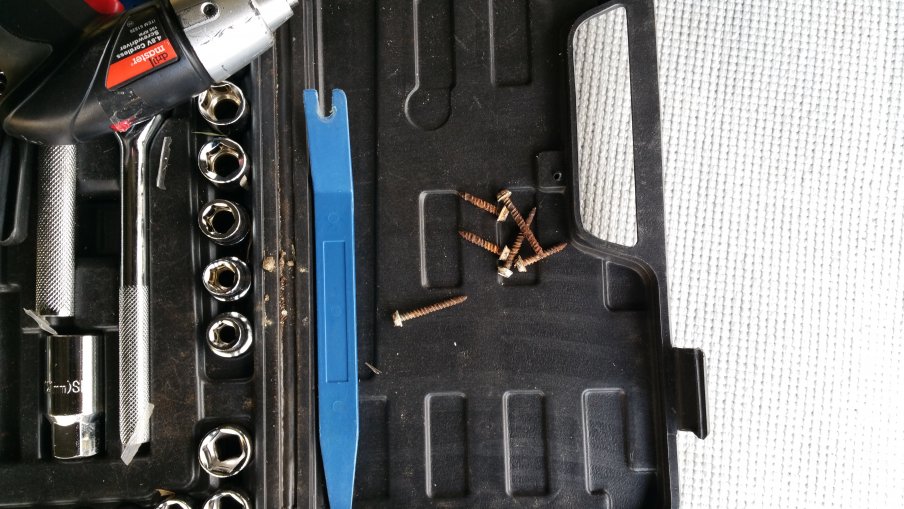
Some came out with a little coaxing, others I had to use vice grips to get them going first, and the rest won't budge and the vice grips won't even catch on them. I have basically chewed up my 1/4 socket so it is off to Harbor Freight to get another one along with some narrow nose vice grips. Will try again tomorrow.
Thanks for reading.
Thanks,
Tommie
__________________
1987 Sunline T1550
2012 Ford Expedition EL Limited 5.4L V8, 4WD
"Twenty years from now you will be more disappointed by the things that you didnt do than by the ones you did do..." Mark Twain]
|
|
|
|
|
03-19-2017, 09:13 PM
|
#92
|
|
Moderator
Join Date: Nov 2006
Location: Ohio
Posts: 12,649
SUN #89
|
Hi Tommie,
A few tips that may help on the rusted screws.
1. On the heads that wiggle in the socket and strip the hex not allowing the screw to come out, some times I have used a 6mm metric socket which is a little smaller. Or even a fresh different socket. The hex on the screw rusts and changes the hex size creating excess play in the normal socket. Jamming on the smaller metric socket some times allows the head to fit and then you can unscrew it. Then to unjam it once out, you have to use a punch to knock the screw out of the socket. This smaller socket trick does not always fit, but sometimes it does.
2. They do make "impact sockets" that are stronger then regular sockets and can take more abuse. They are often a blackish color. Not that black means it is an impact socket, look for the label, impact, just most heavy impact sockets are not the shinny silver chrome. I think Harbor Freight has 1/4" impact sockets but not sure. Dewalt I know makes them for the 1/4" impact drivers.
3. Some times the head is totally stripped and like you said, vise grips pop off as you cannot get in there with the molding edges hitting the pliers. As a last resort to get the molding off, use a drill bit the OD of the screw threads and drill right in the center of the head of the screw. Prick punch (center punch) the screw head to hold the drill bit as you start drilling. Once you cut through the head, stop as the head will be spinning on the bit and you do not need to go deeper. The head can then break off the threads of the screw and allow you to get the molding off. Now that nub of a screw that is left sticks out long enough once you scrape the putty tape away that the vise grips can hold onto and you unscrew the stud stuck in the wood. This is hopefully not a method for every screw, but it works on the ones you cannot get out as you cannot grip them to unscrew with the molding on.
Keep up the good work. Your doing great!!!
John
__________________
Current Sunlines: 2004 T310SR, 2004 T1950, 2004 T2475, 2007 T2499, 2004 T317SR
Prior Sunlines: 2004 T2499 - Fern Blue
2005 Ford F350 Lariat, 6.8L V10 W/ 4.10 rear axle, CC, Short Bed, SRW. Reese HP trunnion bar hitch W/ HP DC
Google Custom Search For Sunline Owners Club
|
|
|
|
|
03-19-2017, 09:34 PM
|
#93
|
|
Moderator
Join Date: Nov 2006
Location: Ohio
Posts: 12,649
SUN #89
|
This is an impact driver 1/4" socket that may help too if you cannot find a standard impact socket. They use these in the 1/4 hex drive portable impact drivers but they will work in you normal drill motor. I know Dewalt makes them as I have one in my kit, I just can't seem to find it as a single item.
But here is an Irwin
https://www.amazon.com/Irwin-Tools-1...etter%2C+1%2F4
Here is a dewalt set, but only need the 1/4 one, not the whole set
https://www.amazon.com/DEWALT-DW2235...etter%2C+1%2F4
I'm sure they sell them, you do not have to be brand specific.
Hope this helps
John
__________________
Current Sunlines: 2004 T310SR, 2004 T1950, 2004 T2475, 2007 T2499, 2004 T317SR
Prior Sunlines: 2004 T2499 - Fern Blue
2005 Ford F350 Lariat, 6.8L V10 W/ 4.10 rear axle, CC, Short Bed, SRW. Reese HP trunnion bar hitch W/ HP DC
Google Custom Search For Sunline Owners Club
|
|
|
|
|
03-19-2017, 09:34 PM
|
#94
|
|
Senior Member
Join Date: Sep 2016
Location: Virginia
Posts: 814
SUN #8893
|
Thanks JohnB. I was switching back and forth between the 1/4 socket and the 6mm socket. Neither would catch on the screws on the passenger side. I will try a impact socket. Luckily, I haven't been to Harbor Freight yet. I plan to go tomorrow.
Thanks,
Tommie
__________________
1987 Sunline T1550
2012 Ford Expedition EL Limited 5.4L V8, 4WD
"Twenty years from now you will be more disappointed by the things that you didnt do than by the ones you did do..." Mark Twain]
|
|
|
|
|
03-19-2017, 09:41 PM
|
#95
|
|
Moderator
Join Date: Nov 2006
Location: Ohio
Posts: 12,649
SUN #89
|
Darn, the 6mm trick didn't work... They must be really rusted down to a smaller hex size.
Once you get something to fit, press in real hard on the drill and go real slow trying to back it out. That "sometimes" helps hold the socket engaged to the screw.
You need a bag of tricks and pull out the right trick for the right stubborn screw... Hopefully the bag is not empty and the screw still in....
Good luck. I know they can be a bugger sometimes
John
__________________
Current Sunlines: 2004 T310SR, 2004 T1950, 2004 T2475, 2007 T2499, 2004 T317SR
Prior Sunlines: 2004 T2499 - Fern Blue
2005 Ford F350 Lariat, 6.8L V10 W/ 4.10 rear axle, CC, Short Bed, SRW. Reese HP trunnion bar hitch W/ HP DC
Google Custom Search For Sunline Owners Club
|
|
|
|
|
03-20-2017, 10:11 AM
|
#96
|
|
Moderator
Join Date: Dec 2006
Location: Michigan
Posts: 6,155
SUN #123
|
So the problem is more that the heads are rusty and the socket won't catch, not that the screws are locked in and the socket strips the head trying to loosen?
__________________
2007 T-286SR Cherry/Granola, #6236, original owner, current mileage: 9473.8 (as of 6/18/21)
1997 T-2653 Blue Denim, #5471
1979 12 1/2' MC, Beige & Avocado, #4639
Past Sunlines: '97 T-2653 #5089, '94 T-2251, '86 T-1550, '94 T-2363, '98 T-270SR

|
|
|
|
|
03-20-2017, 11:39 AM
|
#97
|
|
Senior Member
Join Date: Sep 2016
Location: Virginia
Posts: 814
SUN #8893
|
A little of both I think. This screws I don't think are locked. I was able to get the others out.
Sent from my SM-N910V using Tapatalk
__________________
1987 Sunline T1550
2012 Ford Expedition EL Limited 5.4L V8, 4WD
"Twenty years from now you will be more disappointed by the things that you didnt do than by the ones you did do..." Mark Twain]
|
|
|
|
|
03-20-2017, 12:45 PM
|
#98
|
|
Senior Member
Join Date: Sep 2016
Location: Virginia
Posts: 814
SUN #8893
|
The smaller vice grips seems to be doing the trick.

Sent from my SM-N910V using Tapatalk
__________________
1987 Sunline T1550
2012 Ford Expedition EL Limited 5.4L V8, 4WD
"Twenty years from now you will be more disappointed by the things that you didnt do than by the ones you did do..." Mark Twain]
|
|
|
|
|
03-20-2017, 06:32 PM
|
#99
|
|
Senior Member
Join Date: Sep 2016
Location: Virginia
Posts: 814
SUN #8893
|
Good evening all,
Well, I was able to remove all of the screws from the trim. I pulled out an old hair drier and started prying it loose. The butyl tape appears to be fairly new. I was trying not to bend the trim too much but I failed. This is not an easy job. The staples holding the siding are really small (1/8" crown). No screw driver I have is small enough to pry them up and when I try to go underneath the siding pops leaving small holes. Got frustrated and left that alone and starting trying to loosen up and remove the metal siding. I was able to get the bottom panel off. It slid right off which means no butyl caulking was between the two pieces. The next panel up is a little bit more difficult (more staples and the window to deal with).

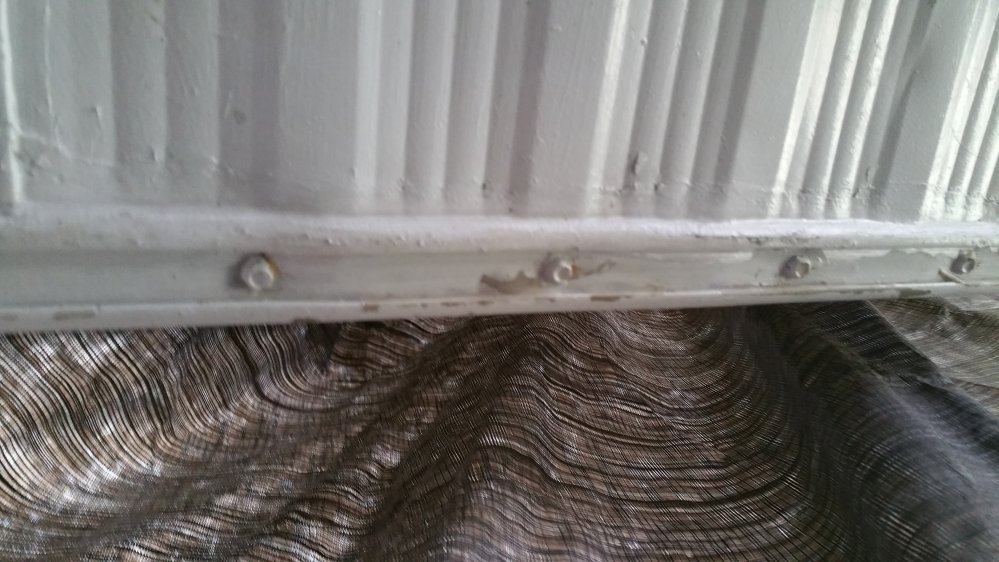
After removing the bottom I was able to get a good look at the bottom corners. They are completely rotted, which is what I expected. My apologies, the pictures are sideways.
Passenger side

Driver side (this is the area underneath the hamper that I could not get to or see very well)

I will try to get the next panel off tomorrow. I will need to figure out what to do about the window. From what I have read, taking it out is a two-person job. The panel may be the only thing supporting it right now.
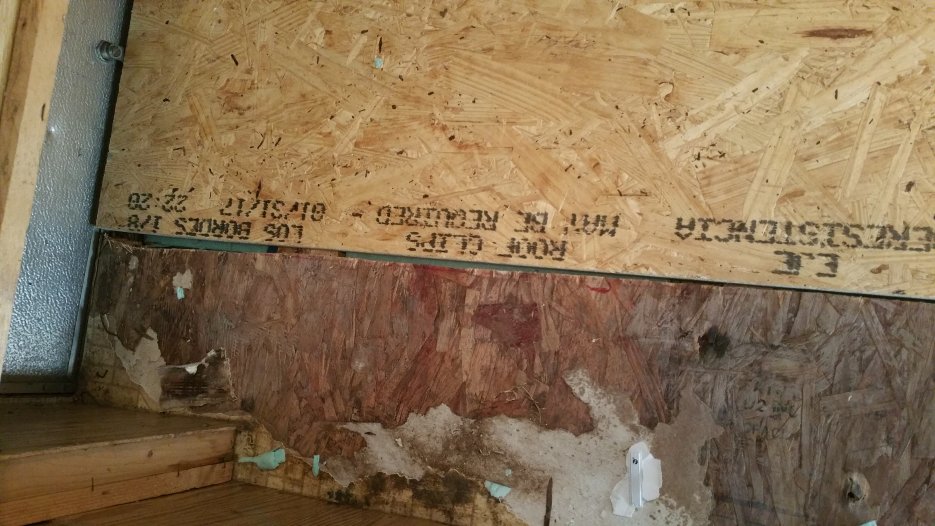
This is the first time I have been able to see the roof in person. Anyone have any idea what this is for?

That's all for now.
Thanks,
Tommie
__________________
1987 Sunline T1550
2012 Ford Expedition EL Limited 5.4L V8, 4WD
"Twenty years from now you will be more disappointed by the things that you didnt do than by the ones you did do..." Mark Twain]
|
|
|
|
|
03-20-2017, 08:21 PM
|
#100
|
|
Senior Member
Join Date: Apr 2007
Location: New York
Posts: 1,846
SUN #264
|
Quote:
Originally Posted by Thomascine
This is the first time I have been able to see the roof in person. Anyone have any idea what this is for?
That's all for now.
Thanks,
Tommie |
That looks like a connector for an antenna; either AM/FM radio or television. Most TT's are pre-wired for both.
__________________
__________________
'12 F250 4x4 Super Duty PowerStroke 6.7 diesel
2011 to present: '11 Cougar 326MKS
1999 to 2011: '99 Sunline T-2453
SUN264 * Amateur Radio kd2iat monitoring 146.52
|
|
|
|
|
|
|
Currently Active Users Viewing This Thread: 10 (0 members and 10 guests)
|
|
|
 Posting Rules
|
You may not post new threads
You may not post replies
You may not post attachments
You may not edit your posts
HTML code is Off
|
|
|
|
 » Recent Sunline Discussions
 |
|
|
|
|
|
|
|
|
|
|
|
|
|
|
|
|
|
|
|
|
|
|
|
|
|


 Linear Mode

