 |
|
 06-04-2017, 08:51 PM
|
#221
|
|
Moderator
Join Date: Nov 2006
Location: Ohio
Posts: 12,654
SUN #89
|
Quote:
Originally Posted by Thomascine

Hi JohnB,
I hope this makes sense. I still have to put in the bottom grid and the grid just above that. I still have those in the garage. These are the two grids that I worked on right after finishing the floor joists. The old grids (that fell apart and had to be pieced back together) were used as templates. But the corners have to be in place to attach them to. Plus the original bottom grid was attached to the 2x3 with 2 or 3 inch screws. Again, I hope this makes sense.
Thanks so much for your time.
Tommie
|
OK, I think I got it.... Maybe try this.
A question, when you add the center grid which is 3/4" thick and you clamp it or test screw it to the 2 x 3, does that then create a flush fit with the new angled end board giving you issues?
You could adjust you bottom shim you are talking about to make the corner metal line up and that will hopefully come out right on being flush with the center grid. And then the 1/8" luan that is in there.
If that would work, then I can see your shim working, but also to add a few screws (you can kreg them if wanted) from the corner piece on the lower front angle to the center grid so the downward loads at the corner are held by the center grid and your little shim.
Does that sound like it will work?
And is this what Sunline did at that corner, just square ended it? Is this what you mean by square end?

__________________
__________________
Current Sunlines: 2004 T310SR, 2004 T1950, 2004 T2475, 2007 T2499, 2004 T317SR
Prior Sunlines: 2004 T2499 - Fern Blue
2005 Ford F350 Lariat, 6.8L V10 W/ 4.10 rear axle, CC, Short Bed, SRW. Reese HP trunnion bar hitch W/ HP DC
 Google Custom Search For Sunline Owners Club
|

|

|
|
06-04-2017, 09:35 PM
|
#222
|
|
Senior Member
Join Date: Sep 2016
Location: Virginia
Posts: 814
SUN #8893
|
Hi JohnB,
I apologize for the confusion. This thread is really long that I can't remember all that has been posted.
Quote:
Originally Posted by JohnB
OK, I think I got it.... Maybe try this.
A question, when you add the center grid which is 3/4" thick and you clamp it or test screw it to the 2 x 3, does that then create a flush fit with the new angled end board giving you issues?
I haven't done a test fit with the angled cuts. When I did the test fit it was with the board that was cross cut. But it should still fit the same if I use the shim that will push the angled end board back to pretty much the same position or close to it. I will have to do another test fit. Keeping my fingers crossed.
You could adjust you bottom shim you are talking about to make the corner metal line up and that will hopefully come out right on being flush with the center grid. And then the 1/8" luan that is in there.
If that would work, then I can see your shim working, but also to add a few screws (you can kreg them if wanted) from the corner piece on the lower front angle to the center grid so the downward loads at the corner are held by the center grid and your little shim.
I had planned to connect the center grid to the corners with screws. I had already drilled the Kreg holes in the two grids so that they could be connected to the corners once they were in. The original center grid was connected to the corners from the outside with staples. I didn't know any other way to connect everything but to use the Kreg. If you remember, I had originally considered using staples to put everything back together but this was before I was introduced to the Kreg.
Does that sound like it will work?
And is this what Sunline did at that corner, just square ended it? Is this what you mean by square end?
Yep, the old piece that came out was a cross cut like this.
|
Thanks again.
Tommie
__________________
1987 Sunline T1550
2012 Ford Expedition EL Limited 5.4L V8, 4WD
"Twenty years from now you will be more disappointed by the things that you didnt do than by the ones you did do..." Mark Twain]
|
|
|
|
|
06-04-2017, 09:48 PM
|
#223
|
|
Moderator
Join Date: Nov 2006
Location: Ohio
Posts: 12,654
SUN #89
|
OK got it now!!! 
I agree, use the spacer as you have it and adjust as needed in thickness. If the square end cuts Sunline had lasted this long, your setup will be stronger and better. Go for it! Don't doubt yourself, you doing really well!
Your camper is built different then the newer ones I'm used to, so I need some help filling in the missing pieces every now and then....
Your doing great, keep up the good work!
On my end, my son and I started today taking my "project camper" apart... Oh the smell of rotted wood... A future post is in the making!
Have a good night.
John
__________________
Current Sunlines: 2004 T310SR, 2004 T1950, 2004 T2475, 2007 T2499, 2004 T317SR
Prior Sunlines: 2004 T2499 - Fern Blue
2005 Ford F350 Lariat, 6.8L V10 W/ 4.10 rear axle, CC, Short Bed, SRW. Reese HP trunnion bar hitch W/ HP DC
Google Custom Search For Sunline Owners Club
|
|
|
|
|
06-04-2017, 10:00 PM
|
#224
|
|
Senior Member
Join Date: Sep 2016
Location: Virginia
Posts: 814
SUN #8893
|
Wew!!! I was getting worried that I had went in a wrong direction. The corners tie in to a bunch of stuff - the front grids, side walls, siding, corner trim...
I can't wait to see what you guys do with the 1950. I didn't know what wood rot smelled like but I do now. I will say I wish that I had went for a 1750 or 1950. A tad bit more room would be nice. You know what they say about hindsight.
I hope you and your family enjoyed your camping trip. I am envious of all you folks that have been able to go. The kid asked me the other day how close I was to being finished. All I could do was laugh.
Thank you for all of the advice and instruction. It is very much appreciated. I don't know how you find the time but I do thank you!
Thanks,
Tommie
__________________
|
|
|
|
|
06-05-2017, 08:56 PM
|
#225
|
|
Senior Member
Join Date: Sep 2016
Location: Virginia
Posts: 814
SUN #8893
|
Good evening,
I was able to do another test fit. So far so good. The battery shackle is interfering with the fit but right now it is all that is holding up the bottom right now. The battery shackle does not fit my Sunny when the metal siding is on. I will have to find something else to secure the battery once the siding is back on. My neighbor came over today and said someone broke into his truck last night. It is warm now and the thieves are more active.
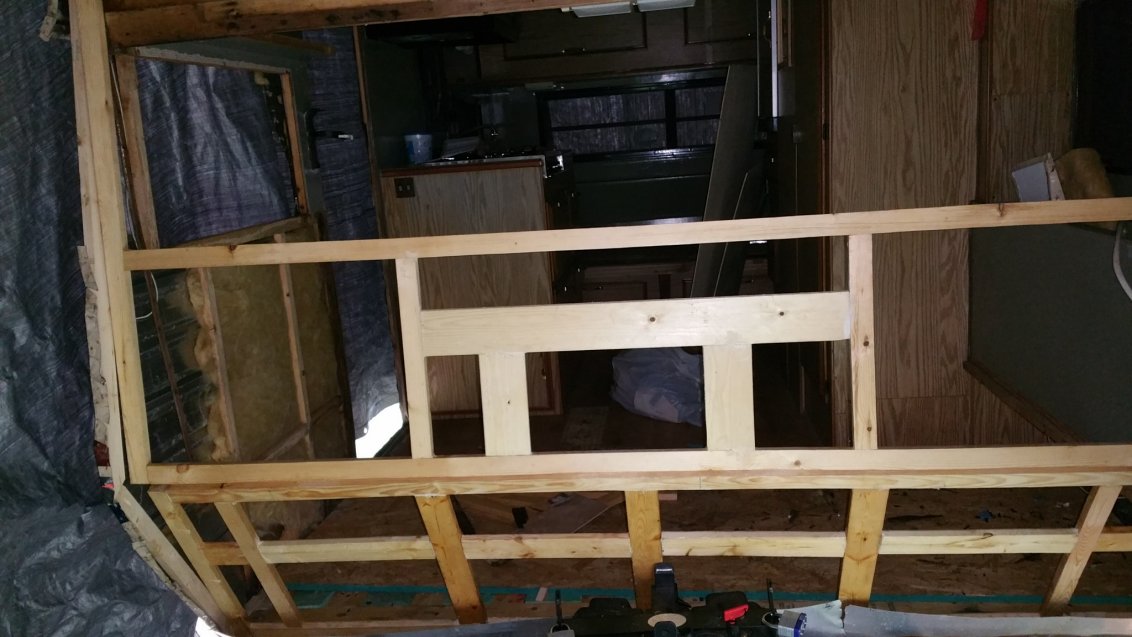
The luan backing for the bottom grid is cut. I have the other half of the luan left over. Was thinking of adding to the back of the upper grid. It won't cover the entire piece but will at least cover the bottom. I may have some more that can be pieced together for the top. The original setup only had luan on the bottom grid.
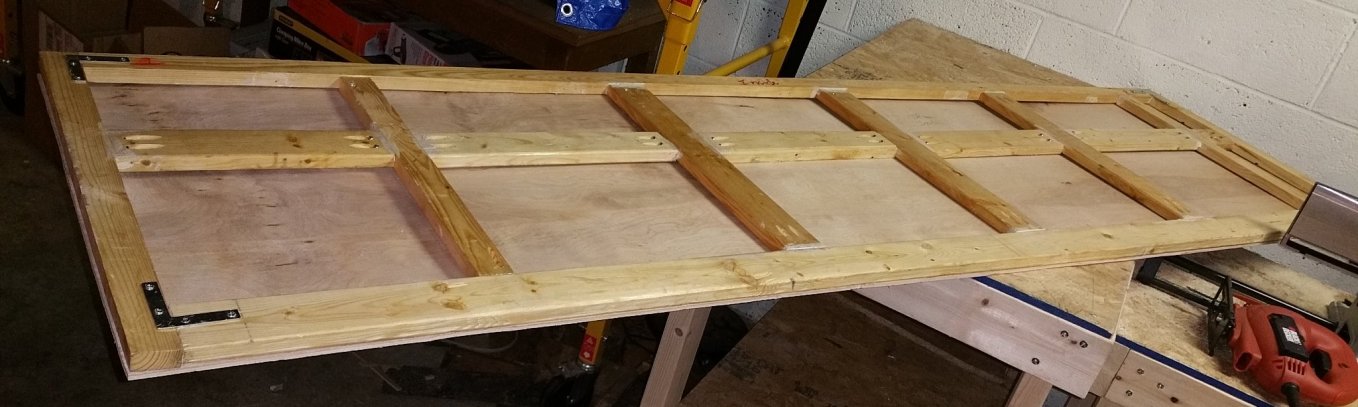
Now just need to figure out how to connect the new wood to the old wood. Also, the original setup used 2-1/2 or 3 inch screws to connect the upper grid to the bottom grid. The red squares in the pic below is where the screws were located. Is there an easier way of connecting the two grids? Brackets? I will be searching the site tonight for ideas.

I feel like I am getting close, at least on the front.
Thanks for looking.
Tommie
__________________
1987 Sunline T1550
2012 Ford Expedition EL Limited 5.4L V8, 4WD
"Twenty years from now you will be more disappointed by the things that you didnt do than by the ones you did do..." Mark Twain]
|
|
|
|
|
06-05-2017, 09:40 PM
|
#226
|
|
Moderator
Join Date: Nov 2006
Location: Ohio
Posts: 12,654
SUN #89
|
Quote:
Originally Posted by Thomascine
Now just need to figure out how to connect the new wood to the old wood. Also, the original setup used 2-1/2 or 3 inch screws to connect the upper grid to the bottom grid. The red squares in the pic below is where the screws were located. Is there an easier way of connecting the two grids? Brackets? I will be searching the site tonight for ideas.
|
Hi Tommie,
It is looking good now! Your grids came out well.
How to fasten the upper to the lower grid and not use the long screws, I have a thought on an alternate way, but I do not think it is easier.
They sell metal plates/strapping. You actually had one on test setup over the weekend. Those galvanized straps. You would need to bend them on the angle of the front and make sure the upper and lower grids are dead tight when putting them on. It would give a slight thickness difference where the straps are, but you make be able to overcome this when the siding goes on, it just goes over the strap.
The long screws might just be the way to do this. What are your concerns about using the long screws? The wood splitting? Or being able to actually screw them in that long and not have them pop up the side in the wrong place? A pilot hole will help that and the splitting.
Is the same issue as attaching the new gird to the old wood concern?
Hope this helps
John
__________________
Current Sunlines: 2004 T310SR, 2004 T1950, 2004 T2475, 2007 T2499, 2004 T317SR
Prior Sunlines: 2004 T2499 - Fern Blue
2005 Ford F350 Lariat, 6.8L V10 W/ 4.10 rear axle, CC, Short Bed, SRW. Reese HP trunnion bar hitch W/ HP DC
Google Custom Search For Sunline Owners Club
|
|
|
|
|
06-05-2017, 10:13 PM
|
#227
|
|
Senior Member
Join Date: Sep 2016
Location: Virginia
Posts: 814
SUN #8893
|
Thanks JohnB.
I found today that the grids may not be totally square, maybe a tad bit off but I think it will still work.
Quote:
Originally Posted by JohnB
They sell metal plates/strapping. You actually had one on test setup over the weekend. Those galvanized straps. You would need to bend them on the angle of the front and make sure the upper and lower grids are dead tight when putting them on. It would give a slight thickness difference where the straps are, but you make be able to overcome this when the siding goes on, it just goes over the strap.
I did not think of these. I am not sure if I can bend them to the correct angle.
The long screws might just be the way to do this. What are your concerns about using the long screws? The wood splitting? Or being able to actually screw them in that long and not have them pop up the side in the wrong place? A pilot hole will help that and the splitting.
I think I am good with pilot holes. So far, I have had little wood splitting. With the screws, yeah, I am afraid I will not place the screws properly so that they will be in the right place.
Is the same issue as attaching the new gird to the old wood concern?
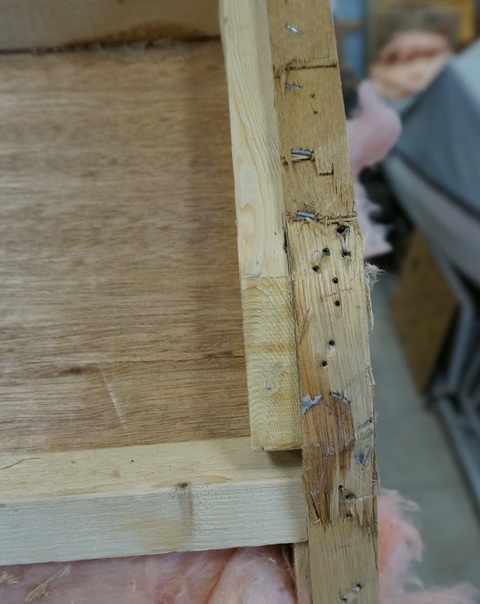
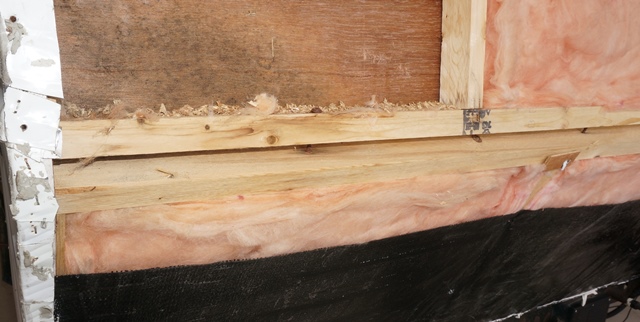
There are areas where new wood is going in and need to be attached to existing wood that is staying. Some of the wood is stained but was still solid and has been treated with RotDoctor. Please see pics below.
Hope this helps
John
|
 This was attached to the piece I had to cut out this past weekend. It needs to be re-attached.
 One of the upper side corner.
 The tip on this one was damaged from removing the staples so it had to be trimmed but it (and that area) has been treated with RotDoctor and it needs to be re-attached somehow. I was thinking of stapling this one and then sistering in a piece below it using the Kreg. OR I could add a shim and put a long screw (and glue) from the old piece through the shim to the new wood. I have ideas. Just not sure what the best solution is. Yep, second guessing myself again.
Thanks again.
Tommie
__________________
1987 Sunline T1550
2012 Ford Expedition EL Limited 5.4L V8, 4WD
"Twenty years from now you will be more disappointed by the things that you didnt do than by the ones you did do..." Mark Twain]
|
|
|
|
|
06-05-2017, 10:59 PM
|
#228
|
|
Moderator
Join Date: Nov 2006
Location: Ohio
Posts: 12,654
SUN #89
|
See is this helps
Quote:
Originally Posted by JohnB
They sell metal plates/strapping. You actually had one on test setup over the weekend. Those galvanized straps. You would need to bend them on the angle of the front and make sure the upper and lower grids are dead tight when putting them on. It would give a slight thickness difference where the straps are, but you make be able to overcome this when the siding goes on, it just goes over the strap.
I did not think of these. I am not sure if I can bend them to the correct angle.
To bend them, if you have a vise, you and put them in the vise and use a larger adjustable wrench, or a pipe wrench side ways to pull on the tab in the vise and bend it. Or you can use a block and wood and pound it if the vise is mounted well to a strong bench.
If no vise, then C clamp the strap to a something rigid. Like the trailer A frame or put the hitch in your tow vehicle and C clamp to the hitch. You do need a good clamp to hold it.
If no tools to do the bend, then go to the screws.
The long screws might just be the way to do this. What are your concerns about using the long screws? The wood splitting? Or being able to actually screw them in that long and not have them pop up the side in the wrong place? A pilot hole will help that and the splitting.
I think I am good with pilot holes. So far, I have had little wood splitting. With the screws, yeah, I am afraid I will not place the screws properly so that they will be in the right place.
Is the same issue as attaching the new gird to the old wood concern?
There are areas where new wood is going in and need to be attached to existing wood that is staying. Some of the wood is stained but was still solid and has been treated with RotDoctor. Please see pics below.
A old wood working tip for screws to help the splitting. Yes, pilot drill first. Then on the screws, get a bar of hand soap, any kind. Drag the screw threads against the soap. You want to soap up the threads all the way around. The soap is dry, not wet when you do this. Then screw it in. The soap acts as a lube and the screw goes in easier, less pressure and helps splitting. On hard woods, oak/maple, you almost have to soap the screws or you will twist the heads off trying to get them in. Softwoods can benefit from the less friction as well.
|
Quote:
Originally Posted by Thomascine
|
Hope this sparks some ideas you can build off of. (literally...  )
John
__________________
Current Sunlines: 2004 T310SR, 2004 T1950, 2004 T2475, 2007 T2499, 2004 T317SR
Prior Sunlines: 2004 T2499 - Fern Blue
2005 Ford F350 Lariat, 6.8L V10 W/ 4.10 rear axle, CC, Short Bed, SRW. Reese HP trunnion bar hitch W/ HP DC
Google Custom Search For Sunline Owners Club
|
|
|
|
|
06-06-2017, 12:10 PM
|
#229
|
|
Senior Member
Join Date: Sep 2016
Location: Virginia
Posts: 814
SUN #8893
|
Lol...Thanks JohnB.
I was going over the fit and found another issue in the upper corners. I cut the piece to match what came out. Sunline used 1 inch shims to fill in the gaps. I can cut some 1 inch strips but how did the get them to bend over the rounded edges? None of the plywood or luan I have bends. 

Thanks.
Sent from my SM-N910V using Tapatalk
__________________
1987 Sunline T1550
2012 Ford Expedition EL Limited 5.4L V8, 4WD
"Twenty years from now you will be more disappointed by the things that you didnt do than by the ones you did do..." Mark Twain]
|
|
|
|
|
06-06-2017, 01:13 PM
|
#230
|
|
Senior Member
Join Date: Sep 2016
Location: Virginia
Posts: 814
SUN #8893
|
The corrosion is worse than I thought.


Sent from my SM-N910V using Tapatalk
__________________
1987 Sunline T1550
2012 Ford Expedition EL Limited 5.4L V8, 4WD
"Twenty years from now you will be more disappointed by the things that you didnt do than by the ones you did do..." Mark Twain]
|
|
|
|
|
06-06-2017, 06:49 PM
|
#231
|
|
Moderator
Join Date: Nov 2006
Location: Ohio
Posts: 12,654
SUN #89
|
Quote:
Originally Posted by Thomascine
I was going over the fit and found another issue in the upper corners. I cut the piece to match what came out. Sunline used 1 inch shims to fill in the gaps. I can cut some 1 inch strips but how did the get them to bend over the rounded edges? None of the plywood or luan I have bends.
|
See if this helps. These pics presented themselves today.... They where not available yesterday... Some say "Timing" can be everything...
The first 2 pics when I say them, thought of our discussion last night... These are FYI for right now unless you need to talk more on this area.


Now to the bending, what Sunline did and the area I think you are working in. See what Sunline did here then I will talk on it.
The top roof to angled front wall transition area.

A closer pic of the shim pack. Notice the grain direction of the shim strip.

A top down shot. Notice the grain direction of the shim strip.
A view from the outside looking in

A close up

The large bend area

The right side of the camper, same roof to front wall area. Notice the different length shims stacked to make a large bend radius.

The outside view

I'm assuming you have 1/8" luan. And I do not know what core type it has, the Sunline luan has a thin layer on top and bottom that have a grain direction to them. The inside core grain direction is 90 degrees to the outside layers grain direction.
What I believe they do is, they rip (saw) the 1" wide shim strips so that the outside layer grain direction is running long ways with the length of the shim. (or basically 90 degrees to the 1" wide direction) And the shim is long, many feet in some cases.
They start with a piece of some good length, staple the end, maybe put 2 staples in as a starter, and then press the strip flat as the go and staple again along the way. Yes, the luan will crinkle like it is cracking in the core, (it really cracking in the core) but the outer layer bends.
All these 1" shims all over this camper are cut with the out side layer grain direction running parallel to the long side of the shim.
If you take a short piece, say 3 inches long and 1" wide and try to bend it, it will about snap in the middle. But if the strip is longer, say 6 to 8" or longer, held on one end rigid and you keep working the long end to form over what you want and staple along the way, it bends. And makes crackling crunching noise as you are bending it.
There are masters of solid wood bending. They make chairs and everything out of hard woods even. I'm not one of them... but I have bent plywood before but much wider sheets. Like 2 to 3 feet wide and 6 to 8 feet long. On plywood that is very thick, say 3/8 to 1/2", in this case I would bend the sheet with the outer grain 90 degrees to the long side of the sheet. I am bending the short side, not the long side like in the luan above. It naturally wants to curl that way.
See if that helps. Sunline line also used progressive length shim stacks to make varying thickness of the curved shim. I would say they went shim happy in place of cutting a solid board to the right radius. There method is fast on the production line and they can tweak it on the fly.
To your corrosion spots, Yes I have some of that too on the T1950. More on the bottom layer of siding in my case. If any of those holes fall outside the butyl tape area of the corner, do the E bond trick on the inside for sure. The holes buried in the butyl will be OK just kike old staple holes, but the ones outside the corner molding are holes to the inside world of the camper...
Hope this helps
John
__________________
Current Sunlines: 2004 T310SR, 2004 T1950, 2004 T2475, 2007 T2499, 2004 T317SR
Prior Sunlines: 2004 T2499 - Fern Blue
2005 Ford F350 Lariat, 6.8L V10 W/ 4.10 rear axle, CC, Short Bed, SRW. Reese HP trunnion bar hitch W/ HP DC
Google Custom Search For Sunline Owners Club
|
|
|
|
|
06-06-2017, 08:16 PM
|
#232
|
|
Senior Member
Join Date: Sep 2016
Location: Virginia
Posts: 814
SUN #8893
|
Good evening,
Thanks for all of the information and pics JohnB. That is very helpful. Not sure if I can pull off the shim process but I can give it a try. The luan that I have is 5mm which equates to approximately 1/5 inch a bit thicker than the 1/8 that was originally installed. I will see what I can do with that. Neither Lowes nor Home Depot had 1/8 luan or plywood. They do have some kind of hardboard that is 1/8 inch thick. It is a real dark brown. Looks more like compressed paper but I believe it is compressed wood fibers.
The good news is I was able to get the walls together and ready for wallboard.


Hopefully, I can get the insulation and wallboard done this week. Then I will need to screw the floor down and decide on how to fill in where the vinyl flooring is missing on the new floor. I need to put something down before the seats go in. I believe SEP is working on something like this so I will go back and take a look at his thread. Then I can bring out the seats to make sure the angles are correct before I start screwing the front in.
Wew! Earlier today I was ready to throw in the towel. I had to go and cool off. Then went back at it. Like SEP said the other day, sometimes you just have to walk away. My friend Amy texted me today. Always encouraging. "What would you be doing if you did not have the camper? Seeeee you have learned so much...." Blah, blah, blah. She is one of those "the glass is half full" people. Guess which one I am.
Making progress. Thanks for looking.
Thanks,
Tommie
PS - I will probably be getting rid of the battery shackle if anyone is interested. It does not fit the 1550 when the metal skin is on. There is not enough room between the metal wall and the battery box. LOL...fits perfect with the skin off.
__________________
1987 Sunline T1550
2012 Ford Expedition EL Limited 5.4L V8, 4WD
"Twenty years from now you will be more disappointed by the things that you didnt do than by the ones you did do..." Mark Twain]
|
|
|
|
|
06-06-2017, 08:25 PM
|
#233
|
|
Senior Member
Join Date: Sep 2016
Location: Virginia
Posts: 814
SUN #8893
|
JohnB,
I zoomed in on one of those pictures and it looks like they used screws to connect the upper and lower grids in the front. I guess that will be the route I am taking.
Thanks,
Tommie
__________________
1987 Sunline T1550
2012 Ford Expedition EL Limited 5.4L V8, 4WD
"Twenty years from now you will be more disappointed by the things that you didnt do than by the ones you did do..." Mark Twain]
|
|
|
|
|
06-06-2017, 09:18 PM
|
#234
|
|
Moderator
Join Date: Nov 2006
Location: Ohio
Posts: 12,654
SUN #89
|
Hi Tommie,
WOW... Those walls look great! And the joint fit is really good. I looked at the T-1950 today and they are no where near as good a fit as yours. You done good!!!
Yes, I know the frustration part too. It happens to all of us at one time or another when doing this kind of work. The rebuild you are doing is an undertaking to say the least, but your coming through it and the end results are really really good. Look at the mess you had to start with and where you are now! When the time comes to head out to the camp ground with camper in tow, there will be good times ahead relaxing by the campfire and being proud of your accomplishments. And you will have a lot of campfire stories to tell about the process you went through to get here....
The upper and lower grid screws, yes that is what Sunline did. Just I have 1 1/2" thick wall studs making it a little easier compared to your 3/4".
See here


Keep up the good work!
Thanks
John
__________________
Current Sunlines: 2004 T310SR, 2004 T1950, 2004 T2475, 2007 T2499, 2004 T317SR
Prior Sunlines: 2004 T2499 - Fern Blue
2005 Ford F350 Lariat, 6.8L V10 W/ 4.10 rear axle, CC, Short Bed, SRW. Reese HP trunnion bar hitch W/ HP DC
Google Custom Search For Sunline Owners Club
|
|
|
|
|
06-06-2017, 10:14 PM
|
#235
|
|
Senior Member
Join Date: Sep 2016
Location: Virginia
Posts: 814
SUN #8893
|
Thanks JohnB. I was determined to get something accomplished this week. Spending hours and not having anything to show for was starting to get to me. I am trying to push forward.
Thanks,
Tommie
__________________
|
|
|
|
|
06-09-2017, 04:19 PM
|
#236
|
|
Senior Member
Join Date: Sep 2016
Location: Virginia
Posts: 814
SUN #8893
|
I am in the process of prepping the siding to go back on. I wiped down the piece that is corroded. Will Eternabond seal these holes? The locations are close to and in the corner.

Thanks,
Tommie
Sent from my SM-N910V using Tapatalk
__________________
1987 Sunline T1550
2012 Ford Expedition EL Limited 5.4L V8, 4WD
"Twenty years from now you will be more disappointed by the things that you didnt do than by the ones you did do..." Mark Twain]
|
|
|
|
|
06-09-2017, 07:49 PM
|
#237
|
|
Moderator
Join Date: Nov 2006
Location: Ohio
Posts: 12,654
SUN #89
|
Hi Tommie,
Yes, Eternabond will seal those holes. Clean the metal with a high flash cleaner to make sure no oily film is left over. I thought you said you had denatured alcohol, that will work.
You can put it on the inside and then a patch on the outside. Make a patch approx 1" round or square per hole. Bigger for bigger holes or covering 2 holes with 1 patch.
Heads up on putting this on, it will stick fast and hard once it touches the metal. What I do is only peel a tiny bit of release paper off, about 1/8" and gently tape that down where I want the patch. Then grab the release paper and peel a little more, press it down and then again peel and press until you are to the end. If you take the release paper off all at once, odds are high the patch will fold over on it self and stick together or wrinkle bad on the metal as it flapped and stuck out of position. Once the patch is on, do a good rub all over to make sure the E bond is firmly pressed down all over.
And if it totally messes up, you can get it off. Heat gun and dull metal scraper and it will come off. Then use mineral spirits to get the fine goo off, then the denatured alcohol to get the left over film of mineral spirits and have a go at it again.
Hope this helps
John
On the outside, when you get all done and the camper back together, you can put a thin film of dicor caulk on the exposed edge of the E bond to not have get dirt stuck there.
__________________
Current Sunlines: 2004 T310SR, 2004 T1950, 2004 T2475, 2007 T2499, 2004 T317SR
Prior Sunlines: 2004 T2499 - Fern Blue
2005 Ford F350 Lariat, 6.8L V10 W/ 4.10 rear axle, CC, Short Bed, SRW. Reese HP trunnion bar hitch W/ HP DC
Google Custom Search For Sunline Owners Club
|
|
|
|
|
06-09-2017, 08:13 PM
|
#238
|
|
Senior Member
Join Date: Sep 2016
Location: Virginia
Posts: 814
SUN #8893
|
Thanks JohnB.
I did a test application earlier. I got the whole system (cleaner, primer and tape).


I will try it on that piece with the corroded holes tomorrow.
Thanks,
Tommie
Sent from my SM-N910V using Tapatalk
__________________
1987 Sunline T1550
2012 Ford Expedition EL Limited 5.4L V8, 4WD
"Twenty years from now you will be more disappointed by the things that you didnt do than by the ones you did do..." Mark Twain]
|
|
|
|
|
06-09-2017, 08:19 PM
|
#239
|
|
Moderator
Join Date: Nov 2006
Location: Ohio
Posts: 12,654
SUN #89
|
Great!!! and the primer too, even better. That will not leak.
Good doing a test on how to do this.
Is the front side using their tan tape? Or is that an aluminum patch riveted on? Just curious. It looks good.
Thanks
John
__________________
Current Sunlines: 2004 T310SR, 2004 T1950, 2004 T2475, 2007 T2499, 2004 T317SR
Prior Sunlines: 2004 T2499 - Fern Blue
2005 Ford F350 Lariat, 6.8L V10 W/ 4.10 rear axle, CC, Short Bed, SRW. Reese HP trunnion bar hitch W/ HP DC
Google Custom Search For Sunline Owners Club
|
|
|
|
|
06-09-2017, 08:23 PM
|
#240
|
|
Senior Member
Join Date: Sep 2016
Location: Virginia
Posts: 814
SUN #8893
|
Quote:
Originally Posted by JohnB
Great!!! and the primer too, even better. That will not leak.
Good doing a test on how to do this.
Is the front side using their tan tape? Or is that an aluminum patch riveted on? Just curious. It looks good.
Thanks
John
|
That is where the door stop goes. For some reason there are 3 holes but only takes 2 screws. I figured I would put eternabond on the back and then with the butyl tape it should be sealed. And a good test.
Thanks.
Sent from my SM-N910V using Tapatalk
__________________
__________________
1987 Sunline T1550
2012 Ford Expedition EL Limited 5.4L V8, 4WD
"Twenty years from now you will be more disappointed by the things that you didnt do than by the ones you did do..." Mark Twain]
|
|
|
|
|
|
|
Currently Active Users Viewing This Thread: 1 (0 members and 1 guests)
|
|
|
 Posting Rules
|
You may not post new threads
You may not post replies
You may not post attachments
You may not edit your posts
HTML code is Off
|
|
|
|
 » Recent Sunline Discussions
 |
|
|
|
|
|
|
|
|
|
|
|
|
|
|
|
|
|
|
|
|
|
|
|


 Linear Mode

