|
|
 12-01-2009, 08:19 PM
|
#1
|
|
Moderator
Join Date: Nov 2006
Location: Ohio
Posts: 12,649
SUN #89
|
Slide Floor Water Damage
Hi Fellow Sunliners
I have a new opportunity
. Found it this weekend. Seems like I have a new winter research project on how to fix.
I have a soggy spot on the rear bottom slide floor. Ill do this with pics. It helps explain better.
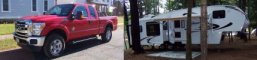
Here is the rear slide over all pic for a point of reference.
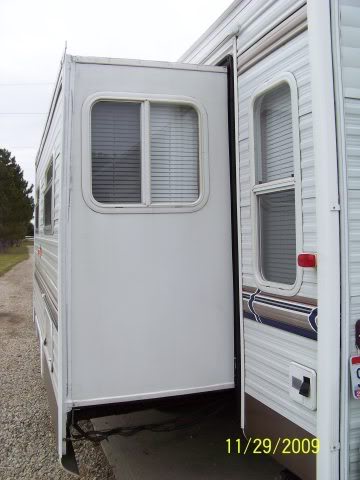
Here is the soggy spot about 8 1/2 from edge towards the center of slide and about 16 of length starting from outside wall toward the TT
Here is the front, solid as a rock. You can tell how straight the Darco is even.
Now how I think I got this soggy spot. First some history on the TT. The Coach was built in Oct 2003. I aquired it in Oct 2007 or 3 years after it was built. I belive when the prior owner traded this to the dealer, it sat on the dealers lot possible 8 months to a year. I can tell by the underneath of this TT and the lack of wear in towing areas when we got it, it was not towed much. So it may have been on a seasonal site. Point: The slide may have been left open for a real long time even when no one was in it. There is no slide topper, yet
Happend at the dealer or by prior owner or both.
While we have camped a lot in the TT since we acquired it, we really have not camped in the rain very much. Point 2: I believe this started at least as a pre existing condition and I never saw it when I bought it. I did notice the Darco was more wavy in this area but never squeezed it or gave it a thought until this past weekend.
So here is the hypothesis:
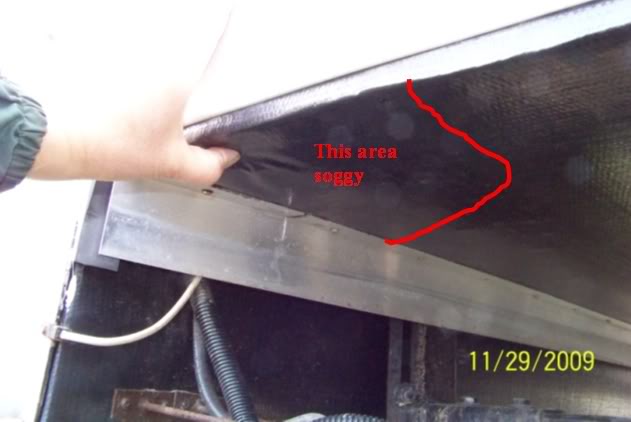
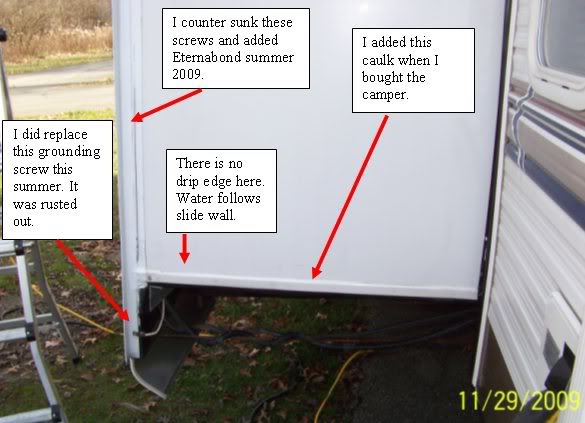
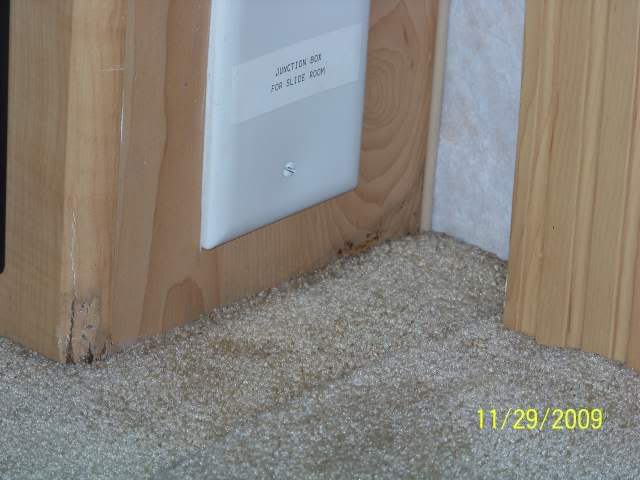
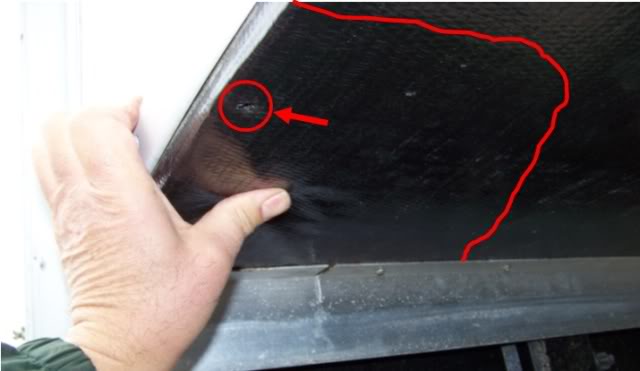
First how the slide is built. See the lower edging that holds the slide side on. There is putty tape behind it and screws thru the edging, siding, and into the slide wall. When I got the camper, I chalked the top of that edge strip as it just looked like a place for water to work it's way under and in the camper.
This summer I removed the flange screws, counter sunk them and installed stainless screws and then put Etertnabond over them. Now recalling one of those lower screws was rusted badly.
I also replaced the screw holding the grounding lug on as it was rusted to holding almost nothing. Again rusted screws on the inside mean something.
Then I look from the bottom up.

There are a series of holes worn in the Darco moisture barrier. About every 5 maybe 6. Under those holes is a hard bolt counterbored into the slide floor. Basicaly is appears the floor is bolted up into the wall structure.
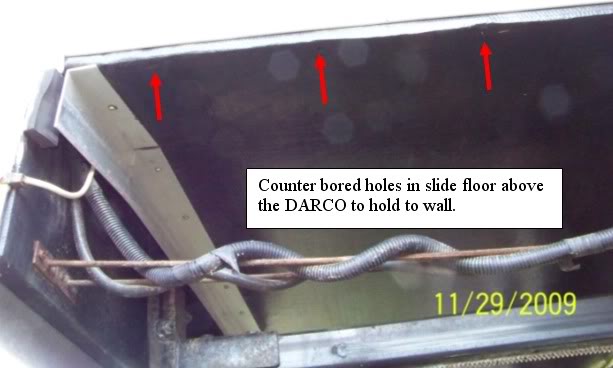
What I believe occurred is, when the slide was built the slide floor was Darco wrapped before the walls where ever put on. See this pic by EMD_Driver as he was taking his 2004 T299SR parts camper apart. The Darco is on top of the floor and the wall studs are on top of the Darco.
The holes where pre counterbored before the Darco wrap. When the wall was added, they found those Cbored holes and drilled up into the wall and then inserted screws or carriage bolts. And they never plugged off those holes in the Darco. As on mine, they are still open.
As water comes down the slide wall during a rain, it bumps over the lower edge strip then onto the Darco. Since there is no drip lip, the water follows around under the slide. Water wicks across the Darco until it falls off or wicks up into one of the holes where the Cbored screws are. Once the water gets in, the Darco moisture barrier is so water tight, the water cannot get out. Now the pooled water inside festers and festers. Over enough rain storms and time, rot sets in.
That is one hypothesis that at least explains what I see now from the outside. Inside the camper there is only 1 area of small water damage. I know this was there from day 3 I owned it. I saw it after I got home with it checking out the power converter. And at that time it was still damp I could smell it up close. It is now dry. I have no explanation for how this spot got there other then the slide was not fully extended and water got in. Again on the dealers lot or by the prior owner.
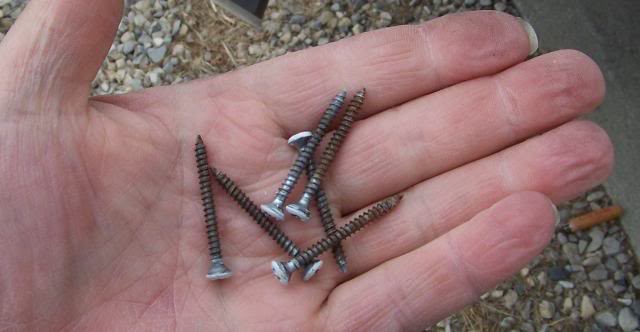
Now to what I have found. I went probing with an ice pic and taking some screws out looking for tell tail signs of how bad the damage is that I can see.
I pulled the lower edging screws out looking for heavy rust. Well no, not really. I also pic probed these holes and they feel solid at the end of the screw. So the wall sill plate is intact at least.
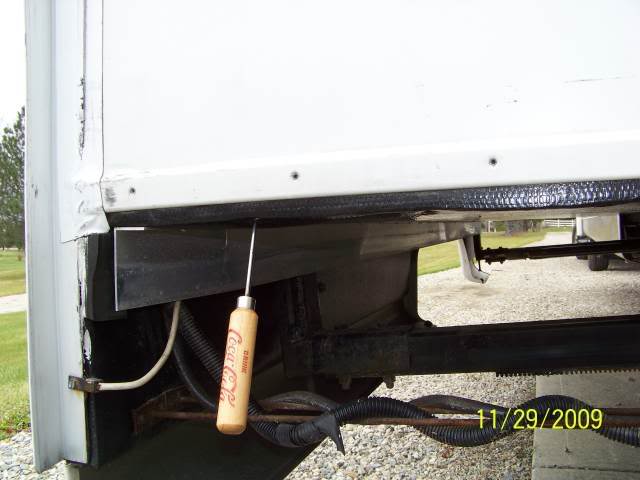
Then I went to the Cbored holes. I could feel the metal bolt so I went to the edge of the bolt at an angle into the wood.
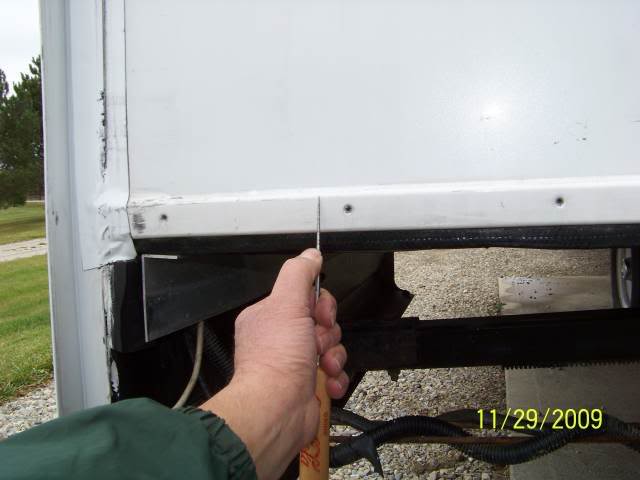
Here is the pick process. Pick up in hole.
Then put finger flush with Darco as a stop gage and pull out.
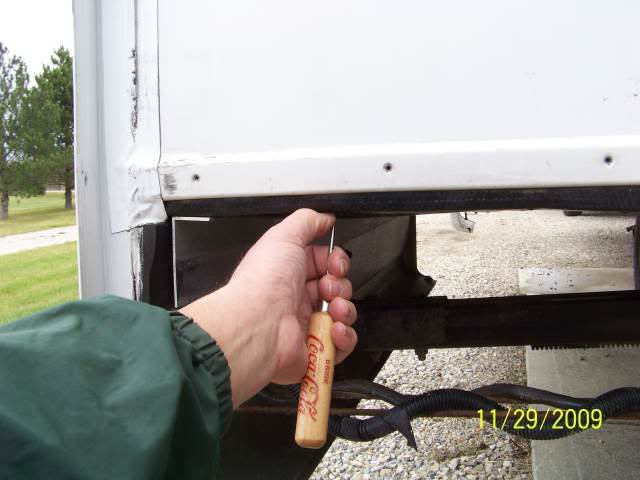
Then compare to the side of the slide. The slide floor is 1 thick. This probe area is close to an inch in probe depth.
Move along the set of holes to about the middle and do it again. This one now is about 1/2 to 5/8 deep.
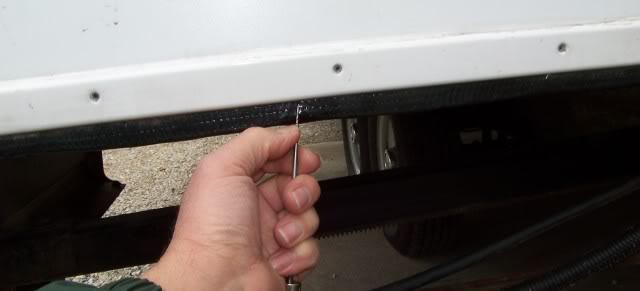
Then move into the solid area. About 1/4 and it is hard wood
And at the end by the camper. Even less maybe 3/16 and hard wood
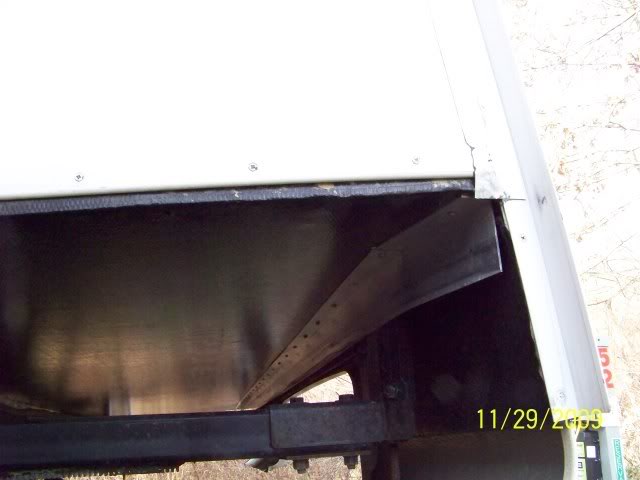
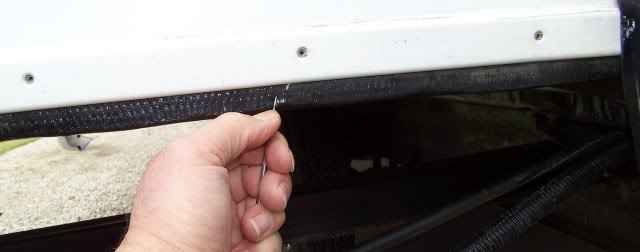
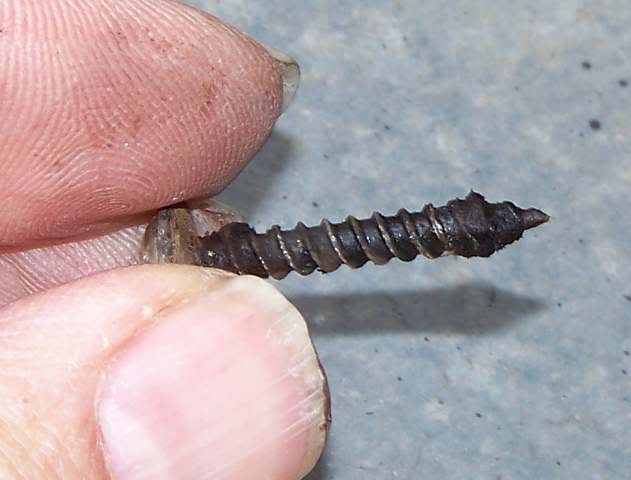
It appears the soggy section is only on the end area. So I took out one of the seal flange screws. Uh Oh
..
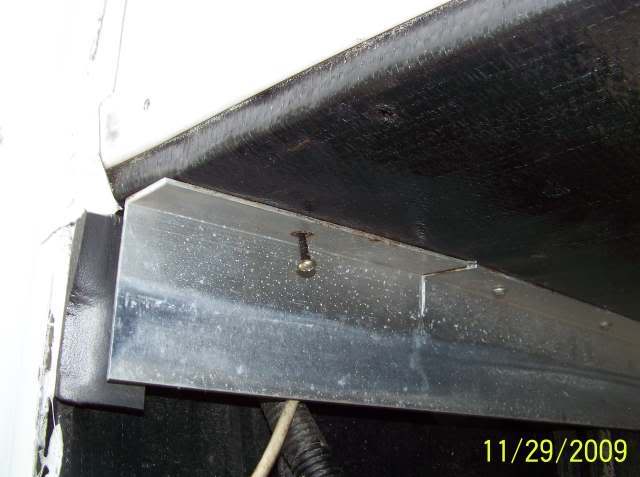
Close up on screw
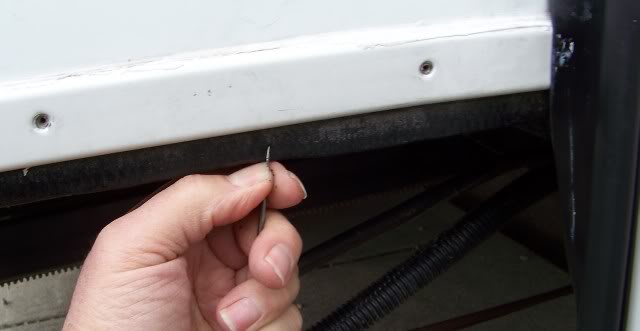
Now a depth probe check. 2 1/2 straight up. It stopped because the tapered pick bottomed out in the aluminum hole.
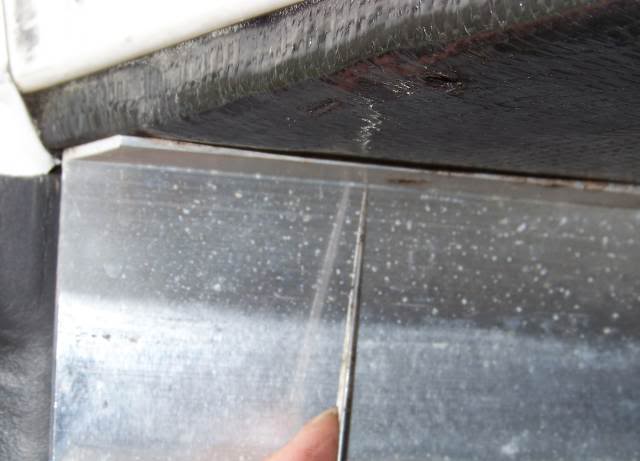
Remember the floor is only 1 thick. I'm about 1 1/2 above the floor line now with the pick tip.
So thats the problem. Until I take off some of the Darco and maybe siding I will not know if this has gone up into the wall support wood. It may only be limited to the floor.
So now the first thing is:
Research on how to do a Darco repair that is bonded dead flush and flat as the slide bottom slides on the Darco when it comes in. I cannot have any edges sticking up or it may rip.
Once I figure out how to bad the damage is, then sort out a method to correct. Can I create a wood patch bonded with metal or do I need a new slide floor?
Anyone been thru this before? Or know how to flush fix Darco. In fact I cannot even find who make Darco... Doing a search on "darco polythene moisture barrier" bring up about every RV maker but no company... Who are they?
Thanks
John
__________________
Current Sunlines: 2004 T310SR, 2004 T1950, 2004 T2475, 2007 T2499, 2004 T317SR
Prior Sunlines: 2004 T2499 - Fern Blue
2005 Ford F350 Lariat, 6.8L V10 W/ 4.10 rear axle, CC, Short Bed, SRW. Reese HP trunnion bar hitch W/ HP DC
 Google Custom Search For Sunline Owners Club
|

|

|
|
12-01-2009, 09:11 PM
|
#2
|
|
Moderator
Join Date: Dec 2006
Location: Michigan
Posts: 6,155
SUN #123
|
Re: Slide Floor Water Damage
Quote:
|
Originally Posted by JohnB
Uh Oh
..
|
When JohnB says uh oh, this can't be good. Hopefully the damage won't be as bad as it looks right now.
I tightened the screws on that side plate this summer. I remember they stuck out just a little bit and I didn't want them to catch. I do remember one, I think close to the inside of the coach, wouldn't tighten much. I seem to remember it just stripped out. I never took them out though to see if they were rusty...I'm hoping that at this point they wouldn't be. However, I suspect the dealer did leave the slide out for periods of time.
At least there's a small supply of slide room floors right now...
Jon
__________________
__________________
2007 T-286SR Cherry/Granola, #6236, original owner, current mileage: 9473.8 (as of 6/18/21)
1997 T-2653 Blue Denim, #5471
1979 12 1/2' MC, Beige & Avocado, #4639
Past Sunlines: '97 T-2653 #5089, '94 T-2251, '86 T-1550, '94 T-2363, '98 T-270SR

|
|
|
|
|
12-02-2009, 04:23 AM
|
#3
|
|
Moderator Emeritus
Join Date: Jul 2009
Location: West Virginia
Posts: 2,039
SUN #897
|
John,
You are correct, that the walls were fastened to the slide floor after the Darco was applied. The hole you referenced in this pic:
Was found every 5-6" on the T-299's slide. Even when you think you've gotten them all out.... Check again! It is those screws and the four slide mechanism bolts, that hold everything together.
Gary
|
|
|
|
|
12-02-2009, 06:49 AM
|
#4
|
|
Senior Member
Join Date: May 2008
Location: Ontario
Posts: 663
SUN #597
|
Darco
John, try these guys:
http://www.darcoinc.com/
The page doesn't say they make the membrane, but the name is just too much of a coincidence.
Henry
__________________
2019 F150 3.5L Max Tow
2014 Arctic Fox 22G
2005 Sunline T-2499

|
|
|
|
|
12-02-2009, 09:12 AM
|
#5
|
|
Senior Member
Join Date: Mar 2008
Posts: 351
SUN #549
|
Well, that just plain sucks.
No matter how you slice it, that is not going to be a fun one to fix.
John, you have access to a borescope? You might be able to pop that side window out and use a scope to see into the wall. Obviously you'd have to drill a hole in the bottom of the opening to get the probe down in there, but that's no biggie. I'd like to be sure that the water came up instead of down. You could also get a peek up into the membrane with one.
Just thinking about the membrane and judging from the pictures, I think you might actually be able to rewrap the bottom and sides with a piece. Of course you couldn't easily get it under the walls, but I think you could get a piece on there under the trim and seal it with something like eternabond.
Feel free to yell if you need an extra pair of hands at some point.
- Frank
__________________
|
|
|
|
|
12-02-2009, 07:50 PM
|
#6
|
|
Senior Member
Join Date: Jan 2009
Location: Rhode Island
Posts: 1,515
SUN #768
|
Re: Slide Floor Water Damage
Quote:
|
Originally Posted by JohnB
{snip} ... Can I create a wood patch bonded with metal or do I need a new slide floor?
|
If you could peel back the Darco maybe the soft section of floor could be "solidified" with Git Rot. Many years ago I used it on a section of the transom of a wood boat. One section was real soft and rotted. I used Git Rot per the instructions on the kit and got a solid surface that seemed bonded to the solid wood. I sanded and painted it and you could not see the repair. I did that so long ago that I forgot the details, and the amount of mess, but I did the repair in one afternoon then waited a few days to sand and paint. You do need to start with dry wood or OSB.
I have followed your other projects here and am sure I will follow this one.
Good luck,
Gene
__________________
 Gene & DW Ginny
2002 Sunline T-2363
2008 Toyota 4-runner 4wd 4.7L V-8
Reese Dual Cam straightline - P3 Brake controller
|
|
|
|
|
12-02-2009, 08:15 PM
|
#7
|
|
Moderator Emeritus
Join Date: Jul 2009
Location: West Virginia
Posts: 2,039
SUN #897
|
If you cannot find Darco, perhaps something like this would work...
http://www.garysupholstery.com/seamark.html
Nope.... It's not my website either!
|
|
|
|
|
12-02-2009, 09:38 PM
|
#8
|
|
Moderator
Join Date: Nov 2006
Location: Ohio
Posts: 12,649
SUN #89
|
Re: Slide Floor Water Damage
Quote:
|
Originally Posted by Gene
Quote:
|
Originally Posted by JohnB
{snip} ... Can I create a wood patch bonded with metal or do I need a new slide floor?
|
If you could peel back the Darco maybe the soft section of floor could be "solidified" with Git Rot. Many years ago I used it on a section of the transom of a wood boat. One section was real soft and rotted. I used Git Rot per the instructions on the kit and got a solid surface that seemed bonded to the solid wood. I sanded and painted it and you could not see the repair. I did that so long ago that I forgot the details, and the amount of mess, but I did the repair in one afternoon then waited a few days to sand and paint. You do need to start with dry wood or OSB.
I have followed your other projects here and am sure I will follow this one.
Good luck,
Gene |
Gene
Thanks. I'll look up more on the Git rod. There is another product called Rot Dr. http://www.rotdoctor.com/ I'll have to read up more on them too.
Pending what I find, it may be a combo of new pressure treated wood and Rot Dr etc. verses the entire floor.
I will not know how good or bad this is until I take down a section of Darco and look up... yuck...
Thanks for the tip
__________________
Current Sunlines: 2004 T310SR, 2004 T1950, 2004 T2475, 2007 T2499, 2004 T317SR
Prior Sunlines: 2004 T2499 - Fern Blue
2005 Ford F350 Lariat, 6.8L V10 W/ 4.10 rear axle, CC, Short Bed, SRW. Reese HP trunnion bar hitch W/ HP DC
Google Custom Search For Sunline Owners Club
|
|
|
|
|
12-02-2009, 09:46 PM
|
#9
|
|
Moderator
Join Date: Nov 2006
Location: Ohio
Posts: 12,649
SUN #89
|
Quote:
|
Originally Posted by EMD_Driver
John,
You are correct, that the walls were fastened to the slide floor after the Darco was applied. The hole you referenced in this pic:
Was found every 5-6" on the T-299's slide. Even when you think you've gotten them all out.... Check again! It is those screws and the four slide mechanism bolts, that hold everything together.
Gary
|
Gary
Need some info. The carpet, Did they lay the carpet down all the way to the edge of the Darco board, then put the wall sill plate on over top sandwiching it inbetween? Or did they stapled it down inside the room?
This weekend curiosity may get the best of me and I may lift up the couch and take back the carpet corner if it is not sandwiched and look at if the rot has come up to the top yet.
The good news is, if they wraped the Darco around the OSB board and then put the walls on, I have better odds the rot has not gone up the walls yet. The Darco would hold it to the slide floor area.

Thanks
John
__________________
Current Sunlines: 2004 T310SR, 2004 T1950, 2004 T2475, 2007 T2499, 2004 T317SR
Prior Sunlines: 2004 T2499 - Fern Blue
2005 Ford F350 Lariat, 6.8L V10 W/ 4.10 rear axle, CC, Short Bed, SRW. Reese HP trunnion bar hitch W/ HP DC
Google Custom Search For Sunline Owners Club
|
|
|
|
|
12-02-2009, 09:56 PM
|
#10
|
|
Moderator
Join Date: Nov 2006
Location: Ohio
Posts: 12,649
SUN #89
|
Quote:
|
Originally Posted by frank
No matter how you slice it, that is not going to be a fun one to fix.
John, you have access to a borescope?
- Frank
|
Fun to fix?? Well remember last year it was my axles
. While it took a while, it was actually fun doing the repair. I knew it was right when I was done and I learned a ton in the process.
The floor, Im prepped mentally to replace the whole floor if I have to. I have enough stuff here at the house to make that happen. Just that will take a bit and wont happen for sure until next spring when the weather cooperates for like 2 to 3 days straight.
A borescope. They have them at work. We use them to look in pipes. Its an option I have not thought of.
I know I will learn more again by the time this fix is over.
The help offer, Ill let you know but I should have it covered. Have to strong strapping sons One an in-law the other a sibling. Both owe Dad some favors as they have no problem calling when something at there house does not work
__________________
Current Sunlines: 2004 T310SR, 2004 T1950, 2004 T2475, 2007 T2499, 2004 T317SR
Prior Sunlines: 2004 T2499 - Fern Blue
2005 Ford F350 Lariat, 6.8L V10 W/ 4.10 rear axle, CC, Short Bed, SRW. Reese HP trunnion bar hitch W/ HP DC
Google Custom Search For Sunline Owners Club
|
|
|
|
|
12-02-2009, 10:02 PM
|
#11
|
|
Moderator
Join Date: Nov 2006
Location: Ohio
Posts: 12,649
SUN #89
|
Hi Folks
The makers of Darco, well that is still a mystery but I have been tipped off on some repairs options for it. Seems the Mobile home industry uses Darco big time.
Flex-Mend is a brand name of repair tape. Once I knew where to start looking, it was easier. Here are 2 hits that come up quick.
http://www.mobilehomerepair.com/shield.htm
http://www.randgsupply.com/Warehouse...yadhesives.htm
Also some one on Sunline club has bought and used something to patch their underbelly. Ill have to search for them. Im thinking Greg, (Mooney) found something and posted about it now over a year ago.
Thanks for the looking
John
__________________
Current Sunlines: 2004 T310SR, 2004 T1950, 2004 T2475, 2007 T2499, 2004 T317SR
Prior Sunlines: 2004 T2499 - Fern Blue
2005 Ford F350 Lariat, 6.8L V10 W/ 4.10 rear axle, CC, Short Bed, SRW. Reese HP trunnion bar hitch W/ HP DC
Google Custom Search For Sunline Owners Club
|
|
|
|
|
12-02-2009, 10:20 PM
|
#12
|
|
Moderator
Join Date: Dec 2006
Location: Michigan
Posts: 6,155
SUN #123
|
Quote:
|
Originally Posted by JohnB
Also some one on Sunline club has bought and used something to patch their underbelly. Ill have to search for them. Im thinking Greg, (Mooney) found something and posted about it now over a year ago.
|
I do remember that too John. I also remember someone else patching their underside with a tape that they bought through Sunline. So it could be the same stuff.
I have an e-mail out to Tim Martin at the moment with probably two pages worth of questions. When he gets back to me I'll try to remember to pass along the question about the frames and this.
Jon
__________________
2007 T-286SR Cherry/Granola, #6236, original owner, current mileage: 9473.8 (as of 6/18/21)
1997 T-2653 Blue Denim, #5471
1979 12 1/2' MC, Beige & Avocado, #4639
Past Sunlines: '97 T-2653 #5089, '94 T-2251, '86 T-1550, '94 T-2363, '98 T-270SR
|
|
|
|
|
12-02-2009, 11:14 PM
|
#13
|
|
Senior Member
Join Date: Apr 2007
Location: New York
Posts: 1,846
SUN #264
|
John,
That tape may also be available through a mobile home dealer. They have the same material sealing up the underbellies of mobile homes that is used on TT's.
__________________
'12 F250 4x4 Super Duty PowerStroke 6.7 diesel
2011 to present: '11 Cougar 326MKS
1999 to 2011: '99 Sunline T-2453
SUN264 * Amateur Radio kd2iat monitoring 146.52
|
|
|
|
|
12-03-2009, 06:50 PM
|
#14
|
|
Senior Member
Join Date: Mar 2008
Posts: 351
SUN #549
|
Quote:
|
Originally Posted by JohnB
Fun to fix?? Well remember last year it was my axles
. While it took a while, it was actually fun doing the repair. I knew it was right when I was done and I learned a ton in the process.
|
Oh no, I meant **NOT** fun!
For me, it's not that I really mind doing the work, it's the shock that it NEEDS to be done. That sinking feeling in the gut.. That's the part that always gets me down.
I agree it will be a learning experience for sure.
Oh, speaking of your wheel alignment I have a link to send you. Keep forgetting. I'll find it and shoot it over.
Quote:
|
Originally Posted by JohnB
The floor, Im prepped mentally to replace the whole floor if I have to. I have enough stuff here at the house to make that happen. Just that will take a bit and wont happen for sure until next spring when the weather cooperates for like 2 to 3 days straight.
|
Yes, I didn't want to jump to any conclusions until you pop it open, but I was thinking the same thing "Be prepared to replace.." Any thoughts on using ply vs. OSB? No doubt you can pull it off. Looking through Gary's pictures, it doesn't look terribly difficult, but a little time consuming.
Quote:
|
Originally Posted by JohnB
A borescope. They have them at work. We use them to look in pipes. Its an option I have not thought of.
|
I borrowed one and used it to look up in the ceiling when I had my leak. I used it again to find holes in the ceiling to run wires through. It was a low-end model, but it did work. Something with a video screen and light would be wonderful.
Quote:
|
Originally Posted by JohnB
The help offer, Ill let you know but I should have it covered. Have to strong strapping sons One an in-law the other a sibling. Both owe Dad some favors as they have no problem calling when something at there house does not work
|
Believe me, I know how that goes. Seems like I am always helping somebody with a project, but when I need a hand for a few hours, everybody is tied up.
Anyway, the offer is always open, John. Like you have said many times, "Us Sunliners have to stick together."
- Frank
__________________
|
|
|
|
|
12-05-2009, 07:50 AM
|
#15
|
|
Moderator
Join Date: Nov 2006
Location: New York
Posts: 1,920
SUN #98
|
Quote:
|
Originally Posted by Sunline Fan
... I also remember someone else patching their underside with a tape that they bought through Sunline.
|
I purchased tape from Sunline years ago to repair a hole in the Darco underbelly (of our previous Sunline) caused from a flat tire.
I still have some of the role left, but it's stored in the trailer.
Let me know if you want information on it, I can go up to the trailer and get it.
Hutch
__________________
Mary & Tom (aka Hutch)
2015 Jayco Eagle Premier 361REQS
2014 GMC Sierra 3500HD 4x4 CC D/A
Sunlines: 2005 Solaris T-280SR; 1999 Solaris T-2670; 1998 Saturn T-24A
|
|
|
|
|
12-07-2009, 05:05 AM
|
#16
|
|
Senior Member
Join Date: Sep 2006
Location: Pennsylvania
Posts: 347
SUN #62
|
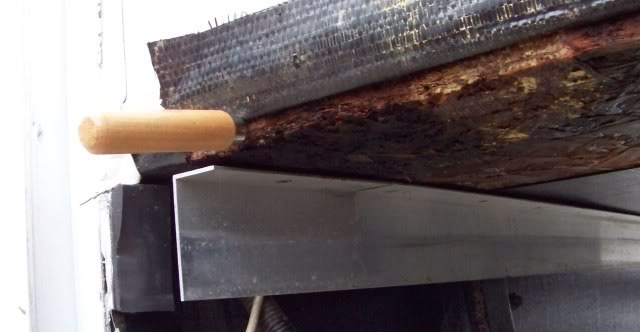
not the best pic John but here is what I did to prevent the water from running around that bottom edge 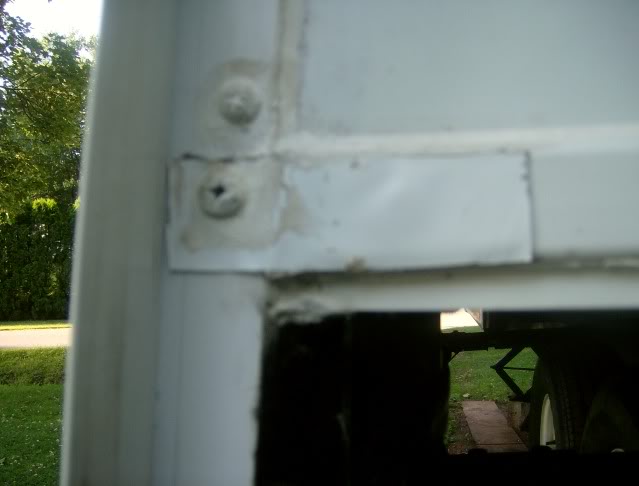 [/img] its pvc angle from home depot, I ran it the whole length on both sides and into the inside.
__________________
05 sunline 267sr
01 F-250 V-10 4x4 Lariat supercab SB auto 4:30 LS
draw-tite 1200# trunnion wd,friction sway control,prodigy
happy camping Rich,Maryellen,Josh and Jake
https://www.campingpa.com/
|
|
|
|
|
12-07-2009, 09:00 PM
|
#17
|
|
Moderator
Join Date: Nov 2006
Location: Ohio
Posts: 12,649
SUN #89
|
Rich
Great idea. Thanks!!
Yes once this repair is over, there will be something added there. Preventing the water from getting there in the 1st place is key to keeping a leak out.
Thanks for the tip
John
__________________
Current Sunlines: 2004 T310SR, 2004 T1950, 2004 T2475, 2007 T2499, 2004 T317SR
Prior Sunlines: 2004 T2499 - Fern Blue
2005 Ford F350 Lariat, 6.8L V10 W/ 4.10 rear axle, CC, Short Bed, SRW. Reese HP trunnion bar hitch W/ HP DC
Google Custom Search For Sunline Owners Club
|
|
|
|
|
12-24-2009, 04:43 PM
|
#18
|
|
Moderator
Join Date: Nov 2006
Location: Ohio
Posts: 12,649
SUN #89
|
Well I have some ugly pics to show. I strategically and surgically cut back the Darco moisture barrier to take a look. Yuk
.
Pics tell a story. Its wet
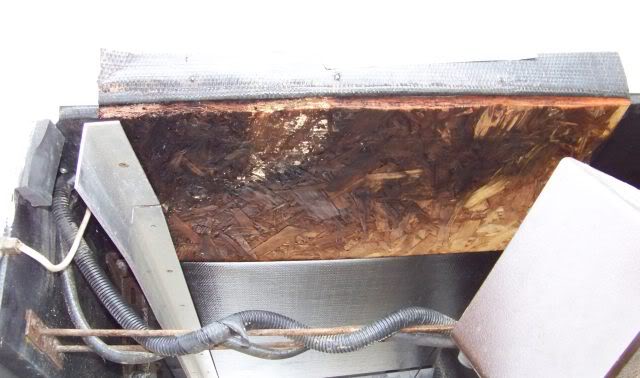
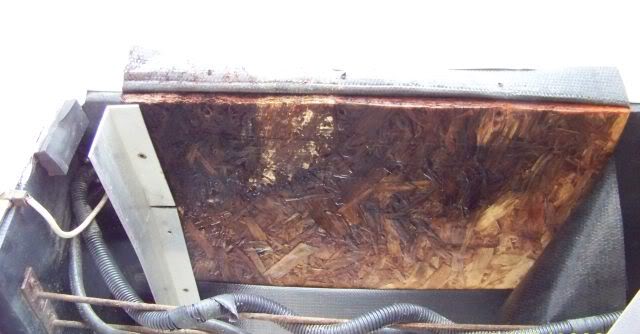
A close up of the worst area edge
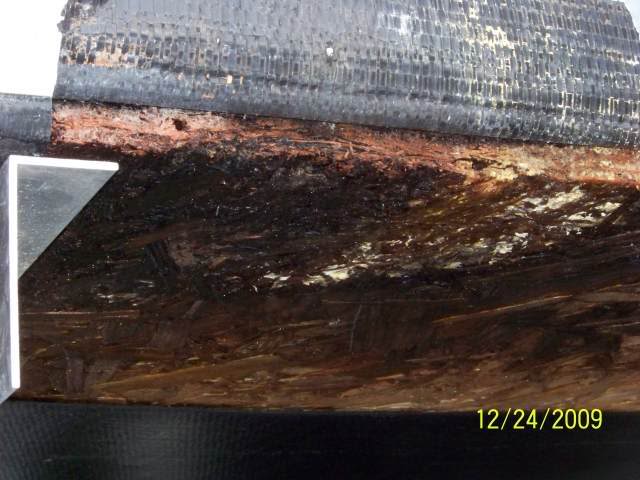
The ice pick depth check.
That is 5 full inches long. May have went more, didnt have a longer pick.
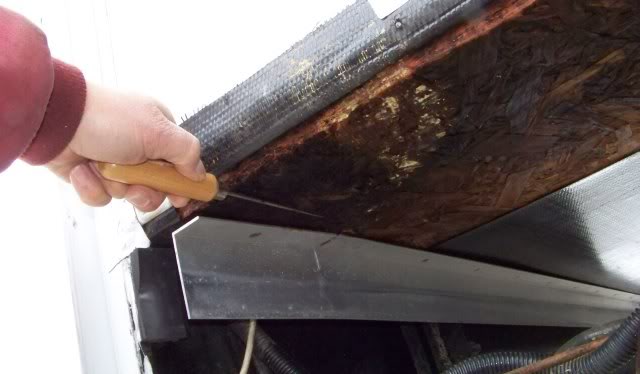
The affected area will take a patch 18 x 26 long. Thinking 2 approaches.
Option 1: Create a 1" thick sandwich patch made up of 1/8 metal top and bottom with 3/4 pressure treated plywood in the center. Cut out area and router depth the edge for the 1/8 plates top and bottom. Flat head screws in metal into good flooring.
Option 2: Start over with a new plastic coated slide floor (plastic bonded to OBS and get ride of the Darco setup.
The screw access holes in the Darco killed this slide floor. Water wicked up in under the Darco thru those holes. There is no drip edge to deflect the water away and the capillary action holds enough water to find its way in thru those access holes and then cannot get out. If those holes where filled or covered from day 1, may have had a better chance of this not happening.
Well at least know I know what my spring project will be. Have to price up a new coated slide floor to see how good or bad that option will be. And where to buy it.
Anyone with any ideas, all are welcome. I'm still collecting ideas before I tear into this.
Thanks
John
__________________
Current Sunlines: 2004 T310SR, 2004 T1950, 2004 T2475, 2007 T2499, 2004 T317SR
Prior Sunlines: 2004 T2499 - Fern Blue
2005 Ford F350 Lariat, 6.8L V10 W/ 4.10 rear axle, CC, Short Bed, SRW. Reese HP trunnion bar hitch W/ HP DC
Google Custom Search For Sunline Owners Club
|
|
|
|
|
12-25-2009, 08:26 AM
|
#19
|
|
Senior Member
Join Date: Mar 2008
Posts: 351
SUN #549
|
Quote:
|
Originally Posted by JohnB
The affected area will take a patch 18 x 26 long. Thinking 2 approaches.
Option 1: Create a 1" thick sandwich patch made up of 1/8 metal top and bottom with 3/4 pressure treated plywood in the center. Cut out area and router depth the edge for the 1/8 plates top and bottom. Flat head screws in metal into good flooring.
Option 2: Start over with a new plastic coated slide floor (plastic bonded to OBS and get ride of the Darco setup.
|
John,
If you go with the patch you might want to consider a way to bolt-through the osb vs. screwing into it. My experience with OSB is that it does not hold screws well enough. Countersunk T-nuts and countersunk machine screws would work and leave a surface with no protrusions. I also think I would make use of some construction adhesive on the wood-metal joint.
If I had to do this job, I think I would prefer option 2, and do the floor in one piece. I would probably give some thought into making up a laminated plywood panel for the floor (I think it's been said it's 1" thick) and then encapsulate it in epoxy. Something like a CPES product for the whole thing and then a layer or two of marine epoxy squeegied on the bottom to make it smooth like glass. That would leave you with a waterproof floor that doesn't require sourcing or funky shipping.
Hope you are having a good holiday.
- Frank
__________________
|
|
|
|
|
12-25-2009, 09:08 PM
|
#20
|
|
Moderator Emeritus
Join Date: Jul 2009
Location: West Virginia
Posts: 2,039
SUN #897
|
John,
As a precautionary measure, I ordered some of the flex-mend repair tape that you found. Since there is only a very tiny bit of loose OSB on our slide floor and the entire floor is solid as a rock now, I think that sealing those holes now is a priority.
I'll take pics of the install/repair and report back.
If you'd like, I could even send you a piece of the tape. That way, you could give your opinion on it.
Gary
.
__________________
|
|
|
|
|
|
|
Currently Active Users Viewing This Thread: 4 (0 members and 4 guests)
|
|
|
| Thread Tools |
Search this Thread |
|
|
|
| Display Modes |
 Linear Mode Linear Mode
|
 Posting Rules
|
You may not post new threads
You may not post replies
You may not post attachments
You may not edit your posts
HTML code is Off
|
|
|
|
 » Recent Sunline Discussions
 |
|
|
|
|
|
|
|
|
|
|
|
|
|
|
|
|
|
|
|
|
|