Journey with Confidence RV GPS App RV Trip Planner RV LIFE Campground Reviews RV Maintenance Take a Speed Test Free 7 Day Trial ×
Sunline RV Forum
Sunline User Photos

Go Back   Sunline Coach Owner's Club > Technical Forums > Repairs and Maintenance
Click Here to Login

Join Sunline Club Forums Today


Reply
 
Thread Tools Search this Thread Display Modes
Old 01-28-2011, 10:10 AM   #21
Senior Member
 
Join Date: Sep 2006
Location: Ontario
Posts: 503
SUN #43
Trailblazer is an unknown quantity at this point
I went out to the storage lot today to take a look at my slide and take a picture of the Chamfer I put on top edge of my slide. Taking a look at my slide I realize I was mistaken in my earlier post and that my slide is similar to John's and not Ron and Alice's. Here is the picture of the top of my slide:


The part highlighted in red is where I added the Chamfer for it to clear the header. The part highlighted in yellow slips into the wall pocket and was catching on my wall panel. The oak fascia then sits flat against the wall.

Looking at Ron's and Alice's slide it appears that part of the press board definitely slips under the wall pocket. I went back to look at the first picture of the damaged that was posted to verify this but the picture is no longer showing so I can only assume at this point this is what is happening.
__________________

__________________
2018 GMC Denali 3500HD Dually
2018 Grand Design 384GK
Formerly,
2003 F311SR
2005 T-2753
Trailblazer is offline   Reply With Quote
Old 01-29-2011, 08:53 AM   #22
Senior Member
 
Ron & Alice's Avatar
 
Join Date: Oct 2009
Location: New Brunswick
Posts: 218
SUN #953
Ron & Alice
Hi guys,
Alice here, I am SOOOOOOOOO frustrated right now that I could spit! I hate this "guessing game" when people try different things, and it turns out worse (I am not referring to you two, lol).

As you can guess, the repairmen did some adjusting down below (moved the bolt) and the floor is lower, but when we try to bring it in, it is now MUCH worse!

John - Ron went underneath and checked everything you asked. No signs of any adjustments being made before yesterday, and no soggy spots at all. (whew!)

Bill - you hit the problem right on the head! That is exactly what our slide is doing, right-side corner now extending to the center a little.

The repairmen are ordering a piece of aluminum to run the width of the slide. They are going to put it behind the fascia board (on the wall board) - main interior wall - so that when the slide goes out, it will strike the aluminum bar instead of sliding under the wall.

More later as the day progresses...
__________________

__________________
LIVING LIFE TO IT'S FULLEST IN...
2004 T264SR
2002 Chev Silverado
Ron & Alice is offline   Reply With Quote
Old 01-29-2011, 11:45 AM   #23
Moderator
 
JohnB's Avatar
 
Join Date: Nov 2006
Location: Ohio
Posts: 12,654
SUN #89
JohnB is on a distinguished road
Quote:
Originally Posted by Ron & Alice View Post
Also would you advise me as to how flush the slide-out floor should be in relation to the trailer floor. Our slide-out floor (since we purchased our trailer) has always been positioned (when out) with about 1" rise. In trying to fix our current problem the slide floor is now flush with the trailer floor: perhaps a quarter inch to half inch lower.

Thanks very much for all your input, we certainly appreciate it. I will be working with the Repairman during the next few days trying to fix the problem. Any further advice is much appreciated.

Ron
Hi Ron and Alice

Sorry to hear your troubles continue. It seems we now know that the slide is hitting the wall packet however in the info we have I do not now if root cause of how this came to be is yet known.

Ron made a comment that ever since you owned the camper there has always been a 1" gap and now after adjustments this is less and is now maybe 1/4" or 1/2" less. That seems to mean there is still a gap.

Was this 1" gap that the slide floor on the front of the trailer end never seated down flat against the metal slide trough on the floor? Meaning there is actually daylight shining thru and you can see the outside if the rug flap was up? And do you know what the repairman adjusted physically?

If this is the case then long ago a problem has occurred. This may be why you cannot see any recent shifting in rust stain on the brackets outside.

Before I type a long note with details that do not pertain to your problem, can you confirm where this 1" gap was and still seems to be there just less.

Any chance of a picture of the area where this gap is?

I have my camper pulled out on the concrete pad today working on my shock absorbers. I will take some pics of the slide interface with the all pocket and the outside of the slide how it fits in the side of the camper when closed.

The adjustments on the slide system are mainly for fitting the slide into the outside pocket of the camper when the slide is in so water does not come in when towing. There is always give and take to make full out and full in work but it needs to be check both place to not sacrifice a tight seal when closed.

We too are learning from your experience so anything you can pass along is very helpful. We have already learned Sunline changed the slide construction late in the 2004 model year. There was a large change in 2005 models. They may have started to phase them in along the 2004 model year. I now have great curiosity if the 2005's and forward actually go into the wall pocket by design and they actually use the rubber seal flange as the mechanical stop for extended out? Sounds hard to believe but they do it on the way in so why not the way out?? . Next time I am in a 2005 and newer I will for sure look at this fit up.

Good luck

John

PS Glad you have no soggies on the slide floor....
__________________
Current Sunlines: 2004 T310SR, 2004 T1950, 2004 T2475, 2007 T2499, 2004 T317SR
Prior Sunlines: 2004 T2499 - Fern Blue
2005 Ford F350 Lariat, 6.8L V10 W/ 4.10 rear axle, CC, Short Bed, SRW. Reese HP trunnion bar hitch W/ HP DC

Google Custom Search For Sunline Owners Club
JohnB is offline   Reply With Quote
Old 01-29-2011, 07:07 PM   #24
Senior Member
 
Ron & Alice's Avatar
 
Join Date: Oct 2009
Location: New Brunswick
Posts: 218
SUN #953
Ron & Alice
Ok, first of all, we cancelled the aluminum piece and the repairmen. Their solution didn't seem to solve the issue. What has gone wrong? What has to be replaced or repaired?

Today, I crawled underneath and jacked up the front slide corner, and removed the adjustment bracket as the center adjustment bolt was siezed. On our trailer, the adjustment bolt has a nut welded to the top side of the plate + a nut on the bottom side of the plate which the capscrew travels along. In my opinion, this nut is there to lock the adjustment in position. As in your photo, I have the 2 slotted plates with nuts & bolts to lock in the adjustment. One of these plates, being bolted onto the slide unit (bottom frame near wheel well) and the other plate is bolted on to the square slide-bar mechanism. Also, the striker bell is bolted on to the bottom slide-bar by means of an independant plate.

I managed to free up the capscrew and nut, reinstalled the unit, secured all nuts & bolts in place, and by then it was "Happy Hour". The slideout is now positioned slightly higher, better than before. I will continue to work on this continuing saga tomorrow, and will post more photos then.

About the floor "gap", it is not a gap so that you would see the ground through the opening. I am referring to the height that the slideout floor settled in, in the fully out position from when we first bought the unit, until we had this current problem. ie, it was approx. 1" higher than the trailer floor. Now, it appears to be approx. level with the trailer floor (excl. carpets).

Ron
__________________
LIVING LIFE TO IT'S FULLEST IN...
2004 T264SR
2002 Chev Silverado
Ron & Alice is offline   Reply With Quote
Old 01-29-2011, 09:19 PM   #25
Moderator
 
JohnB's Avatar
 
Join Date: Nov 2006
Location: Ohio
Posts: 12,654
SUN #89
JohnB is on a distinguished road
Quote:
Originally Posted by Ron & Alice View Post
Ok, first of all, we cancelled the aluminum piece and the repairmen. Their solution didn't seem to solve the issue. What has gone wrong? What has to be replaced or repaired?

Today, I crawled underneath and jacked up the front slide corner, and removed the adjustment bracket as the center adjustment bolt was siezed. On our trailer, the adjustment bolt has a nut welded to the top side of the plate + a nut on the bottom side of the plate which the capscrew travels along. In my opinion, this nut is there to lock the adjustment in position. As in your photo, I have the 2 slotted plates with nuts & bolts to lock in the adjustment. One of these plates, being bolted onto the slide unit (bottom frame near wheel well) and the other plate is bolted on to the square slide-bar mechanism. Also, the striker bell is bolted on to the bottom slide-bar by means of an independant plate.

I managed to free up the capscrew and nut, reinstalled the unit, secured all nuts & bolts in place, and by then it was "Happy Hour". The slideout is now positioned slightly higher, better than before. I will continue to work on this continuing saga tomorrow, and will post more photos then.

About the floor "gap", it is not a gap so that you would see the ground through the opening. I am referring to the height that the slideout floor settled in, in the fully out position from when we first bought the unit, until we had this current problem. ie, it was approx. 1" higher than the trailer floor. Now, it appears to be approx. level with the trailer floor (excl. carpets).

Ron
Ron

I “think” I now understand what you are saying about the 1” higher. Do you mean the entire length of the slide floor is 1” higher then the main camper floor? That sounds like the slide actually never went all the way out. If so that is a slide travel stroke adjustment. Since you are now lower that starts to validate that the slide is actually now out further and the floor is sliding down the cam surface on the trough in the camper floor. Again I’m assuming I under stand that the entire slide floor is not down flat with the main camper floor. YES/No?

See here for the Lippert slide mechanism manual. This is the basics manual and is not tailored to the Sunline but it shows the slide drive mechanism and who to adjust it.
http://www.lippertcomponents.com/Own...deout-Web1.pdf

I believe part if not all of your problem is you are suffering from an out of adjustment slide.

Lets talk about the slide floor being flat. It needs to be. I’m going out on a limb here not having pics of yours or all your problems to confirm Sunline did not change a qty of stuff that may not exactly match to the pics I’m going to show you. The key is you understand what I’m telling you so you can see how yours is working.

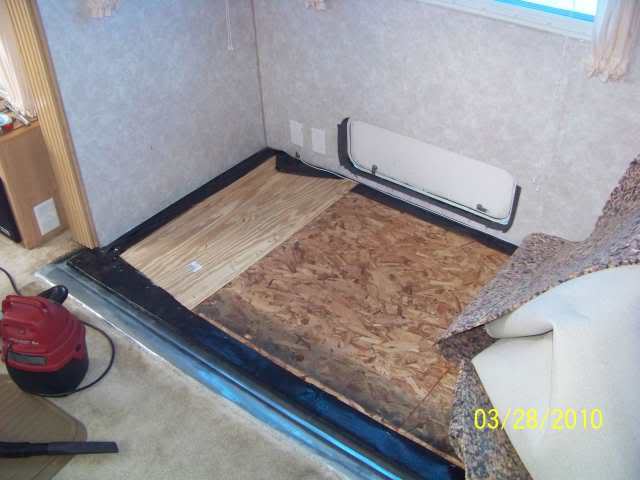
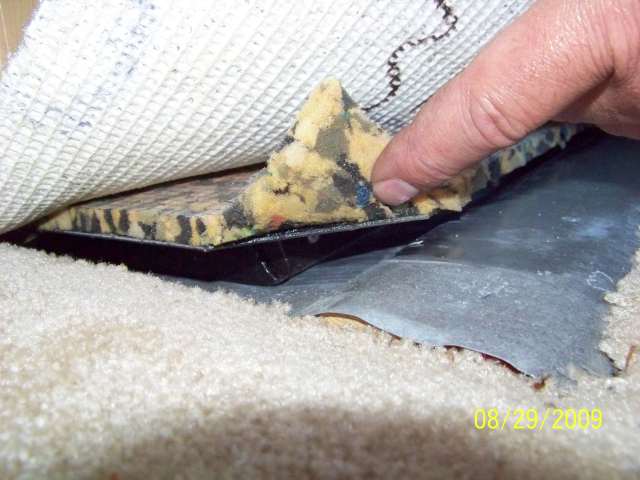
If you pick up the rug flap on the slide the slide floor should be down flat tight against the metal trough lowest point. In the 2005 models the metal was changed to a plastic guide trough but the same thing applies. When the slide is full out the floor drops down to the bottom of the trough. The top of the slide floor should be real close to the top of the camper floor. As you can see here the slide floor and the camper floor are the same.


Now how does one adjust the slide “out” travel? 1st I need to know when your slide extends all the way out you should hear, clunk, clunk of the slide motor drive clutch tripping. Once you hear that clunk you let go of the button. If you are not hearing this clunk that is a separate problem. Please confirm you have the clunk, clunk at the end of slide “out” travel.

I’m assuming it did go clunk, clunk, clunk. That is the mechanical end of stroke of the slide motor drive actuator. There is no more stroke left. That is by design to work that way and all it means is the mechanical slide drive went to end of stroke and it may not mean the slide is all the way out yet.

In order to know if the slide is full out, 1st it must reach full mechanical stroke and go clunk, clunk of the overload clutch. Then you need to look inside the camper at the ends of the slides, both front and back ends top and bottom. Your slide either stops by reaching the camper wall (like mine does) or it stops by the full length vertical aluminum angle on the ends of the slide compressing in the slide seals. Look at the top and then the bottom. The top and bottom need to be parallel. The slide is on an angle until it fully extends out then in the last ~ 2 inches of stroke it trues up.

Look at the top


Then look at the bottom


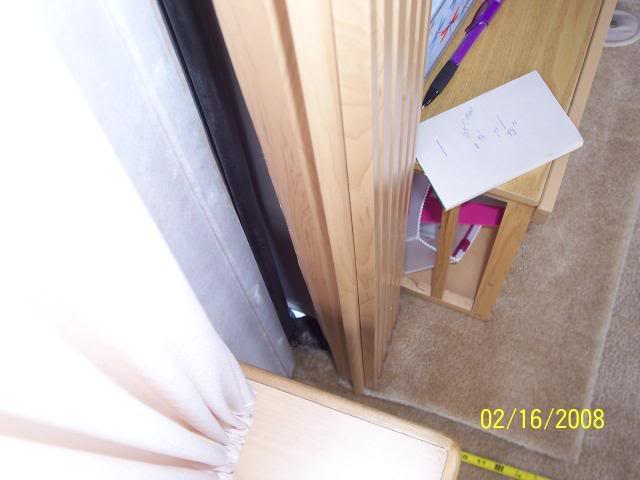
My slide is not yet, fully out in those 2 pics. It needs to travel yet another ~ 1” And the slide floor will not yet be fully down so the slide floor and camper floor are level to each other. Check both front and rear end of the slide. They may be different and if so there are separate adjustments for front and rear. While my slide touches the wall, since I do not have pics of yours I can’t tell what yours is made like. Bottom line, top and bottom of the slide needs to be even distance from the wall. That means the seals are compressed evenly.

Now how to adjust this if one end or both ends are not even. There is a master rack and a slave rack. The slide motor drive acme screw drive (slide actuator) runs the master rack. It looks like this. It is the one with the “stop can” on it and a large threaded rod adjusting screw on the end of the slide drive actuator.


With the slide extended “out”. If this master rack end of the slide needs to go "out" more you loosen up jam nut 2 and the lock nut. Then using the nuts, adjust the correct nut to push or pull the slide in or out so that the master rack end of the slide seats correctly inside the camper. Again the slide face should be even distance top and bottom and the slide floor should of dropped down level to the main camper floor. This does only the master rack end and the end you need to do 1st. Once this end is done or was OK, then you go to the slave drive rack.

Edit:1-30-11 NOTE: By adjusting the position of the master rack (loosening Jam nut 2 and Nylock nut and adjusting) this is a global adjustment. It will move both the master rack and the slave rack at the same time so both ends of the slide will move in the same direction as you are adjusting. This is due to the square shaft drive under the camper. The master rack actually drives the slave rack. If there is excessive wear in the bolts that connect the square drive tube to the pinion gear shaft on either the master rack or the slave rack, this excess clearance will allow moving of the master rack end of the slide first, then after all the excess clearance is taken up the slave end starts to move. Some small delay in the slave rack is normal as there is inherent wind up or play in the system. If you are in the 1/4" to 1/2" or greater of slide movement delay on the slave rack I would consider that a lot of play and you need to address the wear/play in the square drive tube system. This play can explain why you may be tight to the wall when the slide is "out" but then be short travel bringing the slide in or vica versa.

I have also seen on a fellow camper friend's unit when their slide was adjusted wrong before the took ownership that the stop can was not adjusted correct and the slide was over compressing the slide closed. In time the wall structure started to let loose and when the slide closed the entire wall at the bottom shifted approx 3/16 to 1/4" inward. It appears who ever (prior owner) tried to to close up a gap on the slave rack end by over adjusting the master rack. In doing so they broke the wall structure trying to over compensate.


Under the camper there is a square shaft that connects the master rack to the slave rack. At this point we are going to assume you do not have to unhook the square tube and adjust as we are going to use the end of the slave arm first. Look for this end. You will see 2, large bolts that bolt the slide support end to the support arm. The support end is slotted.


You can see the 2 bolts in this pic. That slide support end is slotted on top.


You loosen those 2 bolts and then you can push the entire slide or out to make the wall inside parallel on the top and bottom and the slide floor should drop down level on the floor on that end. If you do not have enough slot, then you have to crawl under the camper and take out the 1/4” bolt and turn the rack drive a tooth or two and put the bolt back in. If you going to the trouble of moving the rack, put the slots on the slave arm end back in the middle so you have some extra slot to work with.

Now caution to not get too carried away on the slave drive arm to make the slide work exactly right on full extended out. Reasoning being is it can affect the slide “in” if you are too far out. Basically the slide is built so both ends are the same width. So when you reach full out, that slotted adjustment for being in mechanical time with the master drive arm is parallel with the slave drive on the seals face. While there is an adjustment on the mater drive arm for “in” there is not on the slave drive arm. Those slots work both positions in and out. So you do not want to over do it when the slide is out or else you can affect retract in motion. So don;t over do it and you need to check in the "in" motion to make sure you are not over doing it on the out motion. Or you have a really worn hole in the square drive shaft that runs the slave drive rack and you loose a lot of motion. Then the square shaft needs a new hole in it. There should not be a lot of play in the system so both front and rear move at once. You could be fighting a lot of play in the system from worn square drive shaft holes. If the front and back do not turn at the same time the slide will go in and out on an angle.

So that is how to adjust the extended “out” position. The in position should stop when the slide drive actuator meets resistance of the slide seals sealing up against the side of the camper. The slide actuator actually has more inches of stroke on the way in then needed. So the slide come is, it seals to the side of the camper and then stalls out the motor. When you see it stop moving you take your finger off the switch.

For the "in" retracted position the stop can comes into play. It is NOT to be used as a hard dead stop to stop the slide from coming in. The slide should be up against the seals of the camper that stop the motion. To adjust the "in" motion, loosen up the stop can and back it away from the frame.


Close the slide. It should be sealing up against the side of the camper. Look at both front and rear. If the slave drive end is not seating tight enough then you over did it on those slots in the slave drive end bracket or you have excess play in the square drive shaft setup. If the square drive is tight and no large play, open the slide and move it in a little in on the slotted arm end bracket.

Once you have it sealing up good, then take the stop can and screw it towards the camper frame until it just reaches the frame and then a little bit of compression and tighten the lock nut. The slide should completely compress the seals and reach the stop can at the same time. I called Lippert and got this straight from them direct.

That is the in and out. Now the up and down verticl where you took off the slide drive arm ends and free’ed up that jack screw. You actually set them with the slide closed. Again this is give and take. If you adjust the height it affects both the in and out positions.

When the slide is “in” look along the top of the slide on how it seats into the camper flange along the top.


Look at the rear top


Look at the front top


The gap between the slide aluminum outer flange and the camper flange should be close to parallel gap front and rear. Now the camper may not be exactly square not the slide. You can see mine is a little out of parallel. The key is, is it a lot out of parallel. By adjusting the height to make the slide inside even and try to not hit the wall paneling like you have now, need to keep in mind that vertical adjustment also interacts with the slide being closed. So it will be a give and take adjustment. The slide floor on the ends needs to sit flat down in the trough on both front and rear ends. If one end is high, then adjusting outside can help. And it may need to be the opposite rack that needs to go up to bring down the slide. Again it will be give and take inside and outside as that 1 adjustment interacts with open and closed.

Since your slide may have been out of adjust for a long time, (since you bought it), the entire slide may have a twist in it from sitting uneven. And when you set up camp this time the entire camper may not be as even and aggravating the wall panel rip you are seeing even worse.

Once you get it adjusted correct your last option is to chamfer the top slide flange or the wall pocket to cheat and give you more clearance like Bill said. If the entire slide has a twist in it, it may take a long time to untwist out against a properly adjusted surface. The clearance chamfer may buy you the time until that occurs.

Good luck and helps this helps.

John
__________________
Current Sunlines: 2004 T310SR, 2004 T1950, 2004 T2475, 2007 T2499, 2004 T317SR
Prior Sunlines: 2004 T2499 - Fern Blue
2005 Ford F350 Lariat, 6.8L V10 W/ 4.10 rear axle, CC, Short Bed, SRW. Reese HP trunnion bar hitch W/ HP DC

Google Custom Search For Sunline Owners Club
JohnB is offline   Reply With Quote
Old 01-30-2011, 09:24 AM   #26
Moderator
 
JohnB's Avatar
 
Join Date: Nov 2006
Location: Ohio
Posts: 12,654
SUN #89
JohnB is on a distinguished road
Ron, I added a few edits in blue in the post above and a few more pics to help get the points across. Hope this helps and let us know how you make out. We do not yet have a slide adjust post but we are getting close.... After you get yours fixed up I may create a separate how a slide works and how to adjust post for future. While there are only a few adjustments it is not always intuitive on what adjustment does what and why. It is a good topic for all slide owners to understand how the slide is suppose to work to help them if and when buying a camper what to look for and how to help themselves.

John
__________________
Current Sunlines: 2004 T310SR, 2004 T1950, 2004 T2475, 2007 T2499, 2004 T317SR
Prior Sunlines: 2004 T2499 - Fern Blue
2005 Ford F350 Lariat, 6.8L V10 W/ 4.10 rear axle, CC, Short Bed, SRW. Reese HP trunnion bar hitch W/ HP DC

Google Custom Search For Sunline Owners Club
JohnB is offline   Reply With Quote
Old 01-30-2011, 09:28 AM   #27
Senior Member
 
Join Date: Sep 2006
Location: Ontario
Posts: 503
SUN #43
Trailblazer is an unknown quantity at this point
Alice, I am sorry to hear that you are still having trouble and understand your frustration, especially when the repairman makes it worse. I am not 100% clear on what exactly the repairman adjusted underneath. Did he adjust the height of the slideout or did he adjust how much it moved out. I am guessing by the description he adjusted how much the the slide out travels out.

Ron, I fully agree with you cancelling the aluminum piece. As you said, that piece is not going to solve the problem.

Like John, I feel you are definitely dealing with and out of adjustment slide. As John says, it sounds like it has been out of adjustment since day one. John has given a great detailed description of how to adjust the slide. Now as John said you need to make small adjustments as each adjustment affects something else. Once you have the slide extension and retraction adjustment correct, you can then make the height adjustment. I would say each time you make a height adjustment, go back and check the extension adjustment to make sure it is still okay. Unfortunately this is going to take some time as you fine tune each adjustment until you get the slide working so that it extends, retracts and seals properly without catching the wall panel. As John says due to a possible twisting of the slide over the years from being out of adjustment, you may have to a Chamfer on the top of the slide once you get the adjustments as close as possible. In fact, even if you do get the adjustment so the slide no longer catches the wall board, I think I would be tempted to add the Chamfer anyways just to provide that little bit of extra clearance.

Good Luck and please keep us informed. It would also be great if you tell us each adjustment you made and the effect each adjustment had on the slide operation.
__________________
2018 GMC Denali 3500HD Dually
2018 Grand Design 384GK
Formerly,
2003 F311SR
2005 T-2753
Trailblazer is offline   Reply With Quote
Old 01-30-2011, 08:21 PM   #28
Senior Member
 
Ron & Alice's Avatar
 
Join Date: Oct 2009
Location: New Brunswick
Posts: 218
SUN #953
Ron & Alice
Busy day!
A to your Q: the entire slide floor is now down flat and level with the main camper floor.
- our unit has the plastic guide trough.
- we do hear the clunk, clunk, clunk at the end of the "out" travel. We immediately take our finger off the switch then.

I did not witness the last adjustment the repairman did, but since our slideout floor is now level with the camper unit, I have to assume from what you wrote that he adjusted the stopcam.

I reinstalled the reconditioned slide drive arm end and tightened the capscrew to adjust vertical height. This positioned the fascia backboard so that it is now brushing up(not catching) against the camper wall on the initial inward bound route.

Today I examined the slide slave slide adjuster and discovered that it offers quite a bit of resistance when I tried to adjust it. As we will be 'on the road again' (going to Cedar Key on Tues.) and that the slide inbound travel is no longer damaging the camper wall, I have decided to live with it for the time being and will tend to it at our next stop, which gives me 2 months to play with it.

Again, BIG thanks - I will keep you update with adjustments/improvements.

Ron
__________________
LIVING LIFE TO IT'S FULLEST IN...
2004 T264SR
2002 Chev Silverado
Ron & Alice is offline   Reply With Quote
Old 01-30-2011, 08:40 PM   #29
Moderator
 
JohnB's Avatar
 
Join Date: Nov 2006
Location: Ohio
Posts: 12,654
SUN #89
JohnB is on a distinguished road
Ron, Thanks for the update and glad your gaining.

Your plastic slide trough is part of the 2005 model upgrades. Good to know. Little by little we keep learning the history of design evolution of Sunline. I wonder if you have the plastic coated bottom slide floor too or do you have a Darco woven material vapro barrier on the bottom of the slide floor?? The plastic coated floor is very very smooth on the bottom and black too. The Darco looks just like the exact black woven materiel under under the main camper as a vapor barrier.

Have a safe trip down to Pat and Cindy's

John
__________________
Current Sunlines: 2004 T310SR, 2004 T1950, 2004 T2475, 2007 T2499, 2004 T317SR
Prior Sunlines: 2004 T2499 - Fern Blue
2005 Ford F350 Lariat, 6.8L V10 W/ 4.10 rear axle, CC, Short Bed, SRW. Reese HP trunnion bar hitch W/ HP DC

Google Custom Search For Sunline Owners Club
JohnB is offline   Reply With Quote
Old 02-06-2011, 08:37 PM   #30
Senior Member
 
rebellious78's Avatar
 
Join Date: Nov 2006
Location: West Virginia
Posts: 446
SUN #96
rebellious78
Are transit bars necessary? Just wondering.
__________________

David & Mary Ann
2018 Ford F350 Dually 6.7L Powerstroke
2006 Sunline Solaris T-264-SR
2012 Palomino Bronco B1500LB
rebellious78 is offline   Reply With Quote
Old 02-06-2011, 09:36 PM   #31
Moderator
 
Sunline Fan's Avatar
 
Join Date: Dec 2006
Location: Michigan
Posts: 6,155
SUN #123
Sunline Fan is an unknown quantity at this point
Quote:
Originally Posted by rebellious78 View Post
Are transit bars necessary? Just wondering.
Nah, not for yours. For a pre-2005 though, I guess they aren't "necessary", but they are a good idea and if they are still with the unit, it's good to use them.

Yours can't hurt from a little floor support when the slide is in though to keep the floor and dinette wall from separating from the sidewall.
__________________

__________________
2007 T-286SR Cherry/Granola, #6236, original owner, current mileage: 9473.8 (as of 6/18/21)
1997 T-2653 Blue Denim, #5471
1979 12 1/2' MC, Beige & Avocado, #4639
Past Sunlines: '97 T-2653 #5089, '94 T-2251, '86 T-1550, '94 T-2363, '98 T-270SR
Sunline Fan is offline   Reply With Quote
Reply


Currently Active Users Viewing This Thread: 1 (0 members and 1 guests)
 

Posting Rules
You may not post new threads
You may not post replies
You may not post attachments
You may not edit your posts

BB code is On
Smilies are On
[IMG] code is On
HTML code is Off
Trackbacks are Off
Pingbacks are Off
Refbacks are Off


Similar Threads
Thread Thread Starter Forum Replies Last Post
Slideout floor problem that may be of interest Galaxiedriver Sunline Slide Room Travel Trailers 0 08-25-2009 07:47 PM
Replacement slideout Topper fabric Galaxiedriver Repairs and Maintenance 0 08-24-2009 09:17 PM
Convex (or Concave?) floor on slideout anyone? ihsolutions Sunline Community 11 08-02-2009 08:01 AM
Slideout awning 264SRinPA Modifications 3 03-18-2009 06:40 PM
Slideout limit switch? r-n-r Sunline Slide Room Travel Trailers 1 09-13-2006 01:21 PM


» Featured Campgrounds

Reviews provided by

Disclaimer:

This website is not affiliated with or endorsed by Sunline RV or any of its affiliates. This is an independent, unofficial site.


All times are GMT -6. The time now is 01:20 PM.


×