 |
|
 04-17-2018, 10:43 AM
|
#21
|
|
Senior Member
Join Date: Sep 2011
Location: Connecticut
Posts: 373
SUN #2943
|
Quote:
Originally Posted by mainah

The first time I did mine I replaced the bushings alone then I found out for less than $50 I could buy the entire setup bushings and all for both sides. Etrailer was able to produce the extra bushings for the springs Dexter was not. A perfect bearing surface is one hard material and one soft. Lead bearings in and engine jewels in a watch. Try marking the bolt head and turn it to match the ware in the bushing at least that side would get the most grease.
|
etrailer has some great specs online too, like the OD and ID of the various options. Their prices can really vary, so you have to watch out. When I bought brakes and drums, etrailer had the best price for the drums, but a pretty poor price for the dexter self adjusting brakes. Like anything, you just have to pay attention.
Your comment about the bearing surface, I'll add that for the Dexter stuff the bolts are black oxide (or some other rough, black finish) and they are physically rough. Hard plated bolts would be much better, I'd think.
__________________
__________________
~~~~~~~~~~~~~~~~~~~~~~~~~~~~~~~
2006 Sunline T-1950
2019 Ford F-250
~~~~~~~~~~~~~~~~~~~~~~~~~~~~~~~
|

|

|
|
04-17-2018, 03:40 PM
|
#22
|
|
Senior Member
Join Date: Apr 2011
Location: Maine
Posts: 3,357
SUN #2097
|
Yeah a hard bolt would be fine but there was no discernable ware on the original bolts in mine (they were bright metal) and they were originals at least the first time I did it so if they had been replaced they have been through two cycles. My replacement parts were not Dexter but a nice heavy build they were not shouldered bolts like the OEM just a jamb stop nut same theory different approach.
__________________
__________________
|
|
|
|
|
04-17-2018, 05:19 PM
|
#23
|
|
Moderator
Join Date: Nov 2006
Location: Ohio
Posts: 12,649
SUN #89
|
Quote:
Originally Posted by Tod Osier
Sorry to be the bearer of bad news - I would love it if this was an isolated case.
|
No worries on being the bear or bad news... I'm thankful you found this and are posting about it. This is the good fortune and power of Sunline Club. When we talk about it, then we can go check our own...
The more think about this and see your end results, right about now I would not be a bit surprised mine are the same, or worse. Since we both grease these well, there is no squeaking and since we are "developing" a baseline for wear, then forward we can track it and change in advance. That is if I stick with the Dexter bronze.
In my case my rubber equalizer is a Trail Aire which also has bronze bushings in it from the factory. I can see if they are worn more or less. They are not as old as the Dexter (early 2009). The Trail Aire came when I went to LT tires in June 2012. Will see if there is a difference. They may be worse...
Quote:
Originally Posted by Tod Osier
The weight of the axles, drums, brakes, and the stiffness added by the axles makes it impossible to evaluate what is going on without tearing them apart.
|
Well, maybe not impossible but not a fast look. My thoughts are I will try this first,
1. Jack the camper up and put the frame on jack stands. Need to get the load off the axles.
2. Place a bottle jack or other lifting device (even a crow bar off a block of wood) under the axle seat area of the axle.
3. Put a dial indicator, mag base on the leaf spring, indicator feeler on the top edge of the shackle at the equalizer area or hanger at the spring ends. The indicator feeler shaft needs to be in the direction of the wear axially
4. Lift the axle tube up and down and watch the indicator.
The clearance should show up. If you find enough to be a concern, then take the joint apart. The shackles are easier then the spring ends to take apart.
I'll report back how this works.
Quote:
Originally Posted by Tod Osier
Did you notice the center bronze spring bushing in the photo of the three? Can you see how it has flowed into the crease made by forming the spring eye? Seems pretty soft to me. Also on the equalizer, it has flowed out of the elongated hole. A tougher bronze would fix this, id think. I was wondering about getting MorRyde bronze bushings. The other thing about MorRyde is that the bushings in the equalizer are replaceable.
This is an early idea, but I'm thinking of getting shim washers to put on the outside of the equalizer to make up the width of the steel pivot/spacer so that the equalizer halves cant splay out/lay over (basically containing the halves of the equalizer). You can see that they were not touching each other and were spread out touching the hangers.
|
Yes I saw your "pretty" bad pics....
MorRyde is a good company and from all I have seen of their products they are good quality. It is an unknown if their bushings are any better.
I agree with shimming the EZ flex on the center pivot point sleeve. Just you need to leave a little clearance so the hanger does not squeeze tight the equalizer. The spreading of the 2 halves will get worse when more wear comes on the bushing as the worn bushing side can then rock on an angle. When there is little bushing wear, the halves cannot rock.
The bushing in the EZ flex are replaceable, they will press out, just do not know if Dexter sells them as a replacement part. Hopefully Dexter used a standard size. McMaster sells them and others. You may have to cut the length you can find or add 2 short ones to make the length https://www.mcmaster.com/#bronze-sle...rings/=1cghfks
Hope this helps
John
__________________
Current Sunlines: 2004 T310SR, 2004 T1950, 2004 T2475, 2007 T2499, 2004 T317SR
Prior Sunlines: 2004 T2499 - Fern Blue
2005 Ford F350 Lariat, 6.8L V10 W/ 4.10 rear axle, CC, Short Bed, SRW. Reese HP trunnion bar hitch W/ HP DC
 Google Custom Search For Sunline Owners Club
|
|
|
|
|
04-17-2018, 05:28 PM
|
#24
|
|
Moderator
Join Date: Nov 2006
Location: Ohio
Posts: 12,649
SUN #89
|
Quote:
Originally Posted by Tod Osier
Your comment about the bearing surface, I'll add that for the Dexter stuff the bolts are black oxide (or some other rough, black finish) and they are physically rough. Hard plated bolts would be much better, I'd think.
|
The standard Dexter or Lippert spring bolts are grade 5 bolts. The oxide coating helps on keeping the rust down on the exposed parts.
I made a grade 8 equalizer pin when I beefed up my spring hangers. I needed one for 1/2" thick hangers not the standard 1/4". When I check mine and if I have to take them apart we can look to see if the grade 8 held up an better than the grade 5.
If we really want to shift the wear on the bronze setup, we need to back into what bronze alloy we have to start with. Not an easy task. Then compare those mechanical specs to other bronze alloys that can be easily found. Then sort out the pin hardness. I can tell us where to go buy a lot better bronze but it will need to be machined down to bushing sizes to fit. The cost will not be good if you do not have a lathe to do this yourself to hire out the machining.
And we need to deal with the fact the grease really is not getting to where it is supposed to be. It is everywhere squirting out but under the high pressure point where it needs to be.
__________________
Current Sunlines: 2004 T310SR, 2004 T1950, 2004 T2475, 2007 T2499, 2004 T317SR
Prior Sunlines: 2004 T2499 - Fern Blue
2005 Ford F350 Lariat, 6.8L V10 W/ 4.10 rear axle, CC, Short Bed, SRW. Reese HP trunnion bar hitch W/ HP DC
Google Custom Search For Sunline Owners Club
|
|
|
|
|
04-17-2018, 05:38 PM
|
#25
|
|
Moderator
Join Date: Nov 2006
Location: Ohio
Posts: 12,649
SUN #89
|
Quote:
Originally Posted by mainah
Try marking the bolt head and turn it to match the ware in the bushing at least that side would get the most grease.
|
This has been tried by many by accident. Me included. If the grease hole ends up in the center of the high wear area, with no grease grooves the weight of the camper pressing down on the small diameter hole, a standard hand grease gun cannot develop enough pressure to lift the camper to allow any grease to flow. It is grease hydro locked.
When people report back after a wet bolt upgrade and say the bushing will not take grease, they have the pin grease hole over the high pressure area.
Ideally the pin has a 360 degree radial, spiral grease groove starting at the grease hole and the groove goes across the entire length of the bushing. And more then 1 of them if you can. Then position the grease hole clocked right dead center of the high pressure contact point. Then the grease will flow out the groove and spread across the spiral pattern all the way into the top clearance area.
The issue may be, the grooving process may weaken the spring bolt and over time of pounding develop a crack in the pin.
As you said, there is very little movement and there is not really a good way to get the grease into the wear zone with the current setup. The bushing itself is too thin to groove.
__________________
Current Sunlines: 2004 T310SR, 2004 T1950, 2004 T2475, 2007 T2499, 2004 T317SR
Prior Sunlines: 2004 T2499 - Fern Blue
2005 Ford F350 Lariat, 6.8L V10 W/ 4.10 rear axle, CC, Short Bed, SRW. Reese HP trunnion bar hitch W/ HP DC
Google Custom Search For Sunline Owners Club
|
|
|
|
|
04-17-2018, 05:44 PM
|
#26
|
|
Moderator
Join Date: Nov 2006
Location: Ohio
Posts: 12,649
SUN #89
|
H'mm technically one could get grease into the wear zone with the parts as there are now. It is not an easy task and a royal pain in the foot but this could work.
Place the grease hole straight down at the 06:00 position. The high pressure contact area.
When it come times to grease, jack up the camper and put jack stands under the frame.
The axles are now hanging from the hangers. Then try and grease the pin. A large part of the weight is off and the grease should go in. If not, then slightly lift the axle tube and grease to allow the grease to get in.
Then let the camper back down.
This would be a royal job to do and most will not take that amount of time to do a 5 minute grease job. Probably myself included. But it would work.
__________________
Current Sunlines: 2004 T310SR, 2004 T1950, 2004 T2475, 2007 T2499, 2004 T317SR
Prior Sunlines: 2004 T2499 - Fern Blue
2005 Ford F350 Lariat, 6.8L V10 W/ 4.10 rear axle, CC, Short Bed, SRW. Reese HP trunnion bar hitch W/ HP DC
Google Custom Search For Sunline Owners Club
|
|
|
|
|
04-18-2018, 09:17 AM
|
#27
|
|
Senior Member
Join Date: Sep 2011
Location: Connecticut
Posts: 373
SUN #2943
|
Always enjoy reading your thoughts John. I agree with almost everything. I'll admit that I've never fully understood the bronze and steel bearing thing, I accept it is true, but wonder in cases like camper suspensions if it is the best. It seems like if grit and pounding are part of the equation that steel on steel would be better suited. The bronze seems too soft or something else is wrong, like maybe the bronze would be fine if it was fully supported (the springs eyes are not exactly perfect) or if the pins and the bushings fit tighter (there is play for shucking to occur when the suspension pounds on the road).
It couldn't hurt if the bolts were polished. In the photo you have of the wet bolt that you have up, you can see the streaks where something brass or bronze was abraded by the black oxide. I'm sure the bolt polished in the bushing fairly quickly, but what amount of bushing is eaten away when that happens? Also how abrasive to the bronze is the iron oxide that the grease is now contaminated with? I just don't know. Single bolts would be a snap to polish in a drill press, I'd have to think on how to polish the bolts in the shackles.
On the equalizer bronze bushings, we could get better ones to replace, but Dexter won't sell the rubber cushions separate, so not much gain to rebuild bearings if a known weak link (rubber) is unavailable. It would be really great if Mor/Ryde would sell replacement bronze bushings (they do) AND rubber cushion for their equalizers (have to find out).
I also don't know what the quality of the grease is when it gets as dirty as that on my equalizer. I'm sure given the amount of wear on the bronze, some of the dirty coloration is bronze, but once any of these parts wear enough that grit can easily migrate in, I'd think they go downhill faster. In the future I'll pump more grease in for sure to try to move all the old stuff out (my practice was to grease until I could see movement of the grease out of the joint and stop when I saw it, not keep pumping to try to get all new grease in). When the setup was new, I remember new grease came out, because the clearances were soo tight that there wasn't much room in there for old stuff.
__________________
~~~~~~~~~~~~~~~~~~~~~~~~~~~~~~~
2006 Sunline T-1950
2019 Ford F-250
~~~~~~~~~~~~~~~~~~~~~~~~~~~~~~~
|
|
|
|
|
04-19-2018, 09:09 PM
|
#28
|
|
Moderator
Join Date: Nov 2006
Location: Ohio
Posts: 12,649
SUN #89
|
Hi Tod,
As Mainah mentioned, in a bushing setup one part is intended to be a wear item (consumable) and the other a very low to no wear part. In this case the bronze needs to wear before the tougher/harder pin. Going steel on steel even if you change the hardness of one of them is not the greatest bearing setup. That does not mean it will not work, just the softer steel will gall rather then wear like bronze does. Actually cast iron and steel are a good match depending on how it is used. Eons ago harden steel with gray cast iron and lubration were used a lot. Even gray iron on gray iron with lube. The gray iron being softer then the steel it did the wearing but not galling. If you ever look at a lathe or a milling machine they are using class 30/35 gray iron ground true as machine ways. It is a bearing surface.
However in the case of a suspension setup with these thin bushings, gray iron would crack being only 1/16" wall thickness.
I "think" what we have in bronze bushing is close to SAE 660 bronze. https://www.dura-barms.com/bronze/le...nze/c93200.cfm
660 is a standard bronze for general purpose bushings. When sized in a diameter large enough, it is a good overall bushing. However the yield stress is only 20,000 psi. The hardness is very low, so low that it does not compare to what I am going to show you. Yield meaning the limit when the metal permanently deforms and will not return to its original shape. This bronze is pretty soft. We are also fighting the small 9/16" diameter. If the diameter was say, 1 1/4" OD, what we have now would last even longer. But that is not going to change due to the whole industry being sized on 9/16" everything in this size trailer.
This type of bronze I feel would be superior over what we have now. https://www.ampcometal.com/products/...o-18-extruded/
I have used a lot of that in applications where ample lube is not always present and long wear in tough conditions are needed. The extruded Ampco 18 has a yield stress of 55,000 psi. 2.5 times stronger then what I think we have now. As far a hardness, the Ampco 18 is around a Rockwell C of 15. The 660 bronze does not even enter the Rockwell C range it is so soft. Keep those number in mind.
The pin we have now which is a grade 5 bolt which has a yield of 92,000 psi and a hardness of Rockwell C of 35. Larger numbers are stronger and harder.
You can see by this yield and hardness numbers the original bronze if not very tough or hard. The Ampco 18 is stronger and harder then the SAE 660 but yet still less then the spring pin. That combo would just plain work better and longer.
The problem is, the cost for us to make the bushing out of Ampco 18 if far beyond what the Never Fail that are made for this. http://images.salsify.com/image/uplo...s58zuw1pn06iwl
Amazon has them for $59 for 14 bushings on Prime. Or $4.21/bushing and we do not need to grease them. https://www.amazon.com/Lippert-27968...Bbushings&th=1
RV Upgrades has 14 of them for $53 plus shipping unless you buy more stuff to get over $99 then it is free freight
https://www.rvupgradestore.com/Never...-p/46-0380.htm
If mine are worn or shot, I will go the Never Fail route. Then the grease part and contamination concern is gone and they are so called "guaranteed" for life. Heck is I can get 100,000 miles out of them, I will be changing more than the bushings.
Yes, grease with dirt in it is not the good. However grease in dirt in agricultural has been doing this for lots of years. Just those applications are not as severe as this axle setup and 35,000 miles. The old grease when it hardens on the outside creates a level of a dirt barrier. It is not perfect but it helps.
Trying to grease and purge the joint of all old grease I do not think will work with the camper on the ground. It might if you jack it up. With camper on the ground the grease is going to ozz out of the easiest path. This is generally the most worn area with a lot of play. You will never be able to force new grease into the axle pin area that is tight with the camper pushing down on the spring pin. That is the reality of a design issue we have.
The black finish with the bronze streaks. That does look like black oxide which is only a flash level of thickness. Like 0.0003". The bronze streaks were most likely from me playing with a bronze bushing sliding it over the pin before it was installed. Yes you can polish that off if wanted. On the shackles, the pins will press out and you can put the bolt in your drill press. I have had to remove them before. That are pressed in like the spring bolts with serrations by the head.
Hope this helps
John
__________________
Current Sunlines: 2004 T310SR, 2004 T1950, 2004 T2475, 2007 T2499, 2004 T317SR
Prior Sunlines: 2004 T2499 - Fern Blue
2005 Ford F350 Lariat, 6.8L V10 W/ 4.10 rear axle, CC, Short Bed, SRW. Reese HP trunnion bar hitch W/ HP DC
Google Custom Search For Sunline Owners Club
|
|
|
|
|
04-22-2018, 09:48 PM
|
#29
|
|
Moderator
Join Date: Nov 2006
Location: Ohio
Posts: 12,649
SUN #89
|
Tod,
I did some checking on my suspension today. I also went back and added up all the mileage on when I installed the Dexter bronze bushings, heavy duty shackles and when I converted from the EZ flex to the Trailair Equa-Flex equalizer. We can now compare the wear I am seeing to what you have.
I am not finished with the suspension check, but this will get you started on thinking on the findings.
Timeline:
2-8-2009 Install Dexter bronze bushings, heavy duty shackles and EZ flex.
7-12-2012 Upgrade to 16 LT tires and change out EZ flex for TrailAir equalizer.
As of 4-22-2018:
23,831 Miles - On Dexter bronze bushings in leaf springs and heavy duty shackles.
11,793 Miles On Trailair Equa-Flex equalizer with LCI bronze bushings.
Here are some pics of what worked and what did not.
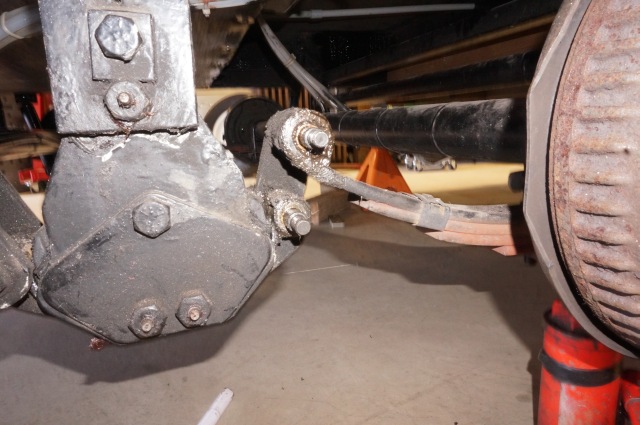
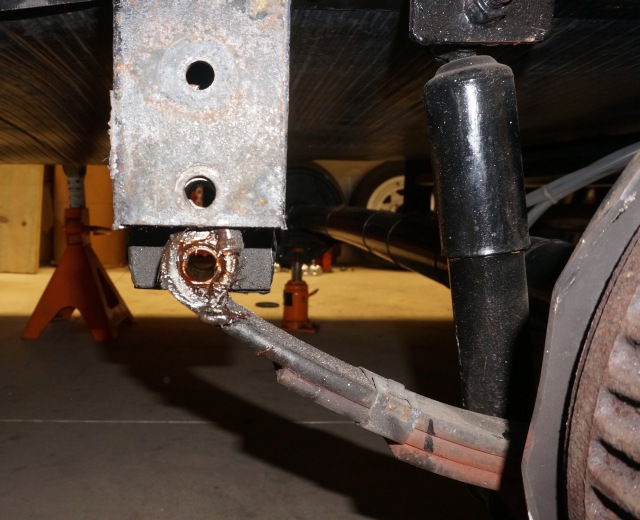
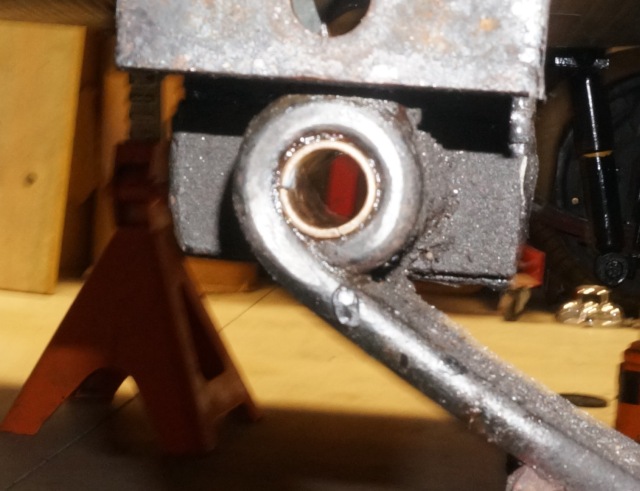
I started with seeing if an indicator check could work to see how much wear is in the bushings without taking the system apart. At the shackle area, this does not seem to work well with Trailair Equaflex. It might work better on a rigid equalizer or a Dexter EZ flex. And this technique should work on the front of rear hanger spring bushings.
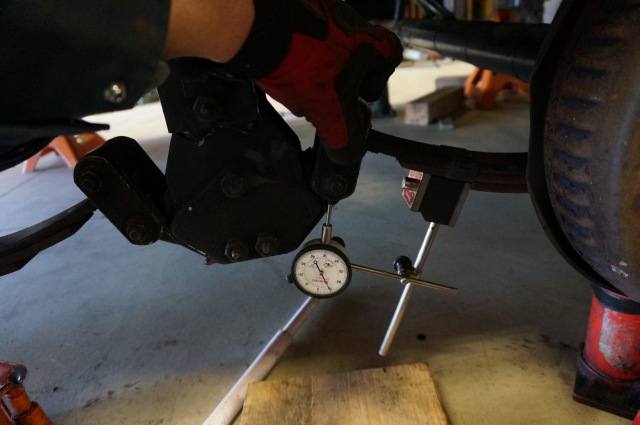
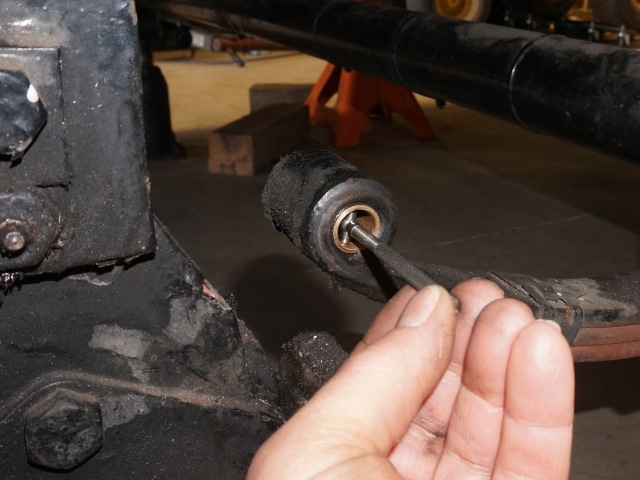
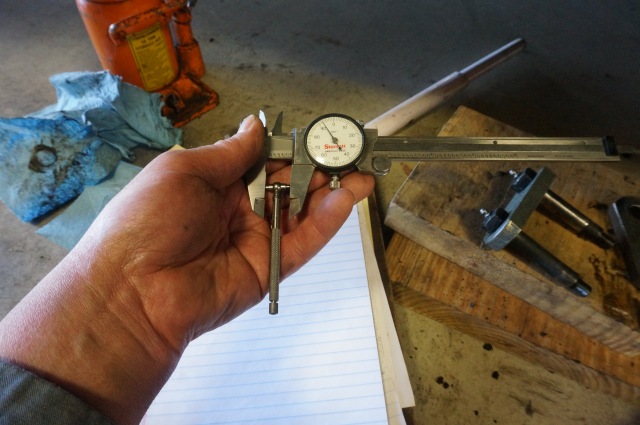
See here for the setup. Indictor aligned in the direction of the wear at the shackles
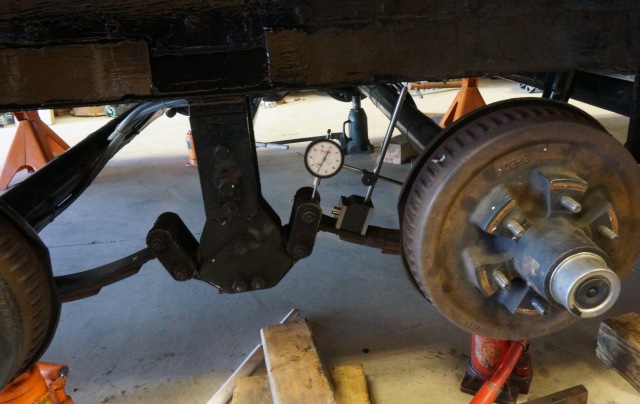
By lifting the shackle plate I do get a reading. However it is not accurate for the top rear front spring bushing.

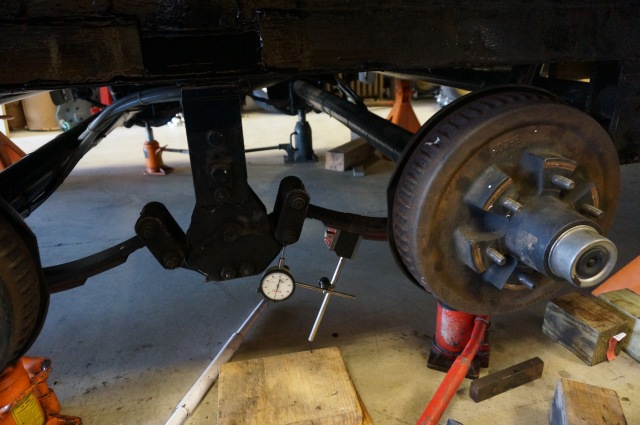
The dial shows 0.012 movement. The problem is if the bottom shackle bushing has less wear then the top bushing, the bottom bushing will stop the movement at the top bushing from reaching the full amount of indicator movement. This became apparent when I did the bottom as then the top bushing can constrain the bottom too. And more so, the trailair Equa-flex bottom arms pivots so easy it is hard to confirm if there is bushing play or the arm moved creating indicator movement. In order to do this correctly, you have to take the shackle plate off both side and only us a pin to un-constrain the bottom and top pins. And if you have to do that, then just measure the bushing bore and pin and subtract the difference.
Here was the bottom setup. Same issue as the top.
Next was to take the shackle pins nuts off and take pics of the wear and measure the wear.
Rear spring front shackle plate off, with grease left on to show the grease.
Some of the grease wiped off to show the bushings before removing the shackle pins.
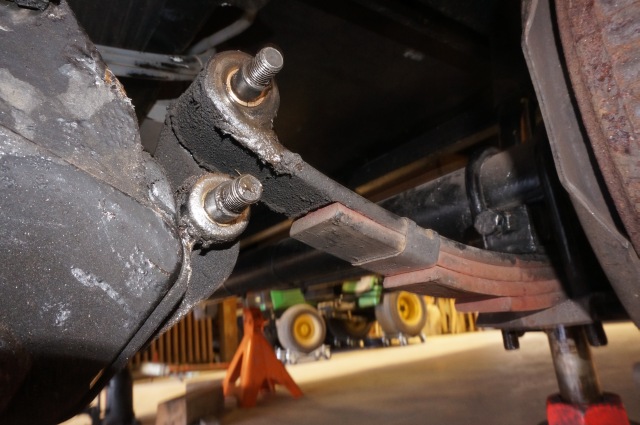
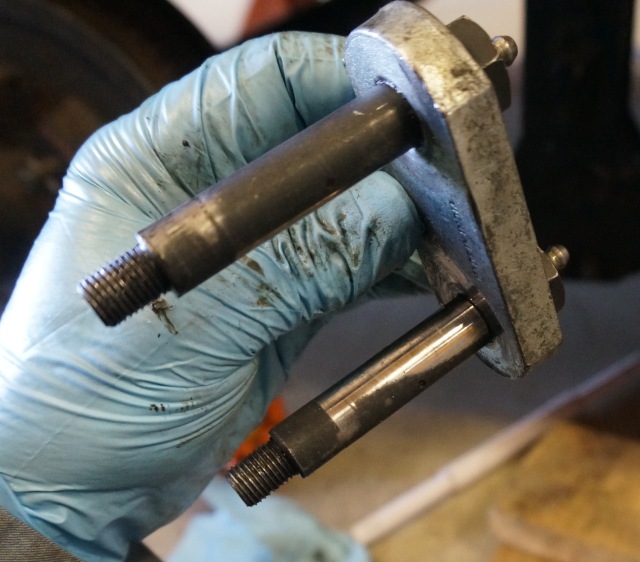
Grease on the shackle pins. It was somewhat smeared when removing the pins.
Shackle pins cleaned up and showing the burnished wear on the insides of the pins. You can see the grease holes
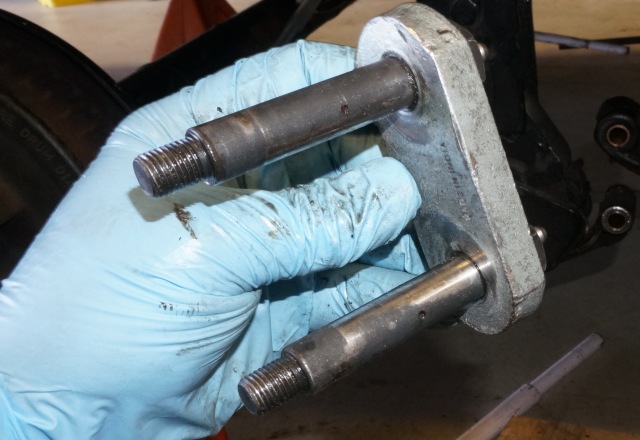
The burnished wear follows the centerline of the shackle plate showing contact pressure on the insides of both pins.
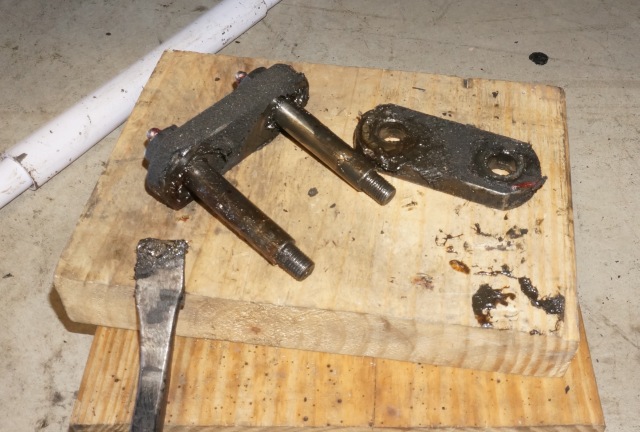
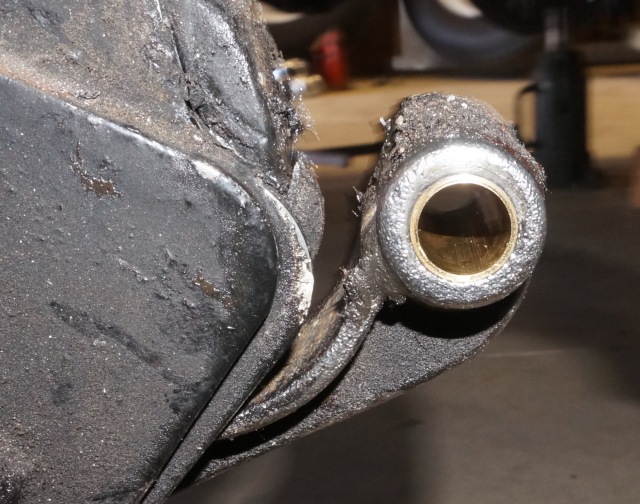
The 2 left rear shackle bushings cleaned up. The spring bushing has slight cracking at the unsupported area of the leaf spring eyelet. (the end of leaf spring as it wraps to complete a circle is a slight recess.)
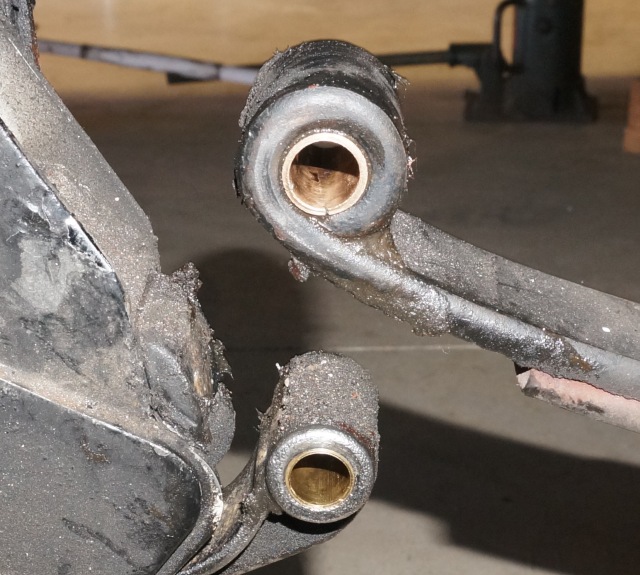
The Equa-flex bushing with 11,793 miles of wear.
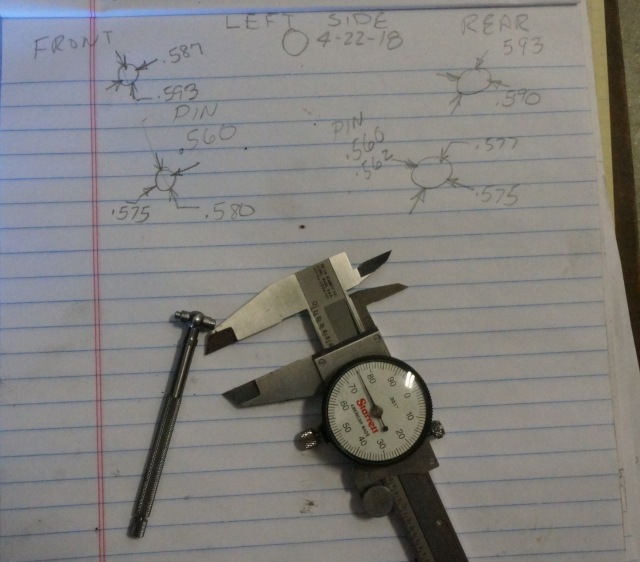
Then using telescopes, I measured the bushing IDs
Here are the dimensions of all 4 shackle bushings. I took dimensions at the contact force line (centerline of the shackle plates between the 2 pins and 90 degrees to the centerline.
There are more pics is interested on the front shackle to match the pics of the rear shackle shown above. See here for a link to my Flicker photo server album for more pics. https://flic.kr/s/aHsmgyyBVH
I do not know what the ID of a new Dexter bronze bushing is so it is hard to tell how much they have totally worn. I may have a spare one, I will look and report back. The pins have very little wear. Approx. only 0.001 to pushing 0.002 max. The pin diameters are 0.560
There is about 0.030 to 0.033 clearance on the Dexter bushings in the line of pressure contact. There is about 0.027 to 0.030 clearance on the Dexter bushings 90 degrees to the pressure contact line. This clearance is from just under 24,000 miles on 10,000# camper.
The Equa-Flex bushing has less clearance but again I do not know what a new bushing of theirs is as new and the Equa-Flex has less miles on it.
The is about 0.020 clearance on the Equa-Flex bushings in the line of pressure contact. There is about 0.015 clearance on the Equa-Flex bushings 90 degrees to the pressure contact line. This clearance is on just under 12,000 miles on 10,000# camper.
Tod, your camper is a little over half the weight of mine and yours has about 32% more miles then I do on the Dexter bushings. Yet I do not have as much wear as yours is. I do not see my bushings totally wearing through the side wall in less than the next 11,000 miles. The wear should be fairly linear.
I do not see changing these bushings right now from what I have found. I will check some more and report back on the shackles on the other side of the camper and at the spring hangers. Im not really seeing why yours wore out so fast. There may be some other factor we are missing. Im thinking, nothing major coming up right now. Maybe one of our other members may see something.
Hope this helps
John
__________________
Current Sunlines: 2004 T310SR, 2004 T1950, 2004 T2475, 2007 T2499, 2004 T317SR
Prior Sunlines: 2004 T2499 - Fern Blue
2005 Ford F350 Lariat, 6.8L V10 W/ 4.10 rear axle, CC, Short Bed, SRW. Reese HP trunnion bar hitch W/ HP DC
Google Custom Search For Sunline Owners Club
|
|
|
|
|
04-22-2018, 09:49 PM
|
#30
|
|
Moderator
Join Date: Nov 2006
Location: Ohio
Posts: 12,649
SUN #89
|
Tod,
Question: What location did these bushings of yours come from, the shackle plate area or the front or rear spring hangers?

Thanks
John
__________________
Current Sunlines: 2004 T310SR, 2004 T1950, 2004 T2475, 2007 T2499, 2004 T317SR
Prior Sunlines: 2004 T2499 - Fern Blue
2005 Ford F350 Lariat, 6.8L V10 W/ 4.10 rear axle, CC, Short Bed, SRW. Reese HP trunnion bar hitch W/ HP DC
Google Custom Search For Sunline Owners Club
|
|
|
|
|
04-23-2018, 04:49 AM
|
#31
|
|
Senior Member
Join Date: Sep 2011
Location: Connecticut
Posts: 373
SUN #2943
|
That is great, but sorry you went through the work. The bushings look beautiful.
I don’t have any idea on the positions that the bushings came from, but I don’t think there is a trend there as far as shackle us single bolt end. I can look at bolt wear from the shackle bolts vs the single bolts. I can tell what end the bushing that survived was on and I’d the completely gone ones. I don’t think one spot was any worse than another.
Our use is different than most, with us putting on thousands of miles of gravel of that 35,000. Every trip we do the goal is to get on to gravel bumpy roads, either the abrasive from the roads (don’t see it getting in there) or the bumps. Also it could be that the bushings in mine were just soft. I don’t buy that they went softer with both the equalizer and the spring bushings. I’ll measure a dexter bushing ID when I get them.
The Alaska trip we are doing this summer will put a lot of miles on, i will be looking at the bushings before 35000 this time.
__________________
~~~~~~~~~~~~~~~~~~~~~~~~~~~~~~~
2006 Sunline T-1950
2019 Ford F-250
~~~~~~~~~~~~~~~~~~~~~~~~~~~~~~~
|
|
|
|
|
04-23-2018, 02:53 PM
|
#32
|
|
Senior Member
Join Date: Apr 2017
Location: New Jersey
Posts: 125
SUN #9247
|
Jealous of both your mileage! Anything unusual about the types of grease being used?
__________________
Norm 01 T267SR
|
|
|
|
|
04-23-2018, 10:58 PM
|
#33
|
|
Moderator
Join Date: Nov 2006
Location: Ohio
Posts: 12,649
SUN #89
|
Hi Tod,
I did more digging into this today.
I took the door side equalizer area apart. The wear was similar to the slide side. But, there seems to be one thing that now is starting to stand out. Cracks in the bushing on the bottom area when in a leaf spring eye.
I have found cracks in some level on all the spring eyes I have had apart. Not sure just yet the cause. It shows up in the area where the outer edge of the spring eye stops. This area has a radius to it and it leaves the bushing unsupported. And since I pressed the bushing in from this direction, that end of the bushing was up against the pressing bolt. That outer end would of had more pressure on it during the pressing in process.
In the EZ flex or the Equa-Flex the castings are all the way to the end of the bushing allowing total support of the bushing. The cracking at the leaf spring eyes may come from fatigue of no support in the end of the leaf spring. That and be aggravated by the pressing operation.
See here, Door side equalizer area with the shackle nuts off

Grease with the shackle plates off. Notice the top left bushing in the end of the rear leaf spring.

The bushing cleaned up. See the chips missing / cracks in the top left bushing. This one is the worst. The other have cracks just not chips this big missing. This bushing is also worn twice as much as all the others.

A close up
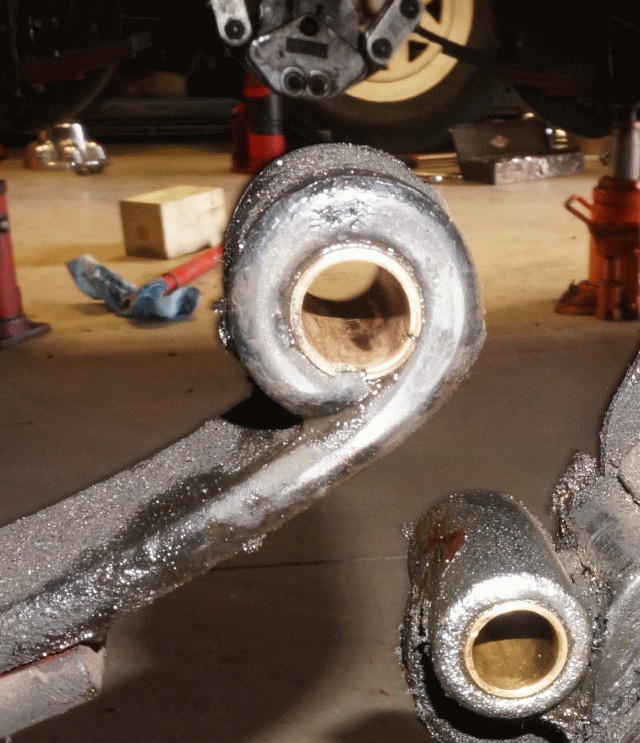
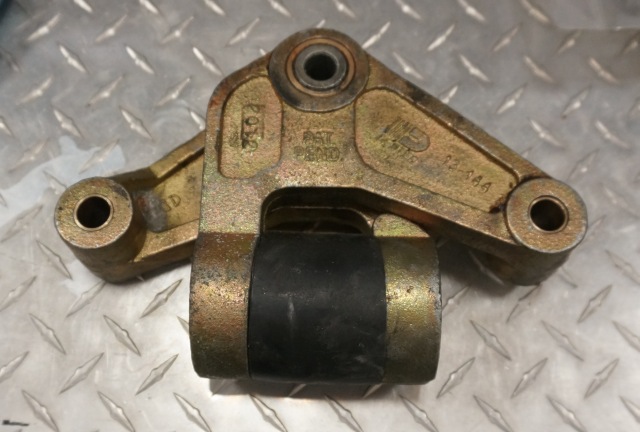
Here is the pin in the bushing and you can see the large amount of wear
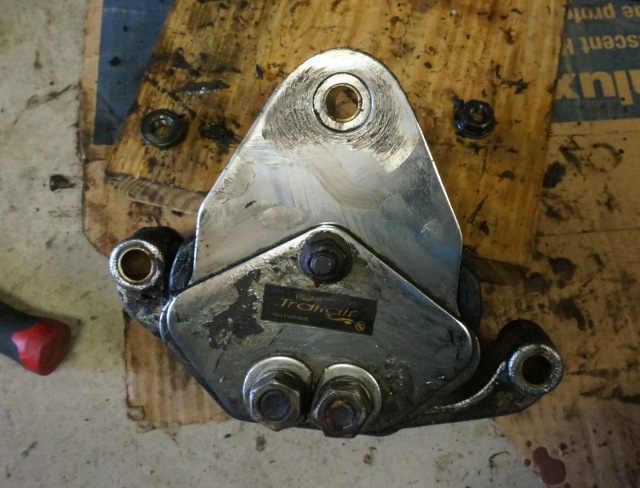
The Trailair Equaflex was binding on the hanger galling up the side plates and making the equalizer hard to pivot. I never would of found this if I did not unhook the shackles. Both sides of the camper had this issue. I cleaned it up and corrected the binding when I put it back on.
The outside
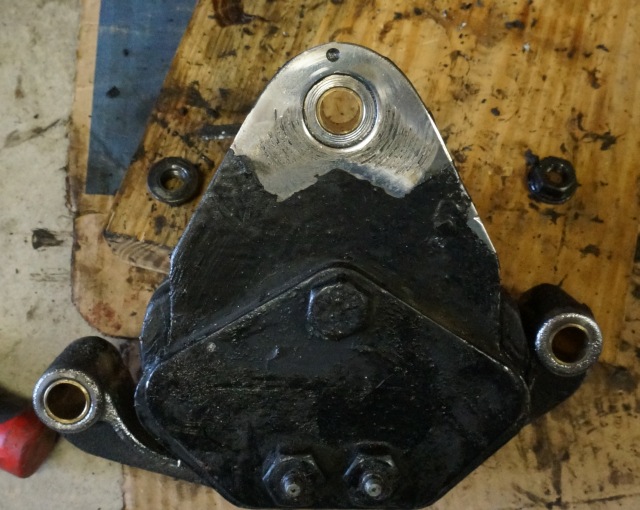
The inside
And I took one front spring hanger apart to check one of those locations. This is the slide side (left) front hanger. Grease all over
A close up of the bushing, also cracked in the same area.
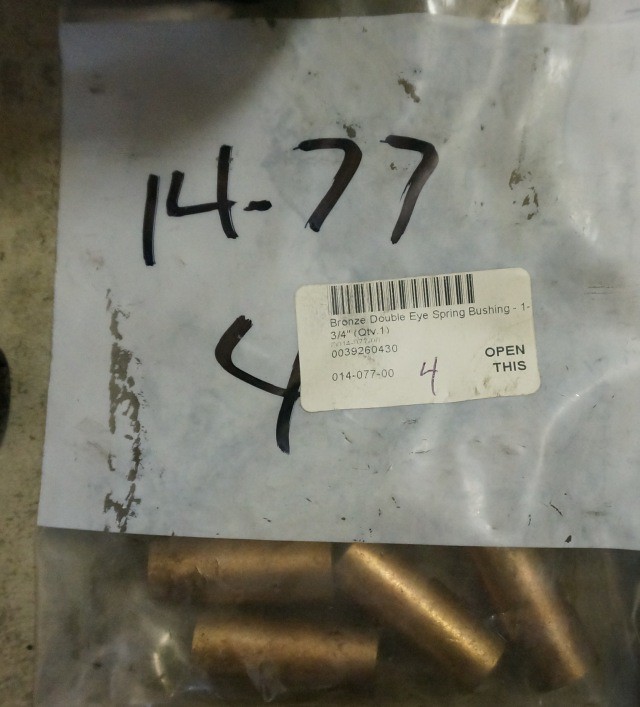
I found I had some spare bushings left over from the original install. So I was able to measure 5 of them. Dexter part number 014-077-00 1.743” long, 0.699 OD with 0.577/0.578 ID when not pressed in the spring eye.
Normally when you press in these kind of bushings it is common the ID changes dimension smaller from the press fit. So I had 2 older new large EZ flex’s and I measured them. These were left overs from the 16” LT tire upgrade. While installed, this EZ flex never had much if any mileage before I changed to the Equa-Flex.
I measured all 4 of the shackle link bushings. They were 0.579/0.578 ID. I suspect they ran a reamer through them after they pressed them in.
Since I now have a new Dexter bushing ID, I can back into the wear I have and I put it in a spread sheet. See here.
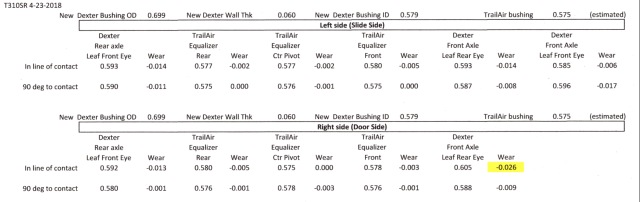
Since it may be too small to read, go here on my Flicker page for a larger one.
https://www.flickr.com/photos/camper...posted-public/
As you can see highlighted in yellow, that one door side (right) rear axle leaf spring has 0.026” wear where all the others are approx 50% or more less than that. The wall thickness of the bushing is only 0.060”. That high wear location is 43% worn through. That bushing location will not go as long as the others and fail before. After seeing, this I will do something with that one bad actor. I’m sorting out when I will change it. It will be no more than a year from now as I really do not like the cracks in the other leaf spring ends.
While yours looked more worn through, is there any chance the spring eye ones cracked and then with the more miles pounded a crack portion away to later accelerate the wear through? In my case, I have a camper twice the weight of yours is sort of against me in this cracking bushing issue. The spring pin pounds harder on the bushing.
Thanks for bringing this up and posting about it. I would not have known about this if you had not mentioned it and I went digging to see if I had the same issue. I do not have the wear you do, but I have other issues…
Thanks
John
__________________
Current Sunlines: 2004 T310SR, 2004 T1950, 2004 T2475, 2007 T2499, 2004 T317SR
Prior Sunlines: 2004 T2499 - Fern Blue
2005 Ford F350 Lariat, 6.8L V10 W/ 4.10 rear axle, CC, Short Bed, SRW. Reese HP trunnion bar hitch W/ HP DC
Google Custom Search For Sunline Owners Club
|
|
|
|
|
04-23-2018, 11:03 PM
|
#34
|
|
Moderator
Join Date: Nov 2006
Location: Ohio
Posts: 12,649
SUN #89
|
Quote:
Originally Posted by enormiss
Jealous of both your mileage! Anything unusual about the types of grease being used?
|
I will get the spec on the grease use and post. It is heavy duty wheel bearing grease.
__________________
Current Sunlines: 2004 T310SR, 2004 T1950, 2004 T2475, 2007 T2499, 2004 T317SR
Prior Sunlines: 2004 T2499 - Fern Blue
2005 Ford F350 Lariat, 6.8L V10 W/ 4.10 rear axle, CC, Short Bed, SRW. Reese HP trunnion bar hitch W/ HP DC
Google Custom Search For Sunline Owners Club
|
|
|
|
|
04-24-2018, 07:23 AM
|
#35
|
|
Senior Member
Join Date: Apr 2011
Location: Maine
Posts: 3,357
SUN #2097
|
Your ware patterns are pretty much the same as the nylon ones on mine. I took mine apart because they had movement side to side instead of linear that was pretty obvious just by hand. If I were to guess the way the design is any off center thrust could chip the outside edges of a spring bushing like a steep sideways hill because there is no thrust surface and the spring bushing does not have a machined bore edge to edge.
__________________
|
|
|
|
|
04-24-2018, 08:15 AM
|
#36
|
|
Moderator
Join Date: Nov 2006
Location: Ohio
Posts: 12,649
SUN #89
|
Quote:
Originally Posted by mainah
Your ware patterns are pretty much the same as the nylon ones on mine. I took mine apart because they had movement side to side instead of linear that was pretty obvious just by hand. If I were to guess the way the design is any off center thrust could chip the outside edges of a spring bushing like a steep sideways hill because there is no thrust surface and the spring bushing does not have a machined bore edge to edge.
|
H'mm, yes I agree. Good point.
As the bushing wear advances, the side twisting of the pin and spring can get worse as there is more room to tilt on an angle. And after enough wear, then the outer edge of the bushing which does not have 100% support of the bushing is trying to hold all that load and it cracks. As the wear gets worse, the angular pin twisting gets worse and soon the bushing can crack away rather than wear away.
I did not look but will next time I have it apart. The opposite end (inside of camper) of the bushing on the top should be having the same issue as outside of the spring on the bottom.
Tandem wheels when you turn really scrub the road. They do all kinds of funky twisting back there. The leaf spring is going to twist at the eyes as much as the pin clearance will allow.
I think you may have nailed it to what it causing this. The plastic compound bushing may not crack but they may grossly deform from the extreme point pressure.
Thanks for throwing those thoughts out there.
John
__________________
Current Sunlines: 2004 T310SR, 2004 T1950, 2004 T2475, 2007 T2499, 2004 T317SR
Prior Sunlines: 2004 T2499 - Fern Blue
2005 Ford F350 Lariat, 6.8L V10 W/ 4.10 rear axle, CC, Short Bed, SRW. Reese HP trunnion bar hitch W/ HP DC
Google Custom Search For Sunline Owners Club
|
|
|
|
|
04-24-2018, 10:57 AM
|
#37
|
|
Senior Member
Join Date: Sep 2011
Location: Connecticut
Posts: 373
SUN #2943
|
Great information all! I've always used what I think of as high quality grease. I'm using Lucas Oil Red 'N Tacky now, but I've used other in the past (have to look it up at home). I'm always looking for a multipurpose grease that is good for bearings so I don't have to have a bunch of grease guns around.
Mainah's point about the side-to-side motion and John's observations with the cracking bushings and the accelerated degradation of the one fit right in with what I've seen and am thinking. On the one bushing I had that remained whole(ish), you can see the flow of the material into the area where John got his cracking and I have a crack there too. Once the bearings start to erode, they fail faster and faster as there is more play (side-to-side grinding and slamming within the bearing) and likely more ability for road grime to get in there.
The inside of the spring eyes may be a problem too. I changed to wet bolts and bronze before my plastic were ruined, but the eyes are not perfect in any springs. For bushings to fit in a variety of spring eyes that are variably round they need to be soft to drive in and would tend towards undersized to fit. If the eyes are not round the bushings are not well supported and can fail (crack). I have my springs all cleaned up and I'm waiting to look at them until I have bushings in hand to play with (waiting for delivery from Dexter).
I'm thinking with wet bolts, I'm not going to make it more than 20K before I absolutely need to check them and if I'm checking them, I may as well replace then. If issues can be seen, who knows how long breakdown takes. I'll dig out my worst bushings from the vat of mineral spirits they are in and get some pics (remembering that a couple eroded completely). The issue of wear with the equalizer I saw could be due to all the shimmying after the bushings were gone.
__________________
~~~~~~~~~~~~~~~~~~~~~~~~~~~~~~~
2006 Sunline T-1950
2019 Ford F-250
~~~~~~~~~~~~~~~~~~~~~~~~~~~~~~~
|
|
|
|
|
04-24-2018, 07:55 PM
|
#38
|
|
Moderator
Join Date: Nov 2006
Location: Ohio
Posts: 12,649
SUN #89
|
As to the grease,
Here is what Dexter recommends. See page 6 under their recommended specs, top of the page.
http://www.dexteraxle.com/docs/defau...4.pdf?sfvrsn=0
As to what I have been using see this:
https://www.tractorsupply.com/tsc/pr...e?cm_vc=-10005
As to what Tod has been using, see this:
https://lucasoil.com/pdf/TDS_Red-Tacky-Grease.pdf
I will admit, I am not a grease guru like those who works in the lubrication field every day. Comparing the attributes Dexter is recommending for, thickener, dropping point, consistency, additives, and min viscosity index, what Tod and I have been using line up with them even if both are not on their list of manufacturers.
That said, while I do use the Traveler Premium grease in chassis lube, I do not use it in wheel bearing packing. I'm not seeing the type of grease used as the failure mode.
And I totally agree, the spring eyes are formed, not machined. They are darn good for a piece of rolled, curled and hardened spring steel, but they are not machined. The spring eye holes are not exactly true round or true flat.
A new Dexter bushing has an ID of 0.579. The OD of the Dexter shackle pin/spring pins is. 0.560" They have designed in 0.019 running clearance from day 1. I'm sure that much has to do with manufacturing tolerances of the spring eyes and the reality of how trailer suspension is made.
The TrailAir bushing is at 0.575 ID against a 0.560 pin. That is slightly better but not a lot. It has 0.015" running clearance from day 1.
This weekend I ordered a full set of the LCI NeverFail bushings. They showed up today. I was thinking I may need them quick as I may have had a large issues with my bronze. It is not that bad yet so for this year I will keep them handy. Or I will install them in the 2 other campers I have needing nylons upgrades. I'm not running out of campers to put them in....
The package warrants them for a lifetime if they ever break or wear out. Don't know just yet if I will have the same camper for another 14 years doing high or higher mileage to see if they hold up...
Next year odds are high I need to install all new brakes and maybe even a spring upgrade. At that time I will address the changing of the bronze. I expect to only put on around 4,000 miles this year.
Good discussion!
Thanks
John
__________________
Current Sunlines: 2004 T310SR, 2004 T1950, 2004 T2475, 2007 T2499, 2004 T317SR
Prior Sunlines: 2004 T2499 - Fern Blue
2005 Ford F350 Lariat, 6.8L V10 W/ 4.10 rear axle, CC, Short Bed, SRW. Reese HP trunnion bar hitch W/ HP DC
Google Custom Search For Sunline Owners Club
|
|
|
|
|
04-25-2018, 07:13 PM
|
#39
|
|
Senior Member
Join Date: Sep 2011
Location: Connecticut
Posts: 373
SUN #2943
|
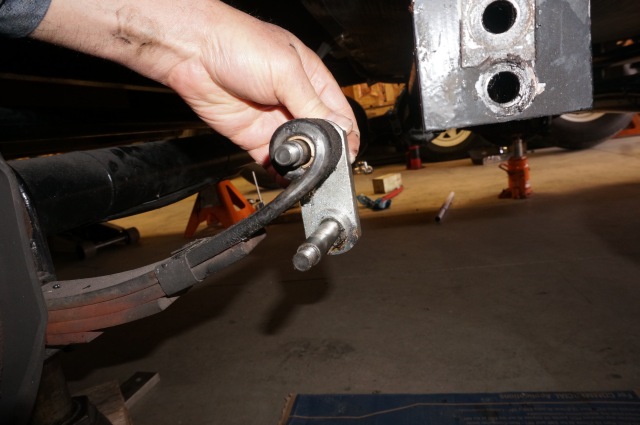
So, the new equalizer and heavy duty wet bolt kit arrived today. One thing that has been a concern given the discussion was the condition of my spring eyes. With the new bushings in hand, I tested them out. I have three that are exceptionally worn, so much so that not only does the bushing fit easily, there is a lot of slop (maybe a 1/16) and the eyes are not round. All the eyes are opened up enough so that the bushings go in easily.
I found some dexter springs of the same model as those taken off online and at a great price (I also found them for really expensive). There are a diversity of Chinese springs that would have fit for in the $20 range, but given my exceptional luck with dexter, i figured I should spring for those!
__________________
~~~~~~~~~~~~~~~~~~~~~~~~~~~~~~~
2006 Sunline T-1950
2019 Ford F-250
~~~~~~~~~~~~~~~~~~~~~~~~~~~~~~~
|
|
|
|
|
04-26-2018, 06:25 AM
|
#40
|
|
Senior Member
Join Date: Apr 2011
Location: Maine
Posts: 3,357
SUN #2097
|
It should take some effort to get any bushing in place. The springs are hard they should have done some damage to the the bolts if the bushings were trashed.
__________________
__________________
|
|
|
|
|
|
|
Currently Active Users Viewing This Thread: 1 (0 members and 1 guests)
|
|
|
 Posting Rules
|
You may not post new threads
You may not post replies
You may not post attachments
You may not edit your posts
HTML code is Off
|
|
|
|
 » Recent Sunline Discussions
 |
|
|
|
|
|
|
|
|
|
|
|
|
|
|
|
|
|
|
|
|
|
|
|


 Linear Mode

