|
|
 09-16-2009, 07:34 PM
|
#61
|
|
Senior Member
Join Date: Aug 2006
Location: Maryland
Posts: 838
SUN #37
|
Whoa, I think this thread deserves the award for most replies in the shortest time!
I haven't read all the replies to date, but just in case this means anything, I found no tags on my springs. They are three leaf.
While I checked, I noticed that the shortest (bottom) leafs (leaves?) on the right side are a little thinner than all the others. These two springs lie flatter than the other side which results in the R/S being about an inch lower than the L/S. Hey Jon, I might not have ever noticed that until you asked me to check for tags! Thanks. It might be a good idea for me to switch those out for thicker ones. Now I wonder if that is the reason the right side wheels are 3/4" closer to each other than the left?
Rich
__________________
__________________
 1992 T-2470 (now residing in South Carolina)
Current Sunline-2007 Solaris 2499
2018 Silverado 1500 w/Max Trailering pkg.
|

|

|
|
09-16-2009, 07:43 PM
|
#62
|
|
Member
Join Date: Aug 2008
Posts: 54
SUN #675
|
Thanks Rich for the feedback. The 2 springs that appear to be the originals had the numbers on the clamp that holds the stack together. The clamp was about half way between the axle and the eye. One side had some numbers that did not seem to be relevant. The other side (edge) had a large 72 stamped over top of a 22. I found out from Dexter that was and still is their part number for a 26" 1,250lb spring.
I measured the tube wall at the A frame (only place I could easily see getting to the wall thickness with calipers) Assuming the main frame is the same thickness as the A frame I measured .135. I am assuming that is a rusty 1/8" so that was a bit disappointing but it has lasted nearly 18 years so I guess it will last some more.
Thanks, Dan
__________________
__________________
|
|
|
|
|
09-16-2009, 09:49 PM
|
#63
|
|
Moderator
Join Date: Nov 2006
Location: Ohio
Posts: 12,649
SUN #89
|
Quote:
|
Originally Posted by Nightlites13
Thanks John for the summary. That was very helpful. I was in research over load. I will measure the frame thickness tonight and make my decision.
Take care.  |
Dan, not a problem at all I can relate. What I threw at you over the last week took me from last October until this February to compile...... So you got the advanced condensed course....
I have not bumped into any one yet on the web who has picture documented TT axle alignment and axle loading etc process on a TT. A lot of talk bits and pieces but never anything with depth to it. They always to it to a shop and never knew exactly what was done. So I had to dig really deep to put all the pieces together. There is no rocket science to this and there is not a lot of precision as compared to the auto world. Once you know where to go looking, it is just straight forward 1920 suspension with 1950 brake technology
.
I hope this ton of typing helped as I was glad someone else could actually use it...
Good luck.
John
__________________
Current Sunlines: 2004 T310SR, 2004 T1950, 2004 T2475, 2007 T2499, 2004 T317SR
Prior Sunlines: 2004 T2499 - Fern Blue
2005 Ford F350 Lariat, 6.8L V10 W/ 4.10 rear axle, CC, Short Bed, SRW. Reese HP trunnion bar hitch W/ HP DC
 Google Custom Search For Sunline Owners Club
|
|
|
|
|
09-17-2009, 07:40 PM
|
#64
|
|
Member
Join Date: Aug 2008
Posts: 54
SUN #675
|
John, Your help has been invaluable to me. All the parts are finally ordered 
I weighed all my info and left the final decision to the last moment. I took your advice and asked Dexter their opinion. Shared with them my frame size and such and they said the 1500# springs would be fine. So that was my gut feeling and what I wanted to hear from them. I'll report findings after it's complete.
Now, if I can get my black water tank to stop dripping (other thread)....but that's a whole other thing.
Hope you all have agreat time in the Adirondacks. Hope we can join you another year.
Take care,
Dan.
__________________
|
|
|
|
|
09-17-2009, 09:34 PM
|
#65
|
|
Moderator
Join Date: Nov 2006
Location: Ohio
Posts: 12,649
SUN #89
|
Dan
A rig pic!! WOW 
Good for you firming it up with Dexter. They are a good company with very good tech help.
When the pile of parts show up, lets talk once again about aligning the axles. See my post I linked you too earlier about how I aligned them. While you may not have the axle seat adjusters etc you can tweak the fron axle to be in better alignment then just slapping it together. Same with the rear axle.
Basically the pilot bolt that holds the spring pack togehter goes up in the axle seat. That is one sloppy hole fit. Mine had 1/8" larger hole in the axle seat to the spring pilot pin. Before you tighten up the U bolts, snug them to just touch the springs. Then setup the tape measure from brake drum stud being plumb to center of tow ball. Then tweak the front axle to be the most inline and eqaul distance it can be left to right. Then tighten the front axle U bolts. Pending hanger positioning, you may not get perfect, but it will be as best it can with what you have.
Then on from front axle to rear axle, do the same thing on the rear axle but have rear parallel to the front.
If you take a little care in how you set it up and tighten the ubolts you can greatly improve the tire wear. Or if you do not pay any attention, it can get worse by just being bolted up out of alignment. There is so much play in those spring seat holes it can be greatly out of align just not being a little bit cautious during U bolt up.
Make it as optium as it can be in the clearance you have to work with. Your tires will wear longer.
Good luck.
John
__________________
Current Sunlines: 2004 T310SR, 2004 T1950, 2004 T2475, 2007 T2499, 2004 T317SR
Prior Sunlines: 2004 T2499 - Fern Blue
2005 Ford F350 Lariat, 6.8L V10 W/ 4.10 rear axle, CC, Short Bed, SRW. Reese HP trunnion bar hitch W/ HP DC
Google Custom Search For Sunline Owners Club
|
|
|
|
|
10-08-2009, 06:35 AM
|
#66
|
|
Member
Join Date: Aug 2008
Posts: 54
SUN #675
|
Races?
Hello All, Rainy weekends and an injured back have kept me from completing this project but I have been picking away. I will post some pix soon. I am in the home stretch now and have run into a problem. I have the 2 drums off that will be going on the new axle. I had bought new bearing sets with the races and wanted to replace everything.
I bought some brass drift punches and I was able to remove the old races OK. The tip of the brass punch started getting chewed up pretty quickly during this process. I am curious if that is normal or perhaps an indication of a problem.
I got everything cleaned up and installed the larger inner race and I think I have it seated in correctly. I then went on to the outer race and got it in half way and then it would not budge. Pieces of brass started flying off and the shape of the punch is pretty well ruined. I tried a pin punch and it chipped and a big screwdriver in frustration. Nothing. So I decided it made the most sense to remove it which was difficult but it is out.
Any idea what I am doing wrong? I have never done this step before and have no idea how hard or easy those should tap into place and how much the punch will get worn down. Might this be an indicator that there is a problem with the drum?
I am going to double check the part numbers today to be sure they are correct but not sure what else.
I should have looked at it more carefully when I took it apart. I do not have an example to look at. I only see one step inside for the outer bearing and assume the race must go all the way to it and seat against it.
Dilemma Dan?
__________________
|
|
|
|
|
10-08-2009, 07:25 AM
|
#67
|
|
Moderator Emeritus
Join Date: Jul 2009
Location: West Virginia
Posts: 2,039
SUN #897
|
The brass is a much softer metal than the steel is. It is normal, for a brass punch to be deformed. Brass is a "Sacrificial" metal that is used to prevent scratching and/or destroying the steel.
|
|
|
|
|
10-08-2009, 07:05 PM
|
#68
|
|
Member
Join Date: Aug 2008
Posts: 54
SUN #675
|
OK, I give up.
I took some suggestions from a few folks. I put my race in the freezer for an hour and a half. Left a heat gun blowing on the drum for a bit. Got a socket slighlty smaller than the race. Cleaned out the hub bore nice and shiny. Tapped away and got about half way to the step and it stopped. Eventually hitting nice big socket square with 2 pound sledge. Will not budge. The race looks to be even around not tipped at all.
Just verified my bearing part numbers to Dexter's reference and it is correct. I can't imagine it is supposed to be that hard to put in. Is it time to think there could be a problem with the drum? Anything else anybody thinks could be causing this besides pilot error.
Thanks
__________________
|
|
|
|
|
10-08-2009, 09:40 PM
|
#69
|
|
Moderator
Join Date: Nov 2006
Location: Ohio
Posts: 12,649
SUN #89
|
Dan
The races do not go in that hard, normally. BUT if it twists on the way in it will bind up big time.
Do you have the old race you took out? If so use your calipers and measure it against the new ones. The races are truly a 4 place decimal dimension but calipers moved to size on the OD, then the slider screw locked, makes a good gage that you can put the other race in to see if it is size to size.
I have used the large socket and a piece of all thread rod thru the bore to draw them in. Once started straight in the hole and pushed evenly, they go all the way in. And the race must bottom out on the shoulder at the bottom of the bore dead against it and square.
To get the races out, I use a slide hammer puller. But a hard drift can take them out too. It would not shock me brass was chipped, peened over. Thats why brass is used,. It takes the beating, not the steel. On removable we are not so worried about damaging the old one.
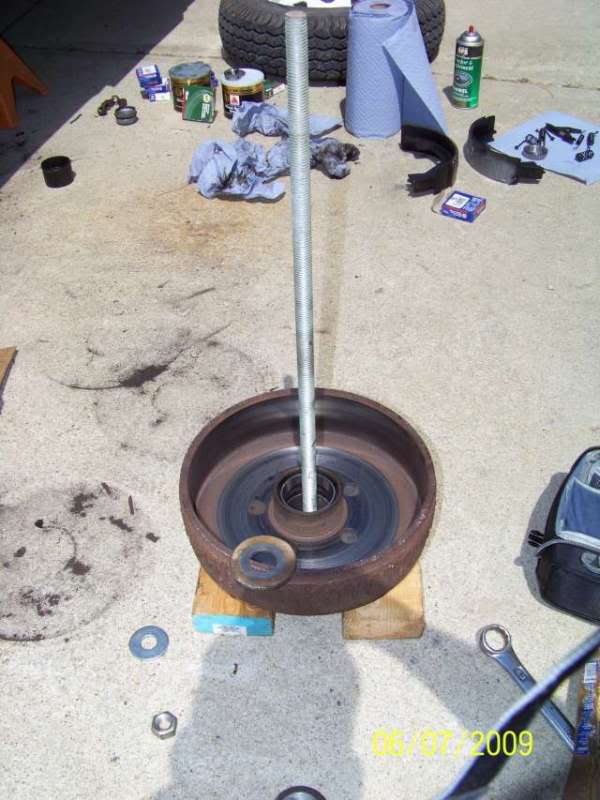
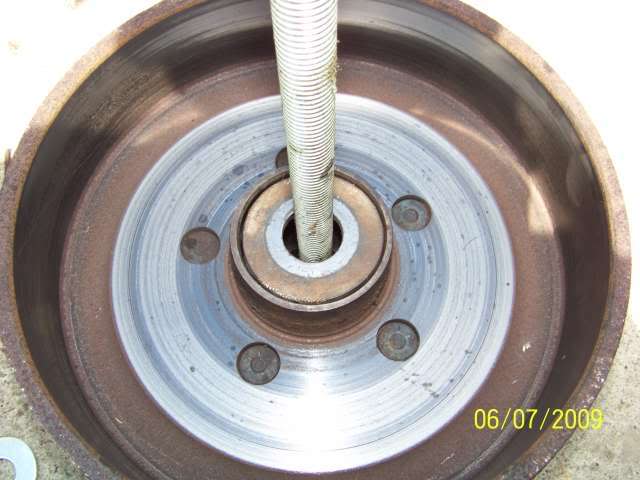
But on installing new, this is where even pressing and non maring needs to occur. See here this spring on my sons PU when we redid his.
Actually this is the same size as yours, a 10 x 2" brake set.
Here is the old race and I can get behind it with the jaws of my slide hammer.

Then the puller behind it

And out she comes.

Now to install, using the draw rod method. You have to find sizes of washers and large sockets that work. Ideally a shop press is used, but that is one thing I do not have so I have to make my own setup. A bottle jack can work too up against something that will take the load to make a shop press. Drum on ground level blocked up, washer socket in side and jack on top, slide under something real heavy that has the right jap. Like a tractor or a 1 ton truck.


If you are a real good in light tapping, a wood block and a soft blow hammer can get you most of the way in.


Once you think you have it down home, a medium tap with a large washer around the race surface, a socket and a hard hammer can tell by sound, its home.
Heavy pounding should not be used. The race can get messed up.
Now is the bore in the drum any good? If you checked the OD or the old to the new and they are dead on, again 4 decimal places here as 0.0005 makes a difference, then the bore should be checked.
I have inside telescoping gages that I can measure the bore then use a set of mics as I do not have a bore gage.
Do you have an set of really old fashion inside calipers? They look like this:
http://www.starrett.com/download/426_p353_356.pdf If you do, you can se it at the start of the bore, then go down to the bottom of the bore and see if it is a different size.
It is not beyond image that if the drum bore is messed up, on a taper, then the race will follow it and can distort it and that is a real problem.
Do you have a buddy at a machine shop? They can check that bore real quick.
Worst case, Etrailer sells Dexter drums. http://www.etrailer.com/c-tphd.htm Just make sure you have the right lug stud bolt circle when ordering. Amazingly they are not that expensive and they come with the races already inserted.
If you have to pay to have the drum machined, pending who does it, it might be cheaper to buy a new one. Standard machine shop hourly rated at $50 to $75/hr pending shop and work.
Hope this helps
John
__________________
Current Sunlines: 2004 T310SR, 2004 T1950, 2004 T2475, 2007 T2499, 2004 T317SR
Prior Sunlines: 2004 T2499 - Fern Blue
2005 Ford F350 Lariat, 6.8L V10 W/ 4.10 rear axle, CC, Short Bed, SRW. Reese HP trunnion bar hitch W/ HP DC
Google Custom Search For Sunline Owners Club
|
|
|
|
|
10-09-2009, 09:32 AM
|
#70
|
|
Member
Join Date: Aug 2008
Posts: 54
SUN #675
|
John,
Thank you so much for all the info again. Getting this fixed has become a little urgent as I am running out of open dumpstations to empty the tanks from Labor Day before cold weather. So the machine shop idea seemed good. I recalled an automotive machine shop the garage I worked in while I was in school used to use. I called them and they said bring them over. They checked them out and pressed all the races in for me. Called me in half an hour to say they were ready. Only wanted $10 for doing it. Gotta say I am happy with that
So maybe next time I will spend a little more time on the learning curve to figure out what I did wrong.
Hopefully I will get it completed this weekend.
Thanks for the machine shop suggestion.
__________________
|
|
|
|
|
10-09-2009, 10:32 AM
|
#71
|
|
Moderator
Join Date: Nov 2006
Location: Ohio
Posts: 12,649
SUN #89
|
Quote:
|
Originally Posted by Nightlites13
John,
So the machine shop idea seemed good. I recalled an automotive machine shop the garage I worked in while I was in school used to use. I called them and they said bring them over. They checked them out and pressed all the races in for me. Called me in half an hour to say they were ready. Only wanted $10 for doing it. Gotta say I am happy with that |
10 bucks....WOW Yes, I too would be happy with that!!
I sensed some frustation in the prior post and glad things worked out. Great!!! Some how you must of tipped it slightly on the way in and created the bind up. It's not hard to do. They are a light to medium press fit to start with so any tipping/out of square puts them in a heavy press fit that takes lots of force.
Good luck and keep us posted on the progress. Go Dan Go!
John
__________________
Current Sunlines: 2004 T310SR, 2004 T1950, 2004 T2475, 2007 T2499, 2004 T317SR
Prior Sunlines: 2004 T2499 - Fern Blue
2005 Ford F350 Lariat, 6.8L V10 W/ 4.10 rear axle, CC, Short Bed, SRW. Reese HP trunnion bar hitch W/ HP DC
Google Custom Search For Sunline Owners Club
|
|
|
|
|
11-08-2009, 09:23 AM
|
#72
|
|
Member
Join Date: Aug 2008
Posts: 54
SUN #675
|
The good, the bad and well, you know...
Sorry, this will be long. I have some pictures and some questions and some ideas. Look forward to hear what you all think.
OK, I got it back together. Please see pictures below.
Getting Started

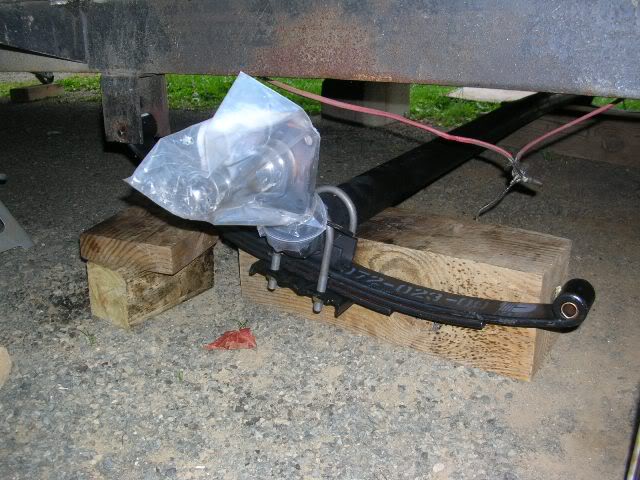
Both axles ready to hang

This was my trick to lend an extra set of hands. Had trouble holding the sockets and C clamps so took some old hardware from the tear down and taped the nut over the grease fitting. Worked very well and only damaged the old rusty nut.

Close up of this set up.
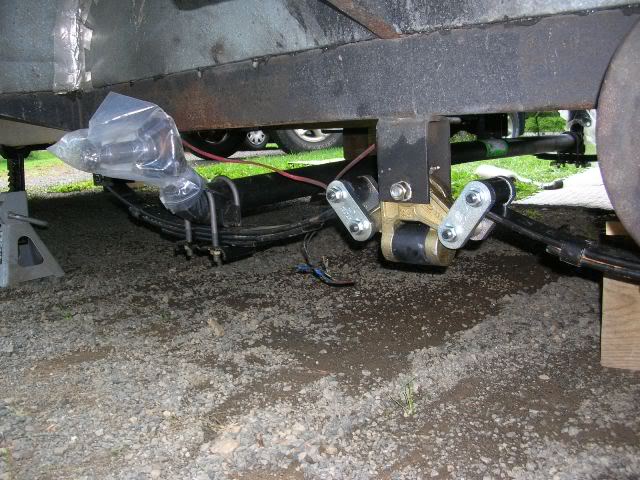
Almost there...

Can't wait

Finally !
The only real trouble I had here was that a couple of the grease fitings did not take grease. I think I read someone else had this as well. I was going to try re-greasing after a little travel time. I did pre-coat the bolts with grease before assembly so I hope that will work itself out?
First trip to the dump and their scale. You guessed it JohnB. Over weight.
Truck 5860#
Truck and trailer 11280#
My math puts the trailer at 5420#
That is with the water from the fresh water tank but without bikes, food, clothes, coolers, generator, firewood and so on.
I guess I need to really look at the stuff I have on board. I certainly was way-over weight this past Labor Day.
On return from scale found right-rear wheel much hotter than others. Decided perhaps I had to adjust the brake a bit as I had never done that before myself. I backed the star wheel off 2 clicks. This wheel was not hot again.
Off to the dump station up the highway. Good test for heat. On arrival all 4 wheels about the same heat seemed good considering stopping from 60mph. Returning home and left rear tire slightly hotter but both front wheels on new axle nearly cool. Feeling good
We squeeze in a short 1 hour overnight trip to Hamonassett state park to test things out before the years end.
First stop left rear hot but not excesively.
Arrival, left rear much hotter, grease slinging out of hub. Disappointed. Front left also a bit hot. Right side seemed about right.
Noticed something here though. After check in when I started to roll I noticed the trailer brakes were hanging up. I manually actvated them a few times and same thing. (I wish I had unplugged the trailer connector at this point in case that was part of the problem)
Trip home. One stop and home were the same front left hot and others about the same as each other.
My conclusions: Having gone through all of this I believe that the problem is not the bearings or axle. I believe the problem is brake related. Not sure how the heat problem could be moving from one wheel to another. Still have to dig a bit more since I have grease coming out on an hour trip which was largely back roads and slower speeds. I am left wondering the following:
Is there a mechanical problem that could be hanging up the brakes causing them to drag?
Could the brakes be getting too hot because I have them adjusted wrong?
Wondering if the brake controller could have been a problem all along. Has anybody heard of them failing and bleeding a little current through to the magnets enough to have them drag and build up heat?
Well, look forward to hearing from you. No rush as she is parked until spring but hope to have some ideas put together to tackle this.
__________________
|
|
|
|
|
11-09-2009, 10:21 AM
|
#73
|
|
Senior Member
Join Date: May 2008
Location: Ontario
Posts: 663
SUN #597
|
Brake Test
Glad to see you got everything together and were finally able to dump that black tank before winter.
There are undoubtedly different philosophies to brake adjustment. Mine is that you should "hear" the brakes drag while spinning the wheel by hand more than you should "feel" them dragging. Do this adjustment without the brake controller connected. Then connect the controller and see if the brakes are dragging more--of course they shouldn't.
It almost goes without saying, make sure the break away switch has the pin fully seated. Disconnect the brake controller--it could get fried otherwise--and pull the pin to check the brake drag again. The brakes should be full on now which indicates a properly functioning break away switch as well. You need DC power from the trailer battery to do this and don't leave the pin out too long as constant power to the brakes will drain the battery.
Just two things I thought of. Hope it helps.
Henry
__________________
2019 F150 3.5L Max Tow
2014 Arctic Fox 22G
2005 Sunline T-2499
|
|
|
|
|
11-12-2009, 09:24 PM
|
#74
|
|
Moderator
Join Date: Nov 2006
Location: Ohio
Posts: 12,649
SUN #89
|
Hi Dan
Good job  I knew you could do it. I will respond in more detail after the weekend on your questions.
In the mean time here are a few quick questions.
On the grease-able spring pins that will not take grease, what orientation did you put the grease hole in while facing the side of the TT? 12:00, 3:00, 6:00, 9:00 or some other oclock. Or never paid any attention to it?
The ozzing grease from the axle, tell me more about this. Where is it ozzing from? Where do you see it? Is the new axle ozzing or the old one that was fine before?
What brand and part number grease did you use? I can look it up.
More soon.
John
__________________
Current Sunlines: 2004 T310SR, 2004 T1950, 2004 T2475, 2007 T2499, 2004 T317SR
Prior Sunlines: 2004 T2499 - Fern Blue
2005 Ford F350 Lariat, 6.8L V10 W/ 4.10 rear axle, CC, Short Bed, SRW. Reese HP trunnion bar hitch W/ HP DC
Google Custom Search For Sunline Owners Club
|
|
|
|
|
11-13-2009, 07:45 PM
|
#75
|
|
Member
Join Date: Aug 2008
Posts: 54
SUN #675
|
Henry, Thank you for your input.
Hi John, Thanks.
Did not pay attention to any O Clock.....later wondered if this was important? 
OOzing grease on the rear (old) axle. Grease oozing from dust cap and spread out on rim while driving. This was the wheel that became the hotest on our short trip. The rear axle was hot on the labor day trip also but both wheels were equally hot at the time.
I can find the grease. It was an Etrailer red grease but I had a question on it and was on the phone with Dexter at the time and had read the specs to them one line at a time to verify the correct type and they said I had the right stuff. Let me know if you want me to look it up more specifically than that.
Look forward to your input. For now it is parked anyway so take your time. I just hope to have a plan before spring rolls back and I can put this to bed for good...I hope
__________________
|
|
|
|
|
11-18-2009, 08:58 PM
|
#76
|
|
Moderator
Join Date: Nov 2006
Location: Ohio
Posts: 12,649
SUN #89
|
Hi Dan
Well getting back to you. See if this helps explain what you are seeing. I have combined your 2 notes into 1 question reply.
Quote:
|
Originally Posted by Nightlites13
Snip
The only real trouble I had here was that a couple of the grease fitings did not take grease. I think I read someone else had this as well. I was going to try re-greasing after a little travel time. I did pre-coat the bolts with grease before assembly so I hope that will work itself out?
Did not pay attention to any O Clock.....later wondered if this was important?
|
What you are describing sounds like you installed the grease hole in the wrong orientation. On new bushings the play is the least and if you install the grease hole of the spring pin in the 4:30 to 7:30 (worst) or 10:30 to 1:30 (next worst) position while facing the pin from the side of the TT, the weight of the TT is pressing down and the springs are pressing up, basically sealing off the grease hole. If you install the hole pointing to the back of the TT, 9:00 position, that direction has the most play to allow grease to get in when the TT is on the tires. Having it at 3:00 will work to, just not as much play there as the TT if pulling the spring forward.
Since you have the pins installed, 2 options.
A. Jack up the TT, then pump grease in,
B. Pull the pin and orientate it at the 3:00 or 9:00 position.
Do grease often, like 3 times a year at least. Talking to Dexter engineering if the bronze is let go dry, it will wear very fast. But well greased and they last a real long time.
Quote:
|
Originally Posted by Nightlites13
First trip to the dump and their scale. You guessed it JohnB. Over weight.
Truck 5860#
Truck and trailer 11280#
My math puts the trailer at 5420#
That is with the water from the fresh water tank but without bikes, food, clothes, coolers, generator, firewood and so on.
I guess I need to really look at the stuff I have on board. I certainly was way-over weight this past Labor Day.
|
Well the good news is you found part of root cause. Now you can react accordingly.
Quote:
|
Originally Posted by Nightlites13
On return from scale found right-rear wheel much hotter than others. Decided perhaps I had to adjust the brake a bit as I had never done that before myself. I backed the star wheel off 2 clicks. This wheel was not hot again.
Off to the dump station up the highway. Good test for heat. On arrival all 4 wheels about the same heat seemed good considering stopping from 60mph. Returning home and left rear tire slightly hotter but both front wheels on new axle nearly cool. Feeling good
We squeeze in a short 1 hour overnight trip to Hamonassett state park to test things out before the years end.
First stop left rear hot but not excesively.
Arrival, left rear much hotter, grease slinging out of hub. Disappointed. Front left also a bit hot. Right side seemed about right.
Snip
OOzing grease on the rear (old) axle. Grease oozing from dust cap and spread out on rim while driving. This was the wheel that became the hotest on our short trip. The rear axle was hot on the labor day trip also but both wheels were equally hot at the time.
I can find the grease. It was an Etrailer red grease but I had a question on it and was on the phone with Dexter at the time and had read the specs to them one line at a time to verify the correct type and they said I had the right stuff. Let me know if you want me to look it up more specifically than that.
Snip
Noticed something here though. After check in when I started to roll I noticed the trailer brakes were hanging up. I manually actvated them a few times and same thing. (I wish I had unplugged the trailer connector at this point in case that was part of the problem)
Trip home. One stop and home were the same front left hot and others about the same as each other.
My conclusions: Having gone through all of this I believe that the problem is not the bearings or axle. I believe the problem is brake related. Not sure how the heat problem could be moving from one wheel to another. Still have to dig a bit more since I have grease coming out on an hour trip which was largely back roads and slower speeds. I am left wondering the following:
Is there a mechanical problem that could be hanging up the brakes causing them to drag?
Could the brakes be getting too hot because I have them adjusted wrong?
Wondering if the brake controller could have been a problem all along. Has anybody heard of them failing and bleeding a little current through to the magnets enough to have them drag and build up heat?
|
Ok lets see. Did you take all 4 brakes apart? We know the front axle was, but what about the rear axle? Did you pull the drums and regrease the rear?
One thing at a time. The easier one 1st. The ozzing grease from the dust cap. This is sort of a classic problem. The dust cap is a press in cap. The drum is cast iron and strong in relation to the thin soft metal grease cap. It is very easy to do, basically the grease cap lip that presses into the brake drum gets slightly folded or creased trying to get it on. If the cap does not go straight on, it will crease. What you end up with then is a pure mechanical gap of an air space between drum and cap. Grease gets warm, wheel spining at high speed, grease ozzes out the gap and all over the wheel. The normal way grease can get out of that dust cap is to have a gap.
Now to fix, 2 options. Pull the cap off and look at the pressing surface, if it is not true round, it is going to leak.
A. Buy a new cap and be extra care full to tap it straight on and not crease the cap.
B. Take a pair of water pump pliers (channel locks) and gently in very fine increments bump open the crease. Go around as far as you need to, not all in one spot. You are trying to flair it back open and being very smooth about it. I have been able to do this with success. I actually did it for a fellow forum member this year at the Buttonwood M & G when his was ozzing out. The shop who did his repack had to have creased the press fit area of the dust cap. He has never taken the cap off and it did not leak before.
Now getting your brakes to all work even and the same. This can take a bit of tweaking until you get good at it.
Since you has the brake plates all apart, a reburnish will help set them back to a more even starting place.
See page 12 for burnishing. Dexter Service manual
How I do the burnishing is, Do this as a mandate on brake new brakes and some times once I have had all the brakes apart and disturbed there seating in positions.
1st I adjust the brakes before leaving the yard. With TT lifted off the ground enough to rotate tire, I spin the tire by hand. Then using the manual adjuster, I keep tightening until the wheel about locks up and cant spin. Then I back off until a faint light drag. It may feel like a partial skip not a 360 deg drag. Reason, the drums have runout (out of round) and the shoes are not exactly matched to the drum yet.
Get all 4 wheels as even on the light drag as you can. Then put the TT down.
Go for a road test somewhere close and where no one is going to being in your way that much. Find a straight spot and drive to about 30 MPH. Then use the manual button on the brake controller and press it pretty hard. Not lock up, but full braking. I brake down to about 20 maybe 15mph. Then do it again, speed up, manual brake down hard but not lock up. This is the burnishing process. Do it about 10 to 15 times. Now you have seated the brakes and burnished them. If they are getting hot then let them cool before repeatedly doing it. On new brakes, you can feel the brakes getting stronger as they get seated in.
THEN, ideally you can find a gravel road and a buddy. Drive straight about 20 to 30 feet and lock the brakes hard and fast. You can use the truck brakes or just the manual button. You are only going about 5 to 8 mph. Have the buddy looking at one side of the TT. Did both brakes lock at once? Did one grab first? Then repeat for the other side. this can be done on hard surface, but be extra careful to not drag and create flat spots. The gravel slips and make it easier.
If one brake is more aggressive, crawl under and back off 2 clicks. Try again. Goal is to get all 4 to lock at once. If they are way out, well back to jack up and retweak all 4 wheels by the faint drag and try again. Just you only need to burnish once.
THEN keep an eye on the brakes. Each time out feel for heat on the drum. Be careful they do get hot in city stop and go traffic. Under normal stopping, not stop and go, feel the drums that they feel about all the same. If one is more aggressive, it will the stopping harder then the rest trying to stop the entire TT and as such be really hot in relation to the rest. Then crawl under and back off 2 clicks.
Once they settle in, then they all brake even and heat is all even. Then your good.
Now after the 1st 200 miles on new shoes, they will for sure need to be readjusted again. They are now seated so you have the highest wear right off when new. Jack up TT, do the spin and tweak until they faint rub like before. Do all wheels. Then check for heat after a few stops and make sure all 4 wheels are around the same temp.
Then your good for about 3,000 miles before the next tweak to make them tighter again for the wear. Repeat the jack up, tweak, feel for heat when you stop.
How heat can jump from 1 wheel to the next can come from brake adjustment. If all 4 are not even, well you tweak out the real hot one, now the next more aggressive on is doing all the stopping and the heat just jumped to it and so on. The gravel drag test shows you real quick if all 4 wheels are stopping as one.
The brake controller, it is global unless you have a wheel wiring issue. All 4 should get hot from a controller hanging on.
It sounds like you are still fighting a little bit of not having all 4 wheels tweaked to the same in adjustment. Once you know for sure all 4 are braking even, then we can go to the next step, is something hanging up and not releasing. I would start 1st with a drag test and just look.
Hope this helps and good luck
John
__________________
Current Sunlines: 2004 T310SR, 2004 T1950, 2004 T2475, 2007 T2499, 2004 T317SR
Prior Sunlines: 2004 T2499 - Fern Blue
2005 Ford F350 Lariat, 6.8L V10 W/ 4.10 rear axle, CC, Short Bed, SRW. Reese HP trunnion bar hitch W/ HP DC
Google Custom Search For Sunline Owners Club
|
|
|
|
|
09-08-2010, 08:24 AM
|
#77
|
|
Member
Join Date: Aug 2008
Posts: 54
SUN #675
|
 Update and Resolution...Finally!
Hello All,
Sorry to have left this for so long but for reasons not related to the TT we had it stored until getting ready for Labor Day. It was hard to start out knowing after all the work last fall that we still had an issue. So a few weeks before Labor day we took a drive or 2 and tried to figure things out. I wanted to post here so everyone following this thread would actually hear how it turned out.
30 minute drive=super hot wheels and grease boiling out. Talked to a friend of a friend with trailer expierience (Thanks Joel). He looked at it and said he felt we had the brake controller too high and suggested replacing the 12 year old time delay unit with a proportional unit. Bought us a new Tekonsha controller. Set it up per manufacturers instructions and headed out. Heat problem gone consistently on 3 of 4 wheels. Still baffled
Friend offered to come over and get to the bottom of this. Especially helpful since our TV lost the water pump on the last trip out. (Thanks Mike) At this point the bearings had been all re-packed, brakes adjusted. New suspension and springs. New front axle so it seemed there was not much left to be causing the problem. At this point it seemed logical to try swapping parts until the problem moved to a different wheel. Here is what we did: - Jacked up TT. Swapped brake drums on left side front to back hoping to have heat problem follow. Adjusted all brakes even. - headed out 10 miles. Front left hot
- Disconnected magnet from FL wheel and headed out same trip-Still hot
- Left magnet disconnected and backed brake adjustment all the way off. Headed out and wheel finally cool
At this point we felt we had ruled out a bearing problem. - Re-connected magnet and adjusted brakes but much looser than other wheels. Went to parking lot and noticed sound coming from wheel. Was FL wheel and realized that when making a left turn it would bind up and bring truck and trailer to stop when coasting on slight grade
- Jacked up TT and found a litle play in wheel. Thought we made a mistake in the bearing pre-load (having taken the wheels on and off several times at this point) Re-tightened it with torque wrench and felt good. Headed out and noise still a problem in the parking lot.
- Returned - jacked up TT and found wheel binding which had been free. Spun wheel in reverse and became free again. Gave it a good spin forward and after 3 revs locked right up.
- Decided to swap the entire brake mechanisim front to back and headed out. Heat problem finally moved to rear wheel. Still can not see a problem with that assy.
- Called Etrailer folks and for $43 got a new assy. Bolted it on and everything works perfect. Several hundred miles on Labor Day and everything working as it should be.
If I can determine what is wrong with this brake assy I will post it here. If anyone wants a pic of it let me know. The bottom line seems to be that I had more than one problem: Mismatched springs - Brake controller over driving the magnets - and a faulty Brake Shoe assy.....No wonder this was tough to troubleshoot.
Thank you all for all the help and information. Could not have done it without you! I can enjoy towing again and looking forward to future trips.
__________________
|
|
|
|
|
09-28-2010, 11:05 AM
|
#78
|
|
Moderator
Join Date: Nov 2006
Location: Ohio
Posts: 12,649
SUN #89
|
Hi Dan, been out camnping so slow getting to your post.
YES, I would be interested in seeing pic's of the brake plate and shoes that casued this issue. Odd as can be. Something must not be made right maybe.
Glad you sorted this out. Now you can go camp without worry. It is not suppose to be this hard, but.... sometimes it is. The rewards of solvoing the problem are great!!
Thanks for reporting back
John
__________________
Current Sunlines: 2004 T310SR, 2004 T1950, 2004 T2475, 2007 T2499, 2004 T317SR
Prior Sunlines: 2004 T2499 - Fern Blue
2005 Ford F350 Lariat, 6.8L V10 W/ 4.10 rear axle, CC, Short Bed, SRW. Reese HP trunnion bar hitch W/ HP DC
Google Custom Search For Sunline Owners Club
|
|
|
|
|
09-28-2010, 11:55 AM
|
#79
|
|
Senior Member
Join Date: Sep 2010
Posts: 122
SUN #1508
|
Old thread but Id thought Id share what I learned over the decades: it takes appx 9amps per axle to supply the brakes, hence the power feed AND the ground must be solid.
If the ground is bad between 'electrical stuff on the trailer' and the frame, and the frames of the two vehicles, when you turn on the marker lights, the lights will backfeed ground thru the brake magnets and the POSITIVE brake line, into the controller.
Just a fraction of an amp will slightly energize the brakes.
Or put it this way: all day you drive along great but as soon as it gets dark, stuff starts breaking....
I had this happen a few years back on a tow dolly with E-brakes due to crappy assembly order at the plant...I fixed it by drilling and tapping holes for #10-24 SS screws all over the place and always making sure the white wire on BOTH sides of the plug is into the frame in more than one place, even to the battery negative in fact.
Once I saw this once as soon as someone comes to me with hot e-brakes its like 99% of the time the problem.
__________________
QuadDriver
1987 2461 behind a 1981 F100 and sometimes my 1990 F150
|
|
|
|
|
09-28-2010, 08:33 PM
|
#80
|
|
Member
Join Date: Aug 2008
Posts: 54
SUN #675
|
Nice to hear from you again John
hanks to quaddriver as well. I have to say I was going in the direction you described as well until I ran with the brakes disconnected and still got hot.
John,
I should be able to get some pix this weekend. I have to say I was at my end when the weekend before Labor day I was under the thing again still trying to resolve the problem I dug into a year ago.
Of course there was more than one thing going on and I remind myself that is one of the most dificult things to troubleshoote (Being a Field/In HOuse Support Tech for a living) in my Job. In any case wanted to say a big old "Yes" it has been rewarding finally after all that work and we made our 4 hour Labor Day trip upstate NY without any problems. Every stop all four wheels were just slightly and evenly warm. What a great feeling to have that nailed finally.
I'll get some pix soon. Thanks for your help.
Glad to hear you were camping
Dan.
__________________
|
|
|
|
|
|
|
Currently Active Users Viewing This Thread: 1 (0 members and 1 guests)
|
|
|
| Thread Tools |
Search this Thread |
|
|
|
| Display Modes |
 Linear Mode Linear Mode
|
 Posting Rules
|
You may not post new threads
You may not post replies
You may not post attachments
You may not edit your posts
HTML code is Off
|
|
|
 Similar Threads
|
| Thread |
Thread Starter |
Forum |
Replies |
Last Post |
|
Blown breaker
|
Rockinjwolf |
Repairs and Maintenance |
6 |
09-04-2009 01:22 PM |
|
Safe on 3 wheels????
|
Lode |
Sunline Community |
5 |
06-26-2009 02:02 PM |
|
My wheels were bent?
|
dkasten39828 |
Sunline Community |
2 |
05-11-2009 03:13 PM |
|
Blown fuses
|
tervio |
Repairs and Maintenance |
13 |
11-17-2008 08:42 PM |
|
trailer wheels
|
vmifan |
Repairs and Maintenance |
2 |
07-26-2007 03:22 PM |
|
|
» Recent Sunline Discussions |
|
|
|
|
|
|
|
|
|
|
|
|
|
|
|
|
|
|
|
|
|