 |
|
 05-03-2017, 09:50 PM
|
#81
|
|
Moderator
Join Date: Nov 2006
Location: Ohio
Posts: 12,651
SUN #89
|
Hi Folks,
I have made it. Yeh!!!! Actually finished a week ago, just did not get time to post until today.
Here is the finish up of the door side frame reinforcing, painting and a few upgrades along the way. The way the lower flange metal welds on, it creates a process on how to paint the inside to help it not corrode. This is a multi step process.
Start with the primer on the frame.

Then you paint it all black with a top coat, inside and out. Then pre-primed and pre-top coated black steel reinforcement is clamped on. Then you have to power wire brush off the paint in the areas of welding so the paint does not contaminated the weld. Then you go through the long slow process of welding the lower flange reinforcing steel on. You have to go slow to not create excess heat warp in the actual frame and create negative camber ( the frame bends down)
Here is the lower flange steel welded on. It is a bunch of weld flash looking at this point

Then you clean up the weld flash and reprime all the welds.

Also to note: Priming and painting folding steps is a real project
. It takes over an hour a step per coat dealing with all the insides and outsides of the linkage and not getting yourself totally covered in paint.
Then a black top coat and then Dicor caulking in the joints between the stitch welds. This helps seal road spray and grim from getting behind the reinforcement metal. The ends of the triangle shape is still open to let any water that may get in, get out.

After the caulk sets up, then a final top coat and you start putting mud flaps and other frame attachments back on like scissors stablizers


And for the last time, (on this project) you add the last 2 tires.

Now to put the A frame back together. I needed to do some long overdue maintenance in this area. The emergency breakaway switch still worked but it was getting old and questionable. Since I had the front junction box apart, I took advantage of changing the breakaway switch.
The power feed wire to the breakaway switch is wired direct to the upstream side battery disconnect switch. This is on purpose so the breakaway is active at all times. Sunline pumped black silicone into the side of this switch, Im assuming to keep the live 12 VDC power lug from anything touching it.

They also crimped the breakaway power feed wire into the same ring terminal as the battery leed. I changed this and put the breakaway on its own ring terminal so next time I just unbolt and change the wire. Sorry, no pic of the new wire. Only the as built vintage.

Here is the new breakaway switch


Something to note and do, at least once a year, you need to pull the breakaway switch pin out, test that you hear a hum at the breaks so the switch is working and put silicone spray on the O ring and put the pin back in. That O ring is crucial to keeping water out of the switch. The O ring left unlubed, can get jammed in the switch over time and you about break the eyelet off the end trying to get it out. Only use silicone spray or lube so it will not swell up the O ring as we do no know what type of elastomer they made it out of.

Here is the junction box along with the fuse holder upgrade. I will do up a separate post on this as there is more to this

And closing up the box and sealing it with 3M 33 or 88 electrical tape to keep the moisture out. There is also a screw upgrade here.

Put all the hitch parts back on, the 2 group 27 batteries, and the propane tanks less the top cover.


And finally, Im done! Yeh!!!
I even made it outside to wash and 303 treat the roof. It had a lot of grinding and rust dust from wire brushing and welding on the frame. Now all clean.


This concludes this frame repair post unless I learn something new on it. The key learning out of all of this, if you end up going over very rough road , look over the frame real good afterwards. Areas special to I beam frames, the area behind the rear axle hanger on the bottom flange. If there is any lower flange deformation, as soon as you see it, that is the time to get it repaired. A total frame look over should be part of your annual inspection program looking for anything not normal and bent or broken off.
Hope this helps someone in the future. Thanks for looking.
John
__________________
Current Sunlines: 2004 T310SR, 2004 T1950, 2004 T2475, 2007 T2499, 2004 T317SR
Prior Sunlines: 2004 T2499 - Fern Blue
2005 Ford F350 Lariat, 6.8L V10 W/ 4.10 rear axle, CC, Short Bed, SRW. Reese HP trunnion bar hitch W/ HP DC
 Google Custom Search For Sunline Owners Club
|

|

|
|
05-04-2017, 03:07 PM
|
#82
|
|
Moderator
Join Date: Dec 2006
Location: Michigan
Posts: 6,155
SUN #123
|
Quote:
Originally Posted by JohnB

And finally, I’m done! Yeh!!!
|
YAY!!
I have to say, that second to last pic, she's looking really really good! Decals and fiberglass look really good still!
__________________
__________________
2007 T-286SR Cherry/Granola, #6236, original owner, current mileage: 9473.8 (as of 6/18/21)
1997 T-2653 Blue Denim, #5471
1979 12 1/2' MC, Beige & Avocado, #4639
Past Sunlines: '97 T-2653 #5089, '94 T-2251, '86 T-1550, '94 T-2363, '98 T-270SR

|
|
|
|
|
05-04-2017, 08:19 PM
|
#83
|
|
Moderator
Join Date: Nov 2006
Location: Ohio
Posts: 12,651
SUN #89
|
Quote:
Originally Posted by Sunline Fan
YAY!!
I have to say, that second to last pic, she's looking really really good! Decals and fiberglass look really good still!
|
Thanks Jon,
Yes, the camper is still great. The inside is still in great shape. The front decal is still the original. The back I changed. I did the clear film trick on the front decal your Dad and you showed me. Still hanging in there, it was a smooth surface, the ones on the corrugated aluminium did not work well. Different shrink rates.
The plastic, that is a another post in forming. Inside the roof vents shrouds have yellowed. The entry doors too. Seems different fiberglass companies make it different. The cargo compartment doors are still white. The entry doors, well the Awesome does not take the all of the yellow all out any more. I'm now experimenting with the Rust-O-leum plastic primer and paint. I'll let you know how it comes out. I might do a wrap on the doors. Have to find out the cost.
Thanks
John
__________________
Current Sunlines: 2004 T310SR, 2004 T1950, 2004 T2475, 2007 T2499, 2004 T317SR
Prior Sunlines: 2004 T2499 - Fern Blue
2005 Ford F350 Lariat, 6.8L V10 W/ 4.10 rear axle, CC, Short Bed, SRW. Reese HP trunnion bar hitch W/ HP DC
Google Custom Search For Sunline Owners Club
|
|
|
|
|
05-04-2017, 08:31 PM
|
#84
|
|
Senior Member
Join Date: Apr 2016
Location: Maryland
Posts: 488
SUN #8237
|
Quite the project John. Your camper looks nice.
You should be proud.
__________________
John
2000 T2370
|
|
|
|
|
05-04-2017, 08:42 PM
|
#85
|
|
Moderator
Join Date: Nov 2006
Location: Ohio
Posts: 12,651
SUN #89
|
Quote:
Originally Posted by johnnybgood
Quite the project John. Your camper looks nice.
You should be proud.
|
Thanks John. Much appreciated.
Yes, we are proud of our Sunny. She still has a good number of years to go camping with us yet.
Quite the project, yes this was. Each time I do one of these more major projects I think, wow that has got to be the biggest one I have done. Then something else tops it... I thought the axle rebuild was the big one, or the slide floor rot, but this frame issue topped all of them... Thank goodness for the new barn... that and retiring last August....  This one took some time to do. Squeezing this on weekends would of been a lot tougher.
Thanks
John
__________________
Current Sunlines: 2004 T310SR, 2004 T1950, 2004 T2475, 2007 T2499, 2004 T317SR
Prior Sunlines: 2004 T2499 - Fern Blue
2005 Ford F350 Lariat, 6.8L V10 W/ 4.10 rear axle, CC, Short Bed, SRW. Reese HP trunnion bar hitch W/ HP DC
Google Custom Search For Sunline Owners Club
|
|
|
|
|
05-05-2017, 09:54 AM
|
#86
|
|
Moderator
Join Date: Dec 2006
Location: Michigan
Posts: 6,155
SUN #123
|
Quote:
Originally Posted by JohnB
Thanks Jon,
Yes, the camper is still great. The inside is still in great shape. The front decal is still the original. The back I changed. I did the clear film trick on the front decal your Dad and you showed me. Still hanging in there, it was a smooth surface, the ones on the corrugated aluminium did not work well. Different shrink rates.
The plastic, that is a another post in forming. Inside the roof vents shrouds have yellowed. The entry doors too. Seems different fiberglass companies make it different. The cargo compartment doors are still white. The entry doors, well the Awesome does not take the all of the yellow all out any more. I'm now experimenting with the Rust-O-leum plastic primer and paint. I'll let you know how it comes out. I might do a wrap on the doors. Have to find out the cost.
Thanks
John
|
Hi John,
Interesting note about the shrink rates, but I'm not too surprised. That combined with all the bends in the aluminum and the rough krystal kote surface don't really promote good adhesion. Mine is still holding up well almost ten years later, but it hasn't had nearly the weather yours has. Even though the temperature does fluctuate a lot, yours probably had more with sun exposure where as mine in the building gets cold, but doesn't usually warm up as much during the day.
I put the film (actually from the same roll, hopefully it isn't too old now) on the '97 decals. I didn't do the back yet, but I thought about it because it is has a few splits in the middle of it where the deep grooves are. Since it is outside, maybe I should consider not covering it. I could probably just get a little clear silicone to seal those two breaks, and prevent dirt from getting behind them. I have the artwork done for that decal and could go have one made, but I do enjoy that it's still an original one.
Otherwise I just have small decals covered in the stuff, such as the RVIA seal, VIN sticker, etc. A couple of them I'm having trouble with moisture behind, hopefully they will last long term.
__________________
2007 T-286SR Cherry/Granola, #6236, original owner, current mileage: 9473.8 (as of 6/18/21)
1997 T-2653 Blue Denim, #5471
1979 12 1/2' MC, Beige & Avocado, #4639
Past Sunlines: '97 T-2653 #5089, '94 T-2251, '86 T-1550, '94 T-2363, '98 T-270SR
|
|
|
|
|
02-21-2018, 06:46 PM
|
#87
|
|
Moderator
Join Date: Nov 2006
Location: Ohio
Posts: 12,651
SUN #89
|
Hi Folks,
Reporting back after a year of this repair. Things worked well until later last year (Oct/Nov 2017). I started to notice the slide was getting real close to scraping the rear top side of the slide opening when going in and out. It did disturb some of the Eternabond on the side of the slide from heavily rubbing it.
This past December (2017) I went looking for what shifted. What I found was the repair from last January (2017) time frame is still good. The frame is straight from the back of the camper up to the hanger area so nothing moved here.  But I did find something new. 
Last year all the focus was on the frame bend at the rear spring hanger. This rear area was easily seen. While I did see a small amount of bend at the front hanger, I dismissed it as the back was 5 times worse. And when I had the rear part repaired, the slide came back into the correct location.
Well... now the issue is at the front hanger. What I backed into happened is, the original event which bent the camper frame in the first place weakened the back and front hanger area. The back being such a large overhung area the problem showed up their the worst. But it still affected the front hanger frame area. Now after towing another year with the back repaired, the front continued to bend to where I am now.
I’ll show this in pics as it is easier to understand.
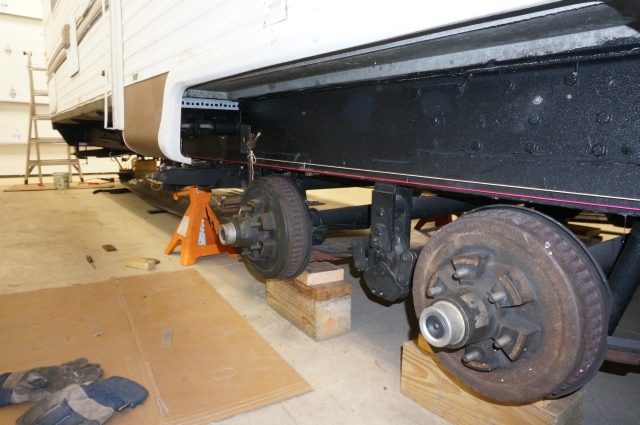
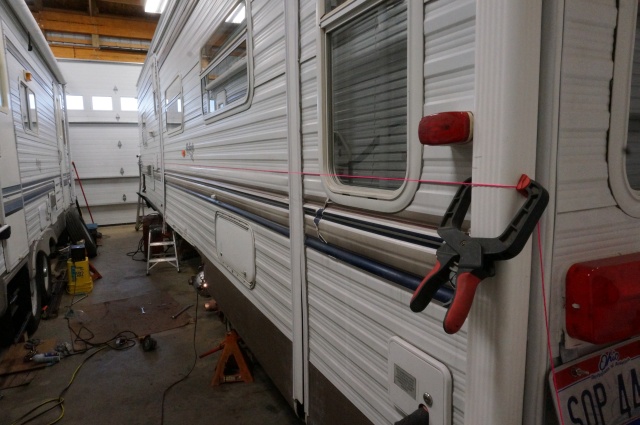
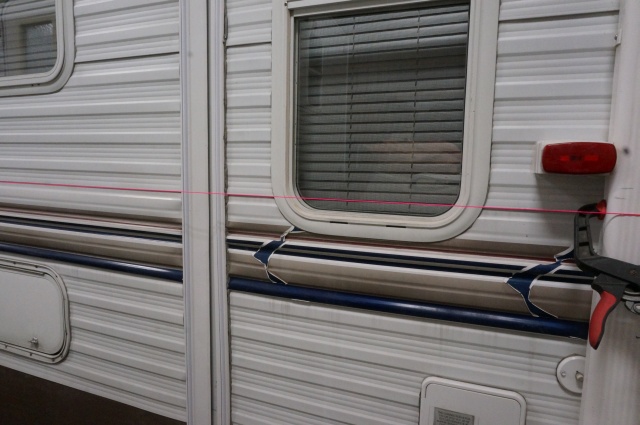
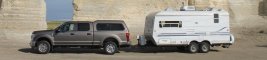
See this picture, this was the day we bought the camper on the way home. I drew a red line across the camper siding and you can see the camper is straight.
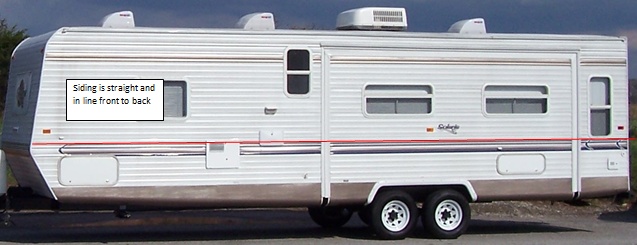
Using that same picture to show the problem, I drew on it the way the frame is now bent. The yellow line is the repair from last year, the axle area is straight with the rear portion of the frame. The curved red line is the bend area now causing the problem. The whole side of the camper bends down toward the back of the camper starting at the front of the slide. Basically the camper up top follows the frame straightness below.

Here are some pics showing a string pulled tight down the side of the camper this past Dec, 2017. I started at the front on the top of the decal strip of siding and pulled it straight to the back. Now you can see the back sagging down and it starts at the front of the slide. The back of the camper is 2” lower than the front.


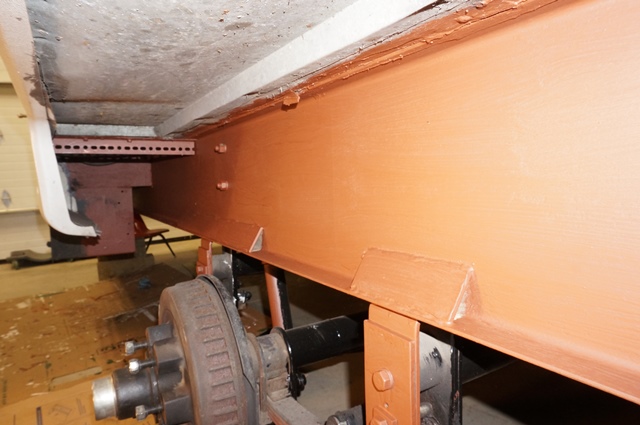
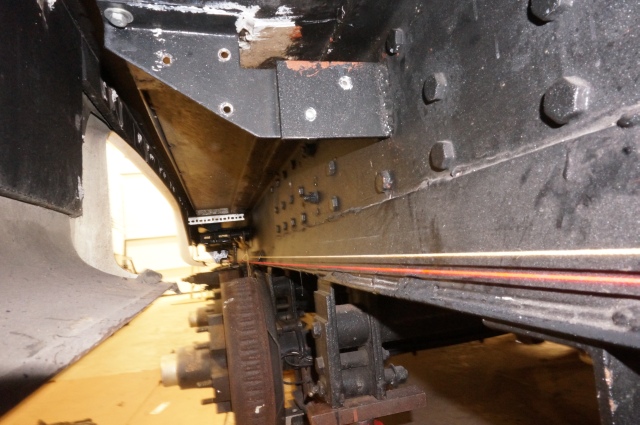
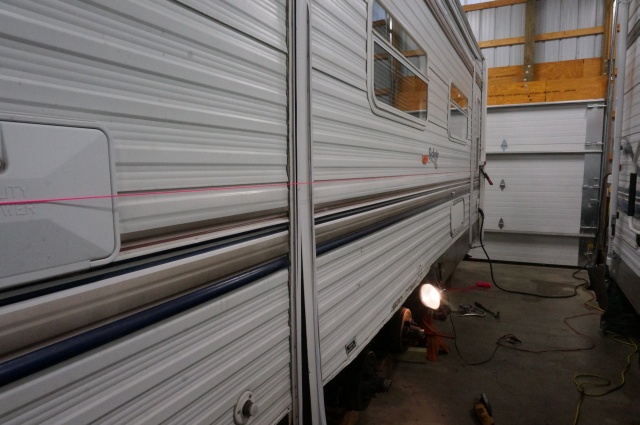
Now let’s look at the frame. I have a piece of 1 ¼” high metal on the front and back of the frame with a red string pulled tight from front to back.

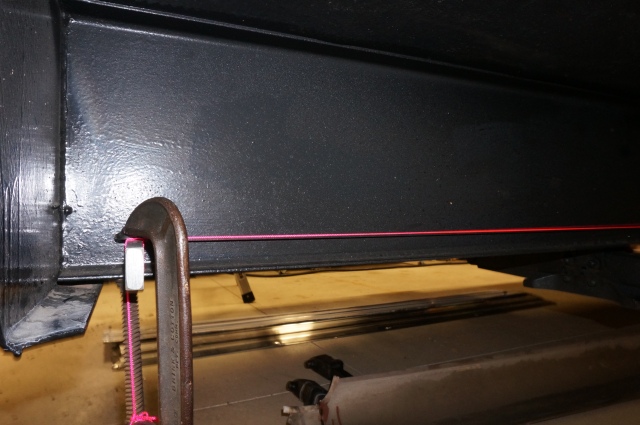
Here is a few feet down the frame. You can see the line is starting to drop as it gets to the center of the camper
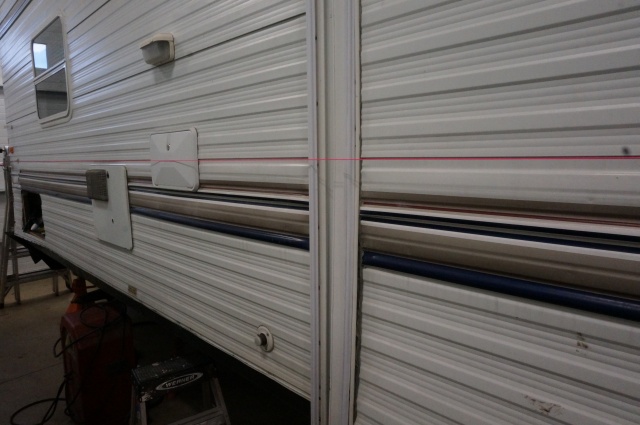
A little more down the frame
And now to the bend area. The line touches the frame where is should be 1 ¼” away
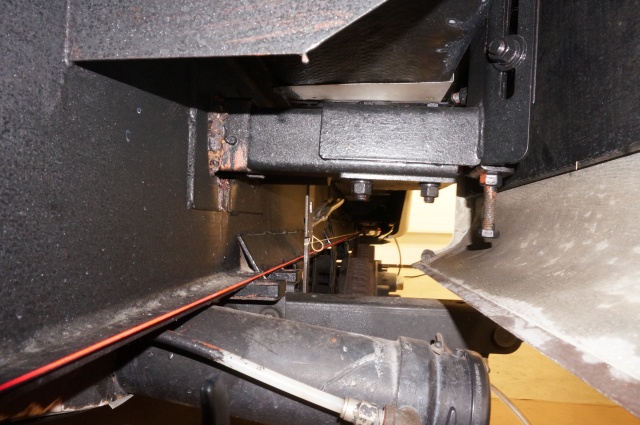
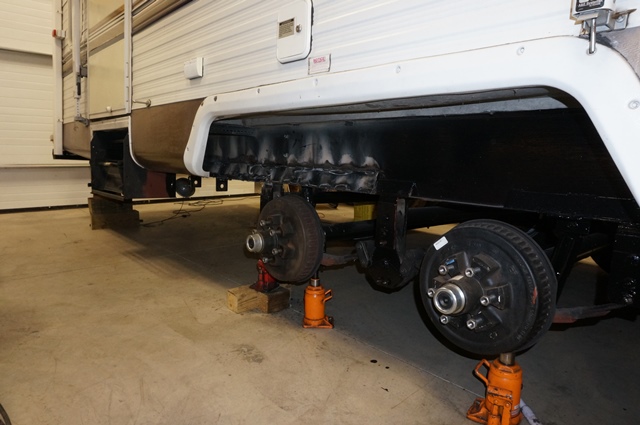
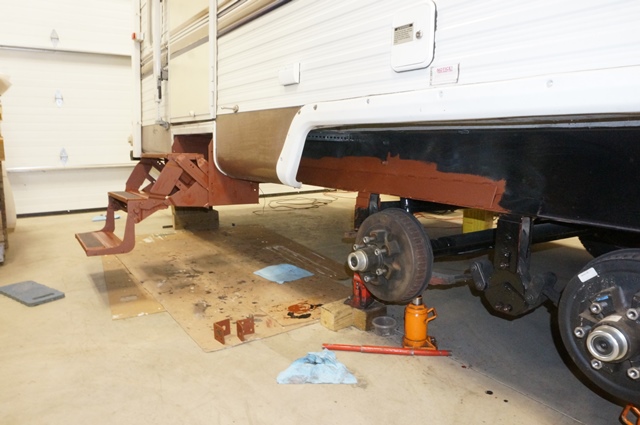
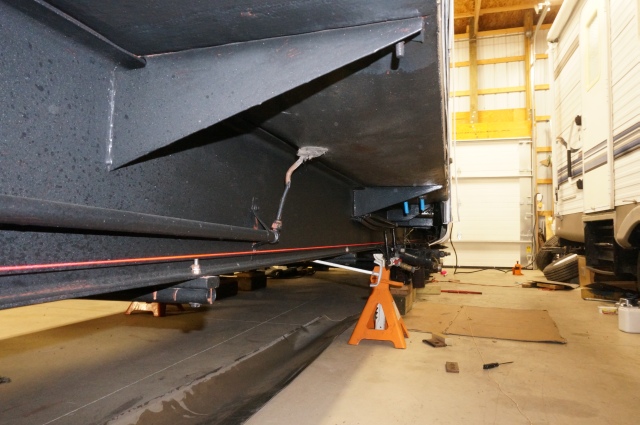
Here is looking from the rear towards the bend area
You can see the back of the camper dropping away towards the back
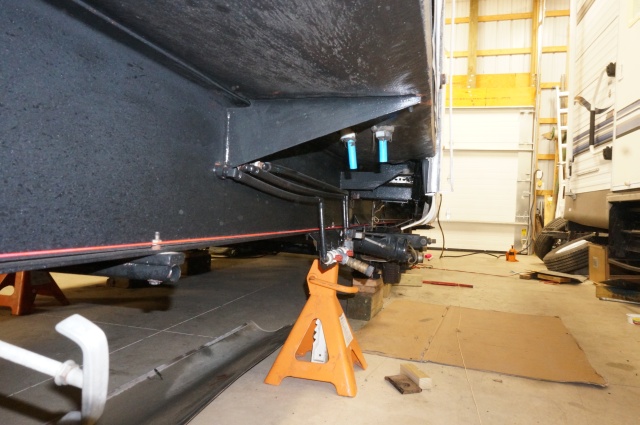
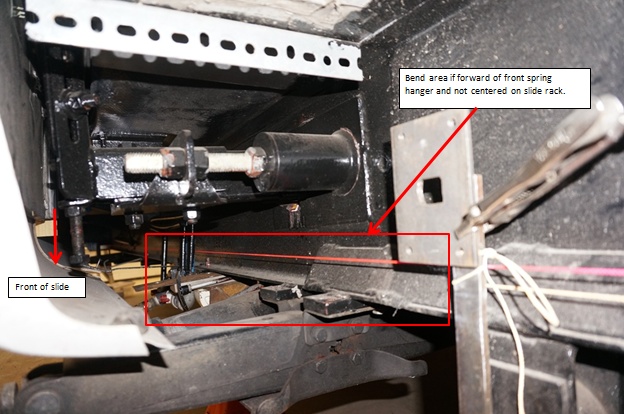
This red boxed area is the area that has the most bend to it. The red line is now held up in this pic to find other areas of bending. The yellow string is part of checking the back section of the frame that is OK.
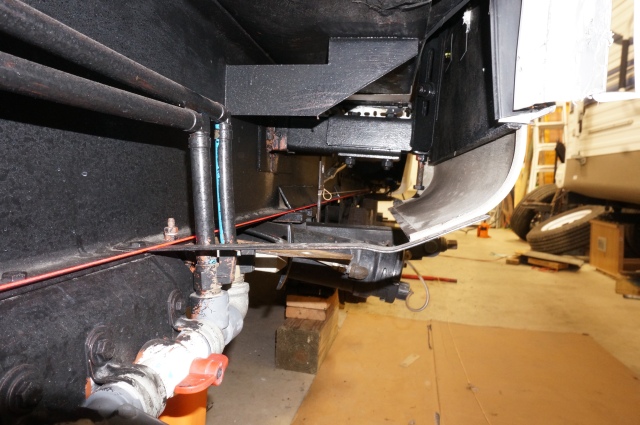
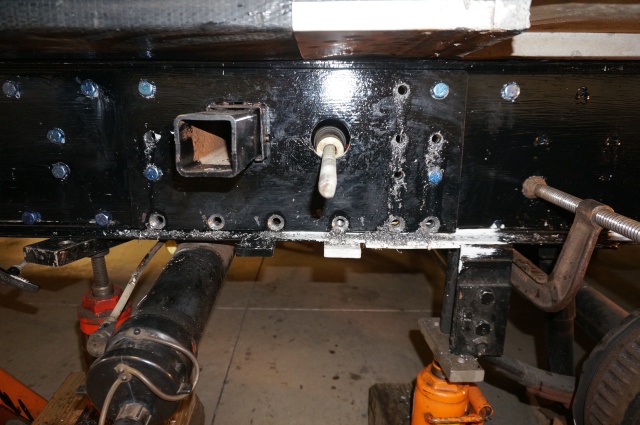
Here is the inside of the frame with the tank cover off. The red arrow is pointing to a bent up lower flange at the bend area. The thin sheet metal above the frame that looks all warped is a thin piece added by Sunline to hold the plastic tank compartment on with. It is not structural.

So that’s the problem. Now how to fix this… That will come shortly in the next reply.
Thanks for looking.
John
__________________
Current Sunlines: 2004 T310SR, 2004 T1950, 2004 T2475, 2007 T2499, 2004 T317SR
Prior Sunlines: 2004 T2499 - Fern Blue
2005 Ford F350 Lariat, 6.8L V10 W/ 4.10 rear axle, CC, Short Bed, SRW. Reese HP trunnion bar hitch W/ HP DC
Google Custom Search For Sunline Owners Club
|
|
|
|
|
02-21-2018, 08:56 PM
|
#88
|
|
Moderator
Join Date: Dec 2006
Location: Michigan
Posts: 6,155
SUN #123
|
This is a peculiar problem John. Do you think you'll get to a point of having to just put new frame rails under it?
Also, you measured the slide side, but does the door side seem to have the same level of sag?
__________________
2007 T-286SR Cherry/Granola, #6236, original owner, current mileage: 9473.8 (as of 6/18/21)
1997 T-2653 Blue Denim, #5471
1979 12 1/2' MC, Beige & Avocado, #4639
Past Sunlines: '97 T-2653 #5089, '94 T-2251, '86 T-1550, '94 T-2363, '98 T-270SR
|
|
|
|
|
02-21-2018, 09:46 PM
|
#89
|
|
Moderator
Join Date: Nov 2006
Location: Ohio
Posts: 12,651
SUN #89
|
Quote:
Originally Posted by Sunline Fan
This is a peculiar problem John. Do you think you'll get to a point of having to just put new frame rails under it?
Also, you measured the slide side, but does the door side seem to have the same level of sag?
|
Hi Jon,
Yes this is "unique". Lucky me  .
A new frame, well it all depends. I have not yet figured out if we will someday buy a new camper or do a total rebuild on this one. We have a lot of years yet to camp. If we keep this one for the next 20 to 25 years, a new frame may be part of that. If we buy a new one, maybe not. The rebuild versus new camper decision I'm not seeing for at least another 5 to 7 years at this point. Maybe longer. A different truck will most likely happen before the camper. I'm pushing to get at least another 90K miles out of the current truck and that might be ~ 5 to 6 years out.
Also there is not a whole lot in travel trailers out there right now to pick from that compares to what I now have in this Sunline. Arctic Fox has drastically cut back on selection, Jayco's higher end Eagle is very limited, the Grand Design ones are too long for where we camp and the selection limited too. A 30 to 32 ft camper high end camper is hard to find with a large cargo capacity and a floor plan we like. And the cargo capacity of these new longer campers are a lot less than ours. It's not really great out there finding a new high end travel trailer right now. The market will change again I'm sure in 5 years. I have not yet got the 5th wheel camper itch. So we keep fixing this one. The inside is still in great shape and it's a dry camper... a lot of great camping memories in this one yet.
If I end up in an unrepairable section of frame situation, I have thought of how to fix that too which would be to replace that section and not the whole frame. That is very doable for what I have to work with, just not quick.
The door side front hanger area, that is for sure on the list to check after I cleanup the slide side. I know it is no where this same level of sag, but I haven't checked it real close yet. Most likely will add some more lower flange reinforcement at the front hanger to make sure there is not a flare up.
Thanks
John
__________________
Current Sunlines: 2004 T310SR, 2004 T1950, 2004 T2475, 2007 T2499, 2004 T317SR
Prior Sunlines: 2004 T2499 - Fern Blue
2005 Ford F350 Lariat, 6.8L V10 W/ 4.10 rear axle, CC, Short Bed, SRW. Reese HP trunnion bar hitch W/ HP DC
Google Custom Search For Sunline Owners Club
|
|
|
|
|
02-21-2018, 09:56 PM
|
#90
|
|
Moderator
Join Date: Nov 2006
Location: Ohio
Posts: 12,651
SUN #89
|
Now to the fix. Part 1.
I started with what we have nicknamed, the heat shrink method. This is a heating and cooling process that weld shops, trailer frame builders and even large bridge builders etc use at times to create a positive camber in a beam. The basic concept is, when you heat steel it expands. When it cools, it shrinks and it shrinks more than it expands. Applying this concept in the right locations causes the beam to shrink the flange area in relation to the opposite side. When enough this occurs, the beam bends towards the shrunk side and creates a bend in the beam.
This method is normally used when the beam is on a set of sawhorses and not installed in a frame already. However the manufactured housing industry who uses these thin I beams like our camper frames, uses it all the time. Sometimes with a house on top. Lippert Industries who makes camper frames, uses this method too for new frames and field repairs with campers on top. If your hear that your camper frame has “camber” in it, odds are high the heat shrink method was used to create it on these thin frames. This camber process actually shows up in the older Sunline brochures. More of mentioned that they have cambered frame for added strength. Arctic Fox, Sabre and a lot of other brands do this too from new. The frame rails are so thin then need camber to not over deflect under the loads.
There is science behind this, but there is also a lot of art. And perfecting the art creates skill. I have not mastered the process, but I now know a fair amount more now then I did before and how it applies on a camper.
I started using this to tweak the door side where I had some negative camber from welding last year at the entry door area. This straightened the section by the entry door. So I took what I learned there and started on the slide side.
You have to first figure out where the bend is. I had 4 areas. One area upstream of the slide arm hole area about 3 feet. Two areas, one on each side of the slide arm hole and then just above the equalizer hanger very slightly.
Once you know the bend areas, I started with laying out vertical lines in the bend zones and removing all the paint. Then you do vertical weld beads in these select locations.

Then the weld beads about 7/8” the way down the beam

It is more involved than just welding beads on the steel. There is some science to it that has to be followed to not over heat the steel, (stay below 1,000F) and you have to let each bead cool before starting the next. And on a camper, you have to shield the bottom of the camper to not melt the Darco plastic membrane. You can see my heat shield clamped and held in place.
Here is inside the frame looking towards weld area. You can see the heat marks. As you can see, this is a very busy area inside the frame.
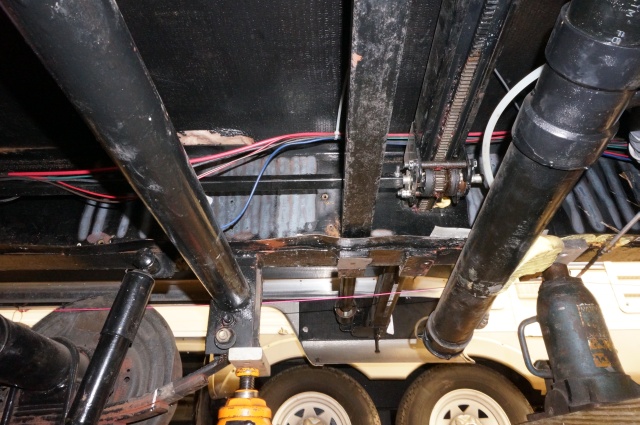
There are limitations to this, once you weld an area you only get one shrink out of it. Adding more heat again in the same spot does not shrink it any more. And unfortunately with a camper on top you cannot heat the top flange like we really would want to.
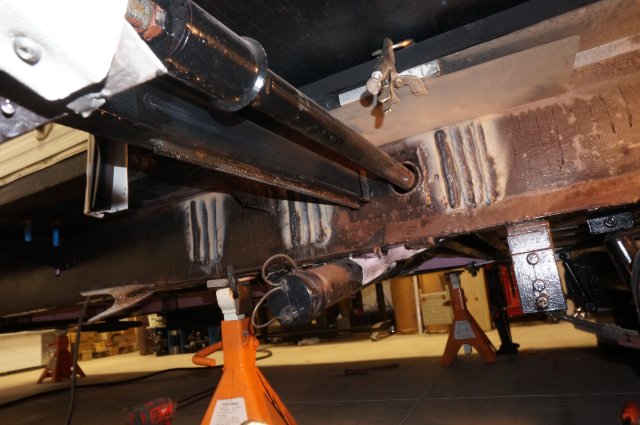
If anyone is going to attempt this kind of repair method, let’s talk as I only breezed over this. If you do it wrong you can bend the beam the wrong way and make the problem worse.
When I reached the end of diminishing returns and could no longer get more shrink, I had removed about 50% of the 2” bend at the end of the frame. This still left an issue as it did not move enough.
Now what??? H’mm, after thinking through this I had one method left. What I had to do last year, cut the frame, jack the camper to where it needed to be plus some more, weld the saw cut closed and reinforce over the top.
So that is what I did. Started with the grinding off the weld beads so I had a flat surface to bolt on a reinforcing plate over the area. I still had some of the high strength steel leftover from last year.
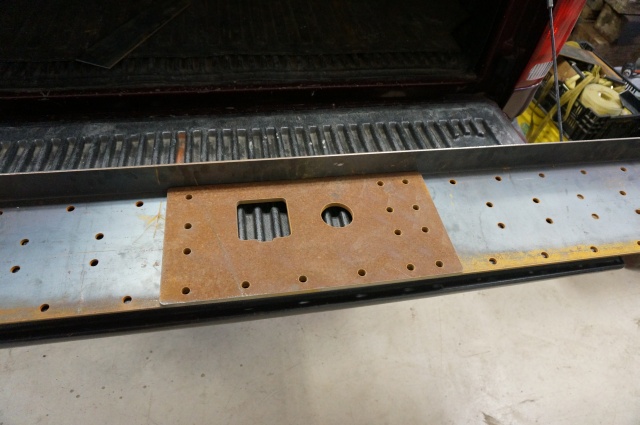
Sent the drawings to my local fab shop and they bent the plate and using their water jet cutter put all the holes in the plate. Here are the plates.
The main outside reinforcing plate.
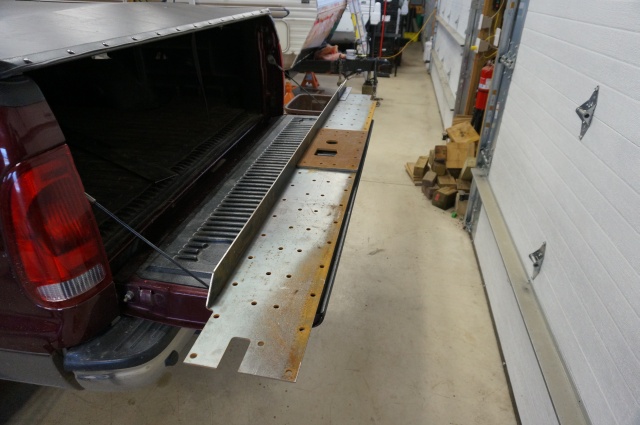
In the center is a cut out for the slide arm system. There is a smaller thickened plate setup on the camper now where the slide arm comes through. This hole spans that area.
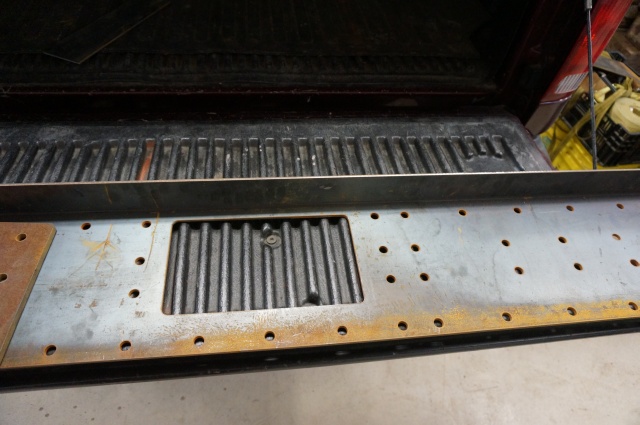
An area that big creates a weak area in the beam. So I had to create a heavier reinforcing plate to go over it.
And to join this front reinforcing plate to the rear one, I have a splice angle to span the top missing flange. I will weld the 2 plates together too.

Those are the new parts.
I’ll end this here. Next will be the fix part 2
__________________
Current Sunlines: 2004 T310SR, 2004 T1950, 2004 T2475, 2007 T2499, 2004 T317SR
Prior Sunlines: 2004 T2499 - Fern Blue
2005 Ford F350 Lariat, 6.8L V10 W/ 4.10 rear axle, CC, Short Bed, SRW. Reese HP trunnion bar hitch W/ HP DC
Google Custom Search For Sunline Owners Club
|
|
|
|
|
02-21-2018, 10:10 PM
|
#91
|
|
Moderator
Join Date: Nov 2006
Location: Ohio
Posts: 12,651
SUN #89
|
The fix, part 2 continued
Had to repaint the area from all the bead welding and before I bolt on the reinforcing plates.
Put clean metal primer (white) on after grinding the weld beads off.
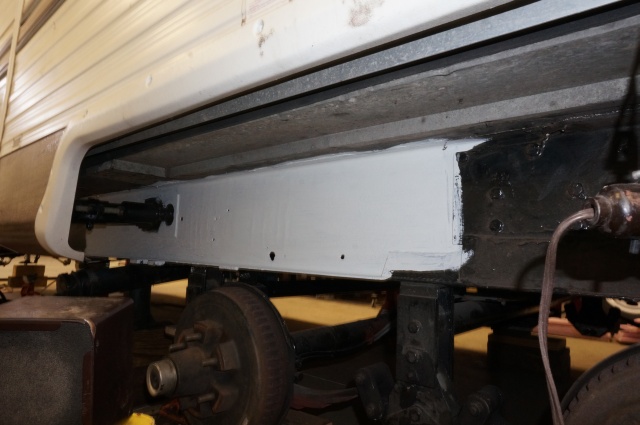
Then the black top coat and scribing the cut line.
The new reinforcing plate
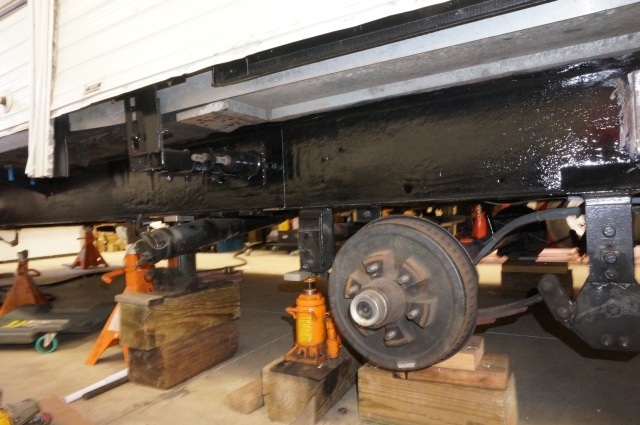
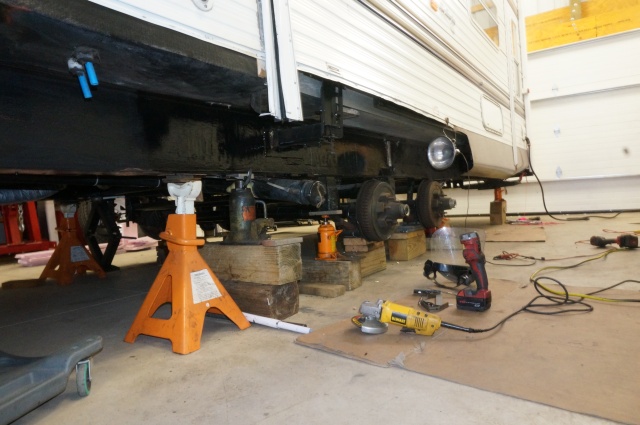
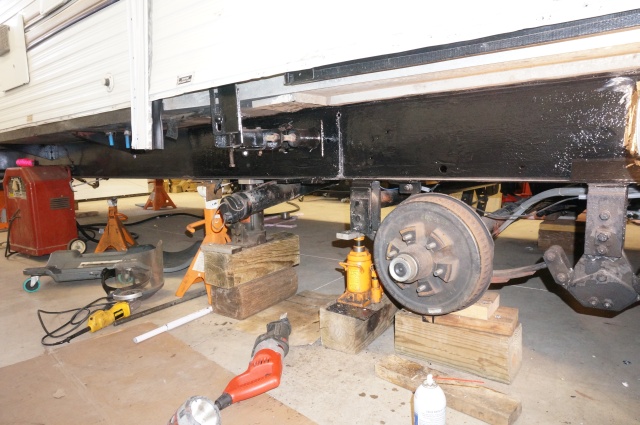
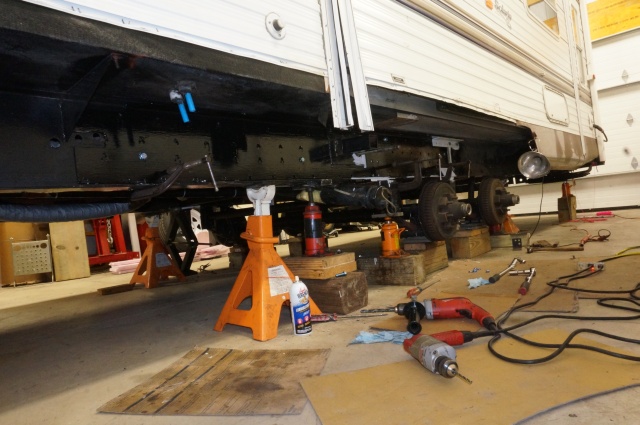
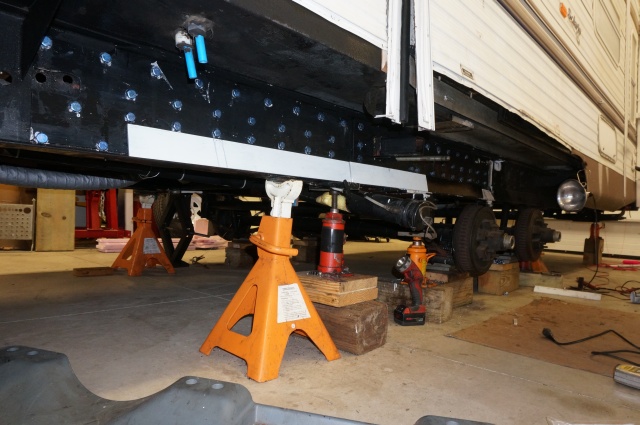
Next was to support the camper. With that large of a frame cut you have to support the camper on both sides of the cut. To bend open the saw cut you over jack the back end of the camper and lower it at the saw cut to have the weight of the camper push it open. This pic shows most of the setup. There are 2 large jack stands at the very front of the camper frame, left and right side not shown. Did not want to trust the single tongue jack that the frame would not pivot on it.
Then there are 4 bottle jacks on the slide area. And another 1 bottle jack on the door side rear end of the frame. And 5 jack stands, most next to a jack. I had to jack the frame into position once cut.
Then the cut

It took a fair amount of fiddling and jacking to get the saw cut to open up to the amount I needed it to. When all done, the gap at the bottom of the frame as 3/16”. I clamped the frame together and tested that the 3/16” was enough and not too much, it showed what I needed to get out of the frame bend. Just I did not have the slide drive all put back together so I used a string along the frame and siding.
Next came welding the frame saw cut back together. A backing plate was added inside the frame behind the saw cut to hold the weld from blowing through this thin beam. It will permanently stay in place. I also used it to C clamp the 2 frame halves to come in line before welding. They were out of align a little from the jacking process.
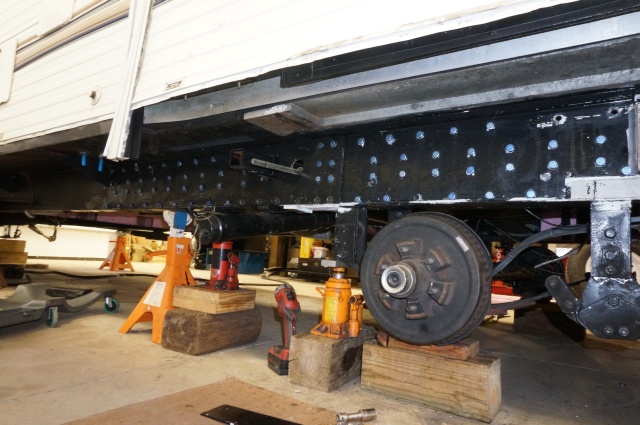
After the frame weld, it was ground flush, primed and painted ready for the reinforcing plates.
A test fit on the slide arm reinforcing plate

Then getting the large reinforcing plate in place. Had to jack it up in place
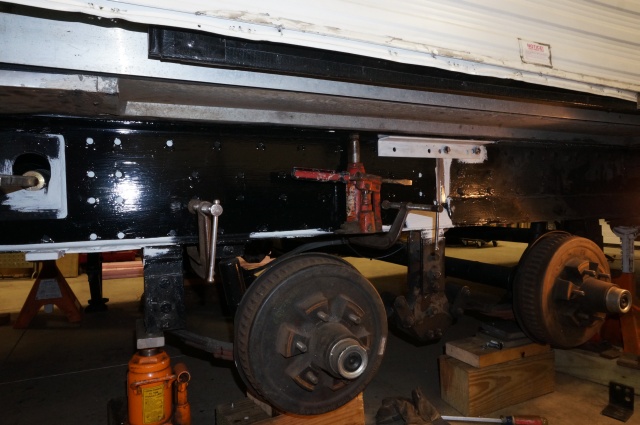
And test around the slide arm hole
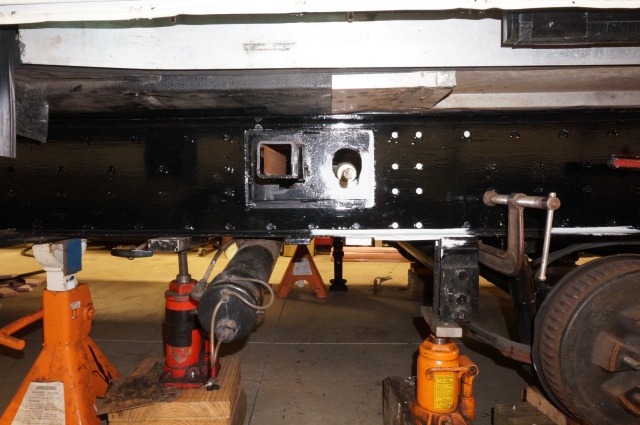
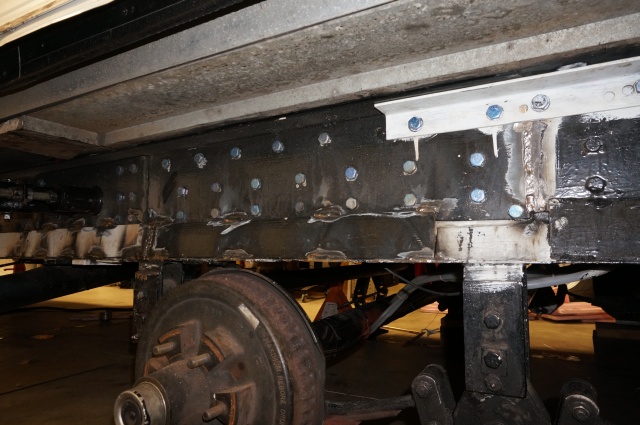
And then to start the drilling process. Put a few across the long plate to allow the clamps to come off.
It took 2 days to drill all the holes. My arm is not as good as it used to be. 
Had to use flat head screws in the bottom row of the slide plate as there needs to be a lower flange reinforcing plate added yet and hex heads would of hit.
And the last drilled hole. Yeh!!! They are all ½” bolts
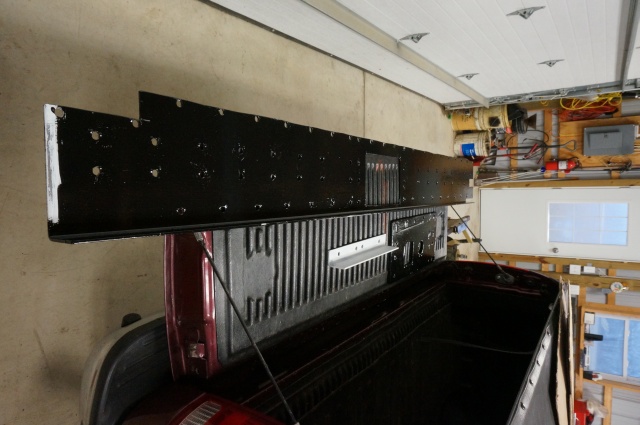
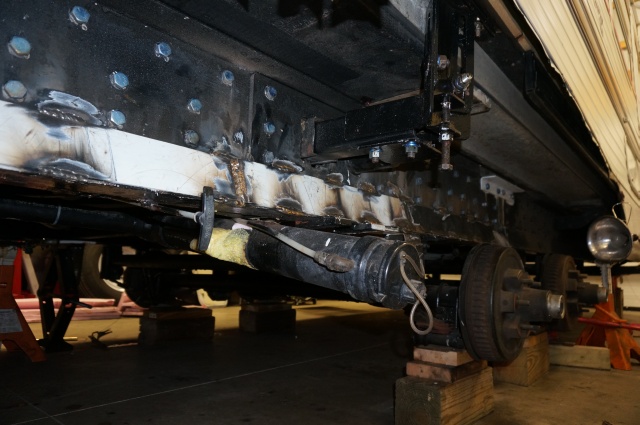
Next was to reinforce the lower flange. Again had some high strength steel left over from last year and put it on.
A fit up test, hard to tell but it is 3 pieces as the slide plate alters the center area.
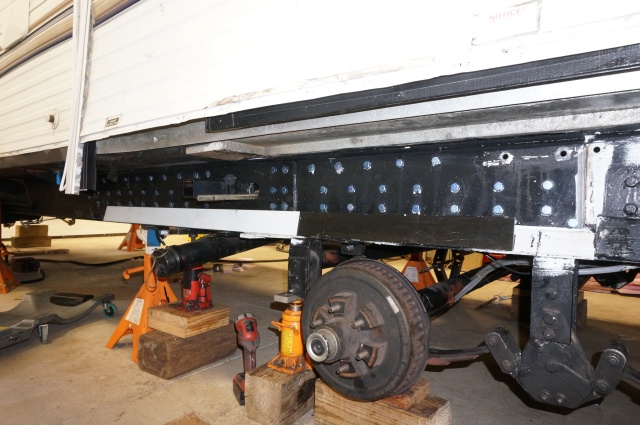
And welded them on. These pics are the morning after. We had such hot and cold temps the metal sweat overnight and the welds started to rust already. If they look a little rust colored, that is why. I have since cleaned them up and primed them to stop the rust.
The next morning after everything cooled, I took all the jacks out and let the springs support the camper like it normally does. Had to put the slide drive back on and totally re-adjust the slide.
Next was to do the string test as the slide fit looked really good. Here is where I started in late December 2017.
And now this. Yeh!!!!
A side shot. You can see the pencil marks on the down spout of where it use to be.
Looking from the front to the back
And looking towards the front of the camper at the front of the slide
I’m a happy camper on how this came out. The bag of tricks was starting to get pretty empty….
Still have a lot of work yet to do to put the camper back together but the big job is done. The tank compartment under the camper is sort of all apart. The fresh tank is out and all the insulation on the sides of the frame has to be redone. Then slide siding and the camper siding to go back on. I’m also doing work up front on redoing the putty tape on the corner moldings to butyl and putting a piece of diamond plate on the lower front.
I’m also going to double check the front hanger area on the door side and make sure nothing is lurking there.
Thanks for looking.
John
__________________
Current Sunlines: 2004 T310SR, 2004 T1950, 2004 T2475, 2007 T2499, 2004 T317SR
Prior Sunlines: 2004 T2499 - Fern Blue
2005 Ford F350 Lariat, 6.8L V10 W/ 4.10 rear axle, CC, Short Bed, SRW. Reese HP trunnion bar hitch W/ HP DC
Google Custom Search For Sunline Owners Club
|
|
|
|
|
02-22-2018, 05:19 PM
|
#92
|
|
Senior Member
Join Date: Apr 2016
Location: Maryland
Posts: 488
SUN #8237
|
Wow John! Youve got a serious labor of love going on there......I get it.
Like you said, when comparing your Sunline to other campers they dont stack up IMO.
__________________
John
2000 T2370
|
|
|
|
|
02-22-2018, 09:33 PM
|
#93
|
|
Moderator
Join Date: Nov 2006
Location: Ohio
Posts: 12,651
SUN #89
|
Thanks John,
Yes, one has to love doing this kind of work or else.... And I do, so it is enjoyable to do. Camping is better, but it all comes with it.
Once I get past fixing the got to do's, I can get back to doing some fun mods on the camper. Plus I have a T-1950 is about a zillion parts right now waiting in the wings...
And yes, I too wish Sunline was still in business.
Thanks
John
__________________
Current Sunlines: 2004 T310SR, 2004 T1950, 2004 T2475, 2007 T2499, 2004 T317SR
Prior Sunlines: 2004 T2499 - Fern Blue
2005 Ford F350 Lariat, 6.8L V10 W/ 4.10 rear axle, CC, Short Bed, SRW. Reese HP trunnion bar hitch W/ HP DC
Google Custom Search For Sunline Owners Club
|
|
|
|
|
02-23-2018, 03:03 PM
|
#94
|
|
Senior Member
Join Date: Sep 2011
Location: Connecticut
Posts: 373
SUN #2943
|
Saw this yesterday and was at a loss for words then and I still am. Wow, just wow!
I appreciate you sharing this.
__________________
~~~~~~~~~~~~~~~~~~~~~~~~~~~~~~~
2006 Sunline T-1950
2019 Ford F-250
~~~~~~~~~~~~~~~~~~~~~~~~~~~~~~~
|
|
|
|
|
02-24-2018, 07:47 AM
|
#95
|
|
Moderator
Join Date: Nov 2006
Location: Ohio
Posts: 12,651
SUN #89
|
Hi Tod,
Thanks for the good words. This fix is more than the average camper fix and thank goodness too..... It was for sure a learning on all fronts. How frames fail and how to fix them.
Point: If you are on an interstate or other road that has major potholes, heads up. While the truck may miss most of them, the camper wheels set further apart can get about all the truck misses. Even doing 50 mph while semi's buzz by in the left lane is too fast. Speed at which you hit that pothole creates one massive blast of negative energy into a camper frame setup. And having many multiples of them one after another is even all that much worse. If you get caught in this situation, if you can get off at the next exit, find an alternative route. Slowing down helps the camper, just do not become a traffic hazard.
In my case I was sort of trapped, 15 miles of brutal concrete interstate and no exits. And I did not realize the extent of what happened at the time.
If you ended up in the situation, after you get out of it check the camper frame over really good. If you do not know the signs of how camper frames fail, ask away here on SOC or start researching. Small damage at the time of the event may go unnoticed to only show up many miles later as the frame keeps bending more and more for every normal miles after the event. Sort of like bending a paperclip back and forth until it breaks.
Thanks
John
__________________
__________________
Current Sunlines: 2004 T310SR, 2004 T1950, 2004 T2475, 2007 T2499, 2004 T317SR
Prior Sunlines: 2004 T2499 - Fern Blue
2005 Ford F350 Lariat, 6.8L V10 W/ 4.10 rear axle, CC, Short Bed, SRW. Reese HP trunnion bar hitch W/ HP DC
Google Custom Search For Sunline Owners Club
|
|
|
|
|
|
|
Currently Active Users Viewing This Thread: 1 (0 members and 1 guests)
|
|
|
 Posting Rules
|
You may not post new threads
You may not post replies
You may not post attachments
You may not edit your posts
HTML code is Off
|
|
|
|
 » Recent Sunline Discussions
 |
|
|
|
|
|
|
|
|
|
|
|
|
|
|
|
|
|
|
|
|
|
|
|
|
|


 Linear Mode

