 |
|
 04-10-2016, 06:47 AM
|
#81
|
|
Senior Member
Join Date: Nov 2006
Location: New York
Posts: 2,909
SUN #93
|
John, I'm sitting here on a Sunday morning reading your post and just had a good laugh:
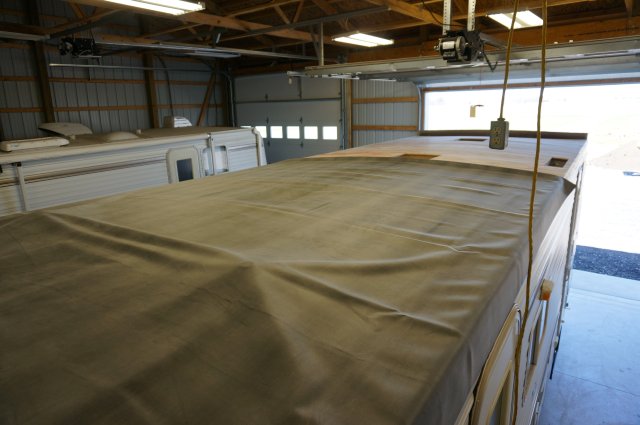
Now we are done and just waiting for the temperature to rise so we can do the roof glue. Possibly this coming weekend.
Be back with more, after the next install.
Reading this "Winter Project" is like watching a rebuild on This Old House.....Norm popped into my head when I read "Be back with more, after the next install."
Maybe you can star in a show, "This Old Camper"!
Nice job and as always so well written......
Kathy
__________________
__________________
Kathy & Leo SUN 093
Central Adirondacks of New York
2013 Rubicon 2900 Toy Hauler
We loved our 2007 T-2499
2010 Ford F-350 4x4 Lariat Super Crew Dually Diesel

|

|

|
|
04-14-2016, 08:07 PM
|
#82
|
|
Moderator
Join Date: Nov 2006
Location: Ohio
Posts: 12,651
SUN #89
|
Hi Kathy,
Now that's funny... "This old camper"... Never know, maybe during the "R" phase of life, I'll take up buying an OK shape Sunny to fix up and then resell.
The temperatures are cooperating. If all goes as planned, a glued on roof will happen this weekend. Stay tuned for more updates.
Thanks
John
__________________
__________________
Current Sunlines: 2004 T310SR, 2004 T1950, 2004 T2475, 2007 T2499, 2004 T317SR
Prior Sunlines: 2004 T2499 - Fern Blue
2005 Ford F350 Lariat, 6.8L V10 W/ 4.10 rear axle, CC, Short Bed, SRW. Reese HP trunnion bar hitch W/ HP DC
 Google Custom Search For Sunline Owners Club
|
|
|
|
|
04-14-2016, 09:42 PM
|
#83
|
|
Junior Member
Join Date: Dec 2015
Location: Ohio
Posts: 4
SUN #8040
|
I am so impressed!! This is a great lesson, broken down step by step for any who may need it. I bought a '98 Sunny last fall, and it had been in storage for a long time. Seems sound, but I haven't weather tested it yet, and I have to say I'm a little nervous...
Thank you for taking the time to share and explain your hard work so clearly and thoroughly. Well done indeed. Best of luck in the spring rain!
__________________
|
|
|
|
|
04-24-2016, 08:59 PM
|
#84
|
|
Moderator
Join Date: Nov 2006
Location: Ohio
Posts: 12,651
SUN #89
|
Quote:
Originally Posted by tacyko

I am so impressed!! This is a great lesson, broken down step by step for any who may need it. I bought a '98 Sunny last fall, and it had been in storage for a long time. Seems sound, but I haven't weather tested it yet, and I have to say I'm a little nervous...
Thank you for taking the time to share and explain your hard work so clearly and thoroughly. Well done indeed. Best of luck in the spring rain!
|
Hi tackko,
Thanks for the good words. And yes, we hope this helps others in the future. There is more yet to come
__________________
Current Sunlines: 2004 T310SR, 2004 T1950, 2004 T2475, 2007 T2499, 2004 T317SR
Prior Sunlines: 2004 T2499 - Fern Blue
2005 Ford F350 Lariat, 6.8L V10 W/ 4.10 rear axle, CC, Short Bed, SRW. Reese HP trunnion bar hitch W/ HP DC
Google Custom Search For Sunline Owners Club
|
|
|
|
|
04-24-2016, 09:39 PM
|
#85
|
|
Moderator
Join Date: Nov 2006
Location: Ohio
Posts: 12,651
SUN #89
|
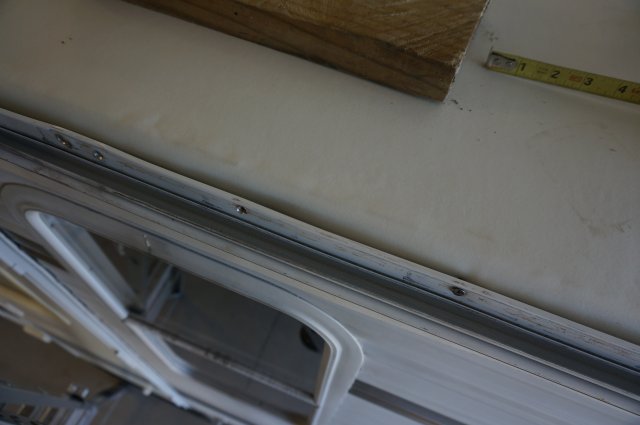
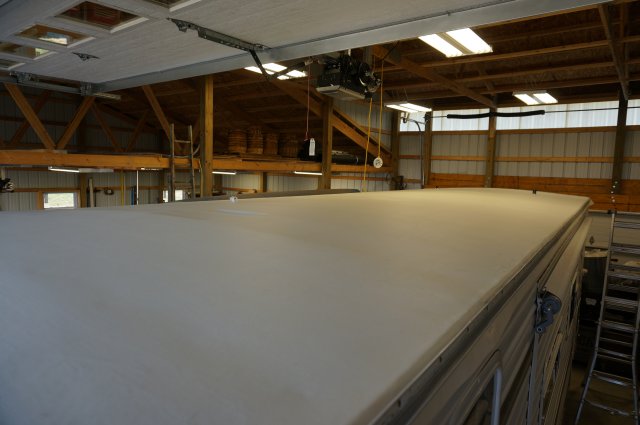
The weather cooperated and 2 weekends ago we were able to get the rubber glued down and the put the roof perimeter molding on.
I'll do this post mainly with pics to make this easier to follow.
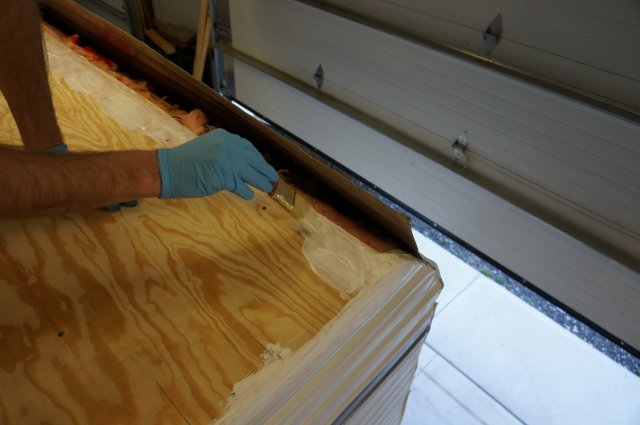
The non leveling Dicro edge came out well. It took 2 applications, but came out well and filled the very irregular space between the plywood and the side wall. On the second application I let the Dicor skin over for a day, then I rolled it smooth to conform to the right edge space. Worked good. Then let it harden up for a week.


We started by doing a screw height check with a putty knife drag over the top. Then a total roof cleaning with a vacuum, then compressed air, then wipe down with a high flash off cleaner to get any dust off.
First is to stage the rubber. Even up both sides over hang

The fold half the rubber back over top of itself. You glue one half at a time.

Then to applying the glue. Did a square feet check of the exposed roof and how much to apply in that area. This way you know you have to put that much on the area you are gluing down. It is sort of medium heavy as the wood absorbs some and you have to put almost a 2nd coat on to get the proper amount onto the roof. Measured the depth of the liquid used out of the gallon to get the right rate. We had to use 0.5 to 0.6 gallons on this first section.
Then brush apply hard areas to get started
Then roll and keep track of how much you used. We figured how much of the gallon can was to go onto this section and kept applying until we used that much

Then roll/pull the 1/2 flap of rubber back to the front. It lays down nice, go slow and let it sort of roll touch as you go.

Then using a squeegee with a rubber edge, drag out all areas to work out the air and to get the rubber in contact with the adhesive.

Here is the front down. We were pleased it came out this good and flat.

Then roll/fold over the back half and glue down

And 2 people pull/roll it right back on. This is where centering up rubber to the entire camper to start with helps. It rolls back on right were it needs to go.

And then there are "obstacles" to over come. 2 vent pipes

Roll to the pipe and stop. Measure, slit and put the rubber over the pipe


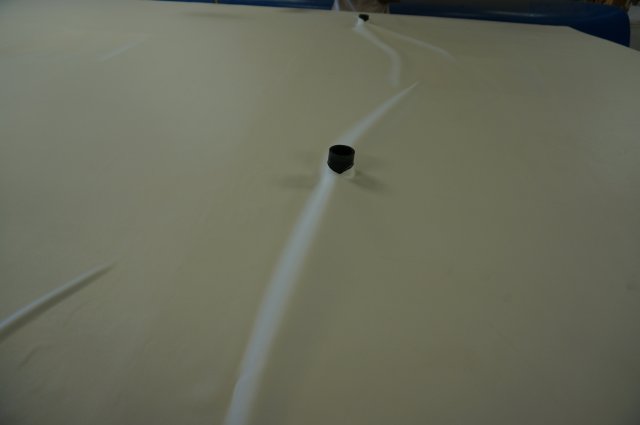
Then work out the air with the squeegee

Trim the hole some more and push the excess rubber down the hole

Then to the rear top molding. We did this different then Sunline. We folded the rubber over the back wall. All screws go through 2 layers of butyl tape.

Fold over
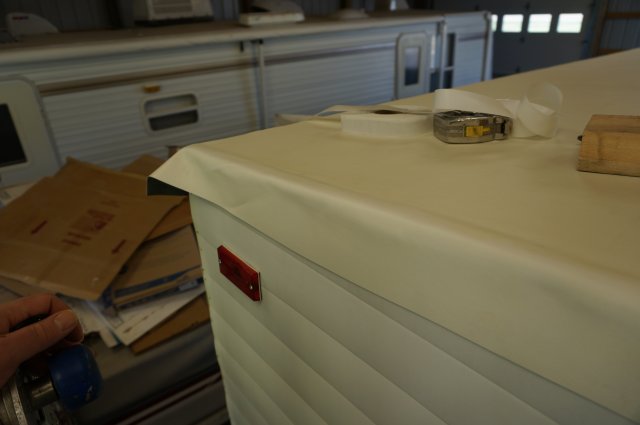
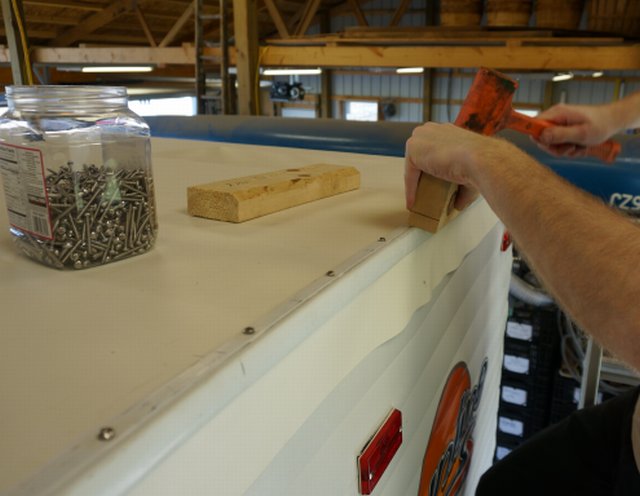
Put butyl on cap molding and start in the middle and work your way towards the ends. We used all stainless screws, everywhere outside the camper


Then you may need to adjust the molding. Since this is 2nd time use, it may need more adjusting then new molding. I really do not like this one screw sided corners. But most all new campers are made this way so not a lot of choice.
Then to the front. Butyl on the inside and top cap molding. Again 2 layers of butyl per screw location.
Butyl on bottom of front to the rubber

Top cap with butyl on it and start in the center and work towards the ends.


Then the gutter rails. Butyl on side of camper
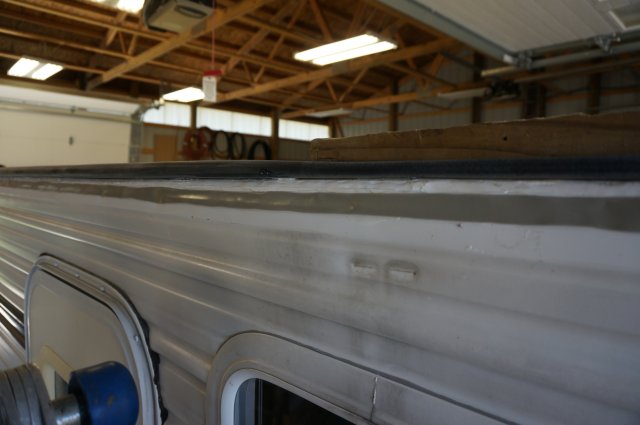
Now to find the holes in the siding to match the gutter rail. This was a fishing expedition. Ice pick located a hole in the front and rear of the siding to align the gutter rail right back in place where is use to be.

The rear pick

Then set 1 screw and do not tighten. Ice pic a few more hole in the middle as 20 feet of gutter rail flexes all over.

Then fill in all the screws. Door side done

Slide side done in the same manner
The front transition. Both sides are like this

This concludes the 2 weekend ago rubber glue down. More yet to come from this past weekend. It will take me a day or so to get that progress up.
Be Back soon. Thanks for looking
John and Ben
__________________
Current Sunlines: 2004 T310SR, 2004 T1950, 2004 T2475, 2007 T2499, 2004 T317SR
Prior Sunlines: 2004 T2499 - Fern Blue
2005 Ford F350 Lariat, 6.8L V10 W/ 4.10 rear axle, CC, Short Bed, SRW. Reese HP trunnion bar hitch W/ HP DC
Google Custom Search For Sunline Owners Club
|
|
|
|
|
04-25-2016, 03:29 PM
|
#86
|
|
Moderator
Join Date: Nov 2006
Location: New York
Posts: 1,920
SUN #98
|
John & Ben,
That roof looks fantastic. You have to be very happy with the way it's turned out.
Thanks for sharing the pictures.
__________________
Mary & Tom (aka Hutch)
2015 Jayco Eagle Premier 361REQS
2014 GMC Sierra 3500HD 4x4 CC D/A
Sunlines: 2005 Solaris T-280SR; 1999 Solaris T-2670; 1998 Saturn T-24A
|
|
|
|
|
04-29-2016, 06:51 AM
|
#87
|
|
Senior Member
Join Date: Aug 2006
Location: Maryland
Posts: 838
SUN #37
|
Better than factory! Nice work.
Rich
__________________
 1992 T-2470 (now residing in South Carolina)
Current Sunline-2007 Solaris 2499
2018 Silverado 1500 w/Max Trailering pkg.
|
|
|
|
|
04-30-2016, 07:31 PM
|
#88
|
|
Moderator
Join Date: Nov 2006
Location: Ohio
Posts: 12,651
SUN #89
|
Hutch and Rich, Thanks for the good words. We are gaining on it now... Not quite done yet but getting close.
__________________
Current Sunlines: 2004 T310SR, 2004 T1950, 2004 T2475, 2007 T2499, 2004 T317SR
Prior Sunlines: 2004 T2499 - Fern Blue
2005 Ford F350 Lariat, 6.8L V10 W/ 4.10 rear axle, CC, Short Bed, SRW. Reese HP trunnion bar hitch W/ HP DC
Google Custom Search For Sunline Owners Club
|
|
|
|
|
04-30-2016, 08:18 PM
|
#89
|
|
Moderator
Join Date: Nov 2006
Location: Ohio
Posts: 12,651
SUN #89
|
Here is some more of the progress. I will break this up into 2 replies to maybe load the pic's better.
Putting the rubber roof itself on was fairly quick, now onto everything else on the roof....
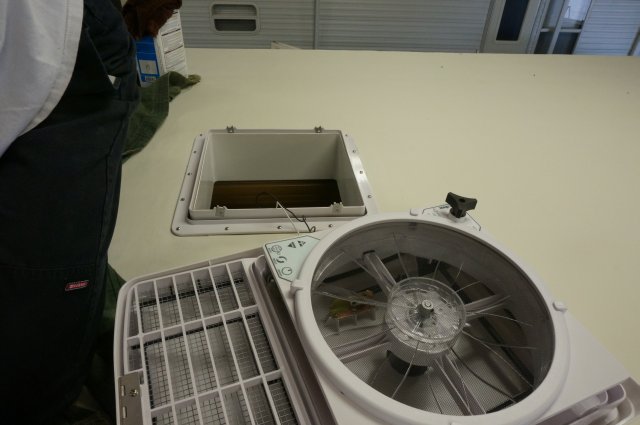
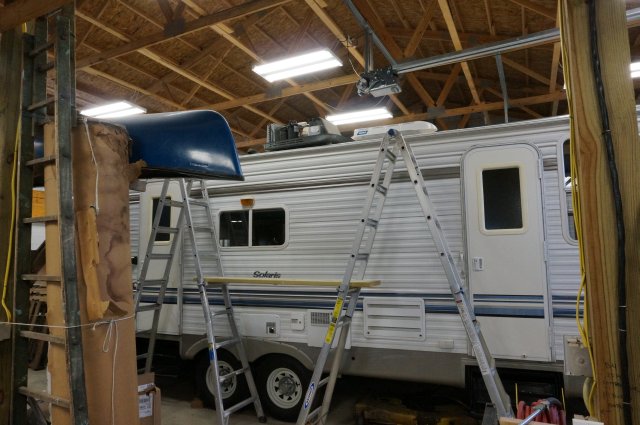
Ben and I divided and conquered. He worked on all the holes in the roof.   I worked on the 4 corner moldings and the gutter rail.
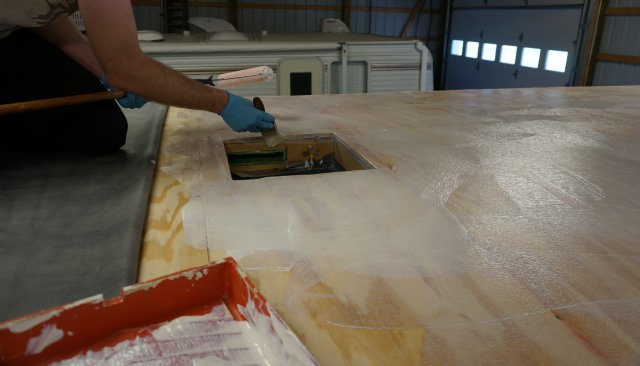
All the roof openings rubber needs to be cut and then folded and stapled in place. Here is the fridge vent. The rest of the openings are done like this too.

Then onto filing up the openings.  For every one of these attachments you need to clean the metal before putting the butyl on and we cleaned the roof area where the butyl tape would go too.
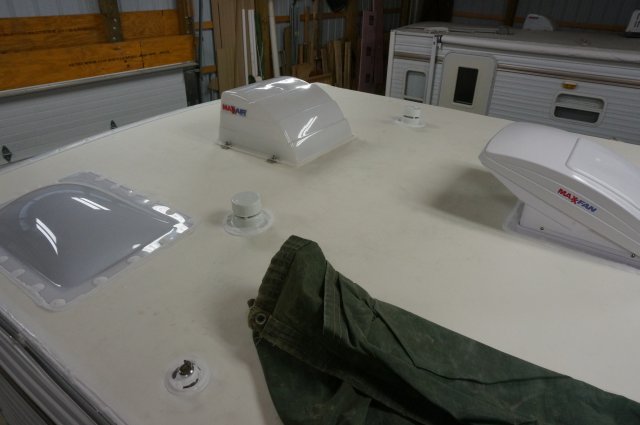
The roof vents, I'm the firm believer in 303 UV protectent so all the new plastic first inside and out were treated.


Now onto installing the vents. Butyl taping process

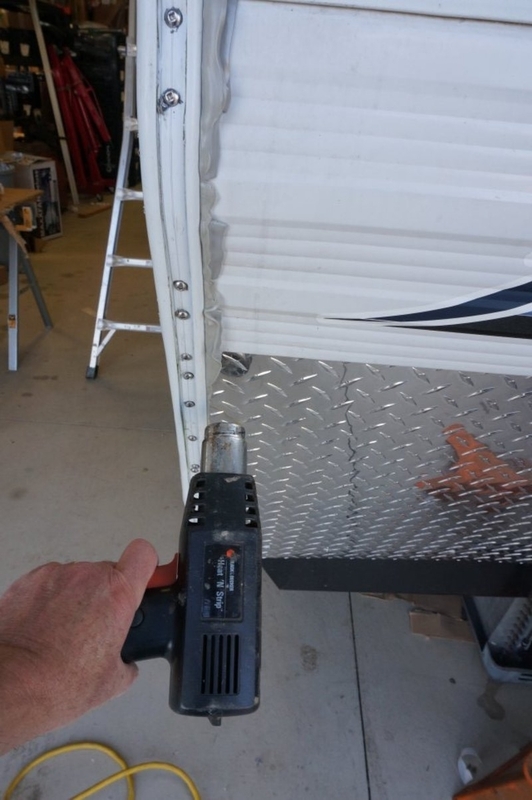
A little assistance from the heat gun since the temps were colder. This makes the butyl flow better when you tighten the flange.

Postion
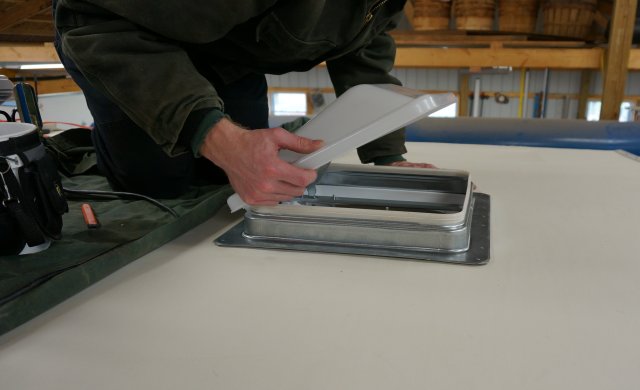
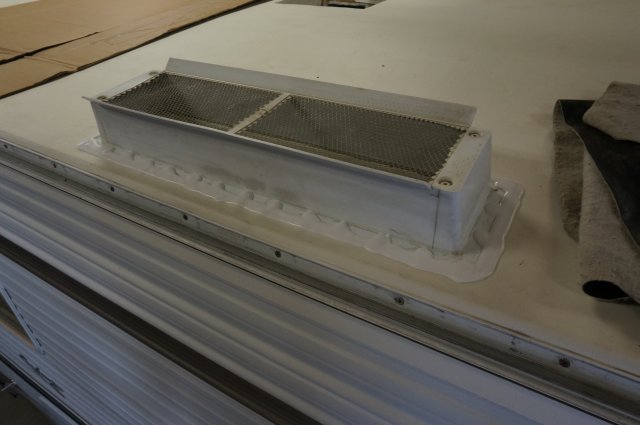
And fasten evenly. There were 2 manual vents and 1 power Maxx Air vent.

Now the tank vents. We (I) mixed up the pipe sizes. I thought they were 1 1/2", nope, 1 1/4". So we made an adapter with 1 1/2" ABS pipe to fit over the 1 1/4 pipe. These Ventline roof vents I like better then the Sunline ones. You can easily take the cover off if needed.
Dicor applied


Fasten
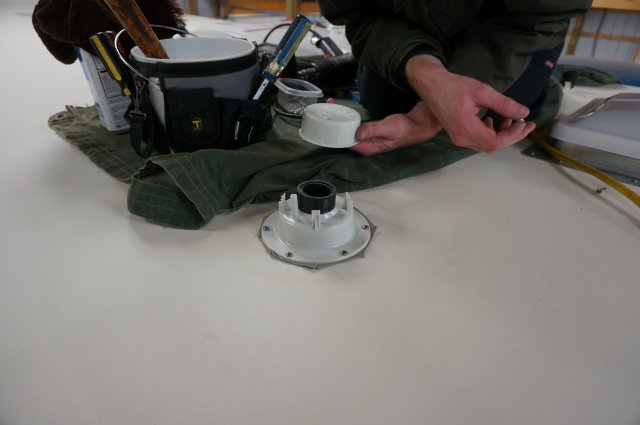
We added a bug screen

Cap on

The radio antenna

The power Maxx Air power vent. Ben has more pics on this.

Shower dome. We used butyl caulk under this. It flows more even and does not put so much pressure on the dome during the installation process. We also used large stainless fender washers to help not split the plastic at the screws like the factory ones does over time. I did this as well on my camper 2 years ago when I changed the dome.

Fridge vent. Ben also did the computer fan upgrade in the vent stack since we had all this off. I missed out on the pics of the fan, 

Now the TV antenna. This was a learning when we took off the antenna. See the dark gray spot in the roof mount, that is water corrosion to the aluminum. Sunline did not put any caulk in that area and it had water in it when we took up the antenna. It had to come from condensation collection as all the sealant was good.

We filled the whole area with butyl to not have that condensation pocket.

Properly locate. You have to go inside the camper and align the hex crank shaft in the right location of the ceiling knob and rotation lock.

Then warm up the cold metal

And fasten

More in the next post
__________________
Current Sunlines: 2004 T310SR, 2004 T1950, 2004 T2475, 2007 T2499, 2004 T317SR
Prior Sunlines: 2004 T2499 - Fern Blue
2005 Ford F350 Lariat, 6.8L V10 W/ 4.10 rear axle, CC, Short Bed, SRW. Reese HP trunnion bar hitch W/ HP DC
Google Custom Search For Sunline Owners Club
|
|
|
|
|
04-30-2016, 09:03 PM
|
#90
|
|
Moderator
Join Date: Nov 2006
Location: Ohio
Posts: 12,651
SUN #89
|
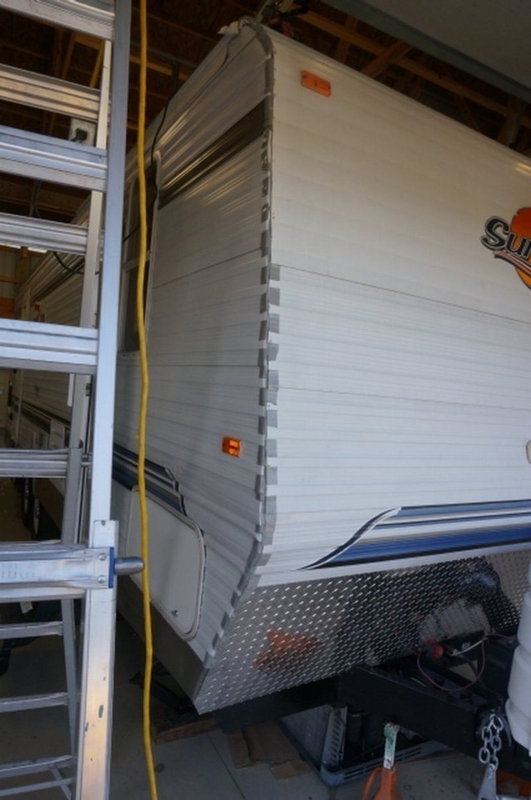
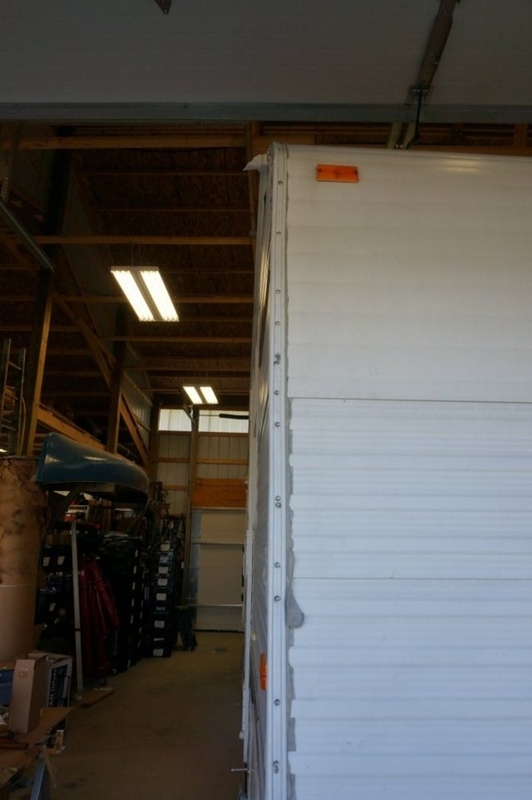
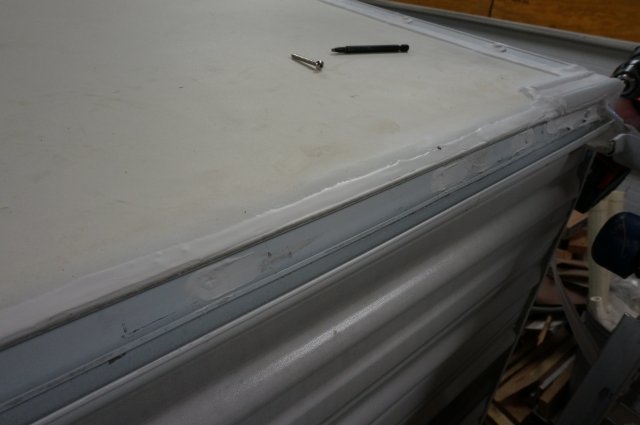
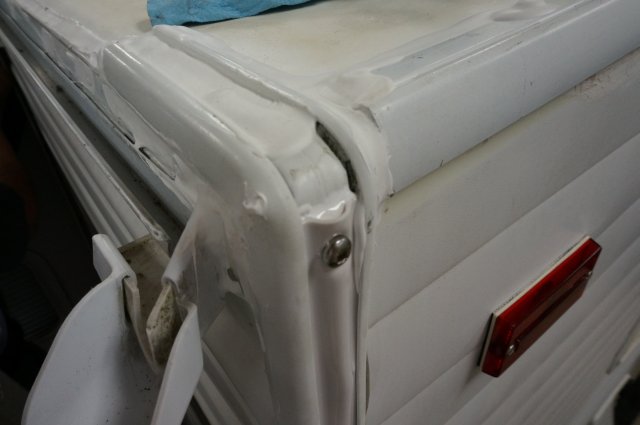
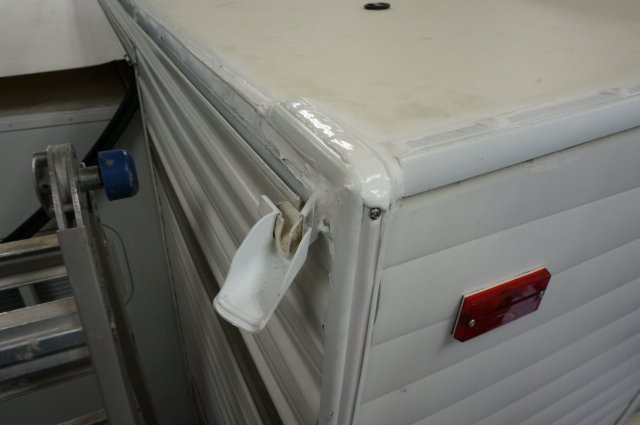
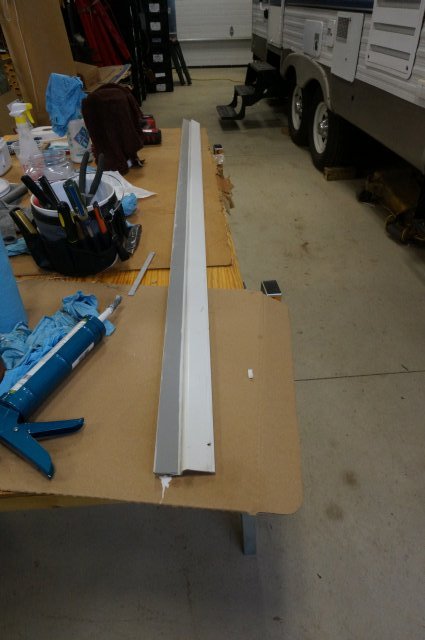
Now to the corner moldings. These take time. Between the preclean, butyl process and then the cleanup, they take a fair amount of time. Ben did the whole roof attachments while I did 4 corner moldings...
You start with this corner molding. It is like a cap, screws only on one side. This is the cleaner we use. It works well at getting grease and oil type slime off


It takes 2 strips of the 3/4" wide butyl to cover the mold. You have to fold it around the corner. This is the back corner

The corner we are doing in these pics

We did the rubber wrap different then Sunline. This method allows a full wrap over the edge all the way around the camper. The corners you have to tuck and fold

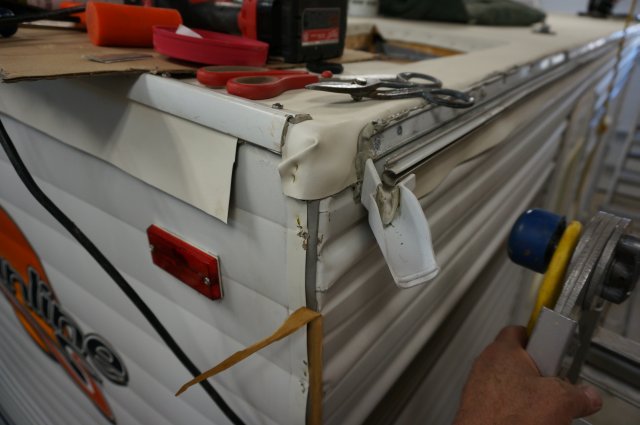
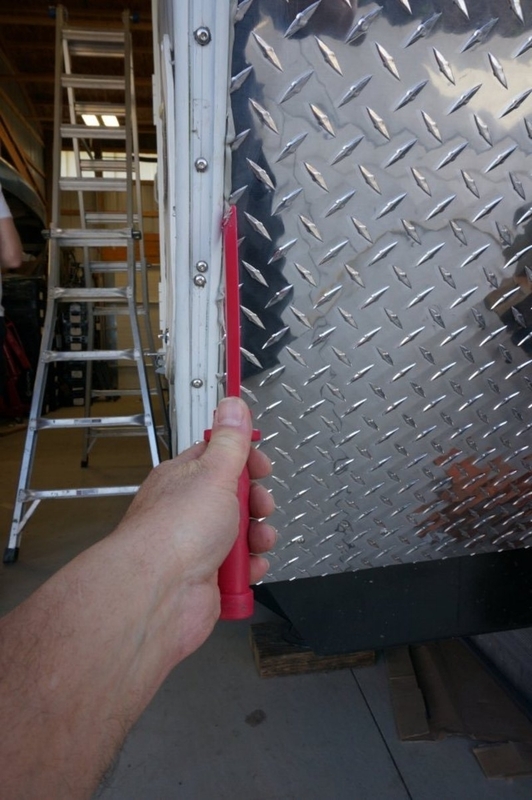
I added short butyl strips in the low spots of the corragate siding. You use more sealing tape, but it creates a more filled corner molding with less air spaces.

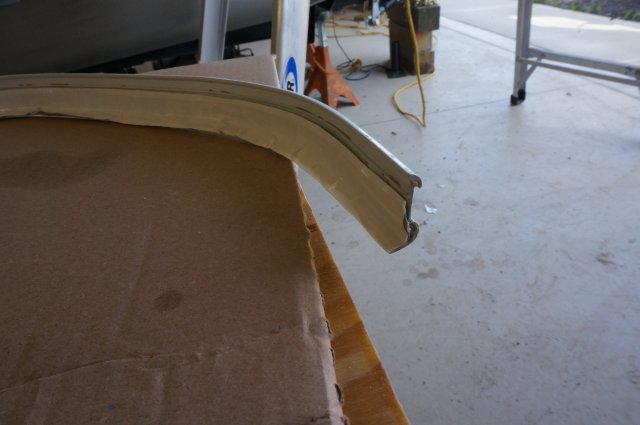
You start at the top and work down. There are a lot of little steps before this pic. You need to align the molding and get it going on straight and the corner wrap needs be on the correct place as there are no screws on that cap side to hold it in place. This is the top 3 feet down the camper. The bottom is still hanging out a little

Now the bottom

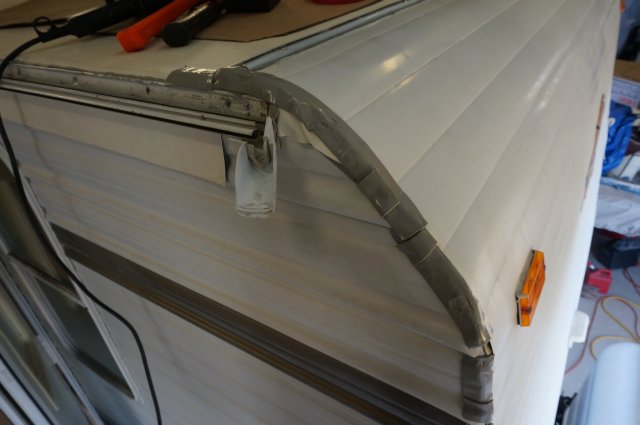
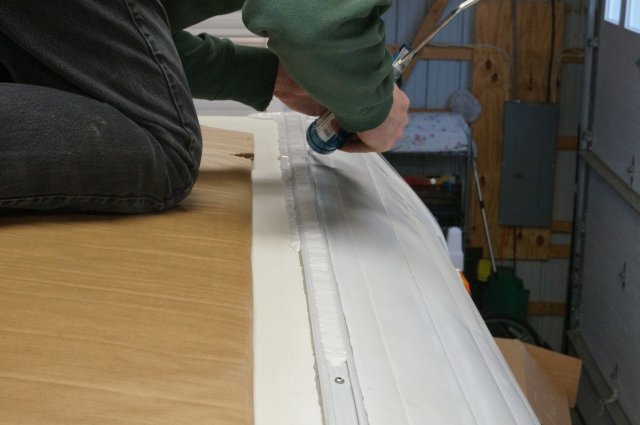
Now to the front. Same process but a little more tricky due to the bend of the roof line.

Clean up and apply butyl
And to prep the camper.
This is the opposite side but you can see how the rubber lays.

To the butyl, I added extra up top to make sure all those valley's get sealant in them.
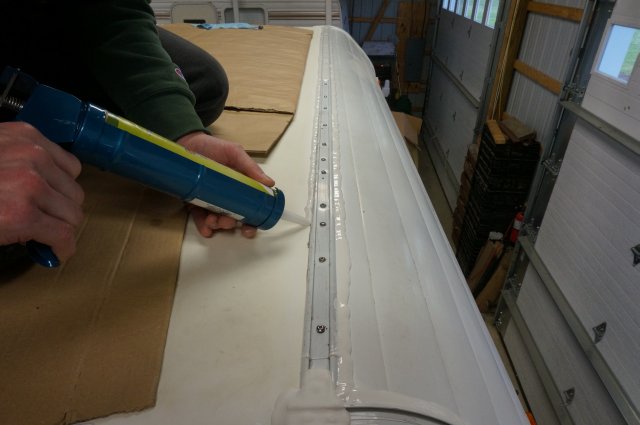
Here you position the cap molding

You need to use large finishing nails or a ice pick to line up the original holes. This helps keep the molding straight while you are working the top down. These 2 pics are of the left side but same process on the right. I missed these pics on the right.

I heat the molding and then tighten and the butyl will flow
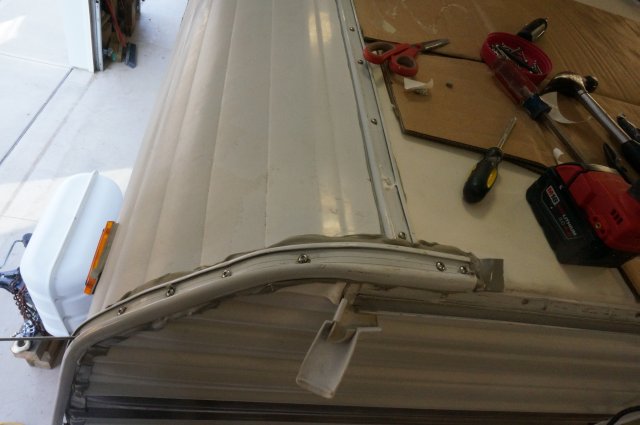
Then you work the next 3 to 4 feet
And the bottom.

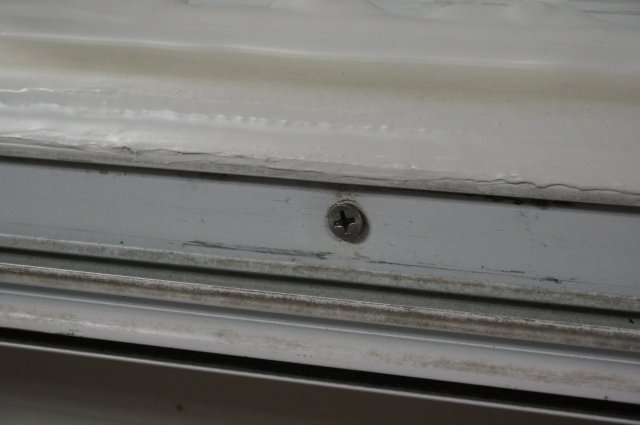
Now to the clean up. This is tedious but you get good at it after a while...
Pending the day time temps while you are working this butyl, some time you add heat, and other times you do not. If it get's too taffy like, then don't use the heat. When it will not flow into voids, you help with some heat.
Using a plastic scraper, cut the sealing tape by pressing to the siding at the molding
Then scrap it off

Sometimes on thick sections you add heat to help. Some the of large corrugations in the siding need this. If you see the butyl pulling away from the siding when trimming it off, then add heat and it will stay bonded.
Then cut and push/spread/smear the sealant tight into any small voids.

Then using mineral spirits on a rag, rub and get all the little stringers off. This cleans it up good. Then you need to clean off the mineral spirits if any caulk is used over these areas.

Well this is it for now. More to come.
Thanks for looking
John and Ben
__________________
Current Sunlines: 2004 T310SR, 2004 T1950, 2004 T2475, 2007 T2499, 2004 T317SR
Prior Sunlines: 2004 T2499 - Fern Blue
2005 Ford F350 Lariat, 6.8L V10 W/ 4.10 rear axle, CC, Short Bed, SRW. Reese HP trunnion bar hitch W/ HP DC
Google Custom Search For Sunline Owners Club
|
|
|
|
|
05-02-2016, 07:45 PM
|
#91
|
|
Senior Member
Join Date: Nov 2015
Location: Ohio
Posts: 141
SUN #7990
|
I do have pics of the MaxxAir fan install as well as the fridge fan mod that I will post when I get some time. Its been work on the camper on the weekends and work on the truck on the weekdays after work for the last month. Should mostly come to a close this weekend and hopefully I will have slightly more free time, keyword slightly.
__________________
Current Camper: 2006 Sunline T-264SR
Previous Camper: 1998 Coleman Mesa
Tow Vehicle: 2002 Chevrolet Avalanche 2500, 8.1L, 4X4
DirecLink Brake Controller, Draw-Tite Ultra Frame Receiver, Reese HP Trunnion Bar Hitch W/ HP DC
|
|
|
|
|
05-02-2016, 09:13 PM
|
#92
|
|
Moderator
Join Date: Nov 2006
Location: Ohio
Posts: 12,651
SUN #89
|
Here is the next installment.... I think we are gaining on it now.... This past weekend we were able to get about 1.5 days worth of work in. A lot of little things.
Caulk... Ben did the majority of the caulking. This was partly from last week and this past weekend.
Roof Vents

Redo for the Maxx Air covers

Maxx Air cover on
Antenna

Fridge vent cover

Shower dome and rear seam


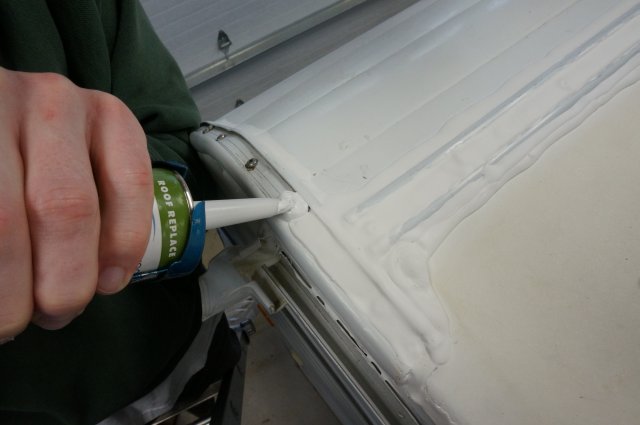
Front seam. Many of these roof seams are pre-prepped for and Eternabond application later this year. In doing so, there is more caulk used to make the E bond go on smoother.

The gutter rail. This are is prepped for future Eternbond too. These rail screws are a concern until the E bond comes. so we used Dicor non leveling on them.

Apply the Dicor

Smooth out

And the top bond, rubber to top of gutter rail. In this case this was about a 45 deg angle as the roof was 3/8" up higher then the gutter rail, as the rail went back in the same place it came off and the new roof is raised. The blend came out well.
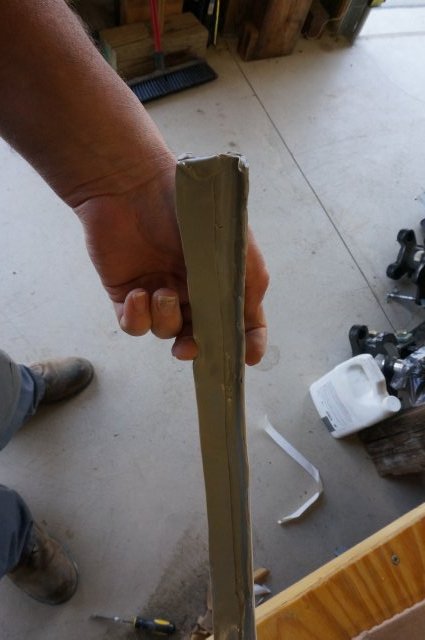
The front vinyl screw cover. We did these a little different then Sunline. Again this is prepped for future Eternabond.
Starts like this

Insert cover

Drill hole

Dicor hole
Insert stainless screw. This will be sealed over too.

This Camco trim cover is different then the others I have seen. It is more preformed and goes in real easy. I think it was 50 foot roles.

Squeeze and pop it in place

Here is the process on the back wall corner
OK I'll add the rest on the next reply.
__________________
Current Sunlines: 2004 T310SR, 2004 T1950, 2004 T2475, 2007 T2499, 2004 T317SR
Prior Sunlines: 2004 T2499 - Fern Blue
2005 Ford F350 Lariat, 6.8L V10 W/ 4.10 rear axle, CC, Short Bed, SRW. Reese HP trunnion bar hitch W/ HP DC
Google Custom Search For Sunline Owners Club
|
|
|
|
|
05-02-2016, 09:50 PM
|
#93
|
|
Moderator
Join Date: Nov 2006
Location: Ohio
Posts: 12,651
SUN #89
|
Now for more odds and ends...
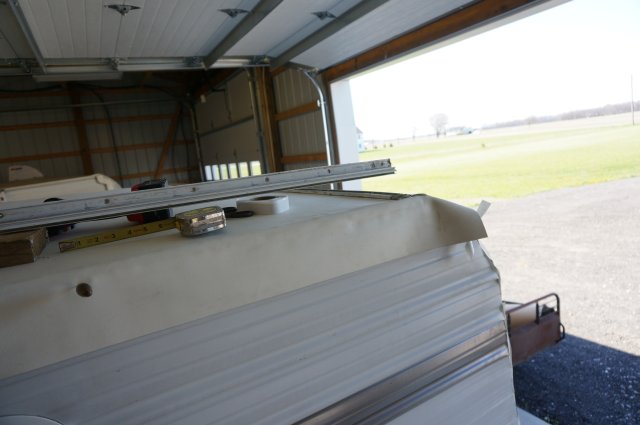
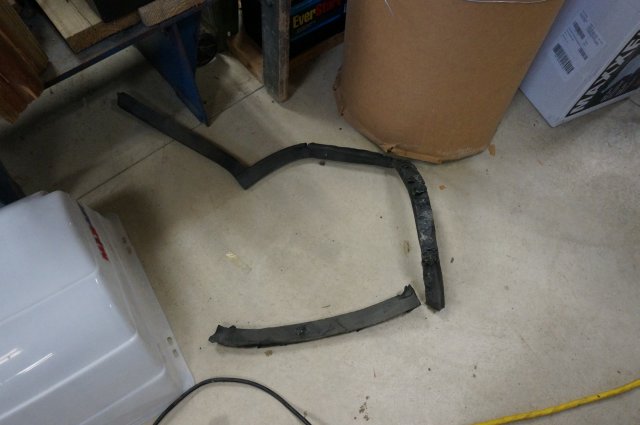
We still had a slide flange to put on. If you have never seen one of these off the camper before, they look like this.


Butyl tape
Tape the low spots on the camper and apply the trim piece lining up the old holes so it goes on the same place it came off

Here is the corner joint. Sunline did not have the miter dead tight and since we used the same holes, there is a small gap. The miter is Eternabonded. These next few pics are to show the seal holding screws. They hide in the rubber seal. And they are needed or the seal will work it's way out over time.

Here is one screw in the horizontal seal section

And now one in the vertical section. Not easy to get to, but this one cooperated. There are also a screw on the bottom end of the seal at the base of the camper and sometimes one in the middle area along the top of the slide.


Looks like this

Hard to see here but there is white silicone over the top corner of the seal to seal the white aluminum flange to the rubber seal in the corner. This is what Sunline did, so on Ben's camper I repeated the silicone. I have tried Dicro in this location and it does not turn out well. Too much pressure from the slide. The Dicor will flow.

And all cleaned up


And the tail lights butyl'ed on and the bulbs dielectric greased. They were corroded in pretty good too. Ben put stainless tabs by the licence plate holder as those plastic tabs break off and your plate gets lost. I almost lost mine before I fixed it.

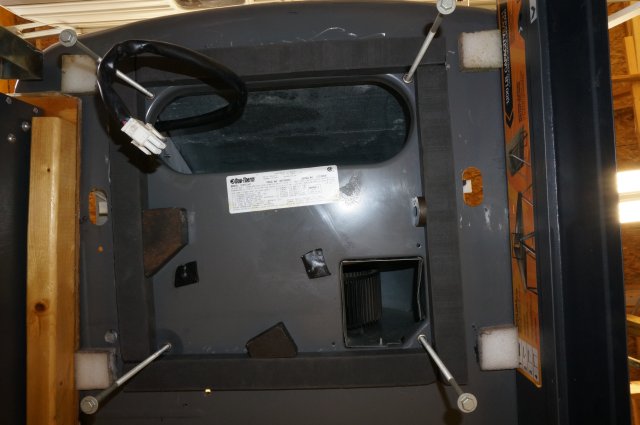
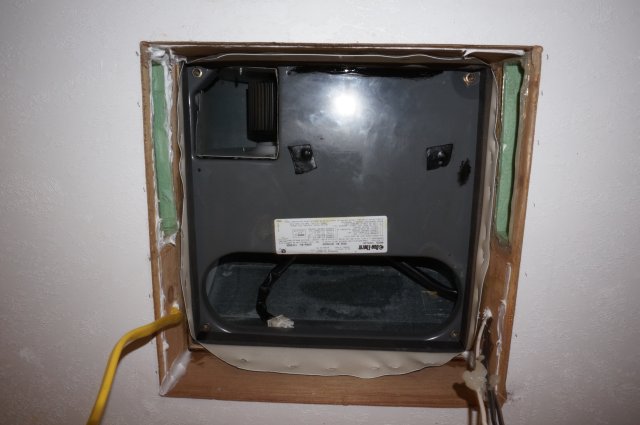
Next was the AC unit. The gasket needed to be replaced. That was an undertaking. The adhesive is really good and compressed. Heat gun and good clean putty knife and off they came. Could not find any other way.

We set the unit up across 2 saw horses as I did not want the oil in the compressor to run all over inside the unit. Had to work looking up and side ways. Mineral sprites will soften up the old adhesive stuck on so we could clean it all off good. Then had to clean off the mineral spirits.
Then to line up the new gasket and get it set correct. The opening in new gasket was smaller then the old one. Had to be dead one to get it all lined up. We did a dry run to fit it and used the 4 bolts and magnets to locate position. Then took the release paper off and both of us had to hold it and align the center hole to the bolts central. Have to be careful to get it centered and not stick in the wrong spot. That exposed new adhesive is amazing. Don't be off or else... It came out well.

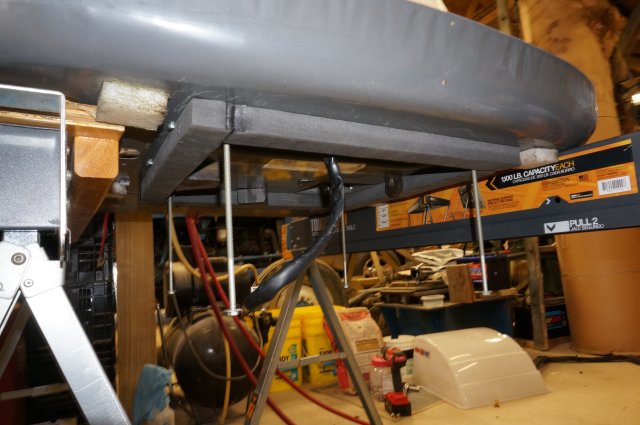
Then to get it up on the roof. Did the reverse of how we got it off. Step ladders and plank. Put the AC unit on the plank, climb up with 2 of us and then lift onto the roof.

Heads up! You have to lift the unit, do not slide it. Sliding will mess up the new gasket. The instructions cautioned this and I can see why.
Set in basic location.
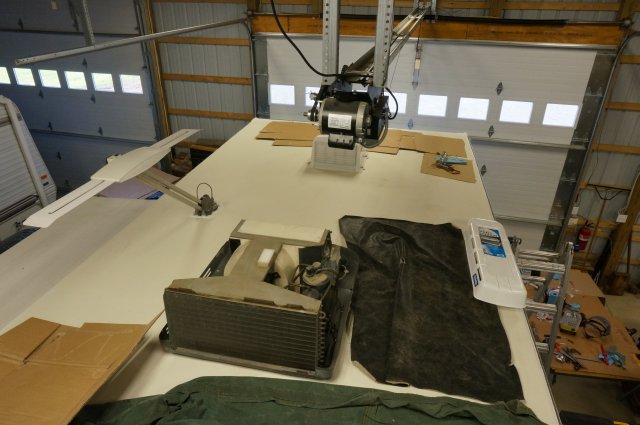
Then one of you go inside and look up to align. The person inside lifts the AC unit up to take the weight off and the person on the roof moves the unit until the bolt holes all line up correctly as the inside person looks for.
Then the air box goes on.

And then, we ran out of time.... Here are 2 shots of the end of the weekend. We still have about 4 to 6 hours left. The plan is we finish up this coming weekend and Ben takes it home to get ready to go camping! 

The roof area is all done except putting the AC cover on. Inside, have to wire up the AC unit and seal up the air box and hook some hoses and shower items back in. Outside there are some odds and ends and the awning to put on.
All for now. Be back next week
John and Ben
__________________
Current Sunlines: 2004 T310SR, 2004 T1950, 2004 T2475, 2007 T2499, 2004 T317SR
Prior Sunlines: 2004 T2499 - Fern Blue
2005 Ford F350 Lariat, 6.8L V10 W/ 4.10 rear axle, CC, Short Bed, SRW. Reese HP trunnion bar hitch W/ HP DC
Google Custom Search For Sunline Owners Club
|
|
|
|
|
05-03-2016, 05:34 AM
|
#94
|
|
Moderator
Join Date: Dec 2006
Location: Pennsylvania
Posts: 2,285
SUN #128
|
WOW! Good work, and a nice tutorial for roof replacement with all the pics!
__________________
Pam
Lance 1475 "Snoopy"
2012 GMC Sierra 3500HD 4x4 D/A
2012 Arctic Fox 30U, SUNLINES - 2006 2753 "Tweety", 2007 QUE "QUEtSE", 2364, 1660
|
|
|
|
|
05-03-2016, 07:20 PM
|
#95
|
|
Senior Member
Join Date: Nov 2015
Location: Ohio
Posts: 141
SUN #7990
|
Quote:
Originally Posted by JohnB
This Camco trim cover is different then the others I have seen. It is more preformed and goes in real easy. I think it was 50 foot roles.
|
It was a 100ft roll, Amazon $13.99 for white, other colors available.
Amazon Link
I plan to do the rest of the camper at some point as all mine is dry rotted and one door was missing. This was super easy to put on, only took like 10 minutes each corner.
__________________
Current Camper: 2006 Sunline T-264SR
Previous Camper: 1998 Coleman Mesa
Tow Vehicle: 2002 Chevrolet Avalanche 2500, 8.1L, 4X4
DirecLink Brake Controller, Draw-Tite Ultra Frame Receiver, Reese HP Trunnion Bar Hitch W/ HP DC
|
|
|
|
|
05-03-2016, 09:20 PM
|
#96
|
|
Moderator
Join Date: Nov 2006
Location: Ohio
Posts: 12,651
SUN #89
|
Quote:
Originally Posted by Tweety
WOW! Good work, and a nice tutorial for roof replacement with all the pics!
|
Thanks Pam. One always picks up something new doing these projects. Learned some more of the Sunline history.
Hope Steve and you can make it out in the Fox soon if you have not already.
John
__________________
Current Sunlines: 2004 T310SR, 2004 T1950, 2004 T2475, 2007 T2499, 2004 T317SR
Prior Sunlines: 2004 T2499 - Fern Blue
2005 Ford F350 Lariat, 6.8L V10 W/ 4.10 rear axle, CC, Short Bed, SRW. Reese HP trunnion bar hitch W/ HP DC
Google Custom Search For Sunline Owners Club
|
|
|
|
|
05-07-2016, 07:36 PM
|
#97
|
|
Moderator
Join Date: Nov 2006
Location: Ohio
Posts: 12,651
SUN #89
|
Today we finished up! Yeh!  A lot of small odds and ends.
- Finished the air conditioner hook up inside
- Cleaned up and put the AC shroud on
- Rear tail light len's
- Cargo door holders
- Inside antenna crank system
- Adjust the slide to close correctly and tighten up all the loose bolts on the slide drive.
- Fix up battery case
- Put new towing chains and hooks on
- Put shower steam dome in
- Hookup outside shower
- Power up AC unit and make sure it works.
- Put vent shrouds inside back on
- Put window mini blind & cornice back on
- Patched slide awining with repair tape
- Vacuumed up the inside of the camper
Installed the awning, here there are some pic's of how we did this. Started out cleaning the gutter channel where the awning goes. It slides in a lot easier clean then full of dirt. Also spread open any pinched spots in the awning cord slot.
We left the awning on the arms when we took it off, so the locking pawl was holding all the spring tension. Made up a container of soapy water. We use this on the awning cord to make it slide in the slot easier.
Then we staged the awning in place. Half in and half out of the barn
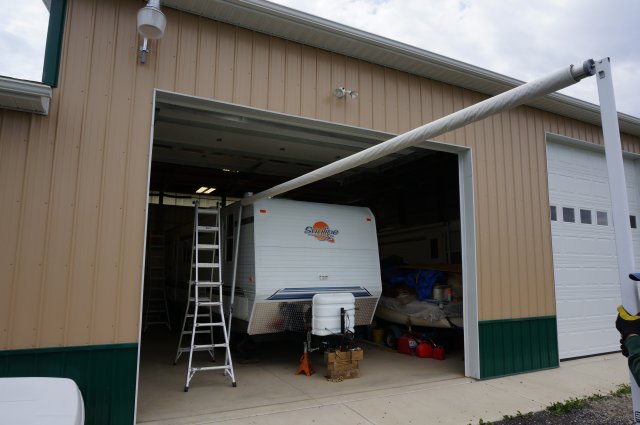

Here is up top,
Soap up the awning cord and get it started in the gutter rail slot

Soap some more and walk about 3 more feet in. You keep going like this until you get it all the way on. 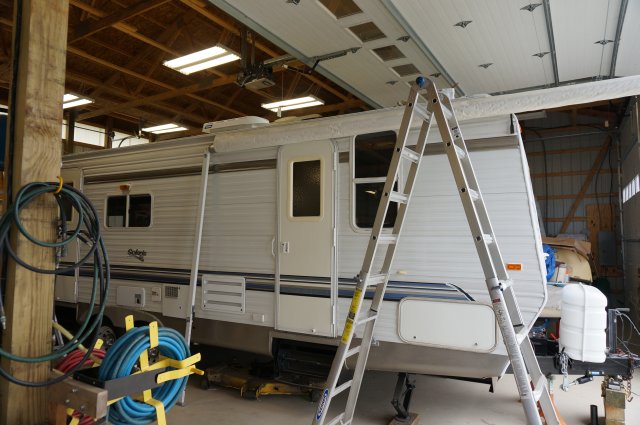

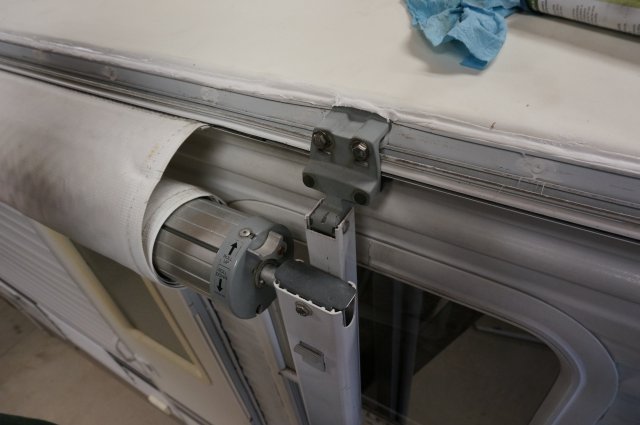
Then hook up the arms and install the roof line brackets. We used stainless lag screws here too.

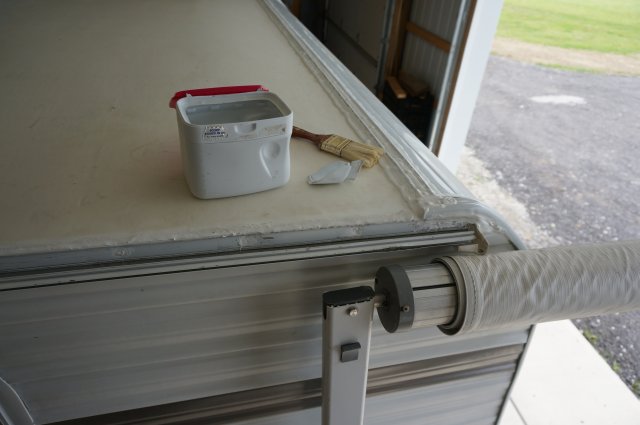
Then, pump dicor into the holes in the camper and caulk up the lags

Install, and caulk the top to blend into the roof caulking. Check that the top bracket is in line with the arm attached to the bottom of the camper. There are slots in the top bracket to adjust this before tightening.
Once you get the hardware mounted, there are 2 small screws under the awning material at the gutter rail. These keep the fabric from sliding. Since we were remounting, we found the original hole on one end, inserted the screw. Getting the other end to line up was not going to happen so we inserted in the new location. The awning may have shrunk over the winter. And being as brittle as it is, was not going to press our luck. It has about 2 more years life on it, slide awing too.
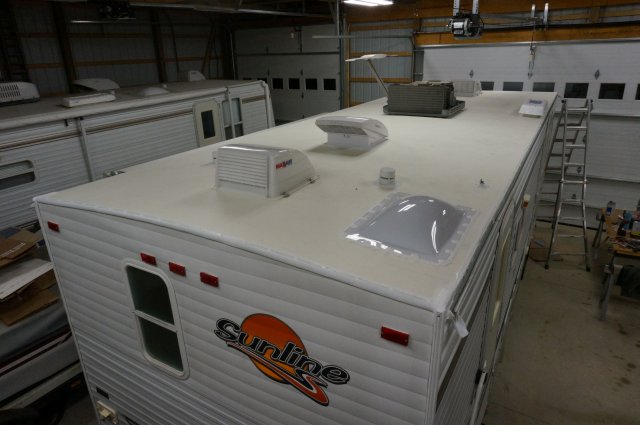
Here is the roof complete


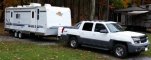
Ben has been feverishly working on his truck, nights. New fuel lines, new brake lines, fuel pump, upper control arms, new alignment adjusters rust converted the entire frame and painted and some other things I'm sure I forgot. He did the exhaust manifold studs I think last year. He took it in for a front end alignment this morning so he could take the camper home with him.
And here we are hitched up ready to take her home.

Out in the yard

Going

And on her way back home

This concludes our winter roof project. We started on 1-2-16 and finished 5-7-16. Between a lot of other things going on, we spent 22 days across this period doing this on weekends. We put in an average of 6 hrs a day. Some more, some less, didn't keep track of exact hours, but have picture dates for every work day. 22 x 6 x 2 men = 264 hrs. We are not the fastest on doing this project but again, it is a labor of love that's for sure. It's done right and no concerns of leaking now. This camper will last a good long time.
Our T310SR now feels lonely all alone in the barn  She lost her younger barn buddy to the great campground.... Maybe she will be back this coming winter for a nap.
Thanks for following along
John and Ben
__________________
Current Sunlines: 2004 T310SR, 2004 T1950, 2004 T2475, 2007 T2499, 2004 T317SR
Prior Sunlines: 2004 T2499 - Fern Blue
2005 Ford F350 Lariat, 6.8L V10 W/ 4.10 rear axle, CC, Short Bed, SRW. Reese HP trunnion bar hitch W/ HP DC
Google Custom Search For Sunline Owners Club
|
|
|
|
|
10-16-2016, 06:12 AM
|
#98
|
|
Senior Member
Join Date: Aug 2015
Location: Connecticut
Posts: 164
SUN #7710
|
John,
What a great job you guys did. And, this is very helpful in trying to get mine back in order. I don't remember you mentioning what you used to glue the new roof down so if you can let me know, that would be great. I have to run out and uncover mine so it will dry out. I don't have a place big enough to put the camper in so it has to stay outside.
Thanks,
Steve
__________________
Steve P
|
|
|
|
|
10-16-2016, 08:51 PM
|
#99
|
|
Senior Member
Join Date: Sep 2010
Location: Michigan
Posts: 854
SUN #1546
|
Wow! Great job, looks fabulous and wonderful pics too!
__________________
 Joan & Miss Emme Lu Who
Full Timing in T-1950 2005 Anniversary Model
1997 6.5L Chevy Turbo Diesel Truck
"Pure Michigan"
Facebook: Apackof2 for the Rd
|
|
|
|
|
10-20-2016, 06:20 PM
|
#100
|
|
Senior Member
Join Date: Nov 2015
Location: Ohio
Posts: 141
SUN #7990
|
Quote:
Originally Posted by sep
John,
What a great job you guys did. And, this is very helpful in trying to get mine back in order. I don't remember you mentioning what you used to glue the new roof down so if you can let me know, that would be great. I have to run out and uncover mine so it will dry out. I don't have a place big enough to put the camper in so it has to stay outside.
Thanks,
Steve
|
We used the Dicor Water based adhesive. We bought it in the whole roof kit that comes with 2 cans, butyl tape and self leveling caulk. Amazon had the best deal at the time, lots of RV places sell it too. They also sell it by itself. We actually only ended up using 1 can for the roof just under 24ft in length. The coverage is in instructions are listed on Dicor's website.
Single Can
https://smile.amazon.com/Dicor-901BA...bber+roof+glue
Whole Kit
https://smile.amazon.com/Dicor-401CK...ubber+roof+kit
__________________
__________________
Current Camper: 2006 Sunline T-264SR
Previous Camper: 1998 Coleman Mesa
Tow Vehicle: 2002 Chevrolet Avalanche 2500, 8.1L, 4X4
DirecLink Brake Controller, Draw-Tite Ultra Frame Receiver, Reese HP Trunnion Bar Hitch W/ HP DC
|
|
|
|
|
|
|
Currently Active Users Viewing This Thread: 1 (0 members and 1 guests)
|
|
|
 Posting Rules
|
You may not post new threads
You may not post replies
You may not post attachments
You may not edit your posts
HTML code is Off
|
|
|
|
 » Recent Sunline Discussions
 |
|
|
|
|
|
|
|
|
|
|
|
|
|
|
|
|
|
|
|
|
|
|
|
|
|


 Linear Mode

