 |
|
 02-22-2016, 08:10 PM
|
#61
|
|
Moderator
Join Date: Nov 2006
Location: Ohio
Posts: 12,654
SUN #89
|
Quote:
Originally Posted by vcrt

Jon, how do you quote individual parts of a post? I tried by quoting all of it and then deleting what I wasn't replying to, but as you can see in my last post, it didn't work.
Rich
|
Hi Rich,
One method is to "quote" a reply in a new window. Strip out the words and any code you do not need, then copy the quote starting raw code and text you want back to the reply you are working in. Like this. You need the quote command in brackets = screen name; and the number behind it. Then delete the new window cut and paste quote you started with
Quote:
Originally Posted by vcrt
Not the 2499 mentioned.
Rich
|
__________________
__________________
Current Sunlines: 2004 T310SR, 2004 T1950, 2004 T2475, 2007 T2499, 2004 T317SR
Prior Sunlines: 2004 T2499 - Fern Blue
2005 Ford F350 Lariat, 6.8L V10 W/ 4.10 rear axle, CC, Short Bed, SRW. Reese HP trunnion bar hitch W/ HP DC
 Google Custom Search For Sunline Owners Club
|

|

|
|
02-23-2016, 04:54 AM
|
#62
|
|
Senior Member
Join Date: Aug 2006
Location: Maryland
Posts: 838
SUN #37
|
I think I have it, it seems that each quote needs to be in brackets. Next time I do that type of quote I'll check back on your post John, I'll probably see it more clearly then.
Thanks,
Rich
__________________
__________________
 1992 T-2470 (now residing in South Carolina)
Current Sunline-2007 Solaris 2499
2018 Silverado 1500 w/Max Trailering pkg.
|
|
|
|
|
02-23-2016, 08:54 AM
|
#63
|
|
Senior Member
Join Date: Sep 2006
Location: Maryland
Posts: 1,131
SUN #64
|
Quote:
Originally Posted by vcrt 
Oh, and I thought the industry was still on the "bigger is better" theme. It seems everywhere you look there are towering 5th wheels and slides, slides and more slides, being hauled by trucks verging on the size of tractor trailer type vehicles. But something has to give at some point.
|
Ummm....you got something against Tractor Trailer Type Vehicles??  {sarcasm}:
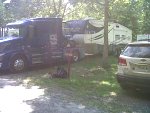
My Brother in Laws Volvo:
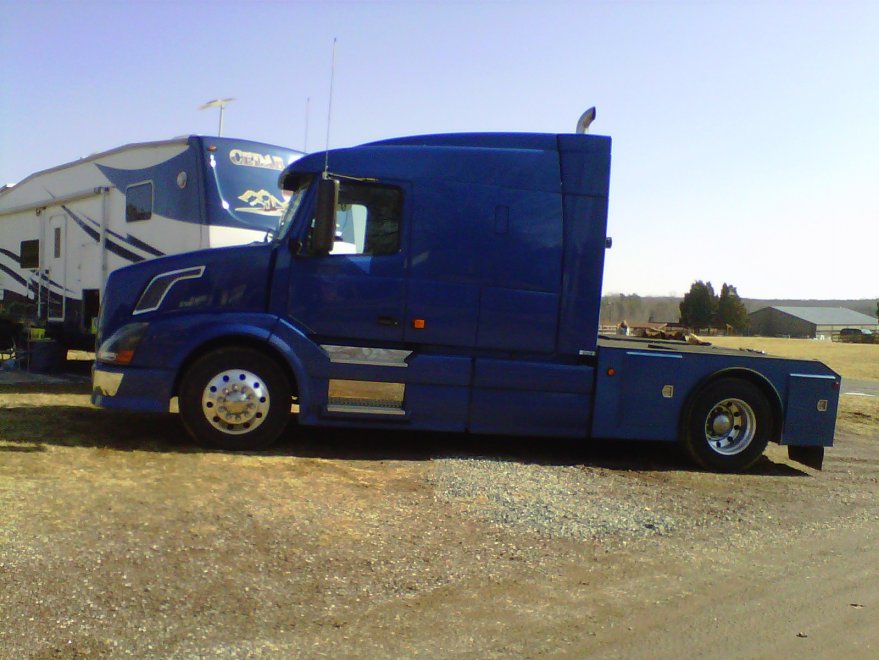
Rear View:
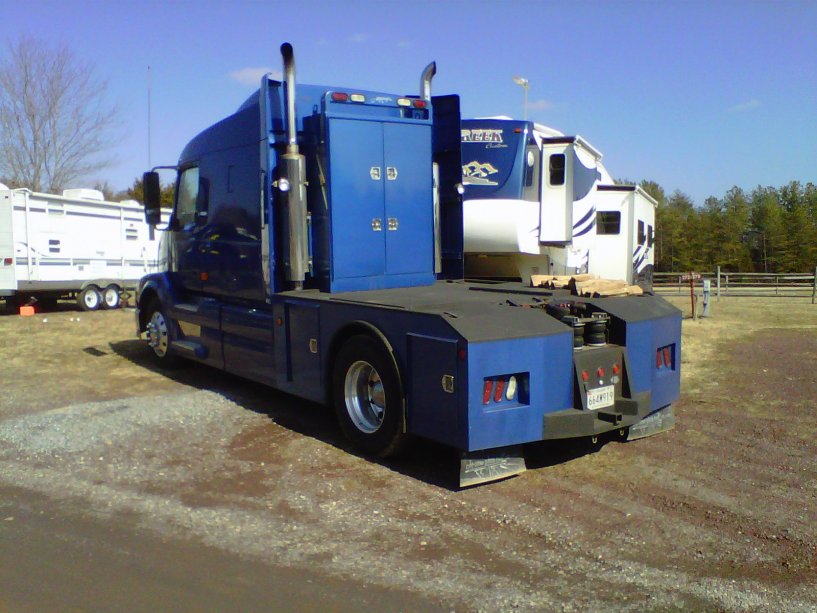
Yes, that is our Sunny in the background.
__________________
2004 Dodge Ram 2500 Club Cab 4x4 CTD
2007 Sunline Solaris T-276-SR: Misty Blue/Cherry
2001 Dodge Ram 1500 Reg Cab 4x4 OFF-ROAD
|
|
|
|
|
02-23-2016, 11:10 AM
|
#64
|
|
Senior Member
Join Date: Aug 2006
Location: Maryland
Posts: 838
SUN #37
|
Cool!
Actually, someday I'd like to take a test drive in one of those things! 
Rich
__________________
1992 T-2470 (now residing in South Carolina)
Current Sunline-2007 Solaris 2499
2018 Silverado 1500 w/Max Trailering pkg.
|
|
|
|
|
02-23-2016, 07:10 PM
|
#65
|
|
Moderator
Join Date: Nov 2006
Location: Ohio
Posts: 12,654
SUN #89
|
We made it back to the camper this past weekend. Was only able to get 1 day of work on it, but it was a good day.
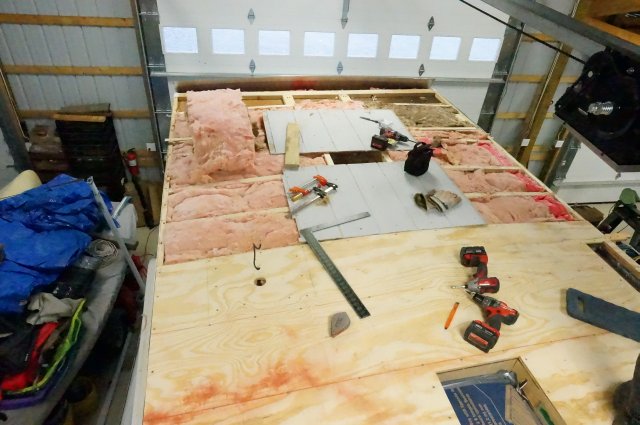
Here is mid day progress on the roof decking. Looking towards the back
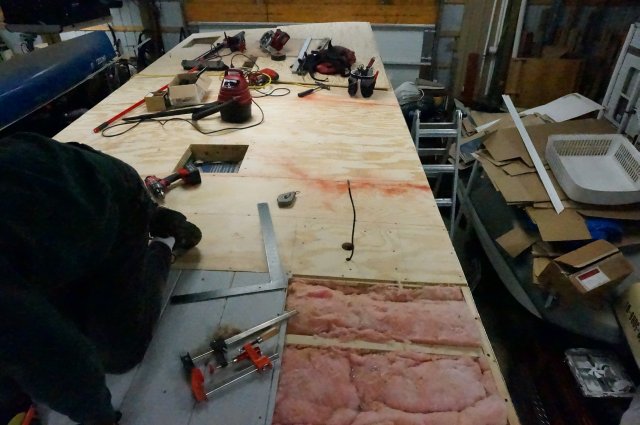
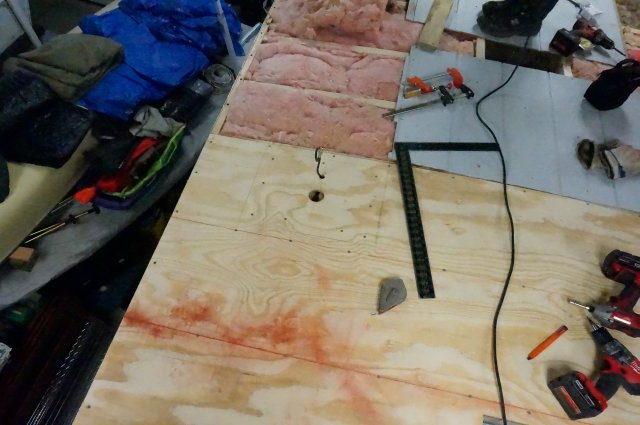
Now looking towards the front. There was only 1 sheet that had no cutout or other something to adjust for.

We added extra reinforcing under the antenna mount. Also had to back into where the 2 holes go
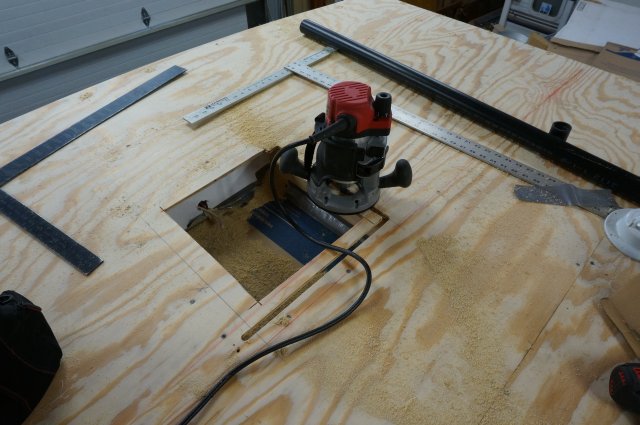
Final trimmed out the openings. Had a few snags with the router bits, but it worked out good and they are a perfect trim fit.

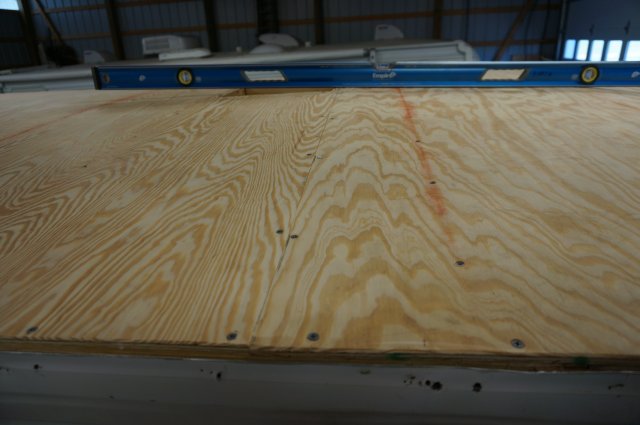
At the front we had a rafter height issue to work through. From the front roof vent towards the front of the camper dropped 3/4" in about 8". This was the bud board setup.

Here you can see the gap better
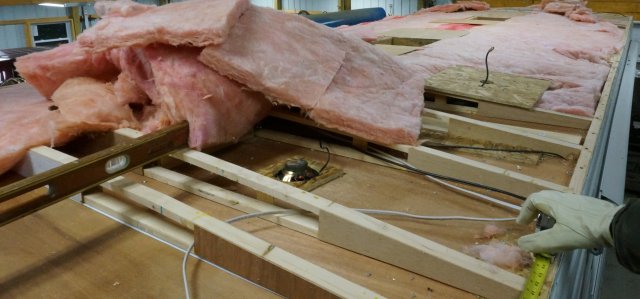
The plywood would not bend like this and do not think when Sunline used walk on decking they do this. So we cut 2 wedge shims from 3/4" in the center to almost nothing 4 foot out by the wall and screwed them to the top of the rafter to make it a in-line drop to the front.

Here you can see the wedge screwed on. I missed a pic of this being loose to see it better.

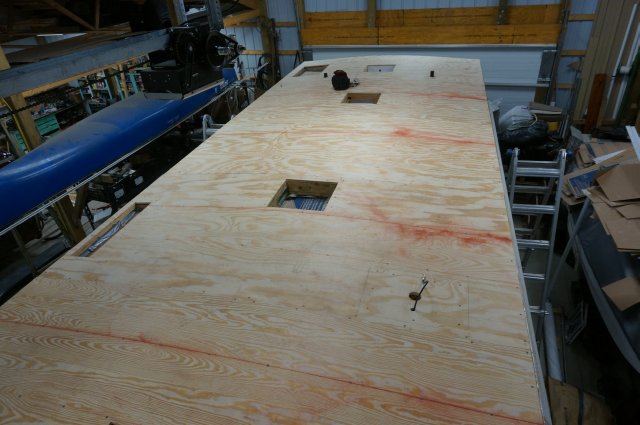
Here we are at the end of the day. Almost done with the decking. There is about 1.5 hours left to final fit the front sheet. Have to take it down and trim the 8 ft wide joint fit dead tight against the sheet behind it. We wanted dead tight joints to not have to use the Dicor fleece tape over any gaps. Could not find it for sale even.
Looking towards the front

Looking towards the back
I needed to check the roof pitch at the AC opening to make sure the roof swept away good from the opening so water would not come back to the AC unit. It came out well. I was prepared to create a wedge type fill strip to raise the AC unit up higher if needed. Right now I'm not seeing it needs it. The bud board setup had 1/2" OSB around the opening to create the AC as the highest area. However the bud board was not really stiff and could puddle back towards the AC, I'm not seeing this exist on rigid decking.

Here is the AC opening with the ceiling ducts. We have to re-fill the factory gaps around the ducting which is really made from 1/4" mini insulation board taped together. They just pumped the gaps filled with silicone. We may do something a little different with roof flashing and a final sealing bead of caulk.

There was a question about the height of the truss style rafter. The truss rafter is 4" tall at the center. The 4 1/8" you see is over the ceiling luan. The prior generation of 2 x 4 rafter would of been 3.5". So we gained 1/2" of center height with the truss setup.

So this is where we are at. Due to weekend conflicts, it will take a few weeks to get back to this.
Thanks for looking
John and Ben
__________________
Current Sunlines: 2004 T310SR, 2004 T1950, 2004 T2475, 2007 T2499, 2004 T317SR
Prior Sunlines: 2004 T2499 - Fern Blue
2005 Ford F350 Lariat, 6.8L V10 W/ 4.10 rear axle, CC, Short Bed, SRW. Reese HP trunnion bar hitch W/ HP DC
Google Custom Search For Sunline Owners Club
|
|
|
|
|
02-24-2016, 05:11 AM
|
#66
|
|
Senior Member
Join Date: Aug 2006
Location: Maryland
Posts: 838
SUN #37
|
So nice and neat! That Dicor rubber roof will be smooth and tight when it's done.
I'm sure it's frustrating to have to do this as time allows, staying away for weeks, then going at it again, but before you know it, spring camping season will be here, the roof will be complete and then the enjoyment begins!
Rich
__________________
1992 T-2470 (now residing in South Carolina)
Current Sunline-2007 Solaris 2499
2018 Silverado 1500 w/Max Trailering pkg.
|
|
|
|
|
02-24-2016, 06:30 AM
|
#67
|
|
Member
Join Date: Dec 2014
Location: Pennsylvania
Posts: 59
SUN #6969
|
Quote:
Originally Posted by JohnB
We made it back to the camper this past weekend. Was only able to get 1 day of work on it, but it was a good day.
Here is mid day progress on the roof decking. Looking towards the back

Now looking towards the front. There was only 1 sheet that had no cutout or other something to adjust for.
We added extra reinforcing under the antenna mount. Also had to back into where the 2 holes go

Final trimmed out the openings. Had a few snags with the router bits, but it worked out good and they are a perfect trim fit.
At the front we had a rafter height issue to work through. From the front roof vent towards the front of the camper dropped 3/4" in about 8". This was the bud board setup.

Here you can see the gap better

The plywood would not bend like this and do not think when Sunline used walk on decking they do this. So we cut 2 wedge shims from 3/4" in the center to almost nothing 4 foot out by the wall and screwed them to the top of the rafter to make it a in-line drop to the front.

Here you can see the wedge screwed on. I missed a pic of this being loose to see it better.

Here we are at the end of the day. Almost done with the decking. There is about 1.5 hours left to final fit the front sheet. Have to take it down and trim the 8 ft wide joint fit dead tight against the sheet behind it. We wanted dead tight joints to not have to use the Dicor fleece tape over any gaps. Could not find it for sale even.
Looking towards the front

Looking towards the back

I needed to check the roof pitch at the AC opening to make sure the roof swept away good from the opening so water would not come back to the AC unit. It came out well. I was prepared to create a wedge type fill strip to raise the AC unit up higher if needed. Right now I'm not seeing it needs it. The bud board setup had 1/2" OSB around the opening to create the AC as the highest area. However the bud board was not really stiff and could puddle back towards the AC, I'm not seeing this exist on rigid decking.

Here is the AC opening with the ceiling ducts. We have to re-fill the factory gaps around the ducting which is really made from 1/4" mini insulation board taped together. They just pumped the gaps filled with silicone. We may do something a little different with roof flashing and a final sealing bead of caulk.

There was a question about the height of the truss style rafter. The truss rafter is 4" tall at the center. The 4 1/8" you see is over the ceiling luan. The prior generation of 2 x 4 rafter would of been 3.5". So we gained 1/2" of center height with the truss setup.

So this is where we are at. Due to weekend conflicts, it will take a few weeks to get back to this.
Thanks for looking
John and Ben |
WOW WOW WOW!!! I sure do wish that was my trailer! When viewing your pictures it looks like a new unit being built at the factory! I wouldn't be afraid to bet you will have the best built Sunline in the world! I am overwhelmed with envy! Lol! if I won the lottery I would purchase a big warehouse and then search the country for used Sunlines and restore them. Some people like to collect cars but for me it would be Sunline trailers. Your Son will remember this experience for the rest of his life!
__________________
|
|
|
|
|
02-24-2016, 07:46 PM
|
#68
|
|
Senior Member
Join Date: Sep 2010
Location: Michigan
Posts: 854
SUN #1546
|
amazing!!!
__________________
 Joan & Miss Emme Lu Who
Full Timing in T-1950 2005 Anniversary Model
1997 6.5L Chevy Turbo Diesel Truck
"Pure Michigan"
Facebook: Apackof2 for the Rd
|
|
|
|
|
02-25-2016, 07:56 PM
|
#69
|
|
Moderator
Join Date: Nov 2006
Location: Ohio
Posts: 12,654
SUN #89
|
Quote:
Originally Posted by vcrt
So nice and neat! That Dicor rubber roof will be smooth and tight when it's done.
I'm sure it's frustrating to have to do this as time allows, staying away for weeks, then going at it again, but before you know it, spring camping season will be here, the roof will be complete and then the enjoyment begins!
Rich
|
Thanks Rich, you are so right, spring cannot come quick enough...
Quote:
Originally Posted by Bubbabc
WOW WOW WOW!!! I sure do wish that was my trailer! When viewing your pictures it looks like a new unit being built at the factory! I wouldn't be afraid to bet you will have the best built Sunline in the world! I am overwhelmed with envy! Lol! if I won the lottery I would purchase a big warehouse and then search the country for used Sunlines and restore them. Some people like to collect cars but for me it would be Sunline trailers. Your Son will remember this experience for the rest of his life!
|
Thanks Chuck, Yes it is coming out well. I expect the whole camper to be more rigid with tying the roof together like this with the decking. Won't know until we get a little further on it, but it for sure feels more solid.
The envy...LOL I said to my son, bummer you have the walk on roof now.  He said, "Well when we redo yours when needed we can convert the roof unless you want to do it now?" I said, well thanks but that will be a long time from now, I hope... LOL
Restoring Sunlines, now there is a thought!!! 
Quote:
Originally Posted by apackoftwo
amazing!!!
|
Thanks Joan.
__________________
Current Sunlines: 2004 T310SR, 2004 T1950, 2004 T2475, 2007 T2499, 2004 T317SR
Prior Sunlines: 2004 T2499 - Fern Blue
2005 Ford F350 Lariat, 6.8L V10 W/ 4.10 rear axle, CC, Short Bed, SRW. Reese HP trunnion bar hitch W/ HP DC
Google Custom Search For Sunline Owners Club
|
|
|
|
|
03-31-2016, 09:14 PM
|
#70
|
|
Moderator
Join Date: Nov 2006
Location: Ohio
Posts: 12,654
SUN #89
|
Between my work schedule being out of town, Ben's schedule helping out for family things and a few too cold of days touching metal tools (15F)... we made it back to the camper with some decent working temps. Were able to get 2 more days work into it.
First was to finish up the roof decking, The very first piece up front had to be custom fit at the joint as the sheet when flex over the rafters creates half of and ellipse kind of fit. So it needed to go up and down a few times to get it fit right. But it came out well. The joint if about a perfect tight fit the entire 8 feet.
You can see here the compound angle towards the front. Flat at the roof vent, then a slop to the front and a quick drop at the very front.

Here is the joint.
Then we had to check all screws for being flush with a putty knife and tighten any high ones. Then comes the sanding of all the joints, edges and blending in the sheet on the rear wall. There is a radius on the end of the sheet and we have this uneven gap to fill between the end of the plywood and the edge of the siding. It is 96 1/2 to 96 3/4" running length from siding to siding over the rafter. When the 96" decking is screwed down, the gap to the siding varies from 1/8" to 3/8" in places as the camper walls of not true the entire length of square always to the roof line of the camper like the plywood sheets are.

And the end wall. This was really out. A full 5/8" to nothing in some spots had to be blended across the 8 feet width. Belt sander with a course belt did quick work of the blending.

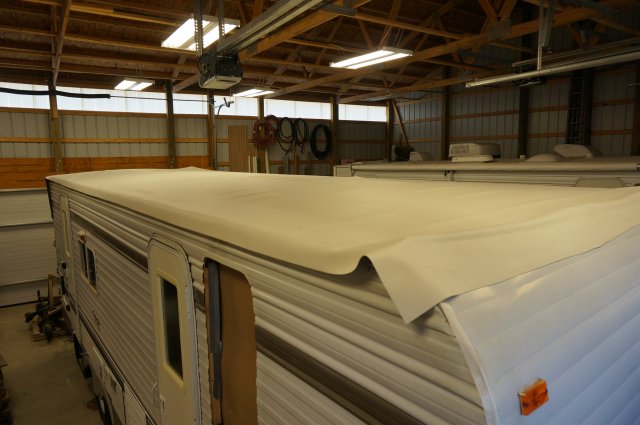
Then to check that the roof membrane fit and was the right length. Yes, it was the size PPL declared it as. Here is the test fit.

Then to deal with the side gap. Originally we were going to rip and fit a piece of clear pine board in this space. That proved to be not doable with so much variation across the length of the camper. The thought of using Dicor non leveling caulk rose to the top how to fix this. It bonds to aluminum and wood. Here is the first fill in progress. Need to go back and do a second one after it has shrunk and dried. With the decking being higher then the siding, we needed to deal with this transition. Sunline doing this at the factory would of just raised the siding higher and not had this transition issue.

This is it for the roof decking until the temperatures get more stable and high enough for the membrane glue.
We also cleaned up a lot of the molding and gutter rail. Scrape off the old putty tape off, clean up the molding and flatten out the screw holes to be ready to install. Cleaned up a few windows too to get ready to install.
The we moved onto the front lower siding. Next reply on that.
Thanks for looking
John and Ben
__________________
Current Sunlines: 2004 T310SR, 2004 T1950, 2004 T2475, 2007 T2499, 2004 T317SR
Prior Sunlines: 2004 T2499 - Fern Blue
2005 Ford F350 Lariat, 6.8L V10 W/ 4.10 rear axle, CC, Short Bed, SRW. Reese HP trunnion bar hitch W/ HP DC
Google Custom Search For Sunline Owners Club
|
|
|
|
|
03-31-2016, 09:49 PM
|
#71
|
|
Moderator
Join Date: Nov 2006
Location: Ohio
Posts: 12,654
SUN #89
|
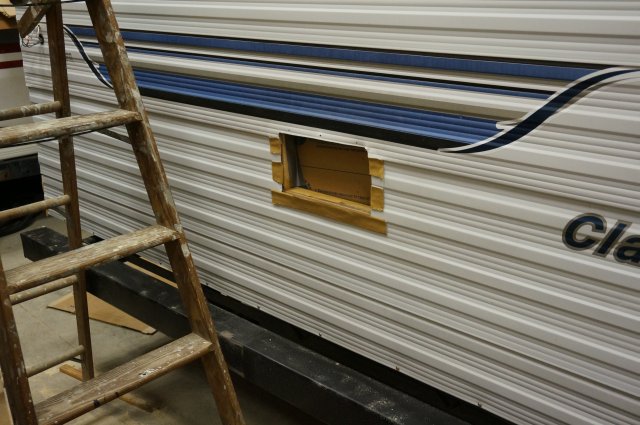
Next was to install the new diamond plate upgrade on the lower front. Ben found these 2 x 8" sheet 0.040 thick. It came out well.
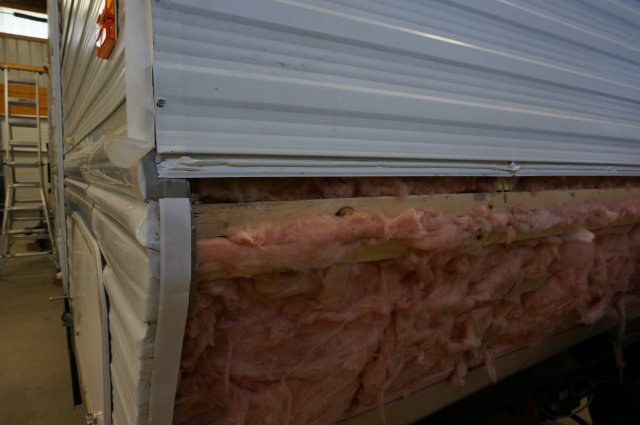
First we needed to deal with the lack of insulation in certain areas. Here is were Sunline had it. Notice the crack of no insulation between the upper wall and the lower at the angle bend. On our camper when we winter camp, that 1/2" wide strip gets condensation in the front bedroom along the wall. Now know why. No insulation. There is also no insulation at the bottom area. Assume this is because if water gets in, fiberglass will turn into mush. Or they just decided to stop there... as it is a front cargo hole.

Stated with filling in the gap at the wall transition and then using foam insulation board at the bottom area. I had a left over part of a sheet and it fit perfect.

Also noticed this water stain. Water had wicked in the front lower siding screws. Not a lot, but yet some. There was no prevention method used to seal this area. That changed when we put the diamond plate on.
Foam board all in place

Now insulation complete

Now ready for the last siding strip. Needed to butyl caulk the joint like before and butyl tape on the ends
Now the angle transition panel on.

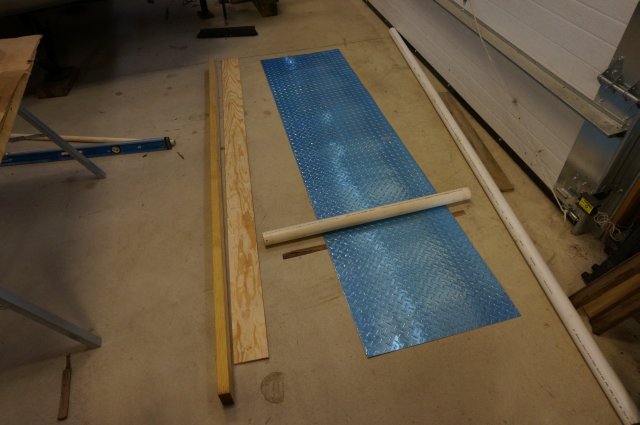
The diamond plate comes rolled and you need to flatten it out. We use a super clean flat concrete floor, an 1/8" luan strip 3 feet wide under it and 2" PVC pipe to roll it and force flatten in the high spots. We also used a 10ft pipe on long direction with a 3/4 pine board under it to put a slight bend the 8 foot ways to stiffen it up.
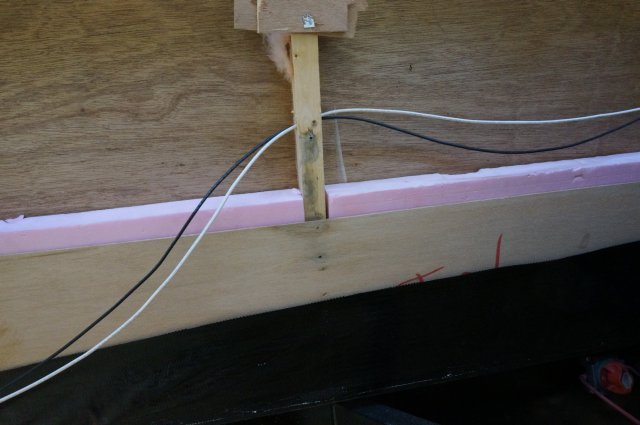
Next was to mark and fit the sheet around the A frame and 12 volt junction box. Marked it and cut out the notches. Ben found a carbide blade made for cutting aluminum sheet and we use my old circular saw. It cut like butter. Plunge cut and all.


Next was to butyl tape the area and build us the locations at the front studs to be even across. Added 1/8" filler strips stacked to a thickness needed like Sunline did to be flat across the width and put butyl tape at the screw locations. Also pre-marked the wall stud locations... Remember to do that now...

We had the fit so good that we had to flex the sheet in the middle to get it to go up into the siding overlap. Came up with using a 1 x 4 x 8ft board in the center so we can bow it out and create shorter vertical height.

You can see here on the dry run test fit.

Now we are ready to "stick" it on. Need more butyl caulk and to take off the release paper on the stud spots. We left the side and bottom release paper still on
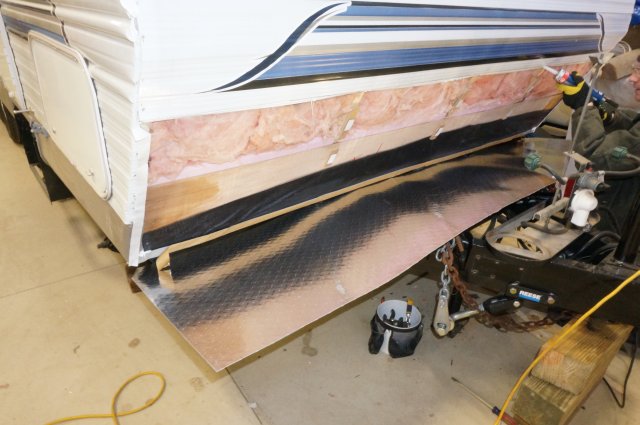
Put the sheet up, shove it up into the siding and then pull the side and bottom release paper.

Next was to mark the holes in the studs. Did this 6" down and 12" down from the joint to line up with the stacked 1/8" spacer and butyl tape under the diamond plate sheet.

Now to waterproofing the screws. Start with stainless screws and a strip of butyl tape

Screw in

Tape squirts out

Trim off

The ends under the corner molding we stapled

The final look

We also left the sheet go below the bottom of the camper wall to act as a drip edge. Sunline stopped the siding at the bottom of the wood wrap. Well, water running down the wall could wick under the original siding and if any hole was in that membrane, in it would go. This drip edge length should help stop that.

So that is it for now. Maybe more this weekend.
Thanks
John and Ben
__________________
Current Sunlines: 2004 T310SR, 2004 T1950, 2004 T2475, 2007 T2499, 2004 T317SR
Prior Sunlines: 2004 T2499 - Fern Blue
2005 Ford F350 Lariat, 6.8L V10 W/ 4.10 rear axle, CC, Short Bed, SRW. Reese HP trunnion bar hitch W/ HP DC
Google Custom Search For Sunline Owners Club
|
|
|
|
|
04-01-2016, 04:55 AM
|
#72
|
|
Senior Member
Join Date: Aug 2006
Location: Maryland
Posts: 838
SUN #37
|
Coming along, looking good!
I remember speaking with LaRue at Sunline once and she mentioned that she's watched the workers installing the rubber roofing and after they secured one end, they clamped the other end into a fixture pulled by some sort of cable puller, like this I would think: Maasdam Pow'R Pull 2-Ton Cable Puller - import-CAL-2 - The Home Depot
That method might make it easier to eliminate wrinkles.
It reminds me of the many vinyl tops we installed in my shop in New York back in the 70's and 80,s. We did some long vehicles too like limousines. Both surfaces were glued completely, allowed to dry for 10 minutes or so depending on temperature and humidity and then several of us would center the fabric, then pull in opposing directions to eliminate all wrinkles and then lower down onto the roof, slick it out and trim the excess.
Rich
__________________
1992 T-2470 (now residing in South Carolina)
Current Sunline-2007 Solaris 2499
2018 Silverado 1500 w/Max Trailering pkg.
|
|
|
|
|
04-01-2016, 04:59 AM
|
#73
|
|
Senior Member
Join Date: Aug 2006
Location: Maryland
Posts: 838
SUN #37
|
One more thing, it would probably be helpful, given the large surface area on a trailer, to lay some sort of barrier on the roof first (sheet plastic, pieces of rigid board like masonite etc.) which could then be pulled away as you are pressing it down. That way the rubber would not stick to the roof until you wanted it to.
Rich
__________________
1992 T-2470 (now residing in South Carolina)
Current Sunline-2007 Solaris 2499
2018 Silverado 1500 w/Max Trailering pkg.
|
|
|
|
|
04-01-2016, 05:06 PM
|
#74
|
|
Moderator
Join Date: Nov 2006
Location: Ohio
Posts: 12,654
SUN #89
|
Hi Rich,
Thanks for the good words
The come along pull you mentioned from LaRue, H'mm, have not heard about that. I made an assumption Sunline bonded the rubber to the budboard when it was on the ground. Then hualed that up on the roof. Ben's camper looked for sure it was built that way the way the staples were through both the rubber and the bud board.
Now in that case, they may have needed to pull the budboard/rubber membrane combo. I could see that stiff budboard needing a tug.
The rubber itself with no budboard, well no I do not think that by itself would want heavy pulling. Think this stuff is like a tire tube.
By the Dicro instructions they state not to pull the length hard, but you can pull the side when attaching the side molding.
Dicor EPDM Rubber Roofing | Dicor Products | Official Website
The glue tha we bought of theirs only goes on the wood and then you quickly pull the rubber over it. No air drying like some glues. It might be this newer type of adhesive you do differently then the older glues as I have heard before glues you do like you said. They are more of a contact cement setup.
Now we need some warmer days to come. This is water based glue. Dicro sells a roof kit, The kit was cheaper then the sum of the parts, so Ben bought one. And we added extra tape and caulk.
Installation Kit for EPDM and TPO Roofing | Dicor Products | Official Website
Thanks
John
__________________
Current Sunlines: 2004 T310SR, 2004 T1950, 2004 T2475, 2007 T2499, 2004 T317SR
Prior Sunlines: 2004 T2499 - Fern Blue
2005 Ford F350 Lariat, 6.8L V10 W/ 4.10 rear axle, CC, Short Bed, SRW. Reese HP trunnion bar hitch W/ HP DC
Google Custom Search For Sunline Owners Club
|
|
|
|
|
04-01-2016, 06:47 PM
|
#75
|
|
Senior Member
Join Date: Nov 2006
Location: New York
Posts: 2,909
SUN #93
|
Ben found a carbide blade made for cutting aluminum sheet and we use my old circular
__________________
Kathy & Leo SUN 093
Central Adirondacks of New York
2013 Rubicon 2900 Toy Hauler
We loved our 2007 T-2499
2010 Ford F-350 4x4 Lariat Super Crew Dually Diesel

|
|
|
|
|
04-01-2016, 07:05 PM
|
#76
|
|
Moderator
Join Date: Nov 2006
Location: Ohio
Posts: 12,654
SUN #89
|
Kathy,
Here you go. $15.18 plus shipping unless you have Prime
http://www.amazon.com/gp/product/B00...s00&pldnSite=1
Here is the mfg web site
Non-Ferrous Metal / Plastic Cutting TCT Saw Blade
The teeth are not like a normal wood blade. The blade cuts small chips and is smooth. I thought we had to rip the entire length, but in our case, did not have too. However this blade would of cut that size with ease. We used the 80 tooth blade which is fine enough but can rip and cross cut with it.
Tell Leo I said hello and hope your project goes well.
John
__________________
Current Sunlines: 2004 T310SR, 2004 T1950, 2004 T2475, 2007 T2499, 2004 T317SR
Prior Sunlines: 2004 T2499 - Fern Blue
2005 Ford F350 Lariat, 6.8L V10 W/ 4.10 rear axle, CC, Short Bed, SRW. Reese HP trunnion bar hitch W/ HP DC
Google Custom Search For Sunline Owners Club
|
|
|
|
|
04-02-2016, 06:57 AM
|
#77
|
|
Senior Member
Join Date: Aug 2006
Location: Maryland
Posts: 838
SUN #37
|
John,
On the subject of the rubber pre-glued to the budboard, I never gave that a thought but now that you mentioned it, it makes sense. The heavy pull would only be needed with that assembly, not with the rubber alone. Yes, I see in step 5 of the instructions they say don't stretch the rubber.
The 3M contact adhesive I use is solvent based. I tried water based years ago and it wouldn't work for my applications. I never tried it again since the solvent based adhesive works so well. The fumes are what I was trying to get away from. I guess the water based adhesive works on the principle that water will escape when solvents will not? That's beyond my expertise anyway.
Rich
__________________
1992 T-2470 (now residing in South Carolina)
Current Sunline-2007 Solaris 2499
2018 Silverado 1500 w/Max Trailering pkg.
|
|
|
|
|
04-02-2016, 06:58 AM
|
#78
|
|
Senior Member
Join Date: Nov 2006
Location: New York
Posts: 2,909
SUN #93
|
thank you John
__________________
Kathy & Leo SUN 093
Central Adirondacks of New York
2013 Rubicon 2900 Toy Hauler
We loved our 2007 T-2499
2010 Ford F-350 4x4 Lariat Super Crew Dually Diesel
|
|
|
|
|
04-09-2016, 08:56 PM
|
#79
|
|
Moderator
Join Date: Nov 2006
Location: Ohio
Posts: 12,654
SUN #89
|
Made it back to the camper. 2 more days of work. First was to start cleaning and prepping more parts to put back on. Onto the moldings and window frames. Scrape, scrape scrape all the old putty tap off, clean up with mineral spirits. On the moldings, flatten out all the deformed areas from the screws bending the metal and get them ready to put back on.
Total cleaning time has been at least 1.5 full days with 2 of us doing this over the course of the project. If you are paying someone to do this, buy all new moldings as the labor to clean up the old ones is worth more then new moldings. In our case, we spent the time verses the labor $$. We work cheap... We had a treat today, Cindy made fresh chocolate chip cookies for lunch
There was over 104 feet of just molding to clean....
Here is the cleaning process. Start with a molding piece like this

Then using a plastic scraper to not scratch the white aluminum, dig at it and then run with a rag and mineral spirits

Comes out looking like this, all cleaned up

After you get the entire pile done... then you need to flatted out all the deformed areas the screws left with the torqueing out process at the factory. Every screw hole has to be flattened.
We created an anvil and a top tamping bar. Had to use different sizes for different shapes so the molding would lay flat supported top and bottom. Here is the wide anvil. A piece of aluminum I had laying around C clamped to a table.
This works on the long gutter rails. The heavy piece of steel, stainless color looking with the 2 holes, goes on top and using the dead blow hammer, flatten out every hole.

Here is a different width setup for the roof top and the corner moldings. They have ridges in the molding and need a thinner anvil thickness to fit between the ridges.

It does not take much to flatten this aluminum. That is why it distorts so much during installation.
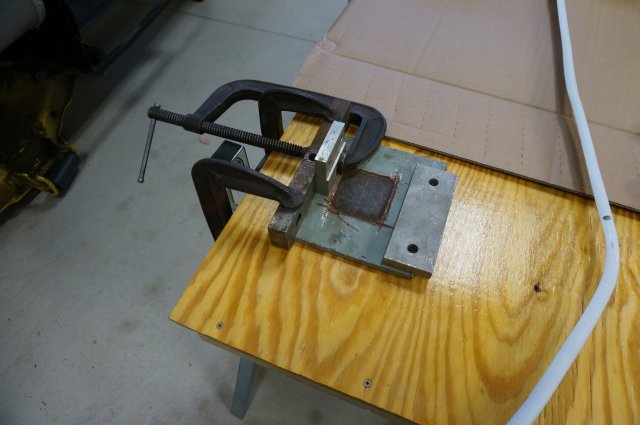
We also prepped the gutter rails for flat head screws. Later this summer, the Eternabond wrap will go over this area and the flat head screws make it easier and cleaner to do this upgrade process. I did this on my camper, but did it all on the camper up on a ladder by hand. Here we had the drill press setup to control the depth and do all the gutter rail a whole lot easier and faster.
The vise is setup with a left over piece of aluminum bar that can support of several feet of rail.

I started with wood in place of the aluminium but it did not cut a clean hole. With the stiffer metal, counter sinking the bar creates an anvil so to speak and supports the metal during countersinking to make a clean hole.

Then drill on...

All the moldings, windows, cargo holes, outside showers etc are all cleaned up. I'll use the next reply to show those being installed
__________________
Current Sunlines: 2004 T310SR, 2004 T1950, 2004 T2475, 2007 T2499, 2004 T317SR
Prior Sunlines: 2004 T2499 - Fern Blue
2005 Ford F350 Lariat, 6.8L V10 W/ 4.10 rear axle, CC, Short Bed, SRW. Reese HP trunnion bar hitch W/ HP DC
Google Custom Search For Sunline Owners Club
|
|
|
|
|
04-09-2016, 09:22 PM
|
#80
|
|
Moderator
Join Date: Nov 2006
Location: Ohio
Posts: 12,654
SUN #89
|
Now to mounting the windows, cargo hole etc.
You have to clean the siding and the window to get any residue off, especially any left over mineral spirits. Ben has some special car paint cleaner, cleans quick and flashes off quick and does not take the paint off. It works good.
Then to apply the butyl tape to the window. I had ordered a case of 1 1/4" wide to reset all the windows in our camper, so we where using this up. This 1 1/4" is wider then needed in many cases but it still works well and no issues of not covering.

We also put extra in the siding depressions. There were some areas on the original install that were suspect water could sneak in. Doing this uses a little more sealing tape, but there is no question you have good coverage.
Cut strips

Apply

Install window. This works well with 2 people. I have done it myself before, but with 2, it makes it much easier to center the window in the hole and then, press in place while the screw on flange inside is added.

Now to trim off the excess sealing tape. Again using a plastic scraper just trace around the frame.
Score the tape
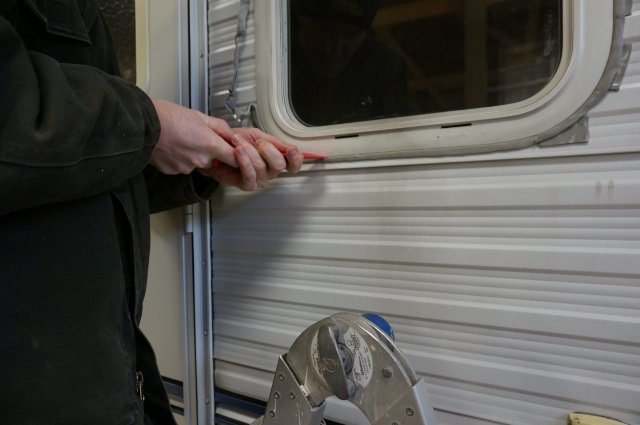
Peel off and clean up any excess and keep on going

Done

Now to the next area. The cargo hole
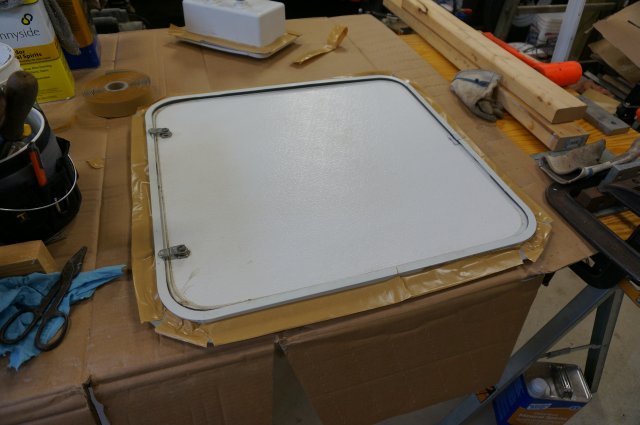

On cargo doors, we ice picked the old holes in the siding to line up the frame up. Start a few screws and take notice of the gap between the door and the frame. Using a large screwdriver, adjust the frame to be even all around the door. If you do not take care about doing this, the door can be tight on one side and mega gap on the other. The hinge flexes a lot and the frame will go where ever it wants to until screwed down.

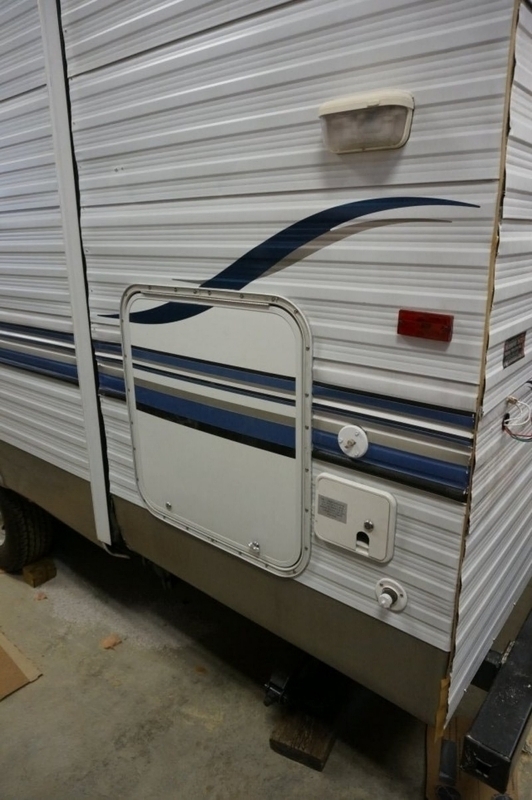
And done. Along with the shore power cord door and the fresh water inlet
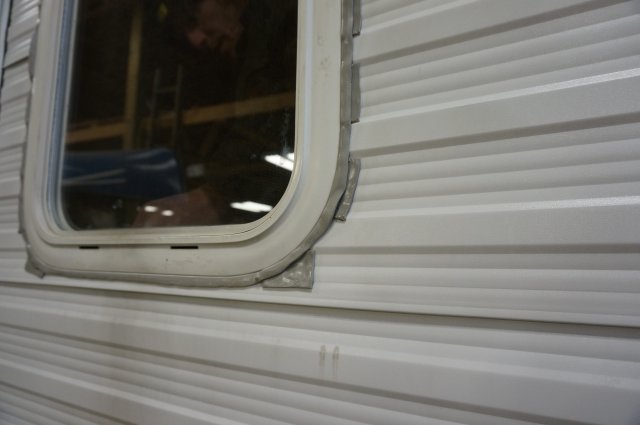
Now the bath window and the outside shower. This time I learned a new trick...  Open the window...Duh! It is a lot easier to hold in place with it open.


Window in place ready to trim

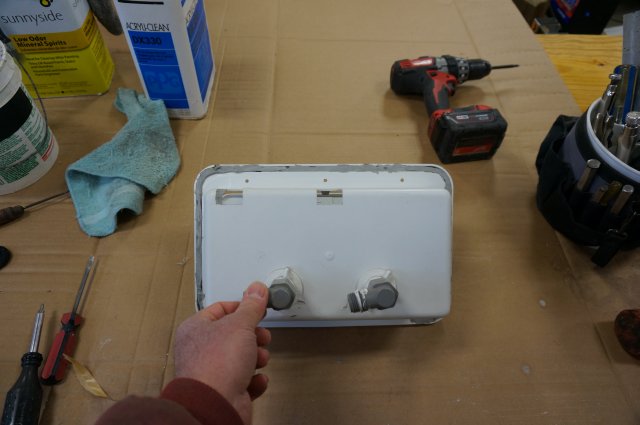
The outside shower. There was a leak around this when we took it off the camper. So we used excess butyl tape that we trimmed off the windows to fill the channels on the housing before lining the flange surface.

And both done.

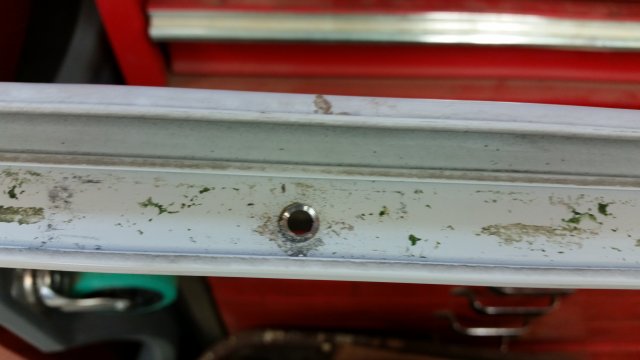
We also upgraded the rusted screws on the marker lights with stainless screws, which we are also using stainless on all outside screws as we go, and drill 2 drain holes in the bottom. I did this upgrade on mine and sure enough, Ben's camper had water filled lenses too when we took it apart. A good upgrade if you have not done this. We will also Dicor caulk the top and left and right vertical sides to help seal the lights to the camper.


Now we are done and just waiting for the temperature to rise so we can do the roof glue. Possibly this coming weekend.
Be back with more, after the next install.
John and Ben
__________________
Current Sunlines: 2004 T310SR, 2004 T1950, 2004 T2475, 2007 T2499, 2004 T317SR
Prior Sunlines: 2004 T2499 - Fern Blue
2005 Ford F350 Lariat, 6.8L V10 W/ 4.10 rear axle, CC, Short Bed, SRW. Reese HP trunnion bar hitch W/ HP DC
Google Custom Search For Sunline Owners Club
|
|
|
|
|
|
|
Currently Active Users Viewing This Thread: 1 (0 members and 1 guests)
|
|
|
 Posting Rules
|
You may not post new threads
You may not post replies
You may not post attachments
You may not edit your posts
HTML code is Off
|
|
|
|
 » Recent Sunline Discussions
 |
|
|
|
|
|
|
|
|
|
|
|
|
|
|
|
|
|
|
|
|
|
|
|


 Linear Mode

