 |
|
 07-04-2018, 08:05 PM
|
#1
|
|
Moderator
Join Date: Nov 2006
Location: Ohio
Posts: 12,649
SUN #89
|
2004 T2475 Repair - Project Camper No 2
The time has come to start the front wall water damage repair on Project Camper no. 2 and brake maintenance. A family member wants to use the camper the end of July so this created an accelerated “fix it” plan, at least for the front wall.
The back wall, roof and all the other larger repair work will come as a winter project. I will add detail to this to help others learn and what to look for in their own camper. This is a fun project camper for me and I am glad I found it. The inside is in good shape from prior owners taking care of it. Just they may not have known about some of the causes of water damage and how to prevent it.
I will do this mainly in pictures to help cut down on the typing. The front wall area has 5 areas of water intrusion.
- The top left roof corner seam – Minor damage
- The left corner molding – Medium damage
- The top right roof corner seam – Minor damage
- The right corner molding – Large damage
- The front window – Large damage
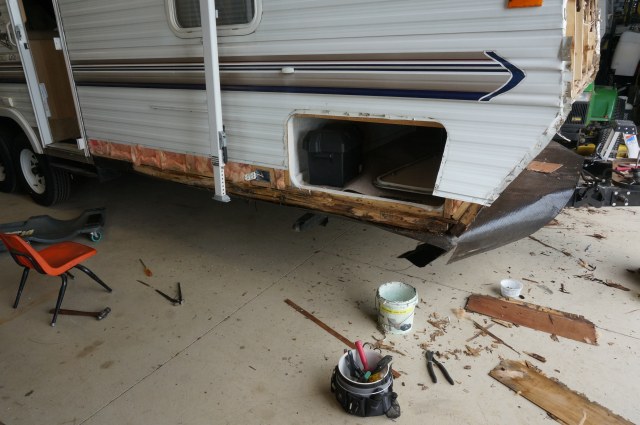
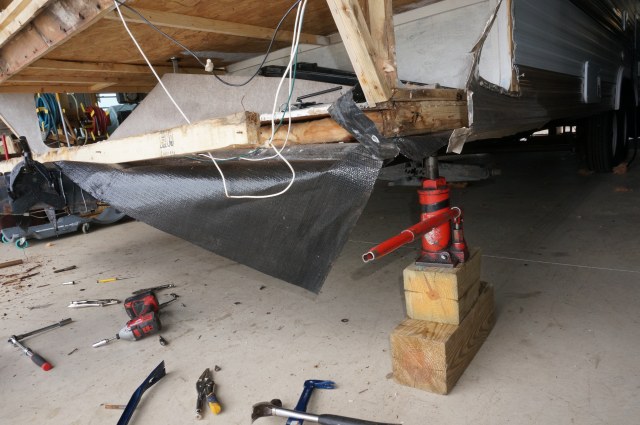
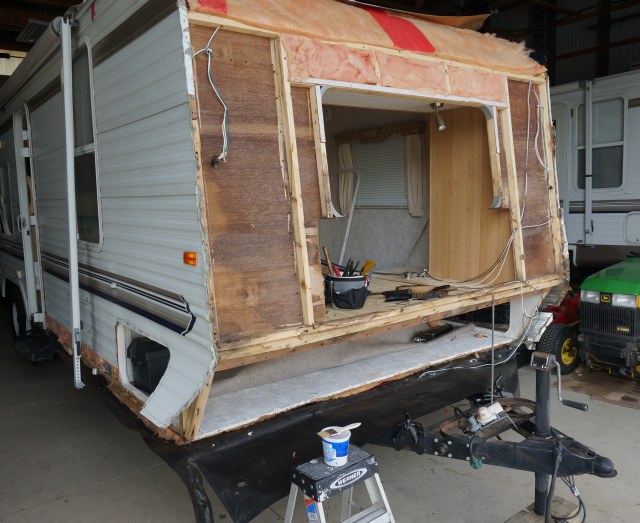
I will try to group the pictures to follow the areas of damage where it fits. I knew when I bought the camper the front wall was wet and that was not a problem for me. Since I knew I had to take the siding off, all the rest of the areas came along for the ride. At this point I have all the rotted wood out and ready to start repair process.
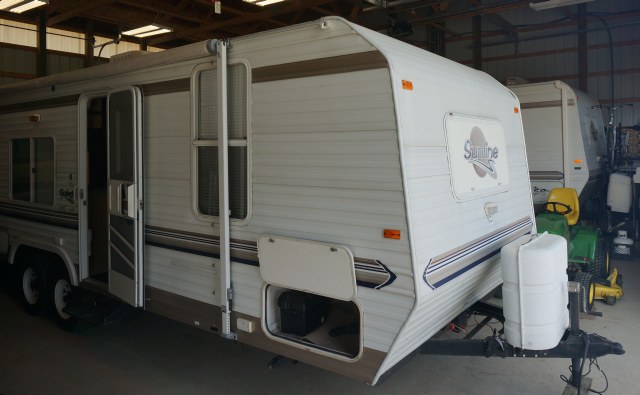
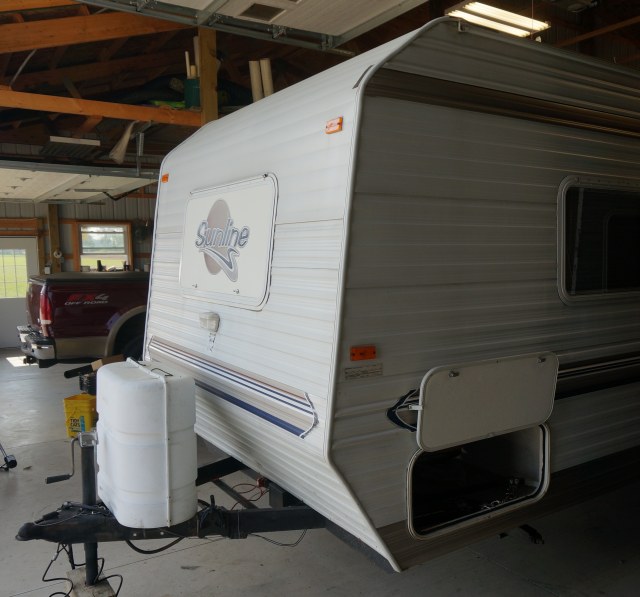
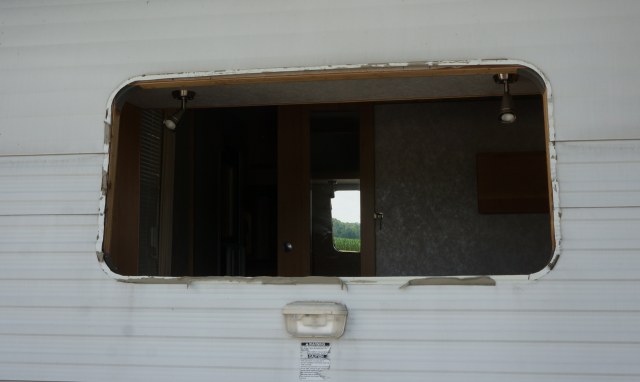
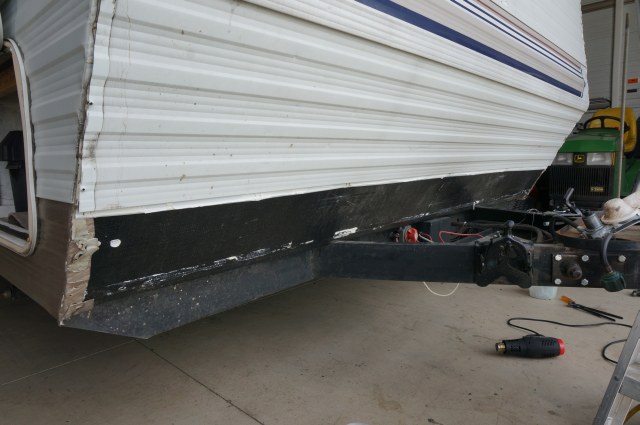
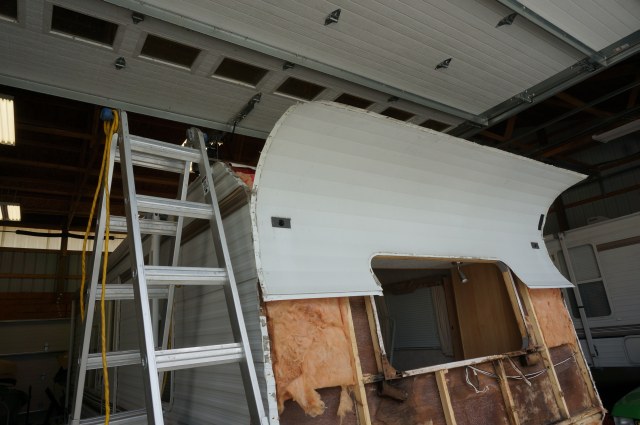
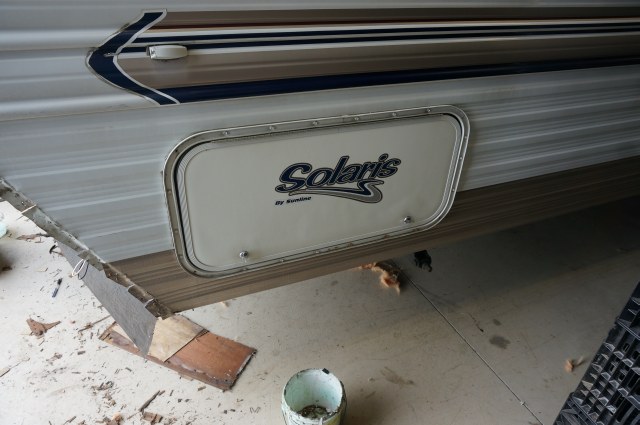
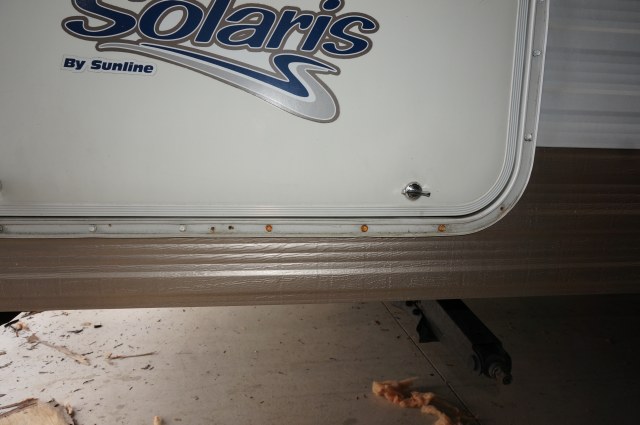
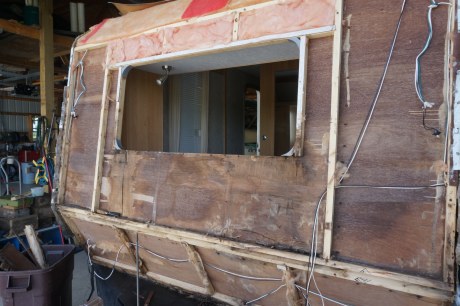
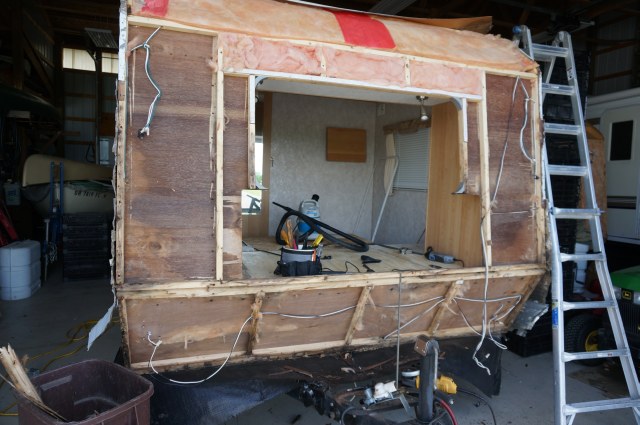
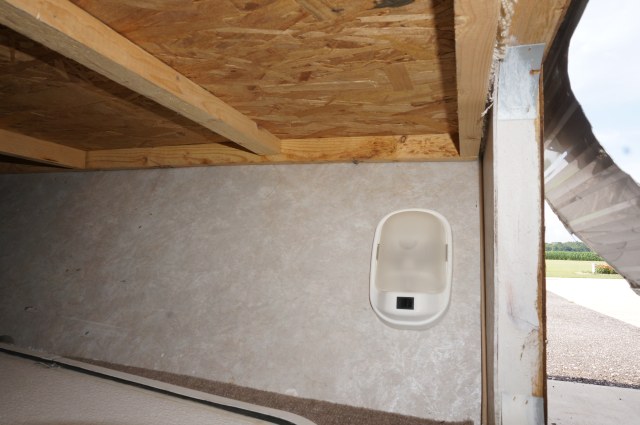
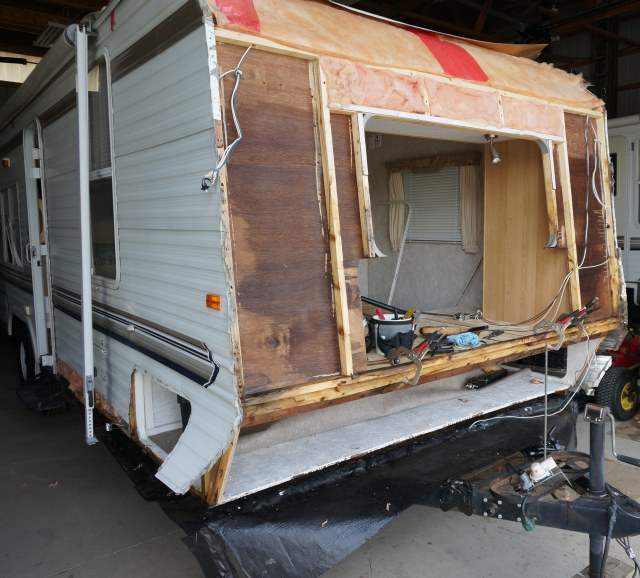
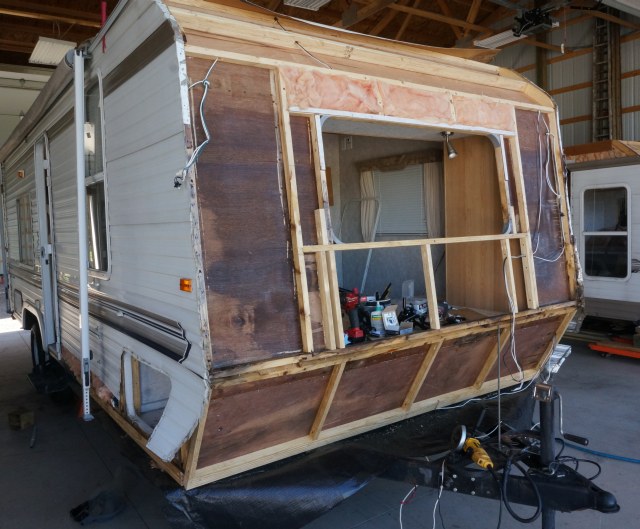
Here is the front wall area of the camper before disassembly.
I started with the top roof to front siding seam as this seam needs to be lifted to inspect for damage and to get front siding off. Using the moisture meter on the roof I could see low levels of moisture (15 to 20%) in the corner scanning from the roof down. The inside of the camper showed 0% in all areas inside the ceiling and the top sidewalls under this area. The caulking was deteriorated and needed to replaced.
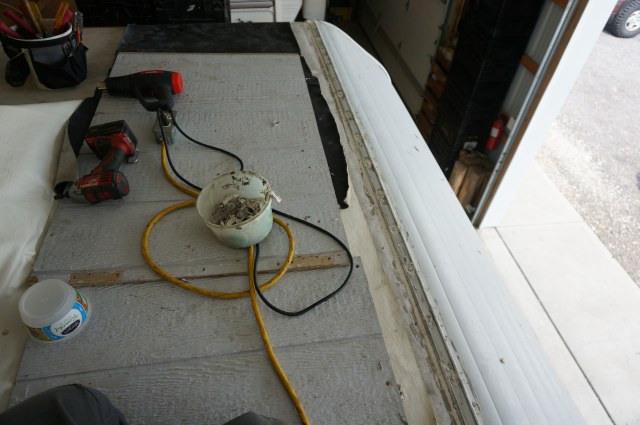
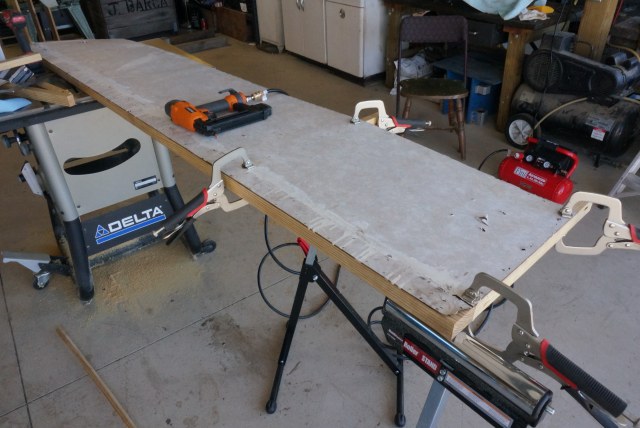
I start with placing tarps on the front area of the roof and 2’ x 4 ‘ plywood sheets so I can access the entire front seam.
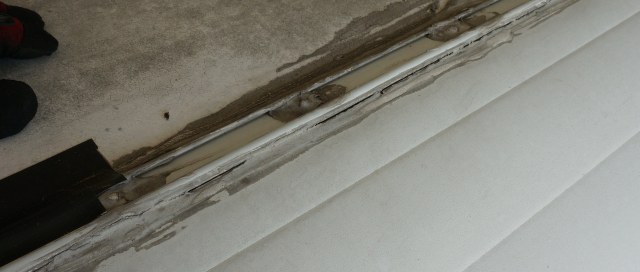
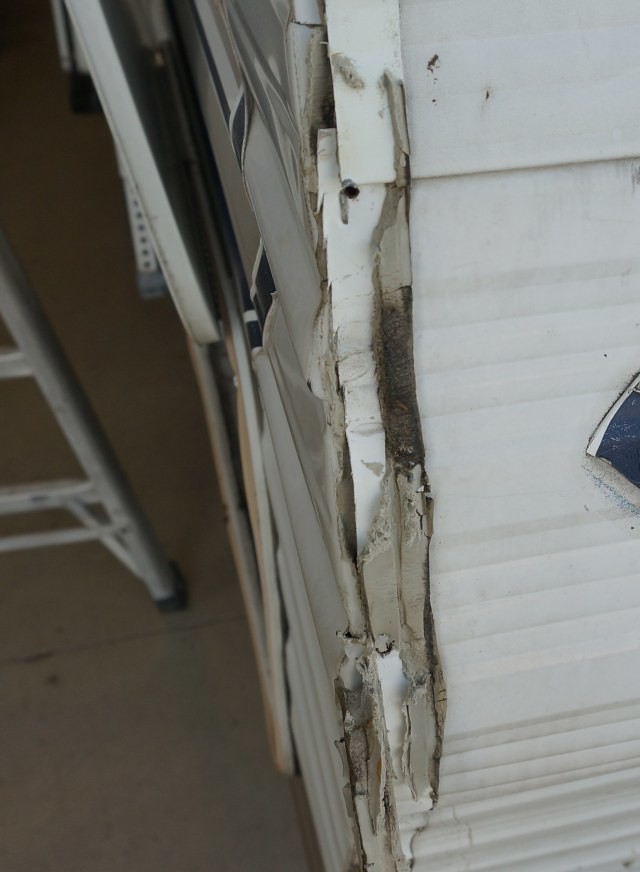
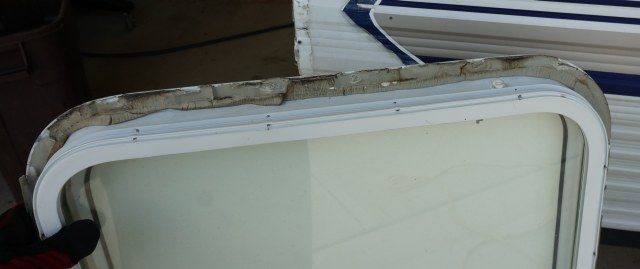
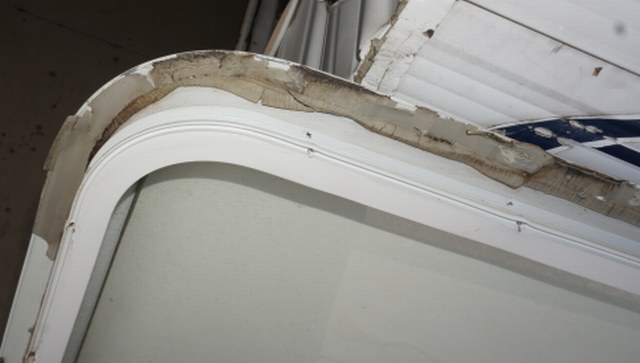
Next is the inspection of the left and right corners. This is what degraded caulking looks like. The sun UV rays really raises havoc on the caulk as the years go by. While some caulk was touched up along the way, it was not effective or enough. When the caulk gets to this stage it needs to be peeled up and new put down. This is past the touch up stage.
Top right side showing the degraded caulking.
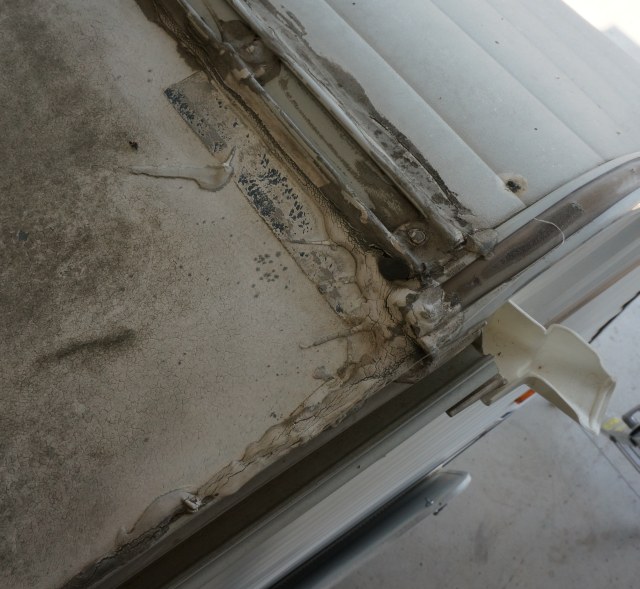
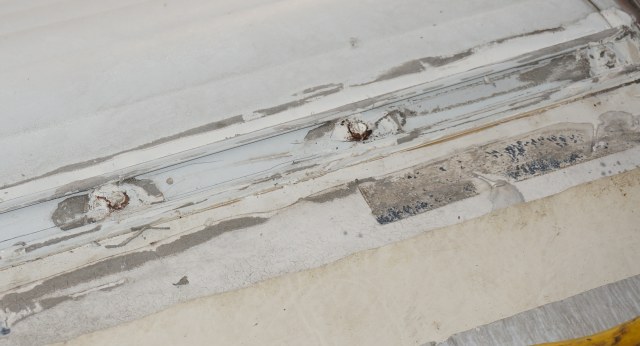
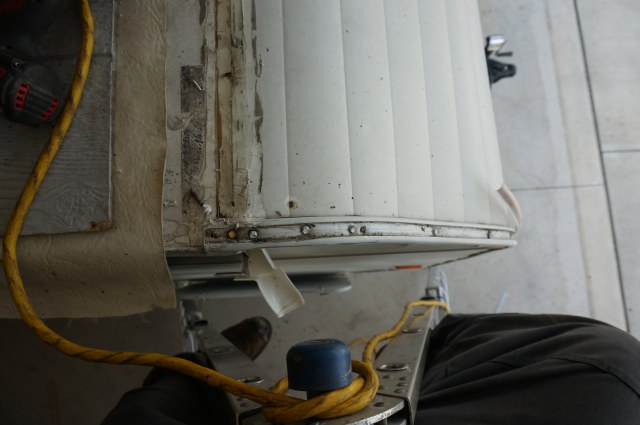
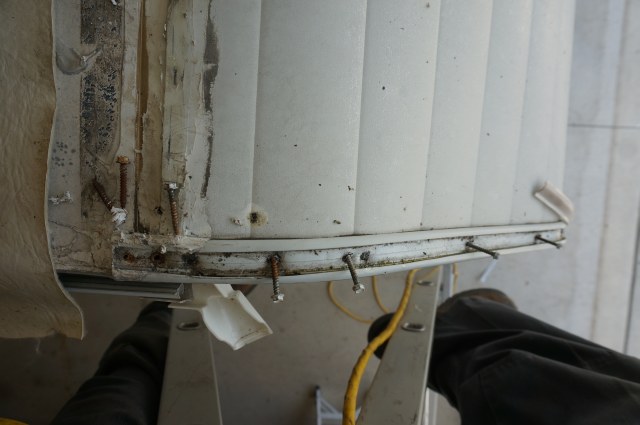
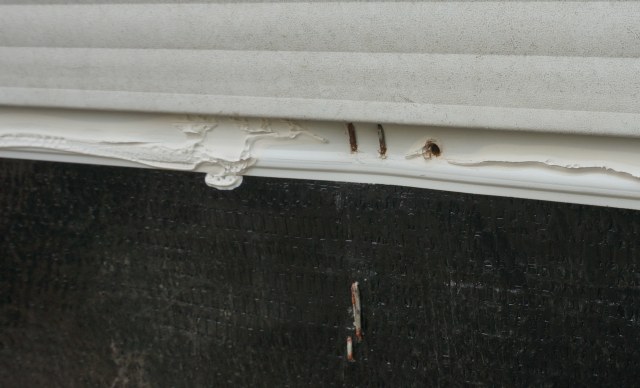
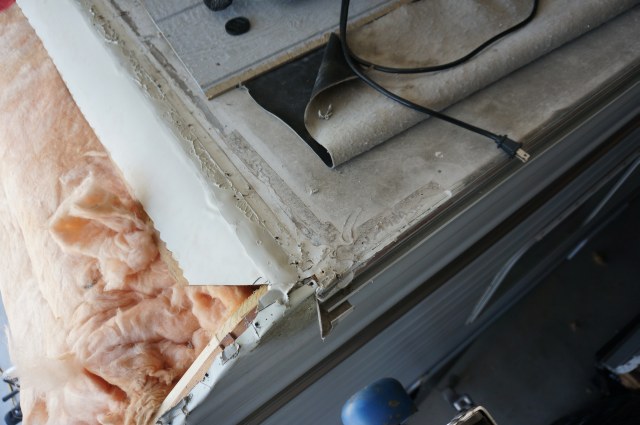
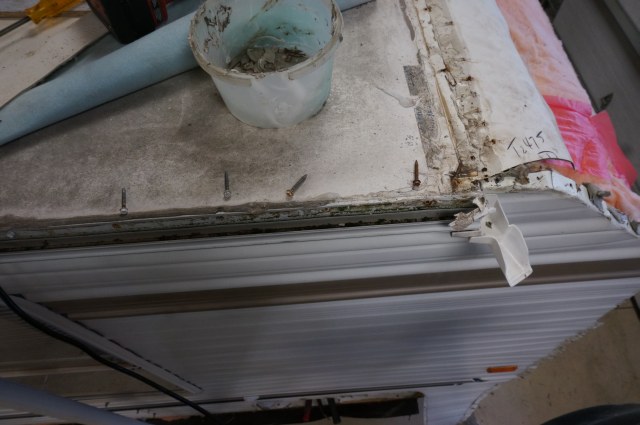
The front seam molding with shrunk caulking that created gaps to the molding.
A close up. As the years go by and the caulk shrinks and can separate from the molding as it did in this case creating a gap to the butyl sealing tape and the screws .
The top left side.
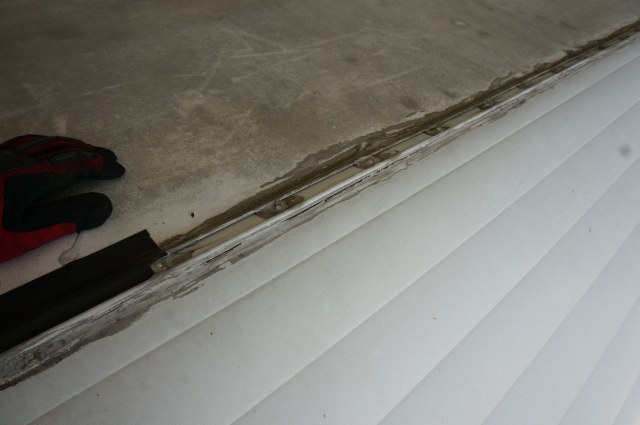
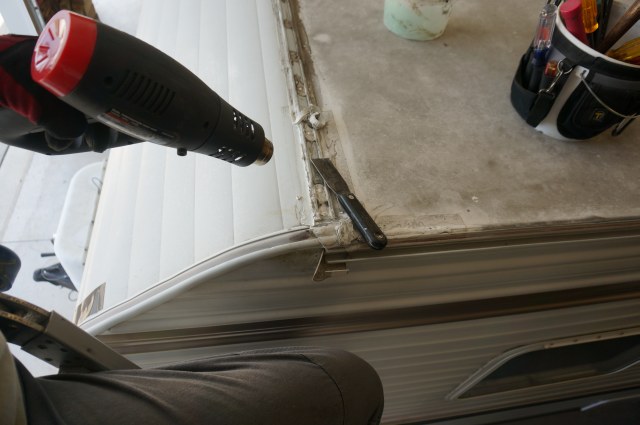
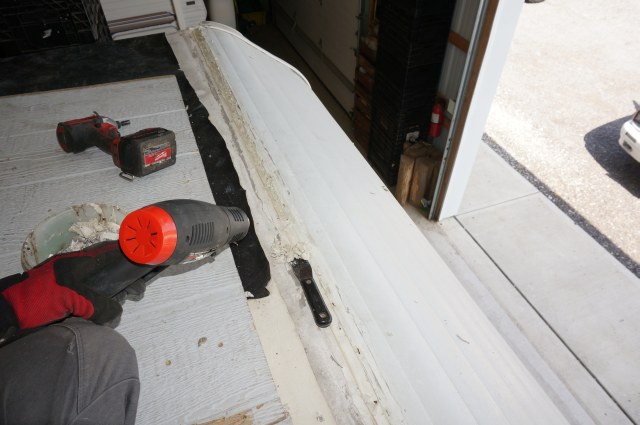
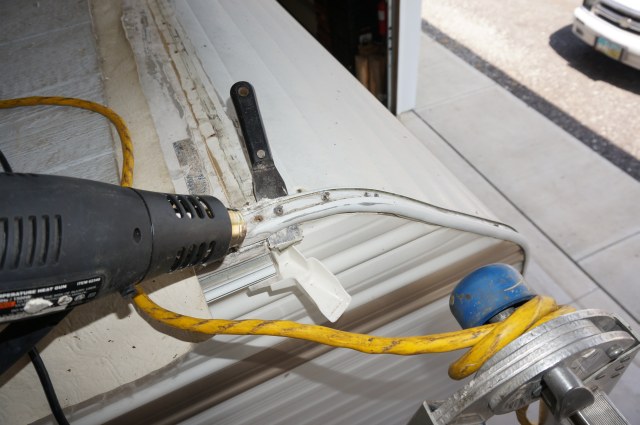
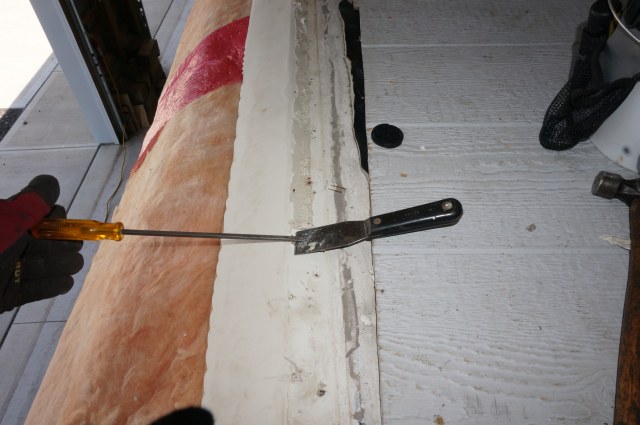
To remove the caulk, you use gentle heat and a very dull metal scraper. You have to dull over ever edge on the scraper blade to not dig into the roof. Heat come from a heat guns. Keep the gun moving not to stay in one spot long. You will get the feel of how much heat you need by how easy the scraper pushes. Point the heat gun in the direction you are peeling up to keep the heat ahead of you.
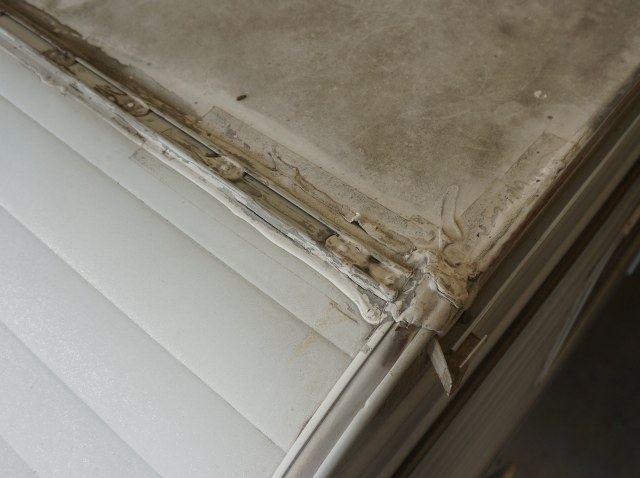
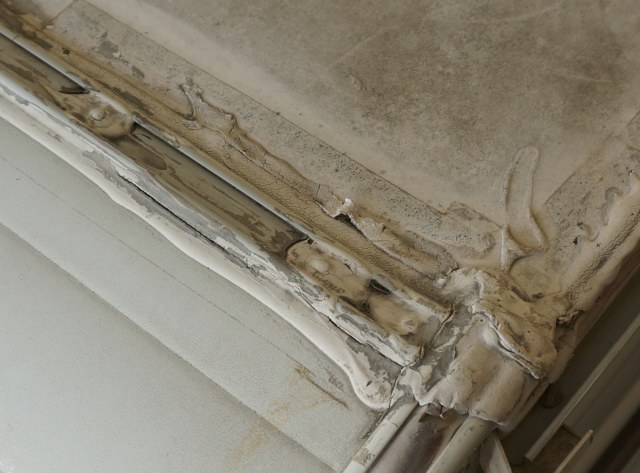
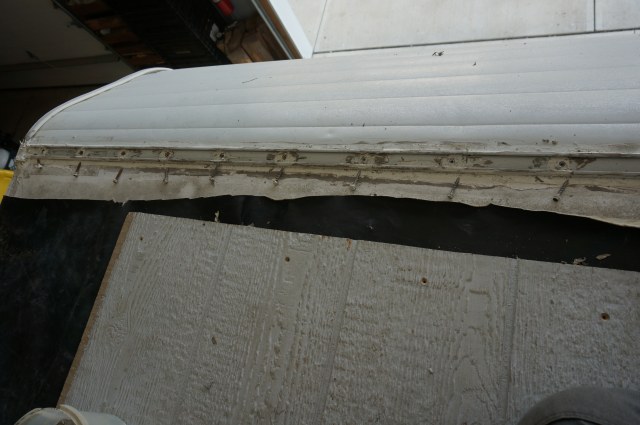
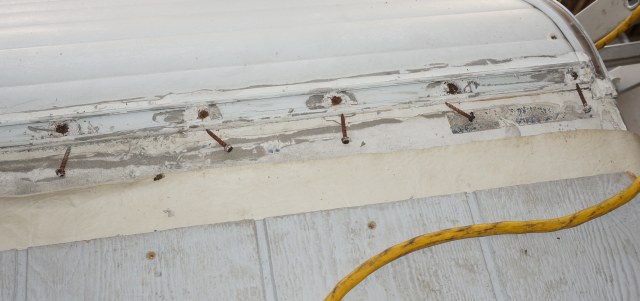
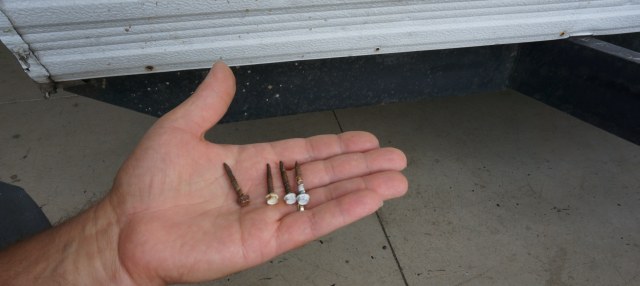
Here are rusted screw heads under the caulk. The cracks in the caulking allowed enough moisture to get in to rust the screw heads. This is the start of leak. The good news the front top corners just started getting moisture. I would estimate about 1 to 1.5 years ago.
Take notice of the rust on the screws. I put them next to the holes they came out of. Rusted screws are “one” of the ways a water infection starts. As the screws rust they can lose some of their holding power. Then the joint starts getting loose and soon water can work its way in.
Front left
Front right
The molding flipped over to show the rust stains which are at the sealing point of keeping water out.
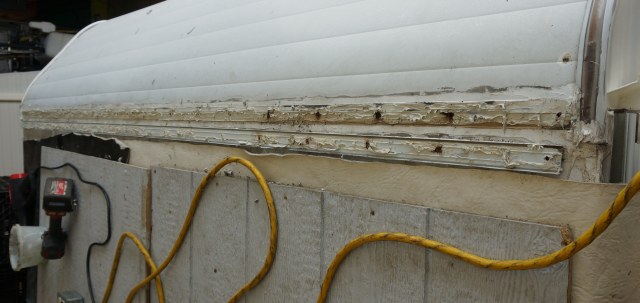
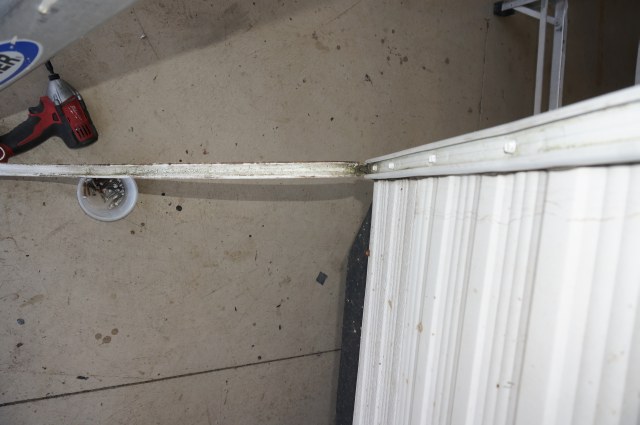
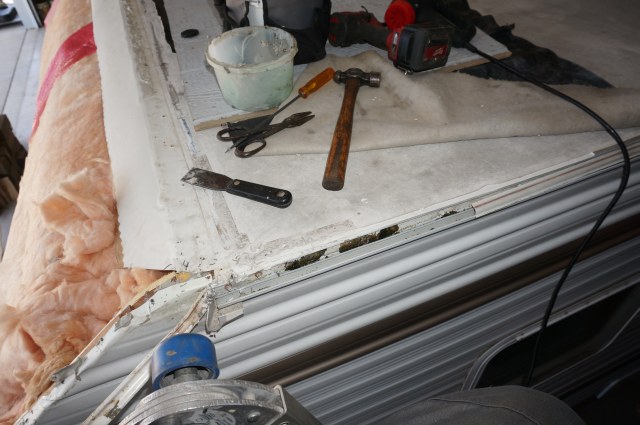
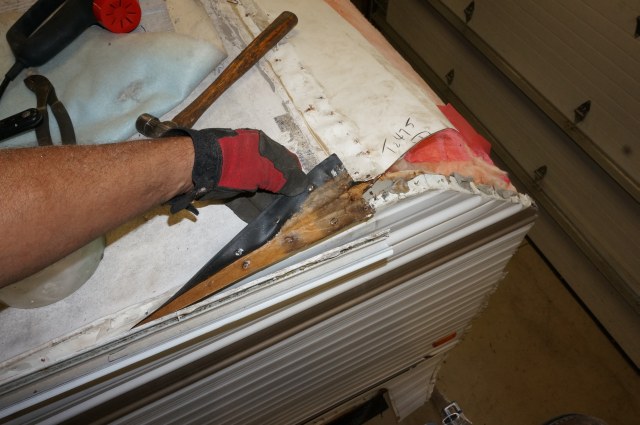
Once the front seam molding is up, you need to remove the butyl tape. Same process with heat and the scraper. Try and not use a lot of heat as excess heat will lift the glue between the rubber and the bud board liner under the rubber.
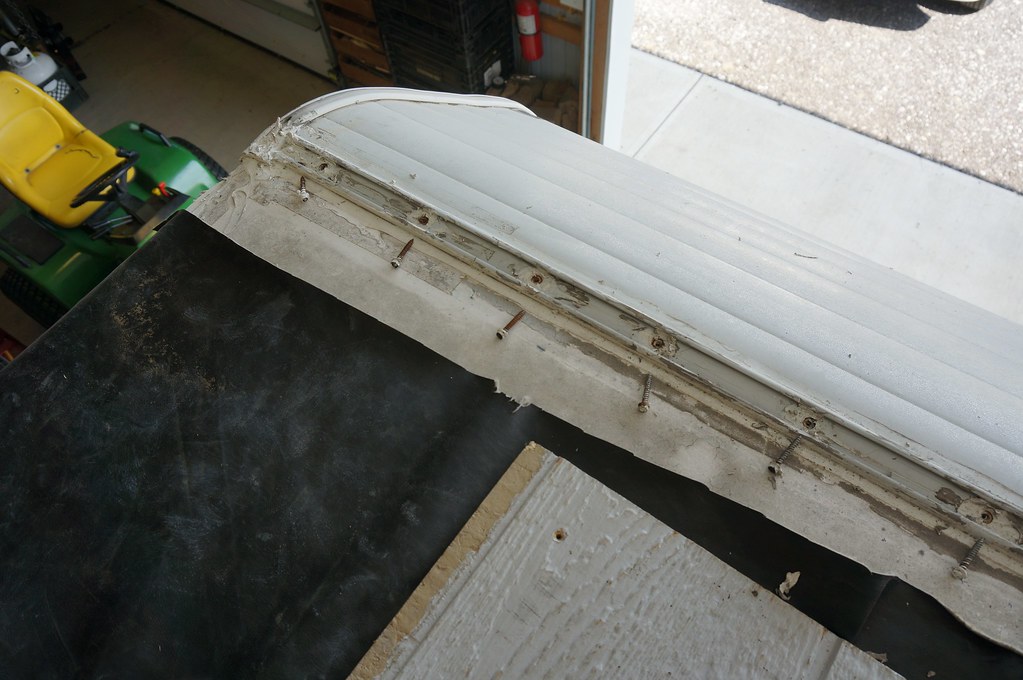
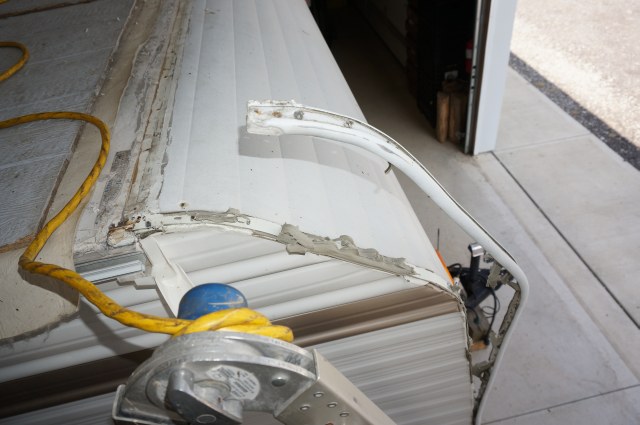
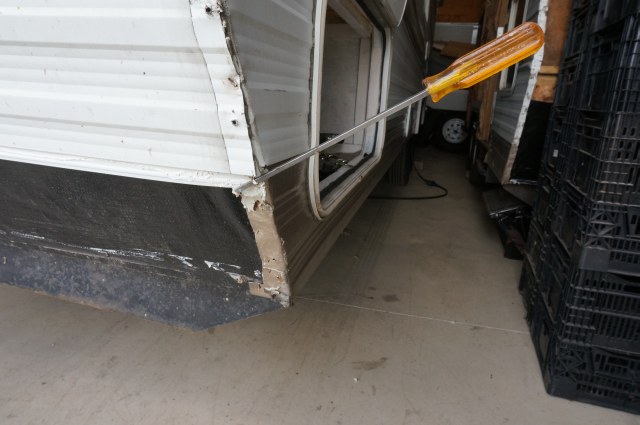
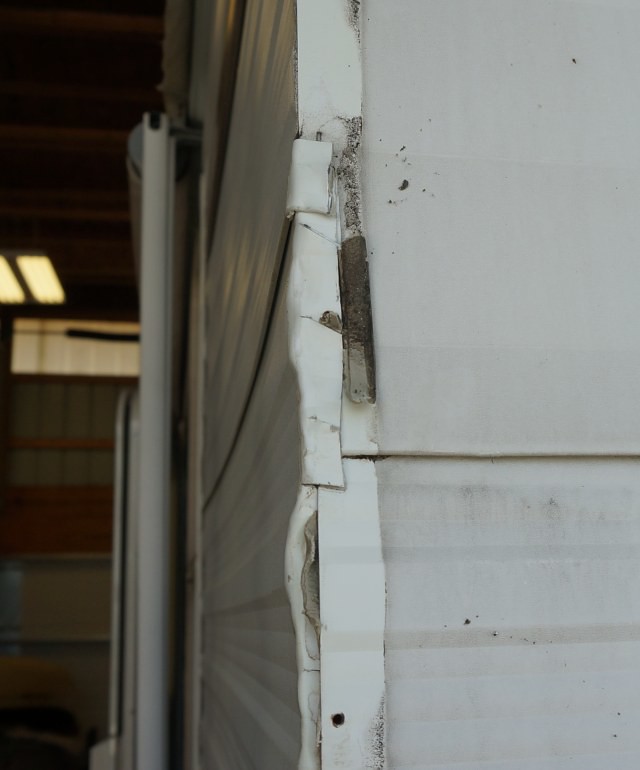
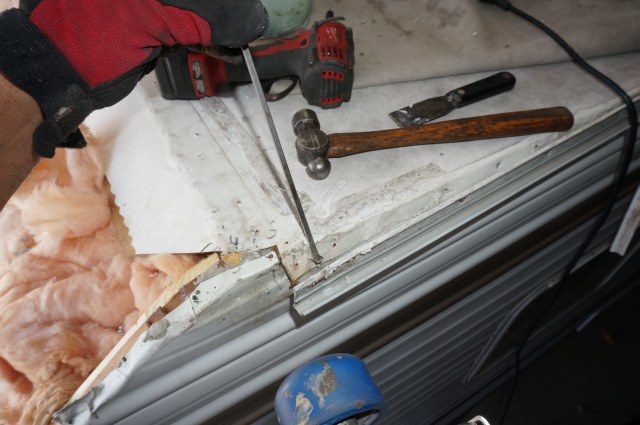
Next is to take up the corner molding. I start at the top and work down the molding. There is a vinyl screw cover that needs to come off. A screw at the top holds it from sliding down. See the rust on the screw.
More rusted screws under the cover
Another issue with the vinyl screw cover, it traps water, mold and crud behind it. Here it collects in the bottom, over time the screws start rusting. The cover needs a drain hole at the bottom
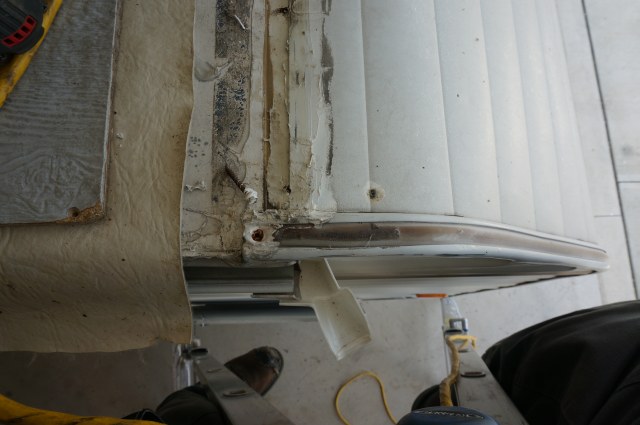
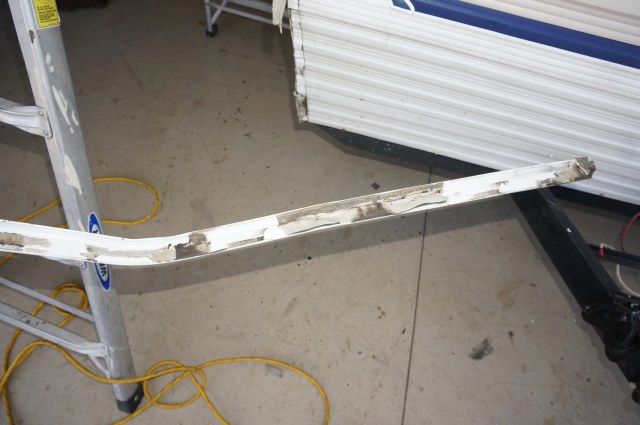
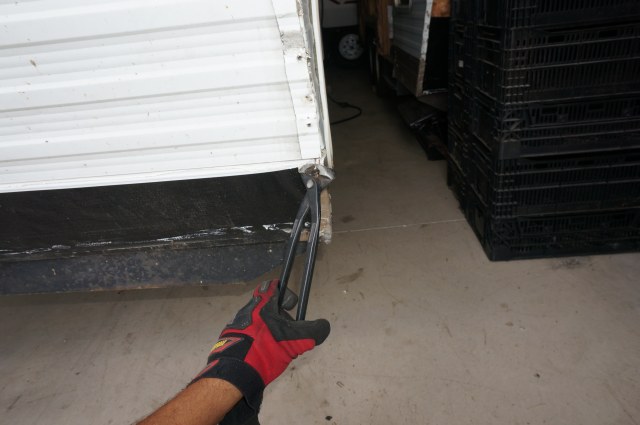
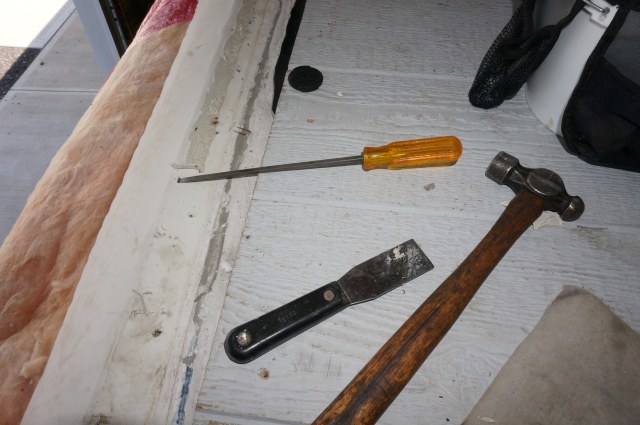
Once the screws are out, then warm the corner molding and gently lift it off
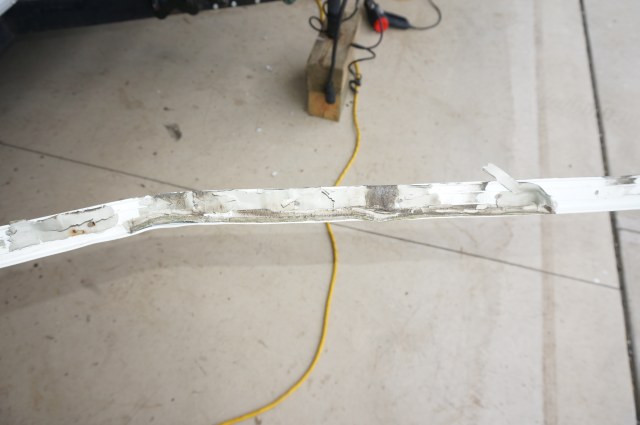
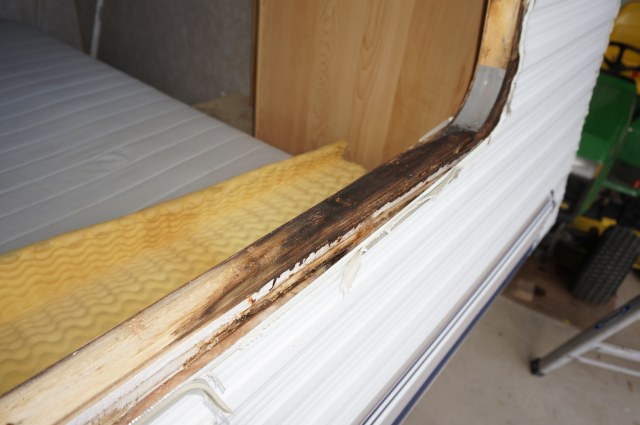
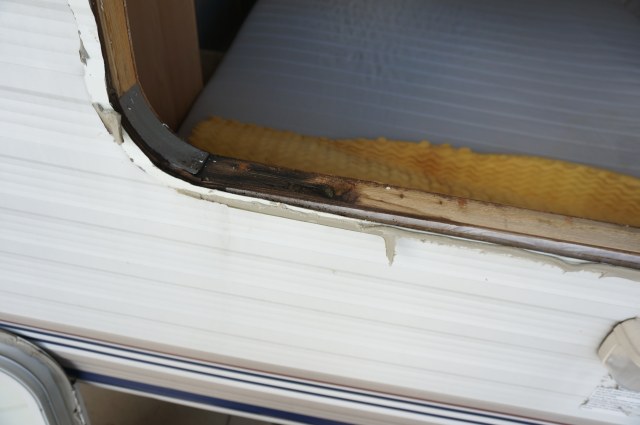
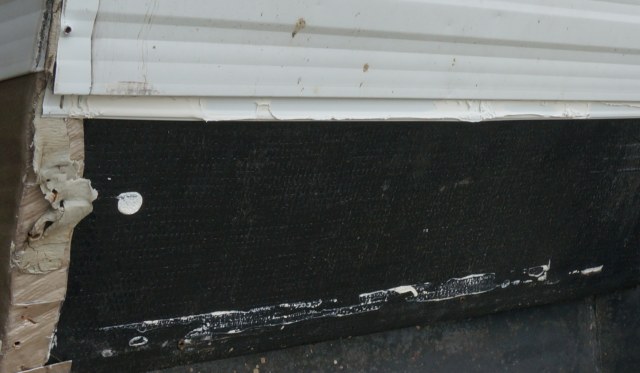
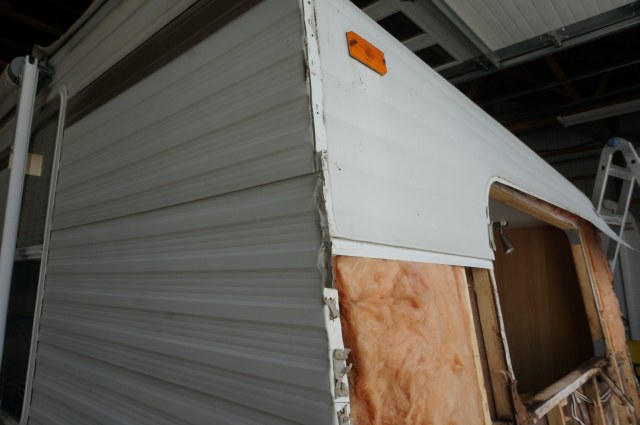
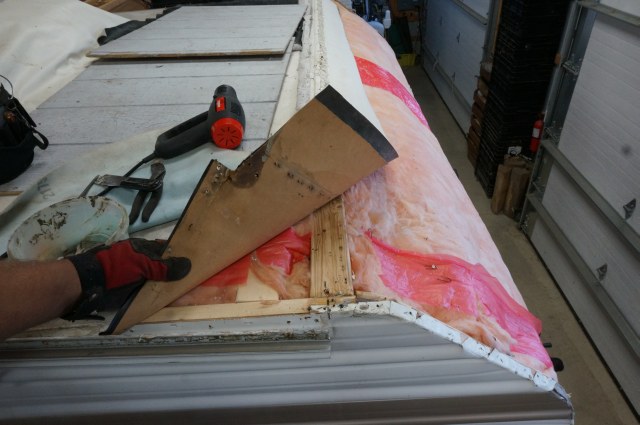
Here is the corner molding leak. The putty tape shrinks over time and separates from the molding or the siding. As the putty tape shrinks it cracks too. This is then a leak path. See the dirt on the siding or the putty tape. That dirt came with the water working its way into the corner. When the dirt line is all the way to the inside exists, a leak gets in. These leaks are old. Could be 8 plus years old.

See at the yellow clearance light area a full blown corner leak.
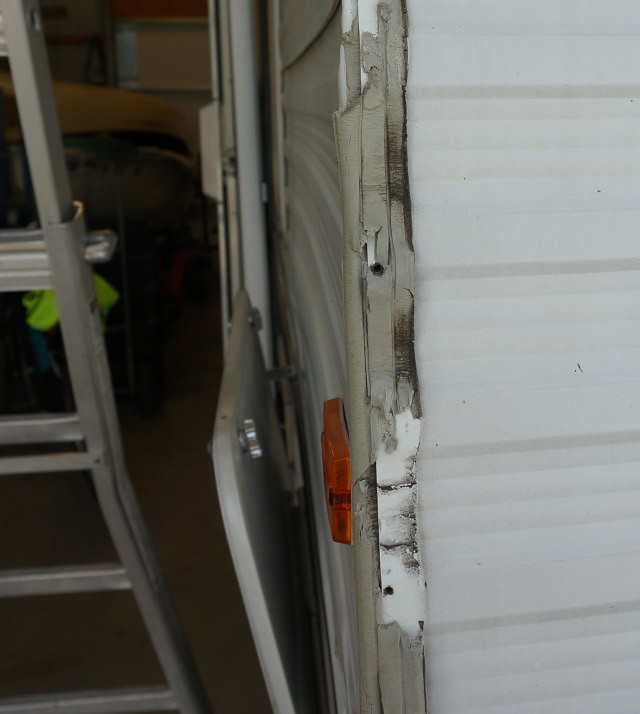
And another area
More in the next reply.
__________________
Current Sunlines: 2004 T310SR, 2004 T1950, 2004 T2475, 2007 T2499, 2004 T317SR
Prior Sunlines: 2004 T2499 - Fern Blue
2005 Ford F350 Lariat, 6.8L V10 W/ 4.10 rear axle, CC, Short Bed, SRW. Reese HP trunnion bar hitch W/ HP DC
 Google Custom Search For Sunline Owners Club
|

|

|
|
07-04-2018, 08:06 PM
|
#2
|
|
Moderator
Join Date: Nov 2006
Location: Ohio
Posts: 12,649
SUN #89
|
Next I took the front window out. Inside the camper you take the blinds down and the valances. There are screws holding the valance up.
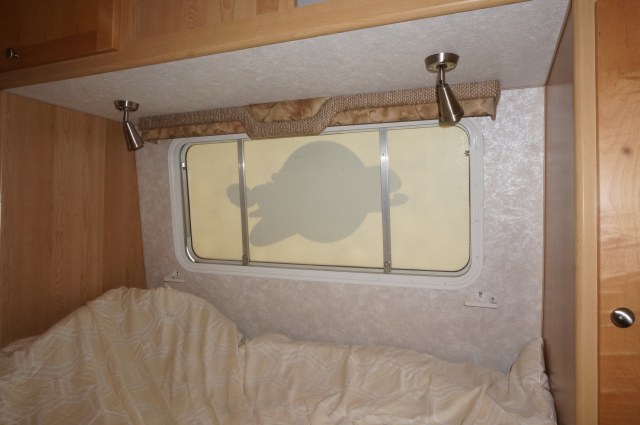
Looking up inside the valance to see the silver screw heads
Take all the inside window flange screws out and remove the flange
Outside, warm the window flange and gently pry. If it is not moving, heat some more it will let go.
This window had putty tape failures just like the corners. I will also water test the window glass seal but I can see the putty tape seal failures. Look at the dirt trail again across the sealing area right into the wall cavity.
Putty tape failure
Next is to start at the bottom front siding panel. The siding starts at the bottom and works up.
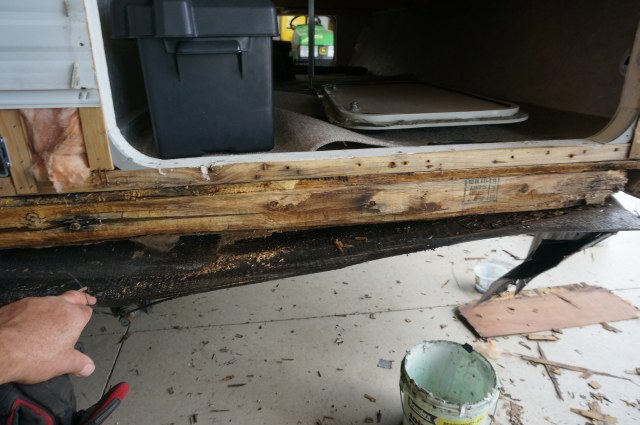
Back to rusted screws. These screws rusted from the inside out. The water from the corner molding and the window goes down until it stops at this screw area. Rusted heads on these bottom screws generally always points to a water infection inside.
The lower siding normally has putty tape or butyl caulk sealing it to the black Darco plastic membrane. You will need to heat that area to let it release and then gently pry it off.
Sunline also uses butyl caulk at the front walls siding joints. You have to heat the joint to get the siding sheet to come loose. Heat and gently pull it will let go once the staples are out.
To get siding staples out I use a high quality steel narrow enough for the staple and thin at the end. Tap under the crown of the staple to just lift the head up about 1/8”. Then grab with pliers or this end nipping tool I have found works the fastest, just do not squeeze too hard you will cut it.
On the newer campers, Sunline used 5/16” wide by 1” long staples on the siding. I use 1/4" wide to put back on as that was what my air stapler is.
Sunline usually has 2 staples per stud.
As you work your way up the siding you will find this joint between the last top large siding piece and the lower corrugated siding. Sunline made the long sides hang over and bend over this joint. Why exactly I’m not yet sure but the Sunline did this method a lot on the newer campers. All the ones I have had apart.
You need to straighten out the tabs so the top siding piece will release.
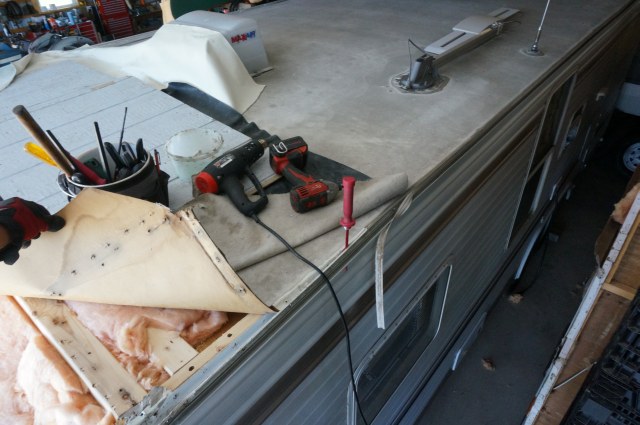
On the top siding sheet heads up, this is a large sheet. I start taking the top roof seam staples out first. Then the corners. “BEFORE” you take out all the side staples on the corners, I install a safety screw on each side. No need to screw flush but enough to hold the sheet. I add it up by the yellow clearance light.
These 2 screws will hold the sheet from falling off and bending all up.
If you have 2 people then not so much an issue, but with one person you need a process. I go to one end, hold the sheet and take the screw out and lower that end of the sheet down.
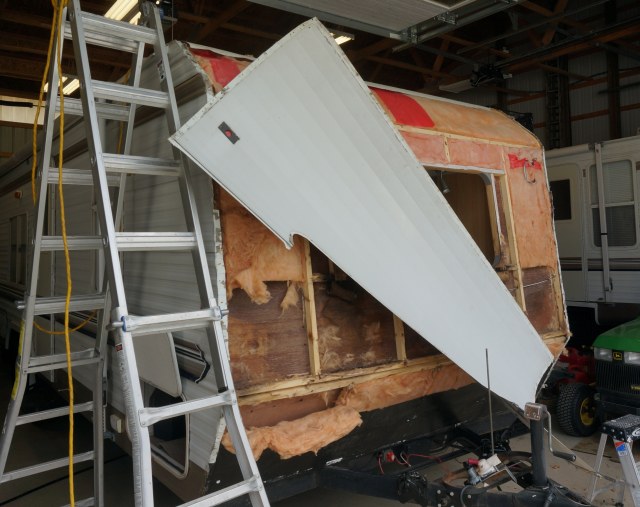
Then go to the other side, pull the screw and take the sheet down. One person can control this.
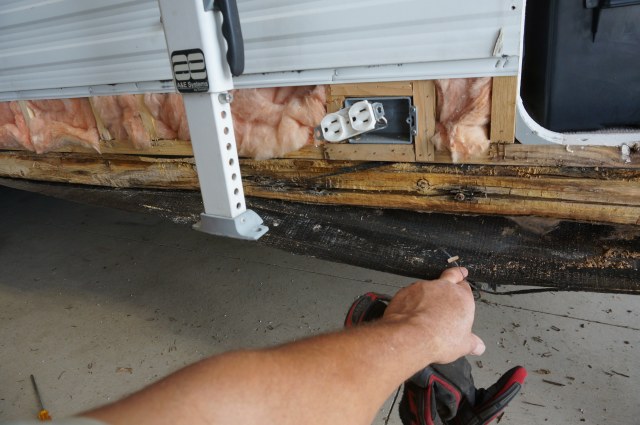
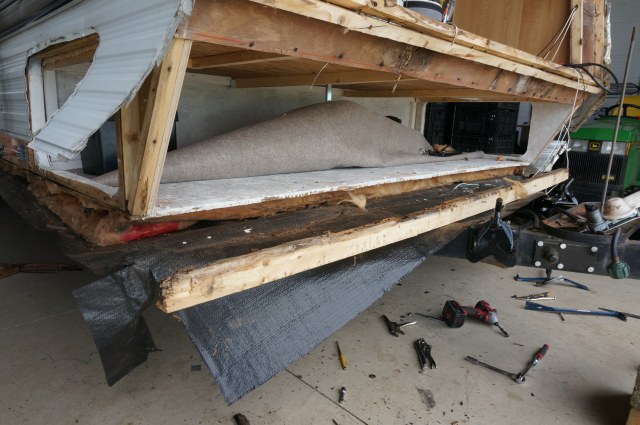
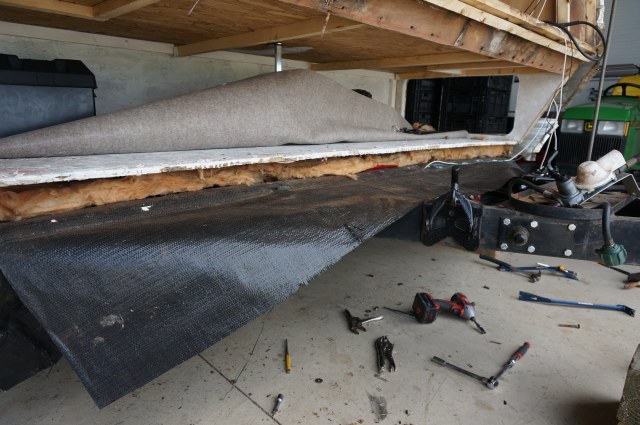
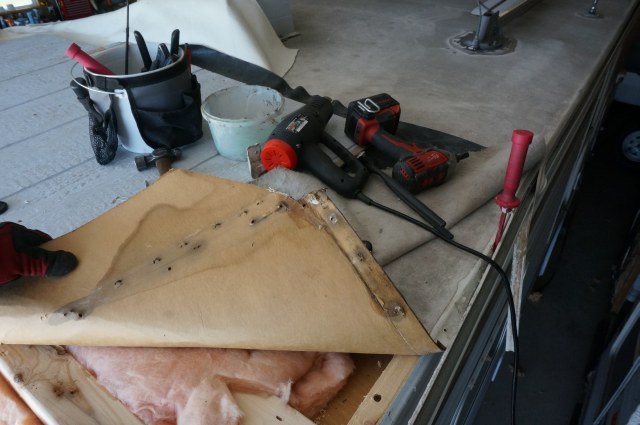
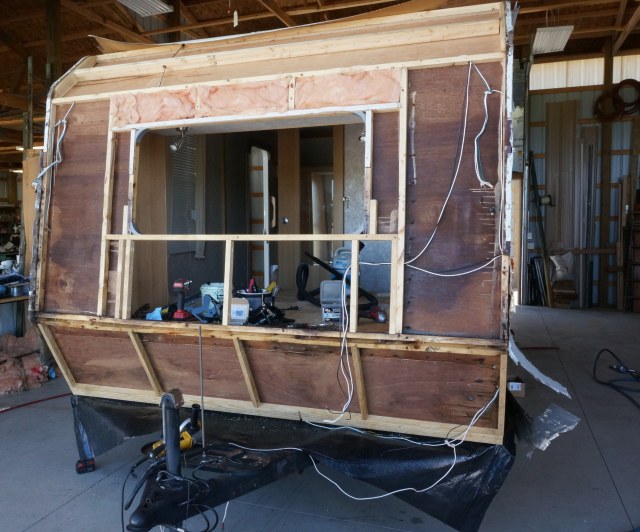
Then remove the insulation and have a look at what you have…
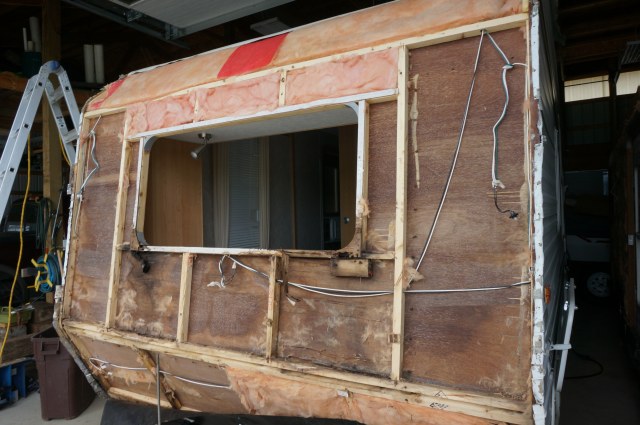
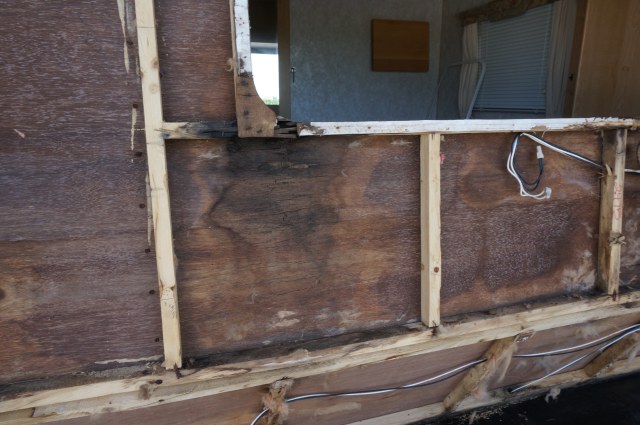
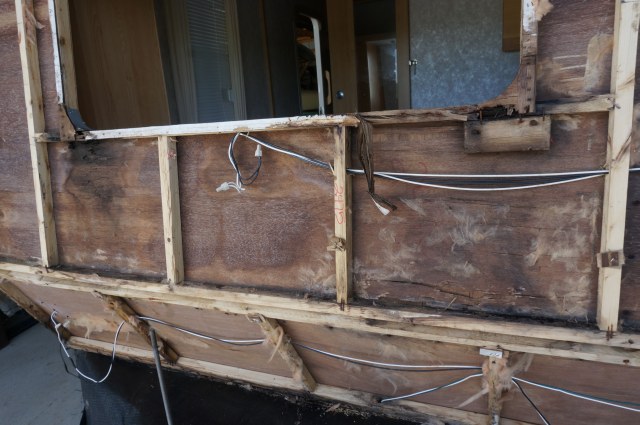

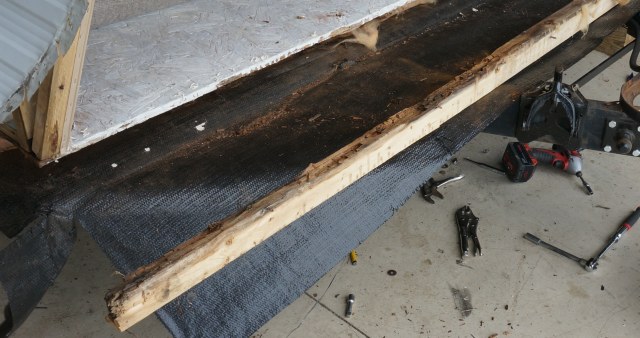
The window is easy to see there are issues. But you need to probe all the wood to see if it is rotted or just discolored and how bad is it rotted. You need to make a decision, can Rot Dr. CPES fix this rot or do I need to replace the wood? I go for replacement if the wood is questionable. If replacement is not practical or I am trying to save the wall board I use the CPES resin on this area and any area with water staining to stop all fungus growth and prevent dry rot later on.
I find an ice pick word good for probing.
Probe all areas.
More in the next reply.
__________________
Current Sunlines: 2004 T310SR, 2004 T1950, 2004 T2475, 2007 T2499, 2004 T317SR
Prior Sunlines: 2004 T2499 - Fern Blue
2005 Ford F350 Lariat, 6.8L V10 W/ 4.10 rear axle, CC, Short Bed, SRW. Reese HP trunnion bar hitch W/ HP DC
Google Custom Search For Sunline Owners Club
|
|
|
|
|
07-04-2018, 08:08 PM
|
#3
|
|
Moderator
Join Date: Nov 2006
Location: Ohio
Posts: 12,649
SUN #89
|
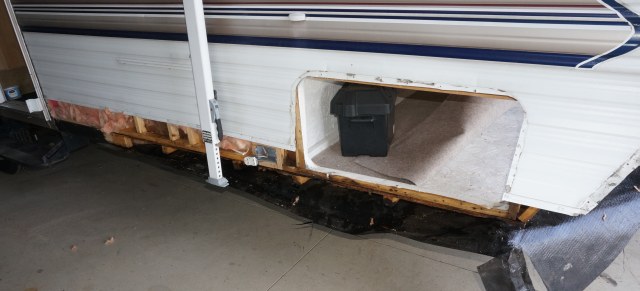
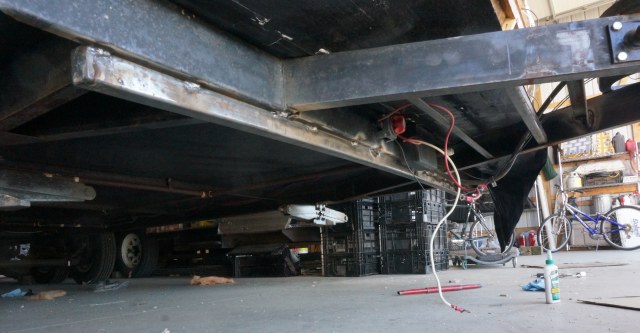
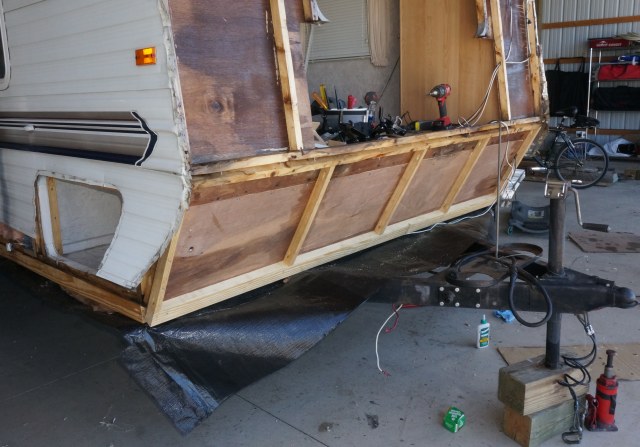
I found the corners had a quantity of questionable wood on them from the corner leaks. The right side (door side) had a lot of questionable wood. The moisture meter showed something going on in the front right side wall in the cargo hole. I needed to pull lower gold siding and the front cargo hole door to tell for sure.
The right cargo door had a tell tail sign, rusted screw heads on the bottom behind the vinyl cover strip.

The good news, this floor plan has an entry door in the gold siding not that far back. This allowed me to only pull the gold siding back to that point. And glad I did.
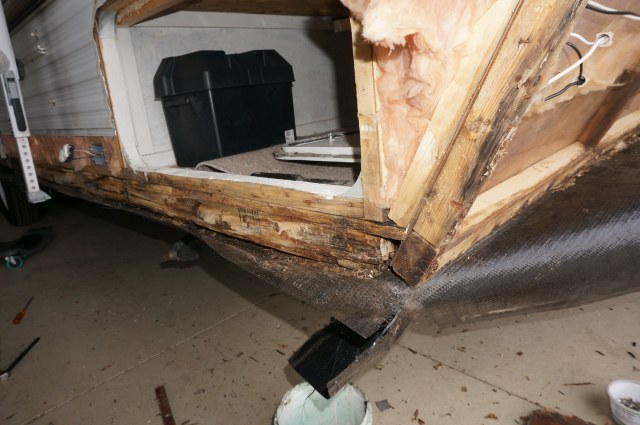
The awning arm screws were rusted and into soft wood.
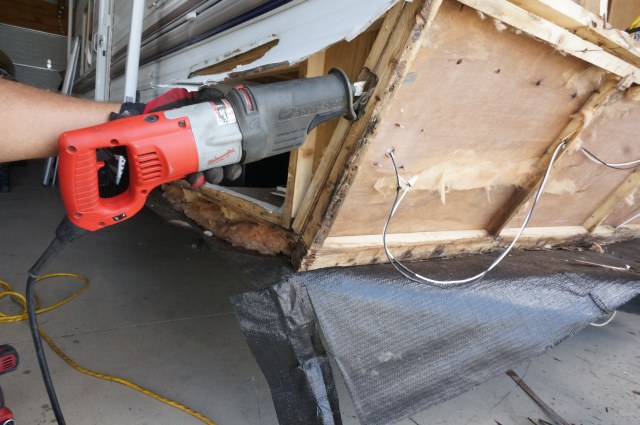
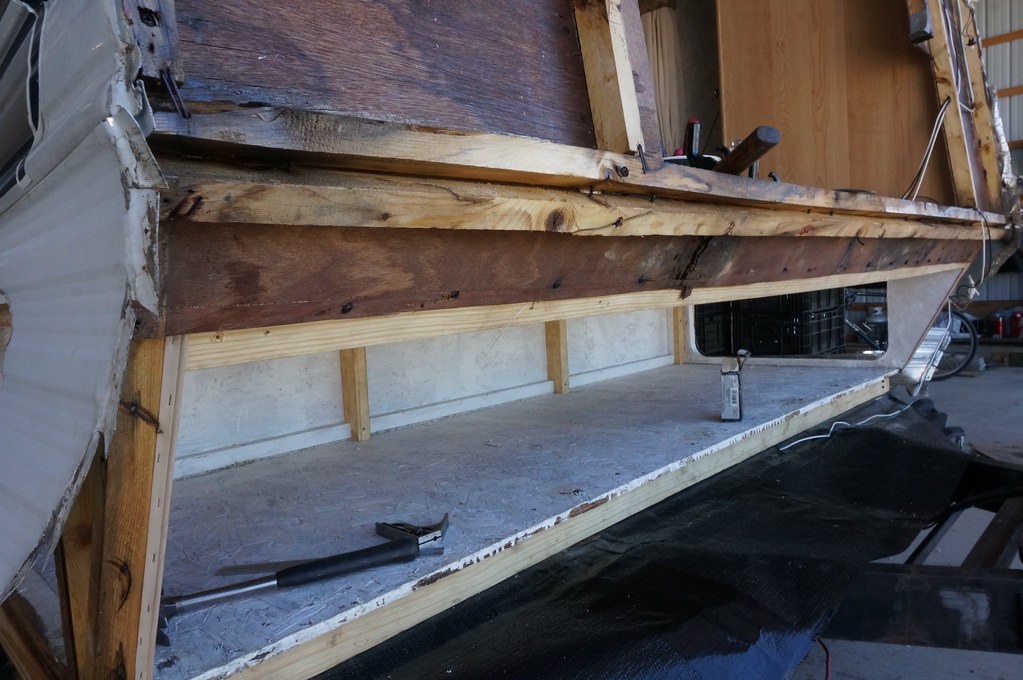
In order to get back to good wood I had to go pretty far down the wall towards the rear of the camper on the bottom wall 2 x 3. I sawzalled the end of the 2 x 3 as a cut out starting point and then ether unscrewing or Sawzall'ing the wall screws coming down from the top of the floor into the lower 2 x 3. Many of the screw heads were rusted beyond unscrewing.

The way a bad corner leak, flows is the water works its way down the corner by gravity until it hits the Darco plastic membrane. It then seems to seep along the sidewall 2 x 3 and across the front 2 x 3. The good news, this leak was not a gusher but a long time seeper. It rotted out the 2 x 3 but did not rot totally through to the main underfloor and soak all the insulation.
Now to the left cargo hole. Same thing here, rusted screw heads.
The good news, the left side is not as bad as the right side. There was a cargo hole putty tape failure leak, but not as bad. I can CPES treat this side.
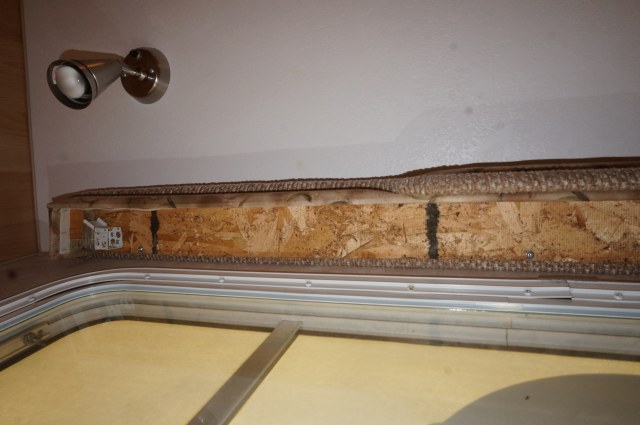
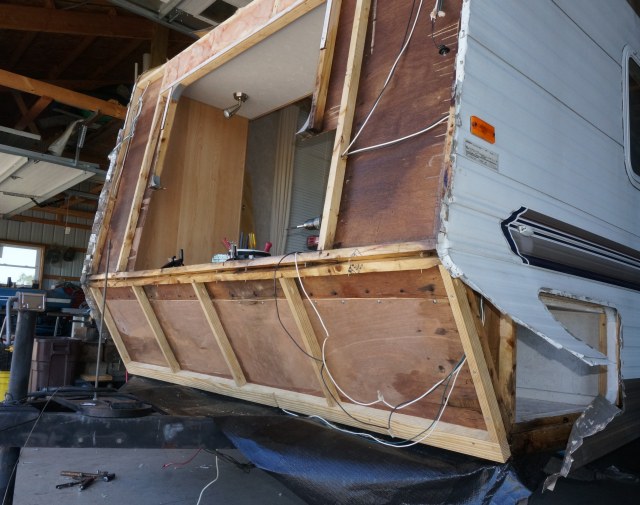
Next was the front window. I wanted to try and save the wall board. I started by gently taking the rotted walls studs out but the wall board was too far gone for a resin fix. The layers of luan were too far gone to be rebonded.
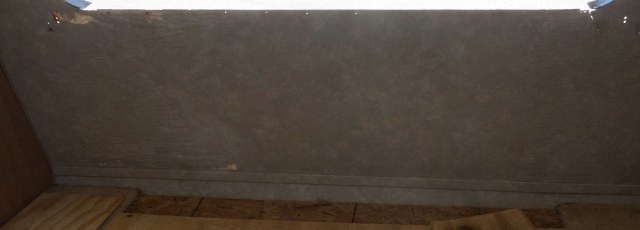
The inside was rippled pretty bad too while I could maybe bond the ripples back to new wood I did not have high hopes it would come out right. Hard to see here the ripples.
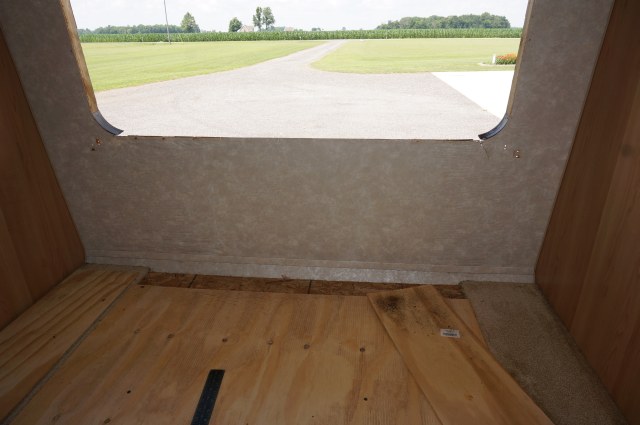
Don’t mind the corn field outside…
I have one piece of 2004 white wall board in my stash of acquired camper stuff I was going to splice in. But I really did not want to use it up… In talking with Sunline Fan on another topic he mentioned make it a head board like the 2006 campers. H’mm, good idea! I can use bead board (Wains coat) and finish it off nice inside. That will work. So I started down that path. Marked the wall to cut out the bad section to replace with new bare luan plywood and cover with a good bead board pattern.
Now we have a real front picture window!
You can see the ripples better now in this lighting.
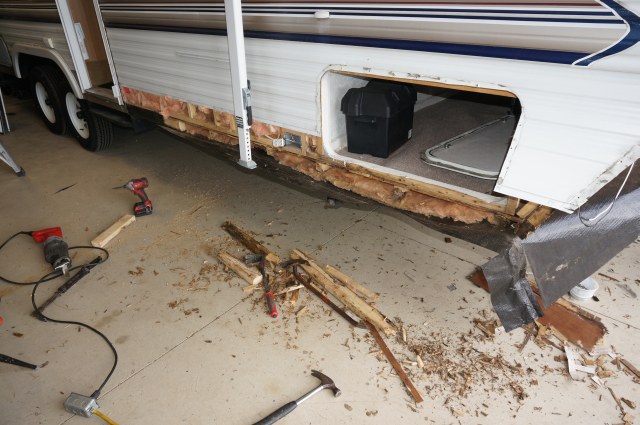
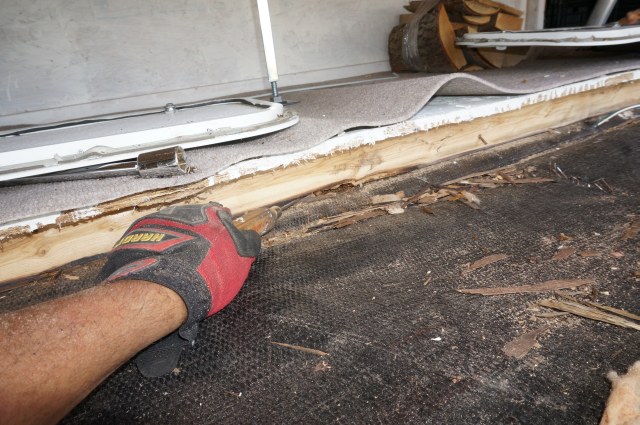
Next was to get the lower wall studs out. Some were so, so and needed to come out to get the lower 2 x 3 wall support out that was rotted. The corners needed to come out regardless. The screw heads all rusted out and broke the screw trying to get them out. Had to Sawzall the screws.
And then to surgically get the rest of the lower walls studs out and not break the wall board behind it. Some needed tools of choice to do the surgery.
Next up is the front floor joist. This joist is bolted to the frame header. I needed to have a good look at it as it was suspect of being really bad rotted and it holds up the front of the camper. I had to take the cargo hole wall board off to see the floor joist.
I made a planned cut so I can add it back in. In the cargo hole I can add a 3/4" nailer strip to hold the wall board when put back in. I drilled 2 small holes so I could accurately locate the edge of the existing board on the outside. You can just see the galvanized finishing nail in the top right corner.
Chalk line mark the wall board cut 1/2” below the nail markers

With the wall board out I can now see that front floor joist. Ah, yup it’s not good.
This pic looks like that front floor joist and floor has a hump or crown to it. More on that in a bit.
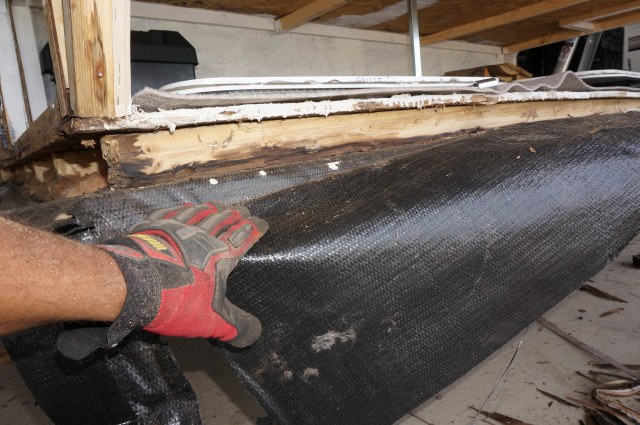
It’s rotted half way across the front of the camper and needs to come out
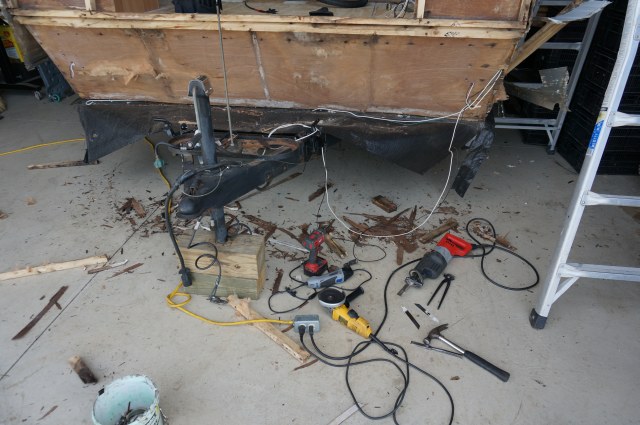
Had to cut off the carriage bolts holding the front joist to the header and jack up the camper to take some of the weight off the header to get the 2 x 3 joist out but it came out.
The bottom of the joist
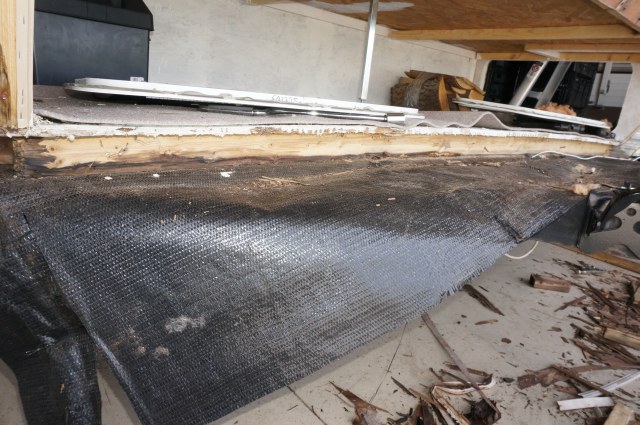
All the insulation is dry and the rot stopped at the 1st header joist. Seem the down pressure of the floor to the header helped seal the water from flowing across the whole floor above the Darco plastic membrane. (thankfully…)
Next reply the top roof corners.
__________________
Current Sunlines: 2004 T310SR, 2004 T1950, 2004 T2475, 2007 T2499, 2004 T317SR
Prior Sunlines: 2004 T2499 - Fern Blue
2005 Ford F350 Lariat, 6.8L V10 W/ 4.10 rear axle, CC, Short Bed, SRW. Reese HP trunnion bar hitch W/ HP DC
Google Custom Search For Sunline Owners Club
|
|
|
|
|
07-04-2018, 08:10 PM
|
#4
|
|
Moderator
Join Date: Nov 2006
Location: Ohio
Posts: 12,649
SUN #89
|
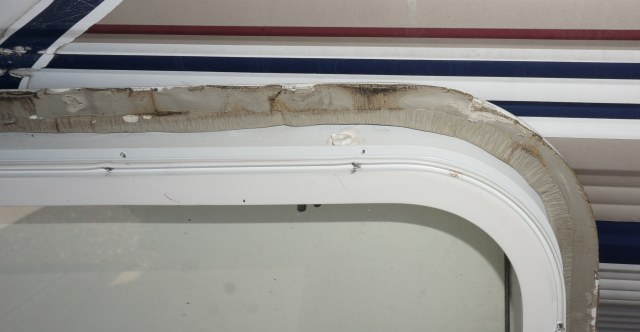
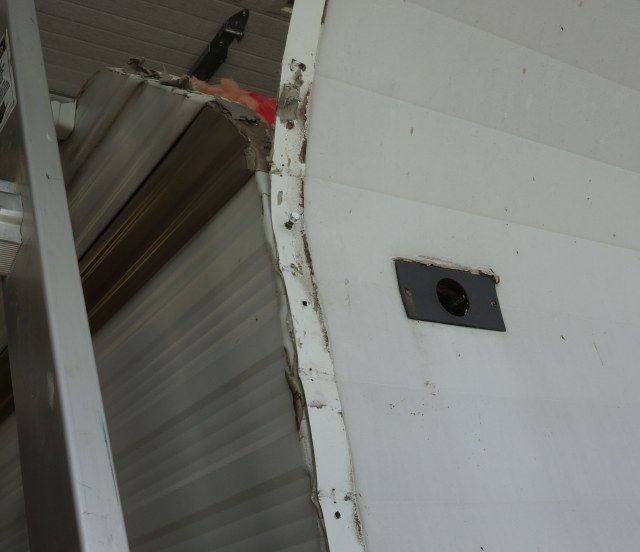
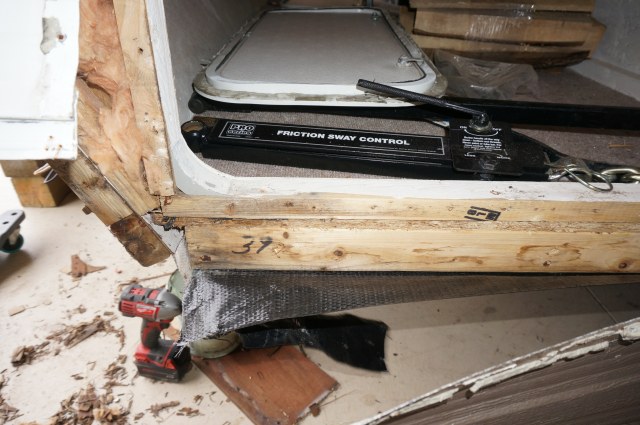
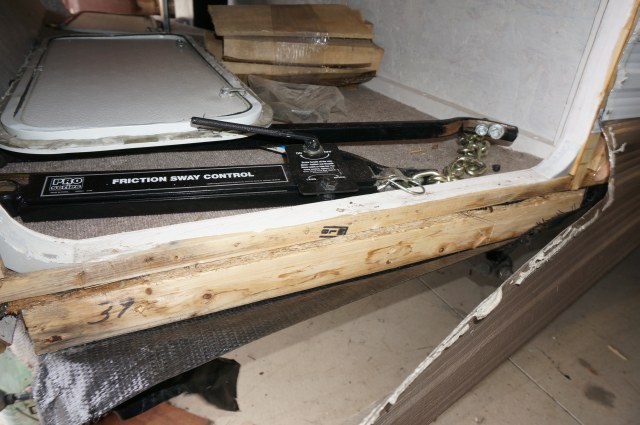
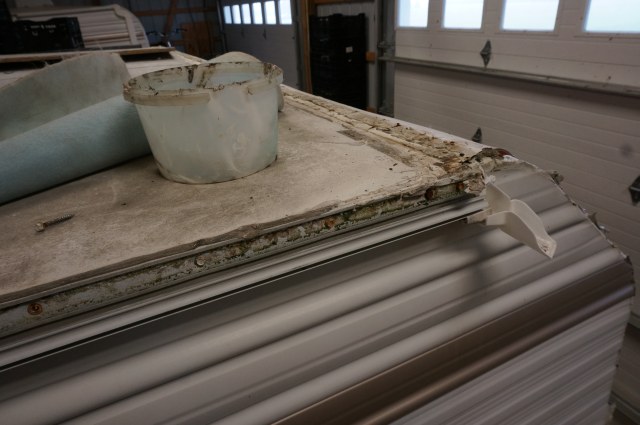
This is the top left and right roof corners. You have to lift the rubber/bud board up to see if water made its way in.
The left side (non door side).
You have to lift out the gutter rail about 2 feet back to allow the roof membrane to be folded back. Peeled back the vinyl screw cover and it is full of yuk and growth. This is an issue after only a few years of ownership. Mold grows behind that cover and starts rotting the screw heads out.
After the gutter rail is pulled back you can take the staples out holding the roof membrane to the siding.
Then take a few feet of staples across the front of the membrane to the front ceiling joists. I place the screw driver pointing forward so it does not slip and poke a hole in the open area of the roof.
Then a putty knife as a rubber protector and lift and pry the staples out.
Then fold back the corner roofing. This pic shows the wood is all good.
This pic shows the wet just started not long ago. I can dry this out and see if I need to do anything more with it. If needed I can reglue the rubber down to new 1/8” luan plywood. These wet spots line up with the rusted screws (aka water wicks) on both the top front molding and the gutter rail.
Now the right side top corner. Rusted gutter screws and top molding screws in this area.
Wet from the gutter rail rusted screws
Super lucky, found this leak just in time before it started growing. 6 months to a year more and this would have been very wet. Notice the water staining at the screws.
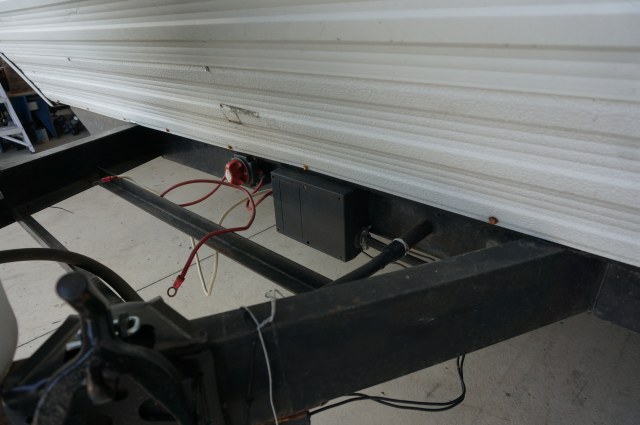
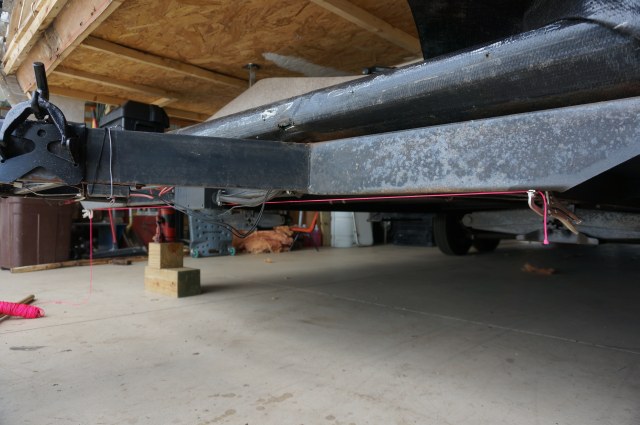
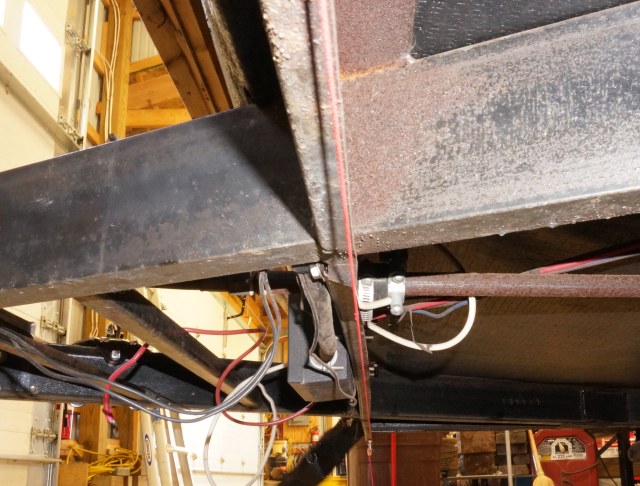
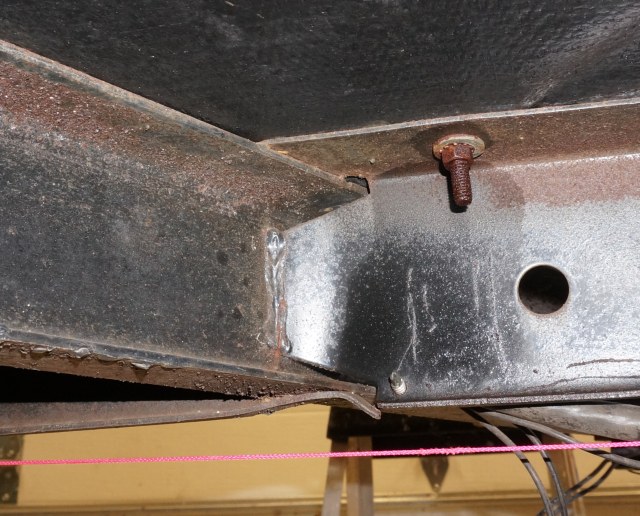
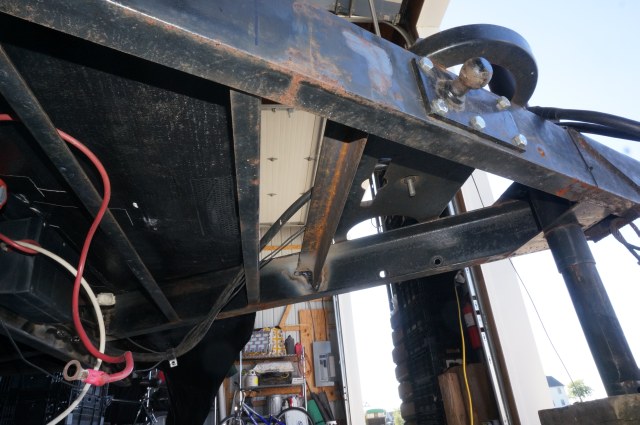
And one last new find. When crawling under to remove the carriage bolts for the front floor joist I noticed, I have a cracked header. This is the older 2004 and pre 2005 frame redesign.
I will leave you with these 3 pics and create a new post on just this topic. This is the third 4” wide A frame header I have seen bent in the last 10 months that are not on a T2499. In my case I can repair this fairly easy as the damage has not progressed yet to a really bad state. I was going to reinforce this area regardless as a “thing to do” as a preventive step. Seems my preconceived notions were accurate.
I am now at the point to start making repairs, Rot Dr treatment and start cutting new wall studding/floor joists. This will start on Thursday.
Thanks for looking.
John
Work Hrs to date: 14.5
Material Cost: $0.00
__________________
Current Sunlines: 2004 T310SR, 2004 T1950, 2004 T2475, 2007 T2499, 2004 T317SR
Prior Sunlines: 2004 T2499 - Fern Blue
2005 Ford F350 Lariat, 6.8L V10 W/ 4.10 rear axle, CC, Short Bed, SRW. Reese HP trunnion bar hitch W/ HP DC
Google Custom Search For Sunline Owners Club
|
|
|
|
|
07-04-2018, 08:20 PM
|
#5
|
|
Member
Join Date: Nov 2011
Location: Wisconsin
Posts: 52
SUN #3151
|
Great tutorial John, I hope I will not need this!!!
Don
__________________
2005 Sunline Solaris Lite T-2363
2006 Ram 2500 Diesel Quad Cab Shortbed 4x4
|
|
|
|
|
07-04-2018, 08:52 PM
|
#6
|
|
Senior Member
Join Date: Sep 2016
Location: Virginia
Posts: 814
SUN #8893
|
It looks like you're well on your way to get it fixed up. I will be following. Still learning.
__________________
|
|
|
|
|
07-04-2018, 09:48 PM
|
#7
|
|
Senior Member
Join Date: Jun 2011
Location: New Jersey
Posts: 544
SUN #2366
|
WOW! Just.... WOW!
__________________
|
|
|
|
|
07-05-2018, 08:46 AM
|
#8
|
|
Moderator
Join Date: Dec 2006
Location: Michigan
Posts: 6,155
SUN #123
|
Some great progress, John! Curious on that rippled wall board section- do you think there's any way to release the vinyl covering? I guess this is a good piece to test on- I wonder if heat, steam, or some sort of release chemical would strip it successfully where it could be glued on again- for a smaller patch job in the future perhaps.
__________________
2007 T-286SR Cherry/Granola, #6236, original owner, current mileage: 9473.8 (as of 6/18/21)
1997 T-2653 Blue Denim, #5471
1979 12 1/2' MC, Beige & Avocado, #4639
Past Sunlines: '97 T-2653 #5089, '94 T-2251, '86 T-1550, '94 T-2363, '98 T-270SR

|
|
|
|
|
07-05-2018, 02:07 PM
|
#9
|
|
Senior Member
Join Date: Sep 2010
Location: Michigan
Posts: 854
SUN #1546
|
Wow! What some people do to relax! 
__________________
 Joan & Miss Emme Lu Who
Full Timing in T-1950 2005 Anniversary Model
1997 6.5L Chevy Turbo Diesel Truck
"Pure Michigan"
Facebook: Apackof2 for the Rd
|
|
|
|
|
07-05-2018, 07:32 PM
|
#10
|
|
Moderator
Join Date: Nov 2006
Location: Ohio
Posts: 12,649
SUN #89
|
Quote:
Originally Posted by beecrazy

Great tutorial John, I hope I will not need this!!!
Don
|
Thanks Don for the good words. Yes, I too hope you do not have to do this... Check all your seams. And if you really wanna know how good or not so good you are, get a moisture meter and scan the whole camper. http://www.sunlineclub.com/forums/f7...per-17613.html
Quote:
Originally Posted by Thomascine
It looks like you're well on your way to get it fixed up. I will be following. Still learning.
|
Thanks Tommie, yes the learning for all of us never stops... Each camper repair whatever it is, we learn something.
Quote:
Originally Posted by j52wf
WOW! Just.... WOW!
|
I knew this was coming, just it was originally going to be later in the year. One never knows how good or bad it will be until you open it up. I'm really glad the roof did not leak bad on the 2 front corners. Got to it just in time. If I had that to deal with, then all the siding on the 2 sides most likley up front would need to come off. A much bigger job. The back wall, ah.... I'm already prepped I may have to remove the side walls but that will be later.
Thanks
John
__________________
Current Sunlines: 2004 T310SR, 2004 T1950, 2004 T2475, 2007 T2499, 2004 T317SR
Prior Sunlines: 2004 T2499 - Fern Blue
2005 Ford F350 Lariat, 6.8L V10 W/ 4.10 rear axle, CC, Short Bed, SRW. Reese HP trunnion bar hitch W/ HP DC
Google Custom Search For Sunline Owners Club
|
|
|
|
|
07-05-2018, 07:40 PM
|
#11
|
|
Moderator
Join Date: Nov 2006
Location: Ohio
Posts: 12,649
SUN #89
|
Quote:
Originally Posted by apackoftwo
Wow! What some people do to relax! |
Now that's funny!
Yeh, some of us beat to the tune of a different drummer... 
The first part of this post will be what can be involved in a front wall fix. Believe it or not, this one is mild compared to front roof top corner leaks. They just get more involved. The water has longer to travel to get to the bottom. More camper to damage along the way.
The one you recently looked at could be all of this front wall repair and more. I am tracking the costs as I go so folks can somewhat know what to expect on something like this. While no 2 leaking campers are the same, they can be close for big picture comparison.
Thanks
John
__________________
Current Sunlines: 2004 T310SR, 2004 T1950, 2004 T2475, 2007 T2499, 2004 T317SR
Prior Sunlines: 2004 T2499 - Fern Blue
2005 Ford F350 Lariat, 6.8L V10 W/ 4.10 rear axle, CC, Short Bed, SRW. Reese HP trunnion bar hitch W/ HP DC
Google Custom Search For Sunline Owners Club
|
|
|
|
|
07-05-2018, 07:54 PM
|
#12
|
|
Moderator
Join Date: Nov 2006
Location: Ohio
Posts: 12,649
SUN #89
|
Quote:
Originally Posted by Sunline Fan
Some great progress, John! Curious on that rippled wall board section- do you think there's any way to release the vinyl covering? I guess this is a good piece to test on- I wonder if heat, steam, or some sort of release chemical would strip it successfully where it could be glued on again- for a smaller patch job in the future perhaps.
|
Thanks Jon,
The rippled wall board, good question. I do not think you can practically release the vinyl wall covering and have a large area not have some kind of mess up with it. It is vinyl and it has been exposed for years to sun in some fashion. It is brittle. One slip and it cracks. I cracked this one 3" long in the widow corner trying so carefully to extract the wall studs that are stapled from the wall board out. All those staples..... After I cracked both corners getting the wall studs out and the fact the luan was totally separated in layers, I called uncle trying to repair it. That is when the big front picture window came along... 
That said I do have a little experiment going on now trying to bond small areas of OK wall vinyl back onto degraded luan. I have the CPES bonding it on now with clamps in place. See here. I poured the CPES in the layer of luan and the vinyl paper. These areas will get covered so it is not a need they look nice. The CPES will fix the bad luan, and we will see if the paper bonds too.
We shall see in about 2 more days when I take the clamps off how good or bad this will come out.
__________________
Current Sunlines: 2004 T310SR, 2004 T1950, 2004 T2475, 2007 T2499, 2004 T317SR
Prior Sunlines: 2004 T2499 - Fern Blue
2005 Ford F350 Lariat, 6.8L V10 W/ 4.10 rear axle, CC, Short Bed, SRW. Reese HP trunnion bar hitch W/ HP DC
Google Custom Search For Sunline Owners Club
|
|
|
|
|
07-05-2018, 08:13 PM
|
#13
|
|
Moderator
Join Date: Nov 2006
Location: Ohio
Posts: 12,649
SUN #89
|
Today was Rot Dr. and start the new wood install day.
The Rot Dr. treatment seals the water stained and lightly rotted wood. You can even use it with a filler and build back up totally rotted away wood if one wants too. It stops any further rot, stiffens the wood and will kill the fungus that allows dry rot to grow is left untreated. There was a lot of surfaces to treat.
This is the product CPES™-Wood based epoxy products to repair and resist wood rot.
They make the CPES in warm and cold weather formulation. With today’s brutal high heat, it was for sure the warm weather one.
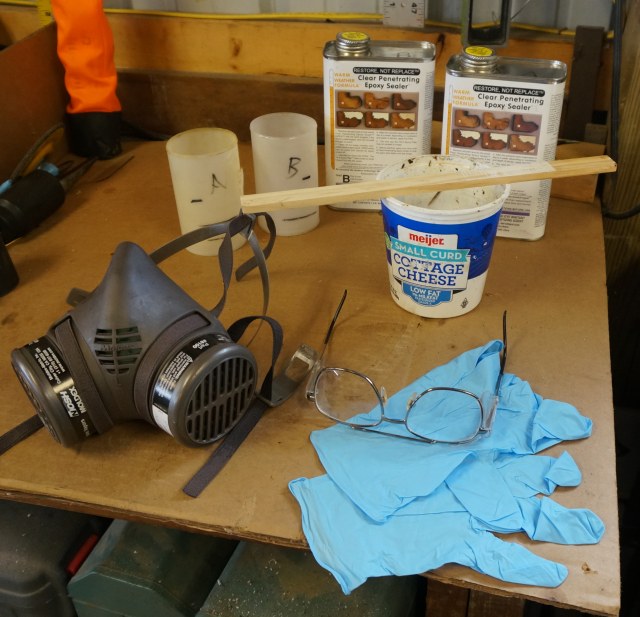
You need a respirator as the fumes when applying get really bad. They sell a good quality Moldex respirator with the correct cartridges for this product. And they also sell replacement cartridges too. You mix equal parts of the resin and the hardener. I use 2 small clear containers so I can see the liquid inside and I put a black marker line on both at the same height. Then pour into a disposable container, stir and apply. Needs gloves and safety glasses for sure. You do not want this product getting near your eyes and it is very thin and can splash easily off a paint brush.
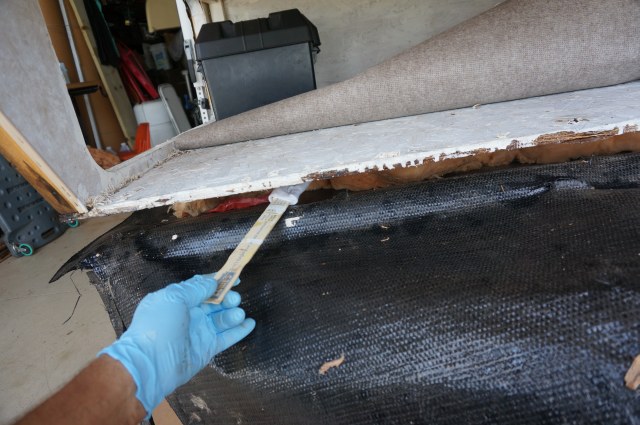
The product is about the consistency of diesel fuel. It will seep deep into the wood. In a known or suspected area of rot, you keep adding it until it stops taking any more liquid. On surface water marks I put a single coat on.
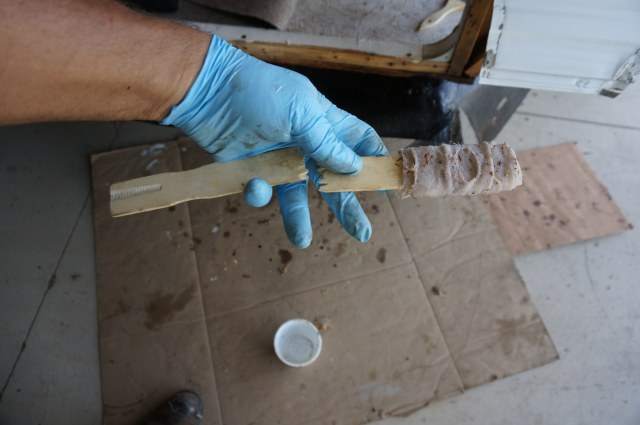
The underside of the floor was a challenge. This OSB boards soaks it up like a sponge and I needed to get it treated well. I started with a paint brush but that quickly became a mess all over the handle painting sideways and upside down. I came up with a rag at the end of the paint stir stick and stapled the cloth on. This worked well as a mop to get the product on the bottom of the floor.
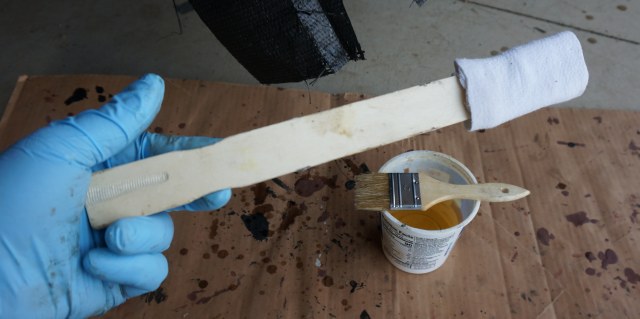
Just as I was finishing up the floor, the paint stick broke. The concept worked well, just use a heavier stick next time.
It took over 2 hours to do all the areas. Some areas needed to be repeated as the rot was present. The product turns the treated area darker in color. The more rotted the area, the darker the color. These pics are hard to tell the difference but it is there. The barn door open with bright sunlight outside tricks the camera light meter.
Here is the before:
And the after:
It will take 3 full days for the smell to totally disappear but it will be totally gone. In the high heat of today (90’s) it tacked up fairly quickly. While the CPES was drying, I started on getting the new wood to install prepped.
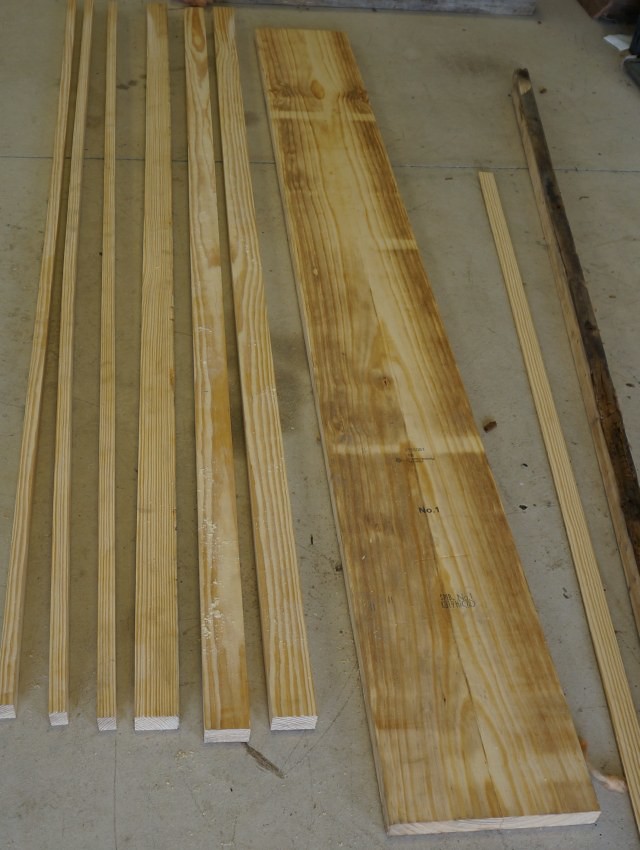
I learned some new things at the lumber yard, I started out looking for premium quality 2 x 4's to rip cut into the correct sizes. These were labeled “select” which means they are sorted by knot size. They select only a size that will not be any bigger, but they can still have a boat load of knots… This was not what I wanted.
Went to the building desk and explained my situation I wanted to rip the boards into smaller sizes and the knots were way too many. I found someone who knew what they were talking about and their inventory. He said, look for anything 8” or wider. The 2 x 4 and 2 x 6 are the softer woods and has higher knots. When you get into 8” and up it is southern yellow pine and the wood grade is much better. I was in Menards and went to the wood area. For only $3.00 more a board I had clear 2 x 12’s…and better wood verses knotted 2 x 4’s to create the same 12” of width. I scored!
The ugly looking 2 x 3 on the right is the rotted out floor joist
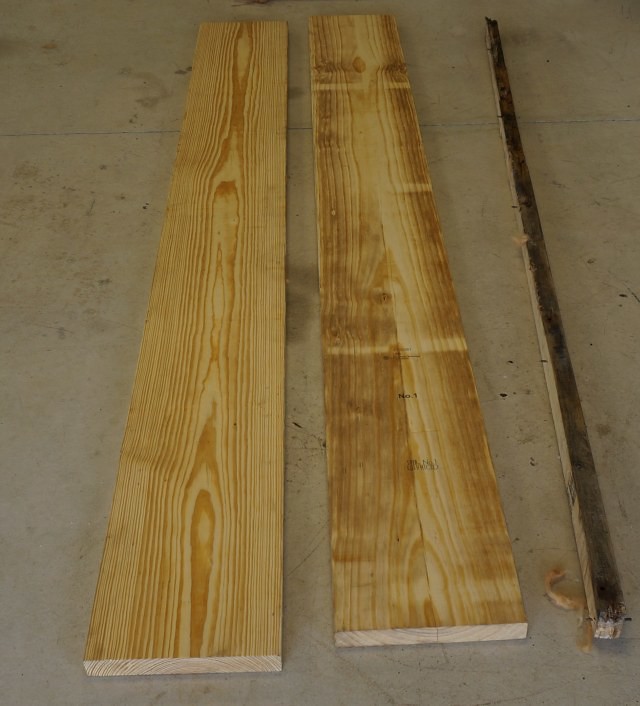
Then cut them into 2 x 3’s and 1 x 2’s.
I had a 2 x 8 pressure treated board in the barn and cut that down for the front floor joist. Been sitting there for about 3 years now. Figure that area might need better protection. The thing cut like junk. It started warping extremely bad. Had to put a screwdriver in the saw split to stop the blade from pinching but I made it through it.
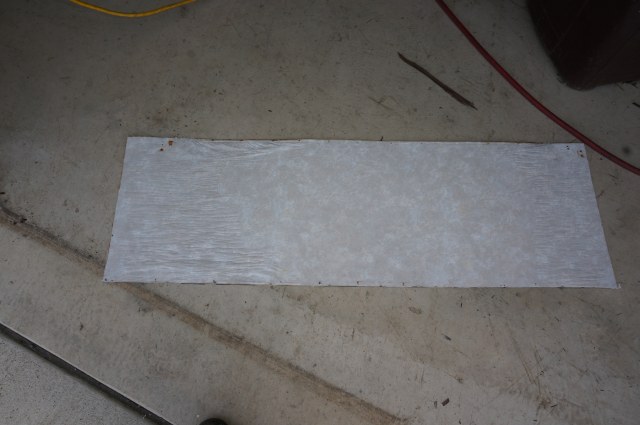
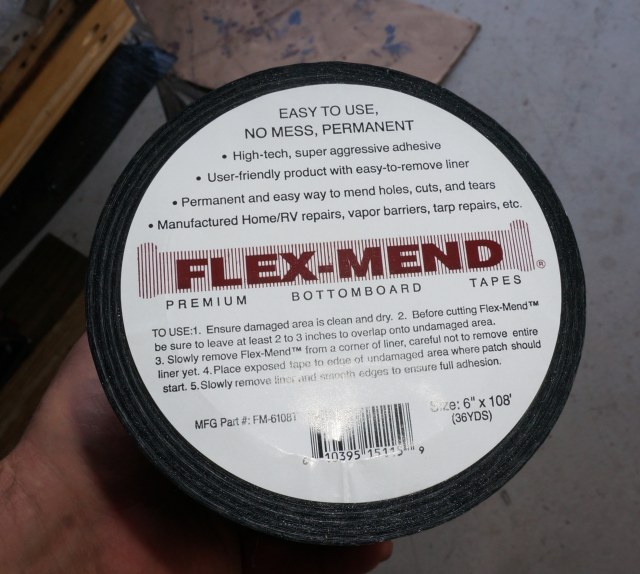
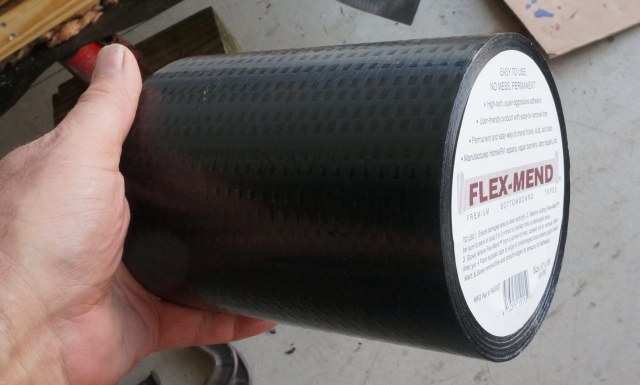
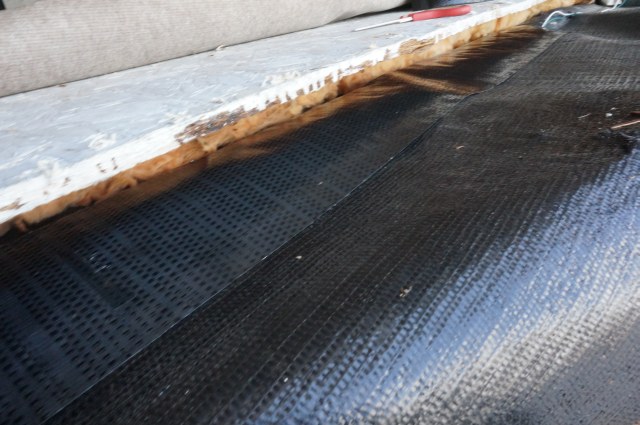
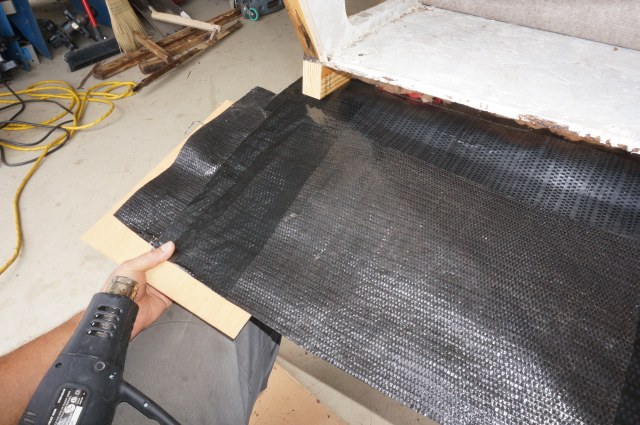
I needed to repair all the holes in the front Darco plastic membrane before I could install the new floor joist. This took some time. I used a belly repair tape called Flex Mend. They make it in varying widths, I used 6” for this task. I also have 4” for general repairs. Amazon now has it or any manufactured housing repair place sell it. Looks like this.
It takes a small learning curve to use it and not create a balled up mess. Once the release paper is off, it is thin, super sticky and can ball all up if you are not careful. Measure out a manageable length and cut it off the roll. Then the roll will not pull on it. I used 4 ft. in my case. Will cover 1/2 the front of the camper.
I will start at right side wall and go to the center. A test fit before taking the release paper off.
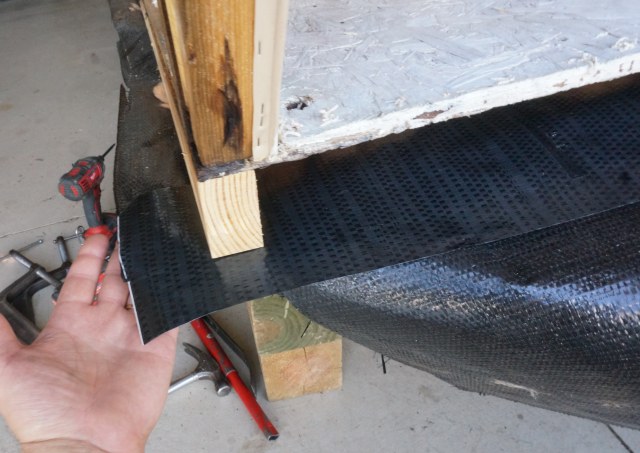
Next is to peel back only about 1 to 2” of release paper. Either have good fingernails or get a pair of tweezers to get the release paper started. It can be tough to get started.
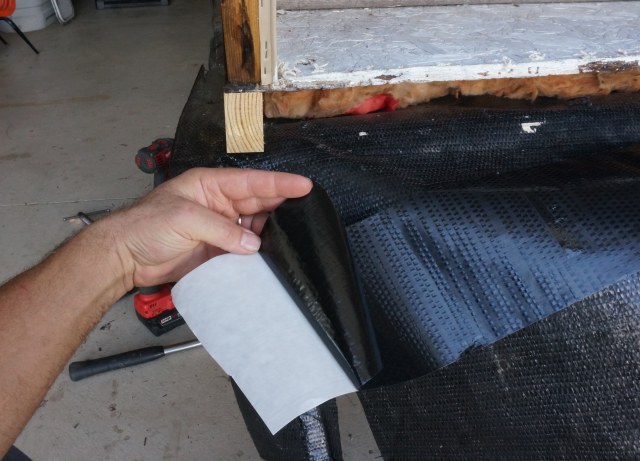
Position in place with the long tail of the piece pulled taught and in line with where you want to stick it. You have to start straight or it will go down crooked. Just gently tap the starting edge and make sure it is aligned right. Then press the entire first section peeled off.
Then pull about 4 to 6” in length of release paper and get it sealed down. Hold the downstream end taught while pressing to prevent bunching up.
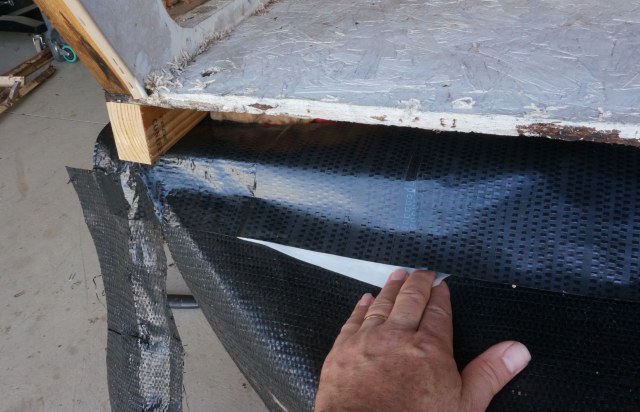
Keep working it in 4 to 6” lengths.
Something to note, you need something firm under the material you are taping ideally, so you can set the adhesive down tight. If the material is spongy, it will not seal well.
There were a lot of staple holes where each wall stud or frame carriage bolt was. I had to make running length wide strips too. A trick I learned long ago from the first mobile home repair business I bought it from was to warm the tape and press it down hard after heating to create a permanent seal. You do this after you have initially pressed it down to set it in place as a second adhesive setting. I did this back in 2009 repairing my slide floor rot and the tape is still fully adhered on the bottom of the slide floor.
I put a board under the Darco, warmed it on low with the heat gun for only about 3 to 5 seconds then pressed hard and smoothed it all over especially on the edges. It was hot enough to barely touch. Do not stay in one place with the heat gun very long it will shrink and melt the Flex Mend.
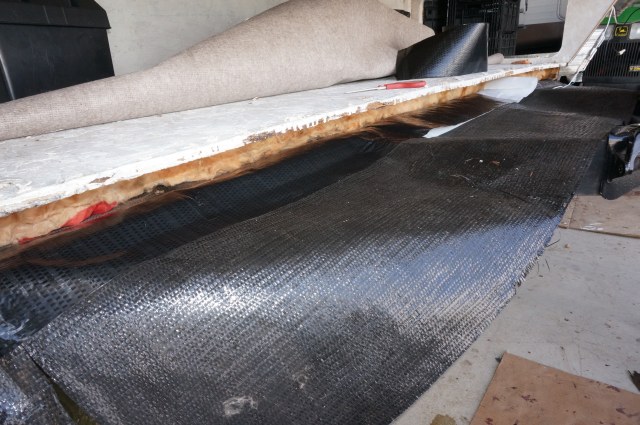
Here is the inside of the front flap all done. I used the Flex Mend on the inside as I could do a better job creating a known good water seal. I used gorilla tape on the outside as an extra back up to the holes. Somewhat hard to see the black Flex Mend on the black Dacro but there is a lot on there.
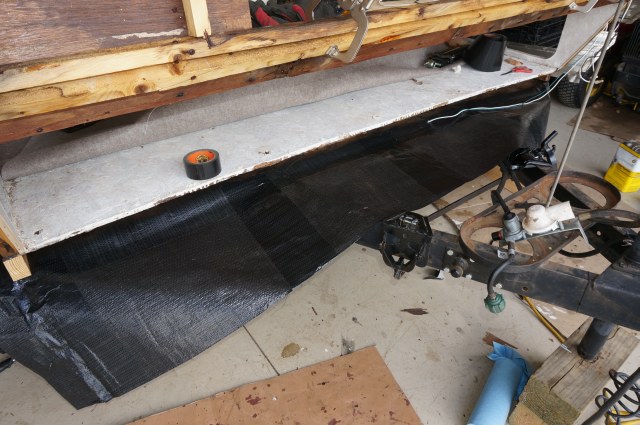
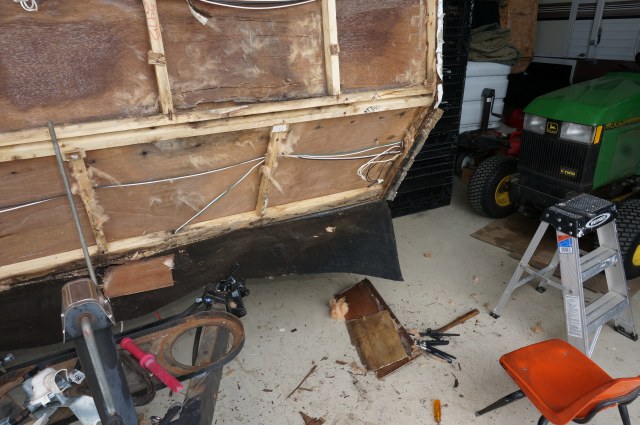
I also found 2 large holes in the Darco which seemed to have worn through over time. These line right up with the 2, A frame side rails. Somehow it was abrasive and wore clear though to match the A frame width. I have not seen this before. I sealed both closed in the repair. A potential major road splash water entry location towing in the rain. Anyone ever see this before?

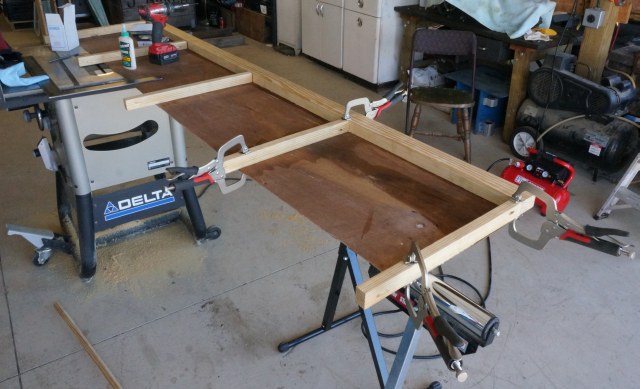
Here is the start of the new wood install. On the right side wall I added a splice board to make a better end butt joint. This will better help carry the load at the splice since this outer side member holds up the wall.
Splice board in place.
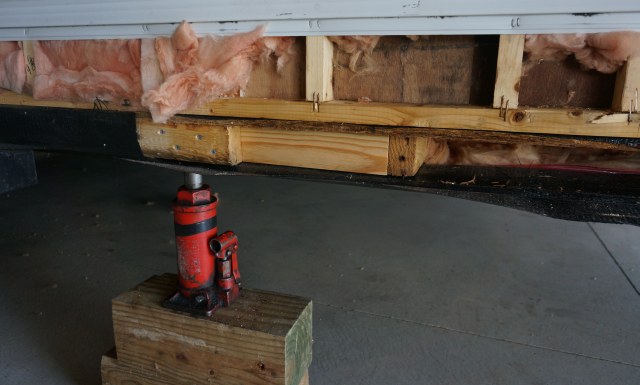
New side member installed. Need to clamp it tight to the wall before screwing it in. Needed the jack to raise the camper slightly off the frame as there is a frame out rigger in this length of board. The fit is tight at the outrigger and had to jack up to get some clearance to install it.
Next was the front floor joist. Had to jack the camper up off the frame to get this in too.

With the bow in the front header following the bent frame, I suspect I need a header fix before I start cutting wall studs to exactly fit in this front wall. Will have to switch to metal working next before I finish the front wall.
All for today. It was long and hot…
Work Hrs. to date: 22.5
1 trip to lumber yard: 2.5 hrs.
Material Cost to date: $142.00
(1) 2 x 12 x 8’ $16.00
(1 lot) Screws $2.00
(1) Roll 6” Flex Mend $48.00
(2) Quart, CPES $ 75.00
(1) 2” Chip Brush $1.00
Thanks for looking
John
__________________
Current Sunlines: 2004 T310SR, 2004 T1950, 2004 T2475, 2007 T2499, 2004 T317SR
Prior Sunlines: 2004 T2499 - Fern Blue
2005 Ford F350 Lariat, 6.8L V10 W/ 4.10 rear axle, CC, Short Bed, SRW. Reese HP trunnion bar hitch W/ HP DC
Google Custom Search For Sunline Owners Club
|
|
|
|
|
07-06-2018, 05:18 PM
|
#14
|
|
Senior Member
Join Date: Apr 2016
Location: Maryland
Posts: 488
SUN #8237
|
Nice documentation John. Thanks for going through all that.
I didnt realize that you even had T2475.
I do know you have a T1950 and it must be feeling pretty lonely by now. [emoji3]
__________________
John
2000 T2370
|
|
|
|
|
07-06-2018, 07:28 PM
|
#15
|
|
Moderator
Join Date: Nov 2006
Location: Ohio
Posts: 12,649
SUN #89
|
Quote:
Originally Posted by johnnybgood
Nice documentation John. Thanks for going through all that.
I didn’t realize that you even had T2475.
I do know you have a T1950 and it must be feeling pretty lonely by now. [emoji3]
|
Thanks John,
Yes, the T2475 was acquired this spring see here for more, http://www.sunlineclub.com/forums/f6...475-18501.html
The opportunity presented it self and it found it's way to the barn.... The T1950 rubs elbows with a few other Sunny's every day. Her parts are sort of "all over"... We have named the T1950 "The baby camper", the T2475 is "the toddler camper" and the T310SR has graduated from "the camper" to "the big camper". While I'm sort of hung up so to speak on model numbers and other Sunline things, dear wife needs something a little more simple. Thus new camper names were born....
Thanks for the good words on the write up. Hopefully it will help our members in the future. There is still a lot more camper fix'ing to go on this one. The plan is to go all through it and correct as needed and waterproof it.
Thanks
John
__________________
Current Sunlines: 2004 T310SR, 2004 T1950, 2004 T2475, 2007 T2499, 2004 T317SR
Prior Sunlines: 2004 T2499 - Fern Blue
2005 Ford F350 Lariat, 6.8L V10 W/ 4.10 rear axle, CC, Short Bed, SRW. Reese HP trunnion bar hitch W/ HP DC
Google Custom Search For Sunline Owners Club
|
|
|
|
|
07-07-2018, 05:02 AM
|
#16
|
|
Senior Member
Join Date: Apr 2016
Location: Maryland
Posts: 488
SUN #8237
|
Quote:
Originally Posted by JohnB
Thanks John,
Yes, the T2475 was acquired this spring see here for more, [url]http://www.sunlineclub.com/forums/f63/camper-project-no-2-2004-t2475-18501.
|
Congratulations, somehow I missed that.
__________________
John
2000 T2370
|
|
|
|
|
07-08-2018, 08:20 PM
|
#17
|
|
Moderator
Join Date: Nov 2006
Location: Ohio
Posts: 12,649
SUN #89
|
An update from the last few days.
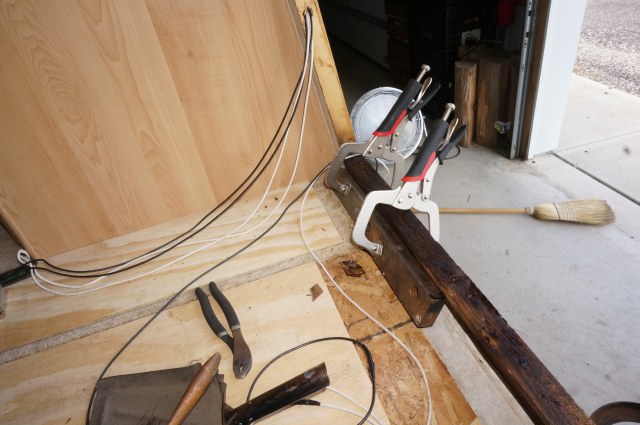
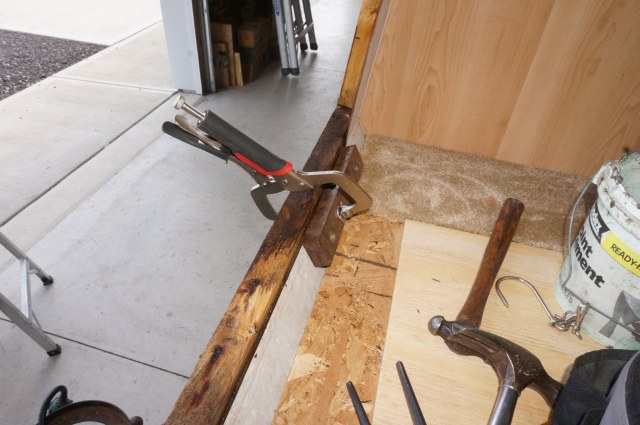
I finished adding the A frame reinforcement. Needs priming and painting but it is done and the front of the camper is now able to start rebuilding on a non saging frame. This frame topic I will create a separate post on as there can be much discussion to it. I will link it hear when done. For now, here are 2 pics of the repair outcome.
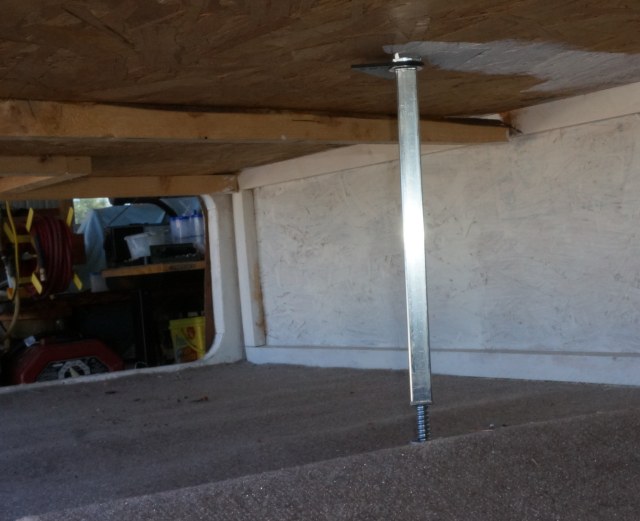
Next was the correcting the bed supports. It seems Sunline may have missed something when attaching the support members to the bottom of the bed system. They were all short and some up to 3/8” away. And they lacked some screws from the top. This created a sagging bed platform.
One of the prior owners installed a bed support brace under the bed and extra plywood on top to help support the bed area. Seeing the issue and having the entire lower front wall off it gave me a good view of the problem and the open access to correct it. So I did.
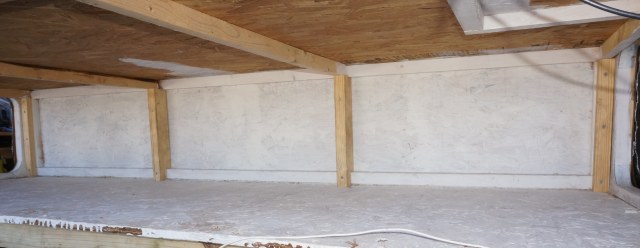
Here is the problem. See the support and then look up at the underside of the bed platform, the 2 x 2’s are not connected at the cargo hole wall. This allowed the OSB to sag over time and sort of sink. All 4, 2 x 2 supports where not holding on that end.
A right side view
A left side view
And now the fix. I custom cut and installed a vertical support at each bed board support to hold that end up. Jacked it up in place, fit the new supports and screwed in place.
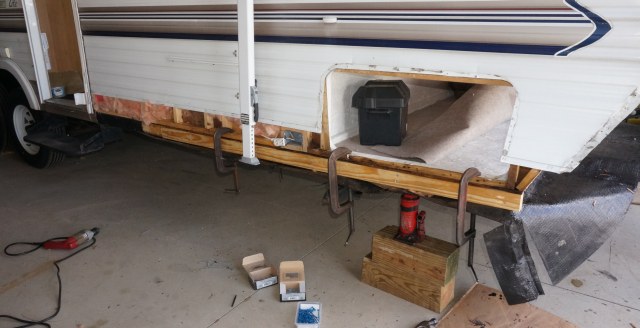
Started and finished the lower knee part of the front wall. Added a splice board where I had to cut the wallboard to get the wallboard out. You can see the new board here. It spans the splicing gap and allows screws to be added to join the cut out piece back in. It is the full width of the camper.
Outside looking in
Inside looking out. Friday was an absolutely beautiful day. Mid 70’s, and low humidity. Like a day out of mid September in Ohio
Made the frame for the lower front wall section. Keg jib screwed it together and glue and stapled the wallboard back on. Also had to Rot Dr. treat the back side of the wall board in 2 steps as I missed this panel the first time.
Amazingly how stiff the flimsy wall board gets when you attached to a Kreg pocket hole screwed frame. For folks who have not heard of Kreg, good tools see here https://www.kregtool.com/
Now installed on the camper.
The inside of the cargo hole. The wall board splice blends in with everything else like it was supposed to be there.

Onto recreating the lower widow frame wall and splice supports to fix the bad wall board removed. Had to clamp the lower window frame in several directions until the Kreg screws could be added. It for sure stiffened up the upper part of the window area.
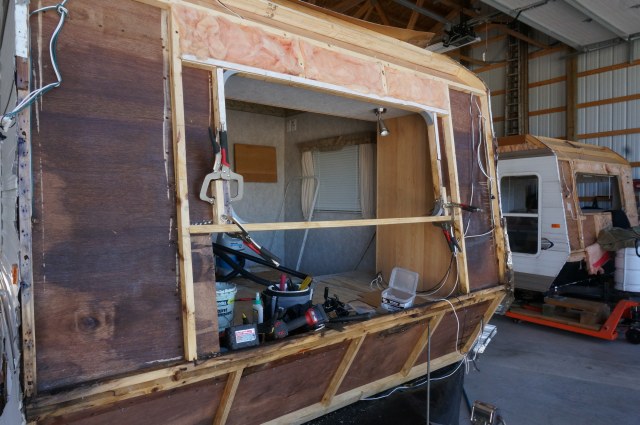
And the added wall studs. More than original partly due to needing splice joints.
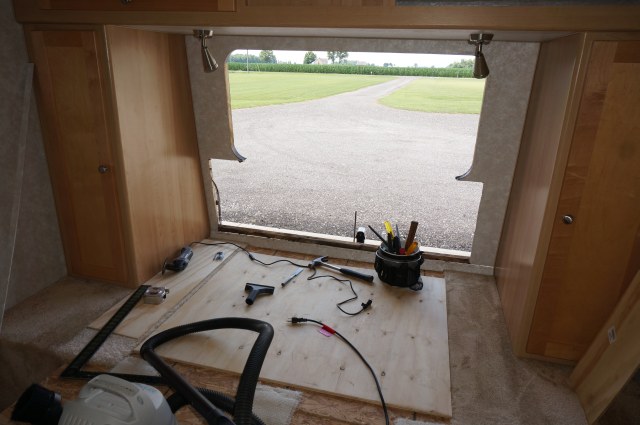
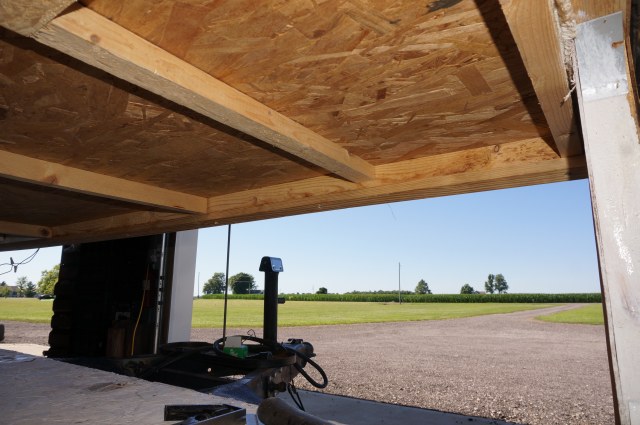
The front is now ready for the wallboard/headboard install and to get insulated.
BenB came over today and helped by checking, cleaning up and adjusting the brakes along with a bearing repack and new seals. We have 3 wheels completed. Had a surprise with the 4th wheel.
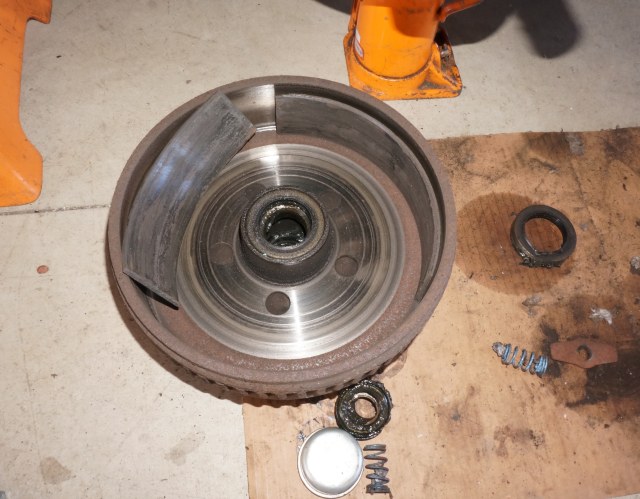
Pulled the brake drum off and the brake linings where laying in the drum….
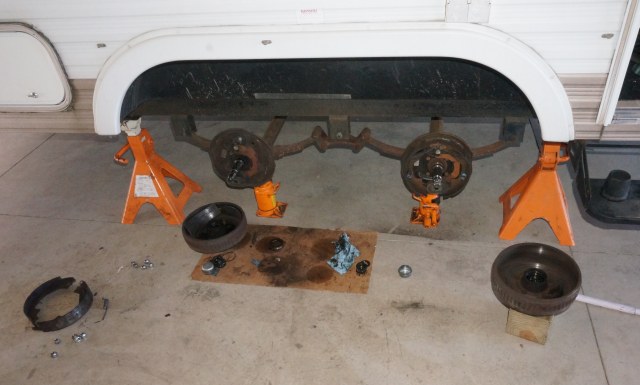
Total separation from the brake shoes. These had a lot of life in lining thickness left but that was about it.

We are now working on getting parts to finish this up. If you found this post and want to know more on a complete brake inspection and bearing repack, see this post. This is on another RV forum, I never made it yet to posting here. This was on my prior T2499 Sunline. The axles and brakes on this T2475 are the same as in the T2499 in this link. Annual Brake Inspection and Axle Re - Lube (Pic's)
This brings me up to date. More as the week progresses.
Note: Material cost can be for an entire item needed to do the job but is only partly used. Example; Bought an entire tube of glue to glue 10 pieces. Entire tube is listed. This will be a better guide for folks wanting to do a repair themselves on what to expect.
Front Wall Work Hrs. to date: 34.5
1 trip to lumber yard: 2.5 hrs.
Material cost to date: $174.40
(2) 2 x 12 x 8’ $32.00
(1) (lot) Screws $10.00
(2) Roll 6” Flex Mend $48.00
(2) Quart, CPES $ 75.00
(3) 2” Chip Brush $3.00
(1) Tube Titebond III glue $6.40
Frame Repair Work Hrs. to date: 6.0
Material cost to date: $60.00
Rectangular tubing and angle iron material Cost to Date: $50
Welding supplies: $10.00
Brake Repair Work Hrs. to date: 4.75
Material Cost to date: $37.00
(4) Brake drum seals: $20.00
(1) Grease: $ 12.00
(1) Parts cleaner: $5.00
Thanks for looking.
John
__________________
Current Sunlines: 2004 T310SR, 2004 T1950, 2004 T2475, 2007 T2499, 2004 T317SR
Prior Sunlines: 2004 T2499 - Fern Blue
2005 Ford F350 Lariat, 6.8L V10 W/ 4.10 rear axle, CC, Short Bed, SRW. Reese HP trunnion bar hitch W/ HP DC
Google Custom Search For Sunline Owners Club
|
|
|
|
|
07-09-2018, 09:38 AM
|
#18
|
|
Moderator
Join Date: Dec 2006
Location: Michigan
Posts: 6,155
SUN #123
|
Looking good, John! Are you planning to just put a whole new backing plate on that one bad one?
__________________
2007 T-286SR Cherry/Granola, #6236, original owner, current mileage: 9473.8 (as of 6/18/21)
1997 T-2653 Blue Denim, #5471
1979 12 1/2' MC, Beige & Avocado, #4639
Past Sunlines: '97 T-2653 #5089, '94 T-2251, '86 T-1550, '94 T-2363, '98 T-270SR
|
|
|
|
|
07-10-2018, 05:04 AM
|
#19
|
|
Junior Member
Join Date: Jul 2018
Location: Michigan
Posts: 15
SUN #10685
|
John B,, i am new to this site,,but very glad i found it ? we just got our 89 T2461 but like its size and features,,i have did quicky repairs so we can use it this summer,,but in Oct,it will go in the barn and major repairs will start,,front vent leaked and will have major repairs in that area,,( you got a roof repair how to ? ) also want to take the none working AC off the roof and cover the hole..as a small portable is all we need,,I am a retired carpenter so have all the tools,,but need the know how in some ares
Thanks for all your info
Cheers Ron
__________________
|
|
|
|
|
07-10-2018, 06:06 PM
|
#20
|
|
Moderator
Join Date: Nov 2006
Location: Ohio
Posts: 12,649
SUN #89
|
Quote:
Originally Posted by Sunline Fan
Looking good, John! Are you planning to just put a whole new backing plate on that one bad one?
|
Jon,
Thanks for the good words
H'mm a backing plate..?? Do you mean something to take the place of the wall board I cut out? If so, yes I have a piece of new luan to put in their. Then the bead board (wainscot) will go over that. I have to shim the wall surface out anyway so I will just fill the area with new luan. It will hold the insulation in then until I get to the beadboard.
If your backing plate has something to do with the frame repair, need more info what you are referring too.
__________________
__________________
Current Sunlines: 2004 T310SR, 2004 T1950, 2004 T2475, 2007 T2499, 2004 T317SR
Prior Sunlines: 2004 T2499 - Fern Blue
2005 Ford F350 Lariat, 6.8L V10 W/ 4.10 rear axle, CC, Short Bed, SRW. Reese HP trunnion bar hitch W/ HP DC
Google Custom Search For Sunline Owners Club
|
|
|
|
|
|
|
Currently Active Users Viewing This Thread: 1 (0 members and 1 guests)
|
|
|
| Thread Tools |
Search this Thread |
|
|
|
| Display Modes |
 Linear Mode Linear Mode
|
 Posting Rules
|
You may not post new threads
You may not post replies
You may not post attachments
You may not edit your posts
HTML code is Off
|
|
|
|
 » Recent Sunline Discussions
 |
|
|
|
|
|
|
|
|
|
|
|
|
|
|
|
|
|
|
|
|
|


