 |
|
 07-10-2018, 06:13 PM
|
#21
|
|
Moderator
Join Date: Nov 2006
Location: Ohio
Posts: 12,654
SUN #89
|
Quote:
Originally Posted by Spirit Hawk

John B,, i am new to this site,,but very glad i found it ? we just got our 89 T2461 but like its size and features,,i have did quicky repairs so we can use it this summer,,but in Oct,it will go in the barn and major repairs will start,,front vent leaked and will have major repairs in that area,,( you got a roof repair how to ? ) also want to take the none working AC off the roof and cover the hole..as a small portable is all we need,,I am a retired carpenter so have all the tools,,but need the know how in some ares
Thanks for all your info
Cheers Ron
|
Hi Ron,
Congrats on your new camper! and project....
Yes, I have a roof repair post too but not on the metal roof that you have on your 89. At least I think you have a metal roof. This link is for a rubber roof but it has a lot of pics and talks to a lot of the same wood, siding, sealants etc as your will have, just not the actual roof material.
You can fix anything on that camper with your background. And we can help with the "how to" or "How does it come apart" questions.
Pics go a long way in these repair threads....
See here for the roof http://www.sunlineclub.com/forums/f7...avy-16834.html
And here for some more on "How do they come apart" Have not yet made it to the fixing part yet... http://www.sunlineclub.com/forums/f7...avy-17684.html
We have many other members who have done major repairs with pic's too. Start a post on yours when the time comes and folks will help if they find your post.
Happy camping this year and look forward to your repair post.
Hope this helps
John
__________________
__________________
Current Sunlines: 2004 T310SR, 2004 T1950, 2004 T2475, 2007 T2499, 2004 T317SR
Prior Sunlines: 2004 T2499 - Fern Blue
2005 Ford F350 Lariat, 6.8L V10 W/ 4.10 rear axle, CC, Short Bed, SRW. Reese HP trunnion bar hitch W/ HP DC
 Google Custom Search For Sunline Owners Club
|

|

|
|
07-10-2018, 08:40 PM
|
#22
|
|
Moderator
Join Date: Dec 2006
Location: Michigan
Posts: 6,155
SUN #123
|
Quote:
Originally Posted by JohnB
Jon,
Thanks for the good words
H'mm a backing plate..?? Do you mean something to take the place of the wall board I cut out? If so, yes I have a piece o new luan to put in their. Then the bead board (wainscot) will go over that. I have to shim the wall surface out anyway so I will just fill the area with new luan. It will hold the insulation in then until I get to the beadboard.
If your backing plate has something to do with the frame repair, need more info what you are referring too.
|
Sorry, brake backing plate, to bolt to the axle. So basically all new brake parts for that minus the drum.
__________________
__________________
2007 T-286SR Cherry/Granola, #6236, original owner, current mileage: 9473.8 (as of 6/18/21)
1997 T-2653 Blue Denim, #5471
1979 12 1/2' MC, Beige & Avocado, #4639
Past Sunlines: '97 T-2653 #5089, '94 T-2251, '86 T-1550, '94 T-2363, '98 T-270SR

|
|
|
|
|
07-10-2018, 09:15 PM
|
#23
|
|
Moderator
Join Date: Nov 2006
Location: Ohio
Posts: 12,654
SUN #89
|
Quote:
Originally Posted by Sunline Fan
Sorry, brake backing plate, to bolt to the axle. So basically all new brake parts for that minus the drum.
|
Now that's funny.... my brain went blank... and instinct kicked in. A backing plate is normally used in welding as a reinforcement. And what you call a "brake backing plate", I nickname it "a complete brake plate", no backing....
Normally if buying new brake parts, yes a complete brake unit; shoes, magnets, arm, springs, adjuster and the shoes etc. are cheaper then buying the shoes separate.
In this case we are on a quick timeline so no time to order online. So I drove 15 minutes over to the family parts annex ...(aka BenB's place) and picked up new shoes that were for a 3,500# Dexter axle on a Coleman Mesa Popup... The magnet and arm, adjuster on the 2475 were still all good.
__________________
Current Sunlines: 2004 T310SR, 2004 T1950, 2004 T2475, 2007 T2499, 2004 T317SR
Prior Sunlines: 2004 T2499 - Fern Blue
2005 Ford F350 Lariat, 6.8L V10 W/ 4.10 rear axle, CC, Short Bed, SRW. Reese HP trunnion bar hitch W/ HP DC
Google Custom Search For Sunline Owners Club
|
|
|
|
|
07-10-2018, 09:32 PM
|
#24
|
|
Moderator
Join Date: Dec 2006
Location: Michigan
Posts: 6,155
SUN #123
|
I know the feeling. I have a few old brake plates hanging on the garage wall, for emergencies. They are used, but they weren't bad, so they have good parts that can be used in a pinch.
__________________
2007 T-286SR Cherry/Granola, #6236, original owner, current mileage: 9473.8 (as of 6/18/21)
1997 T-2653 Blue Denim, #5471
1979 12 1/2' MC, Beige & Avocado, #4639
Past Sunlines: '97 T-2653 #5089, '94 T-2251, '86 T-1550, '94 T-2363, '98 T-270SR
|
|
|
|
|
07-10-2018, 10:28 PM
|
#25
|
|
Moderator
Join Date: Nov 2006
Location: Ohio
Posts: 12,654
SUN #89
|
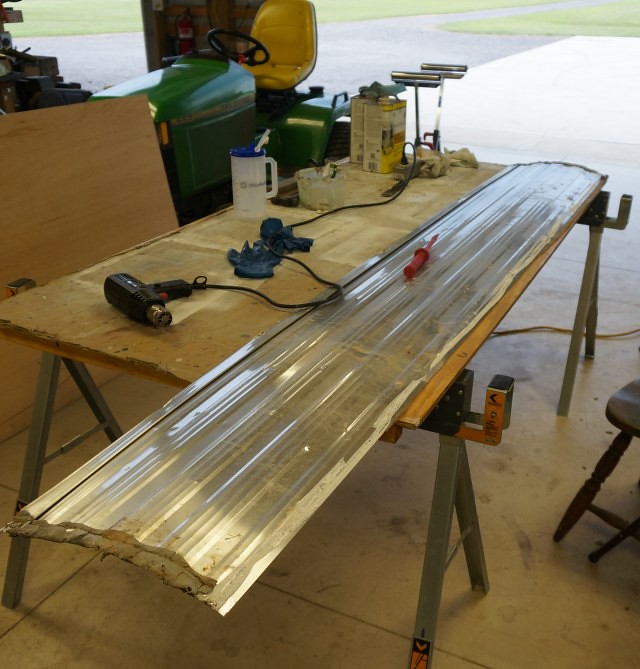
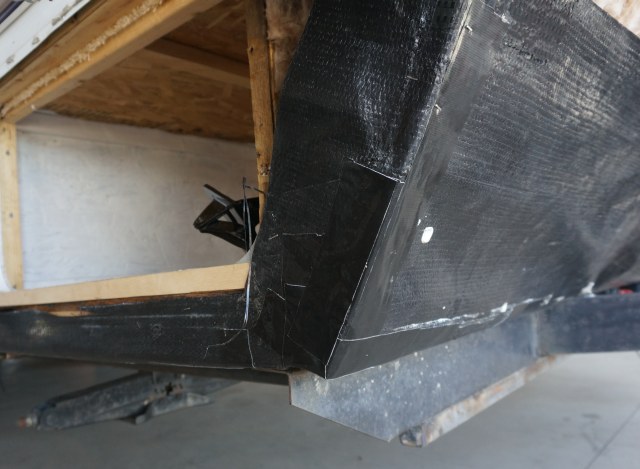
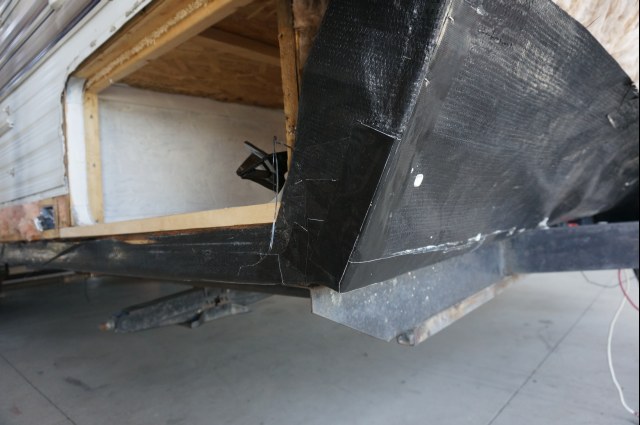
Update over the last few days.
I acquired the parts to complete the brake repair and installed them. In the process there was also some wheel well areas that needed attention so water would not get in. I patched this for now but will address later when the back of the camper comes apart.
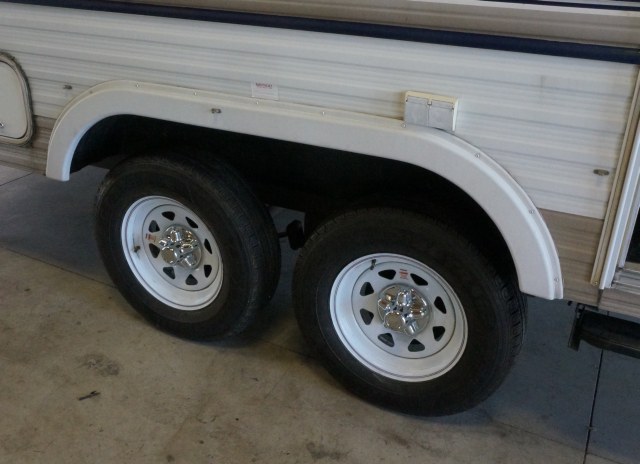
We put new wheels and tires on the T2475 that were targeted for Project Camper no. 1 (The T1950) as they need to get used to help oil them verses sitting in the barn and time going by on them not being used. The 4 main tires which came on the T2475 have about 1.5 years left on them before they age out which were still good, but since this is a 700 mile trip, we went with the new ones. And the spare changed too which was from 2004 original still
Amazing it must have been undercover the whole time. No outside sun damage, but I would not use a 14 year old ST tire spare on an over the road situation of a TT.
I converted to the push on hub caps. It makes the 3 sets of re-torqueing needed when changing wheels so much easier and they are a lot cheaper than buying the Dexter hub caps when the 3 tangs break off which they do often.
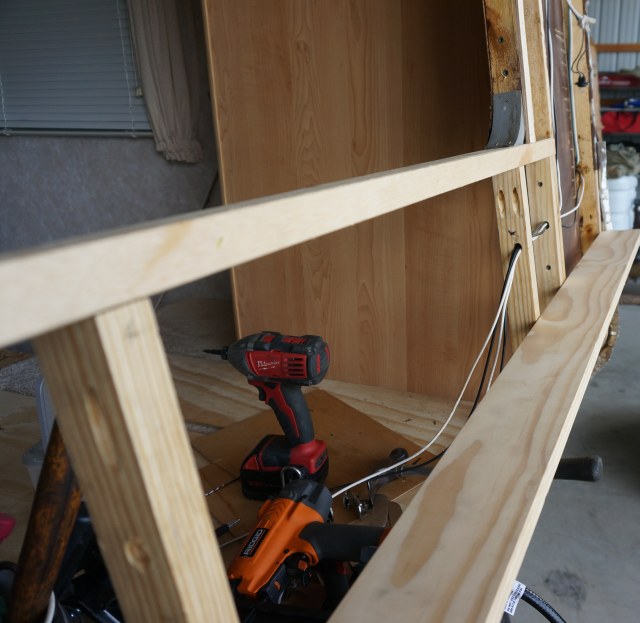
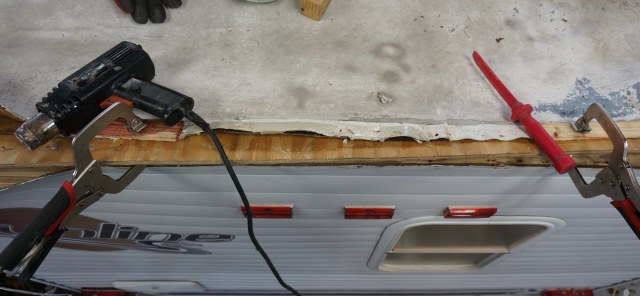
Moved onto bolting the floor to the frame header. I had to do a lumber yard run so that ate up some time for get longer bolts and some other things. On this size frame, it takes 5/16-18 x 4 long carriage bolts or hex head. I went with galvanized to help stop the heavy thread rusting.
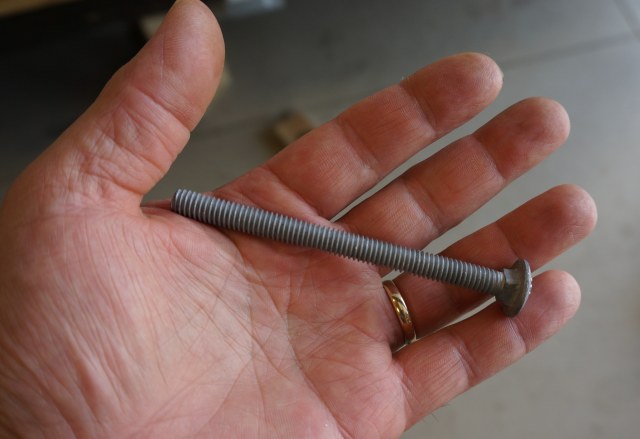
These took longer than normal to install due to circumstances. If you have a cracked frame header and you are doing floor repair, put the carriage bolts in before the frame repair. Once the lower header reinforcing is on you cannot drill up from the bottom. And going down from the top, while using the old holes in the floor as a guide, Sunline did not always drill them straight down. I had 2 which where a fishing expedition to find the slot in the header from above.
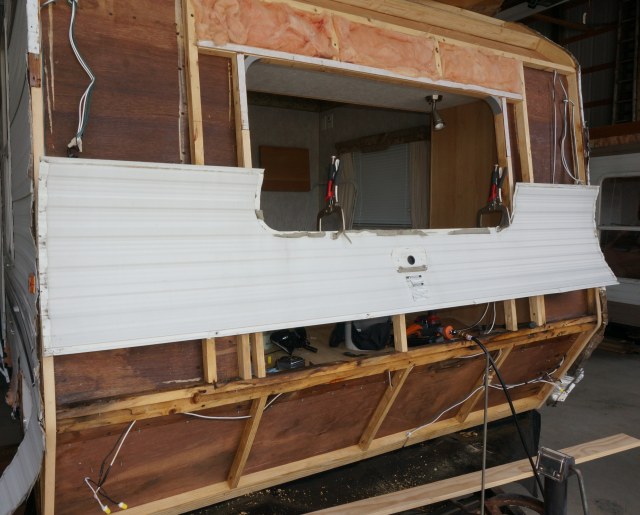
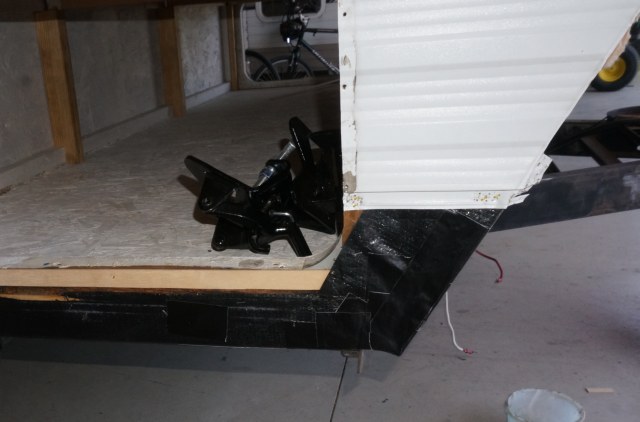
Next was to get the front wall wiring all ready to close the wall short of the front hitch light. Also to be noted, Sunline would put silicone in the wire nut caps of the DOT lighting wires. The front clearance lights have this done to them to help keep water out and I have seen it on all the rear DOT lights. However they do not do this to any of the 12 volt camper wiring. And the wires on the cargo hole lights where very oxidized the wire nut spring inside rusted bad. I used new wire nuts and siliconed all the nuts to keep any moisture out of the connection.
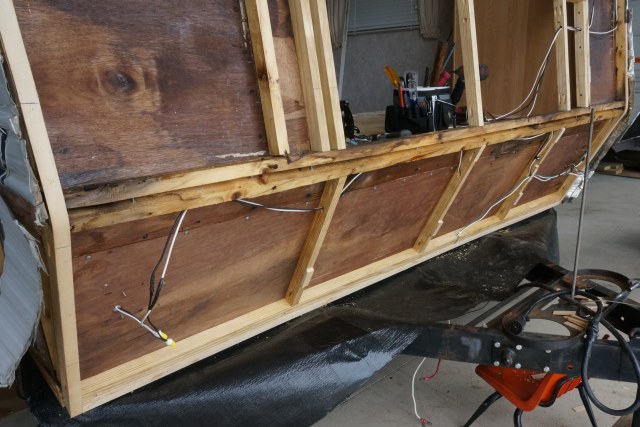
The front wall needed to be prepped for siding. For those who may not have done a siding repair, there is a process to this. Sunline would shim out the front and rear wall of the camper by 1/4. They used 2, 1/8 luan shims stacked to do this. The reason is so they can align the siding in a straight line on natural wood studs that wave in and out. Sunline did not want the siding to follow that wave spo they shimmed the walls studs at the stapling location.
Each wall stud needs to be checked for shimming and how much. However as important is to know where the old siding needs to be located so you can put the shims in the correct place and most important, the siding goes back on in the same place it came off. Especially with cargo holes or windows that are precut out now.
A trick I do is to mark all the wall studs where the bottom of the siding is stapled on before taking it off. This gives a guide as to where to put it back on and have all the siding line back up with precut holes in it. Since I replaced all the lower wall studs there are no marks. I had to recreate them. I started with clamping on the window section of siding, there were some marks left and I had the window cut out to line up. Then custom measured each next piece of siding where its staple edge would land on the stud and mark the studs.
Once you know the stud locations you can add shims on the wall studs as needed in the correct location and put new marks on top of the shims to see when adding the siding. On the ends walls you start with the 2 shims full length of the wall. Then you find a 8ft straight edge. I used a piece of clear 1 x 4 board that as verified straight.
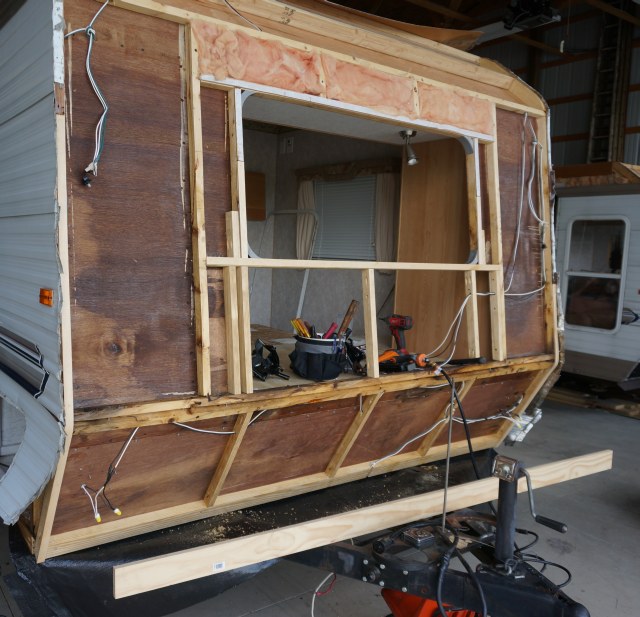
See here how different each wall stud bows in or out. And some do not needs shims they are bowed out so much.
This location needs varying numbers of shims to come out as a straight line to staple the siding to the studs.
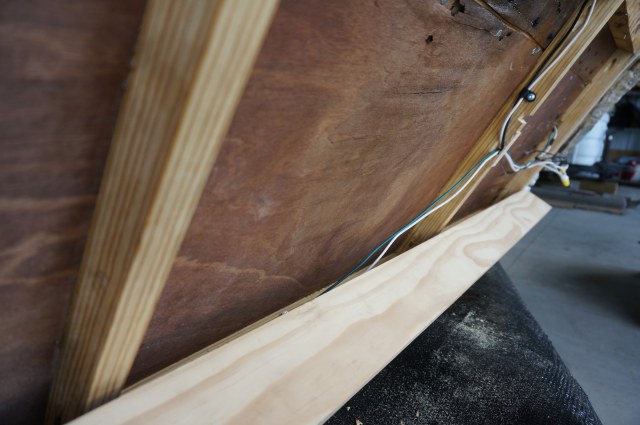
This area needed no shims, this area sticks out in relation to the end walls. It seems that 1/4" of shim is enough in most cases to be able to deal with wall studs warped in or out.
Here you can see the shims on the studs across the front. Some have up to 3 shims, others none. You can see the siding line up marks on the right side of the camper wall. (left side in the pic)
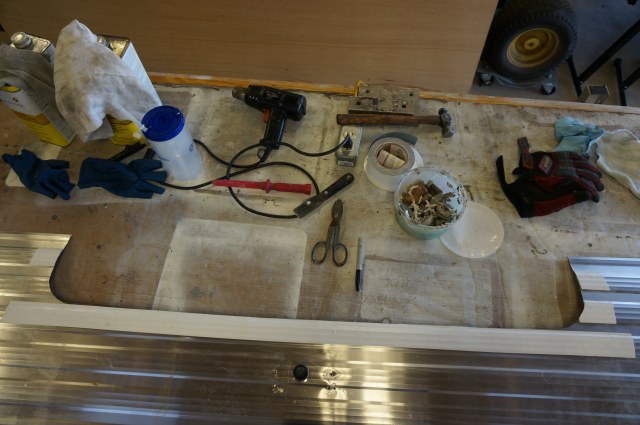
Now onto the process of cleaning up all the siding, molding and cargo doors etc. to be able to start the siding installation. This process takes time.
- Start by scraping off with a plastic scraper any putty tape.
- Use a heat gun remove the butyl caulk between the seam joints.
- Chemical clean all the dirt, old putty and butyl off the siding. Start with mineral spits and a rag.
- Using metalworking pliers or wood blocks to straighten out any bent edges or burred holes.
- Follow up with a high flash cleaner to remove mineral spirits residue. I use Naphtha as the high flasher cleaner.
- If there are any holes in the siding from corrosion or stone dings, seal the inside of the siding with Eternabond tape or other long lasting sealants. Just do not use silicone in this application.
- Do both sides of the siding or cargo hole door, window etc.
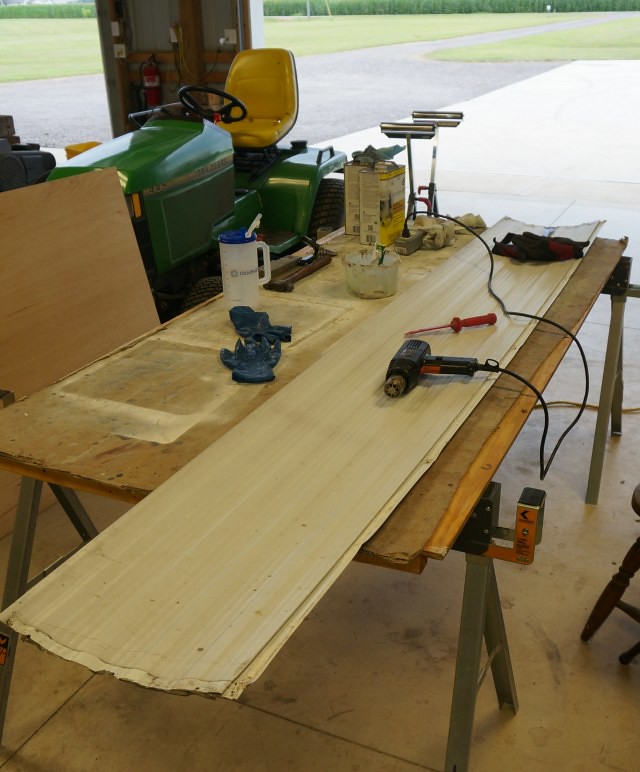
The back side can be as bad as the front.
You really want all the areas that the new sealants touch during installation to be clean and free of the old putty tape/sealants. This takes a good amount of time but makes installation so much easier and it will last and be waterproof when done right.
Im in cleaning mode now. More as progress continues.
Thanks for looking.
John
__________________
Current Sunlines: 2004 T310SR, 2004 T1950, 2004 T2475, 2007 T2499, 2004 T317SR
Prior Sunlines: 2004 T2499 - Fern Blue
2005 Ford F350 Lariat, 6.8L V10 W/ 4.10 rear axle, CC, Short Bed, SRW. Reese HP trunnion bar hitch W/ HP DC
Google Custom Search For Sunline Owners Club
|
|
|
|
|
08-01-2018, 08:40 PM
|
#26
|
|
Moderator
Join Date: Nov 2006
Location: Ohio
Posts: 12,654
SUN #89
|
Need to catch up on the progress as I am done with the camper for now. There is still a large rear wall repair to do, but that will come some winter.
As stated in the last update, cleaning and getting the camper ready to put back together is a time-consuming task. I will highlight some areas I have not yet mentioned and briefly post some of the areas mentioned in other SOC posts.
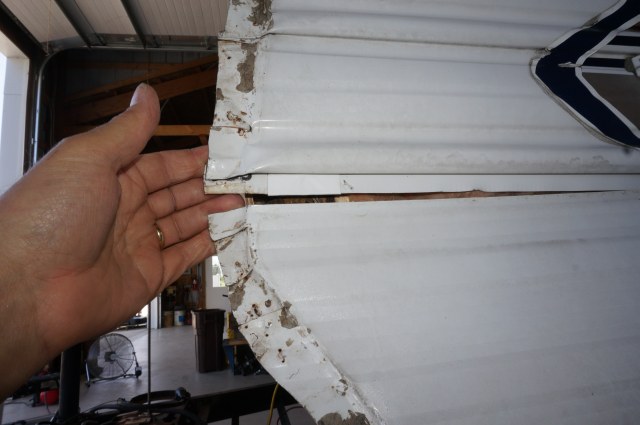
Siding corrosion:
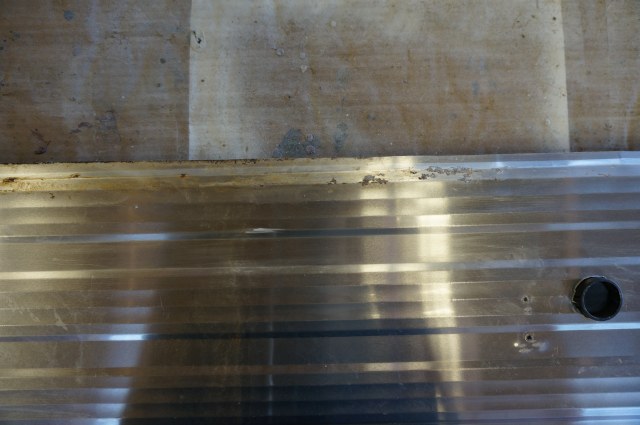
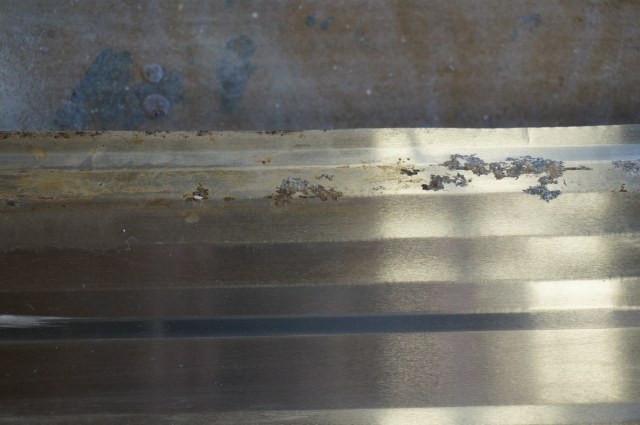
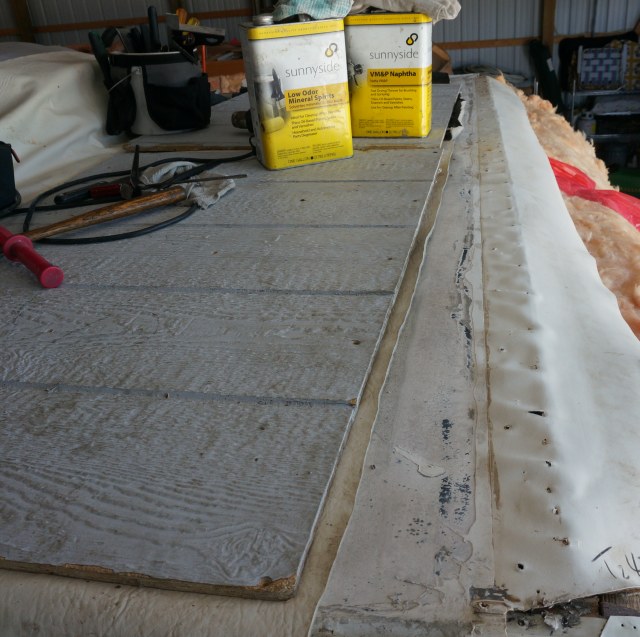
The back side of the aluminum siding is untreated. Meaning it is bare aluminum and given the right conditions it can corrode. In this case, from the inside out.
Here are some pictures of typical siding corrosion from a long standing water infection. I would estimate this took about 3 maybe 4 plus years to slowly get to this point. All of this corrosion is in the area of a water infection. Lightly galvanized staples do rust when they are wet enough, long enough. There is lightly coated screws used building the camper and they rust too inside the wall. This rusting is a chemical reaction and it adds to the siding problem. There is also a chemical reaction of standing water on bare aluminum, wet wood, and about anything else the water touched and presented to the bare aluminum to start a corrosion action that will spread over time once stated and the moisture remains.
The back side of a siding joint.
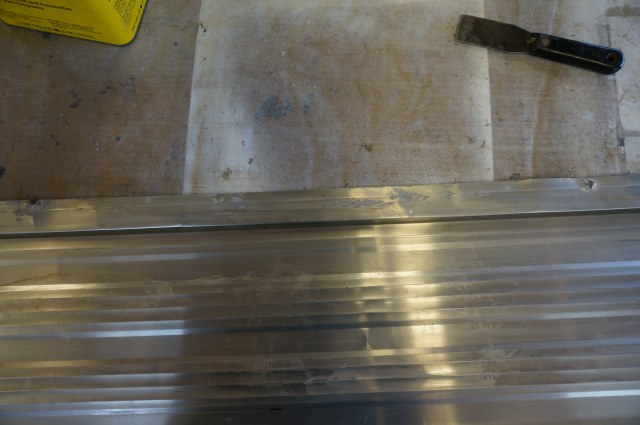
Close up
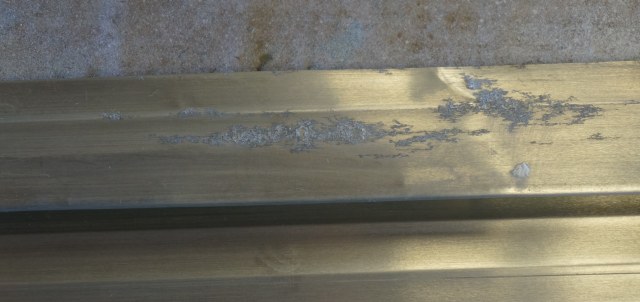
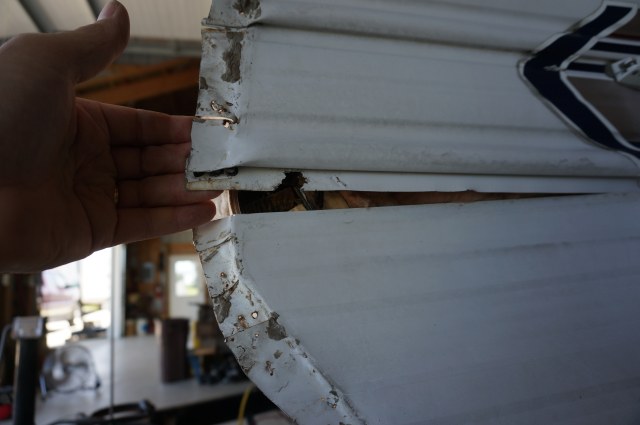
The male top part of the siding which goes into the siding joint. This is the area directly below the center of the front window. The hitch light wire goes through the black bushing.
Close up
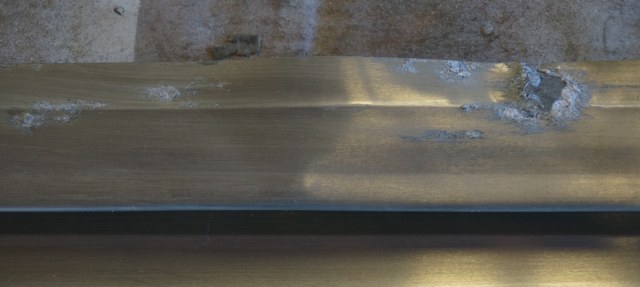
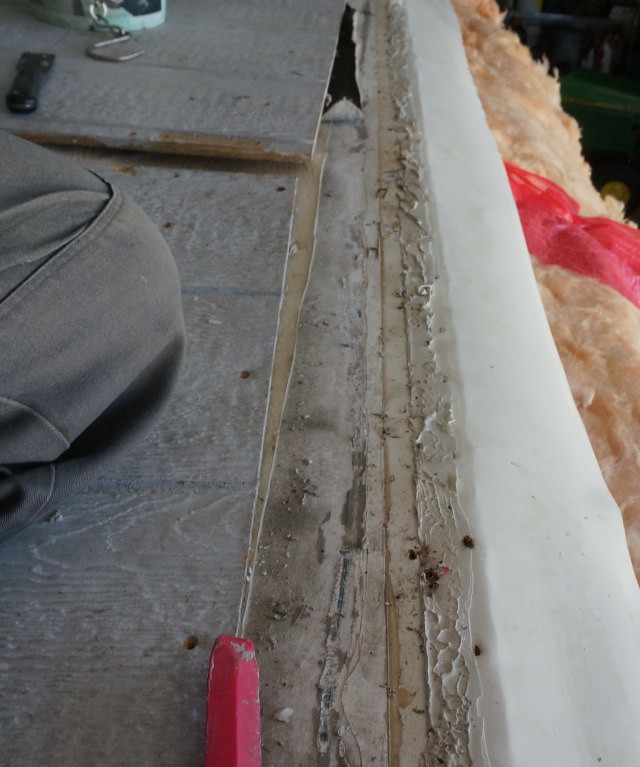
Staple corrosion.
More staple corrosion
This is how I repaired the siding before putting it back on. Totally clean the area with a high flash cleaner. I used Naphtha.
I use 2” wide Eternabond Roof Seal tape on the inside over the affected area. This prevents water from getting into the camper and seals the air & moisture from getting to the corrosion to prevent it from spreading.
This is a progression of putting the E bond on. Start with a short amount of release paper peeled back, approx 1/2" to stick and alow being able to align it.
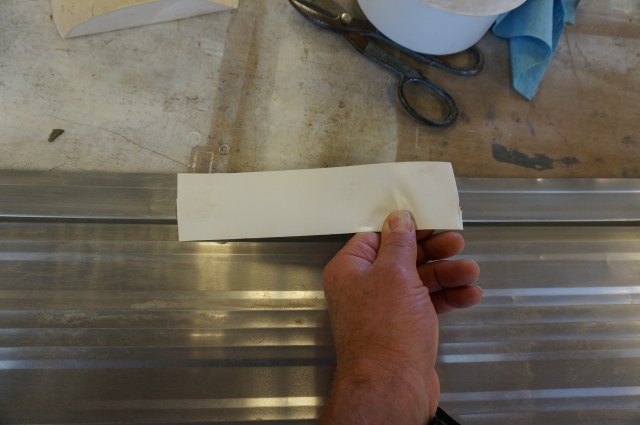
Press tight, fold over and peel some more release liner, Approx 3/4 to 1". Keep doing short approx 1 to 2" lengths of peel and stick down of the E bond. Going full peel will have higher odds of it getting all stuck to itself.
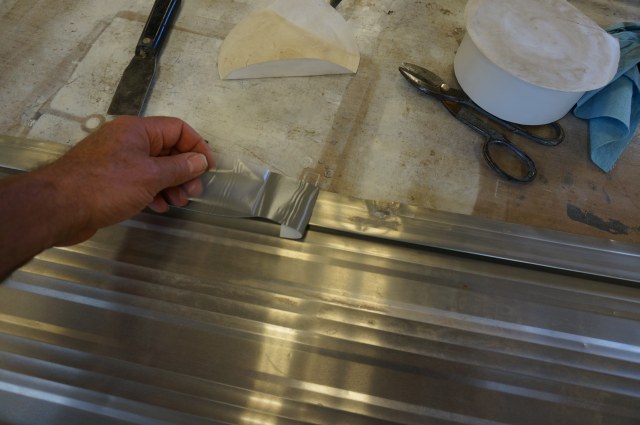
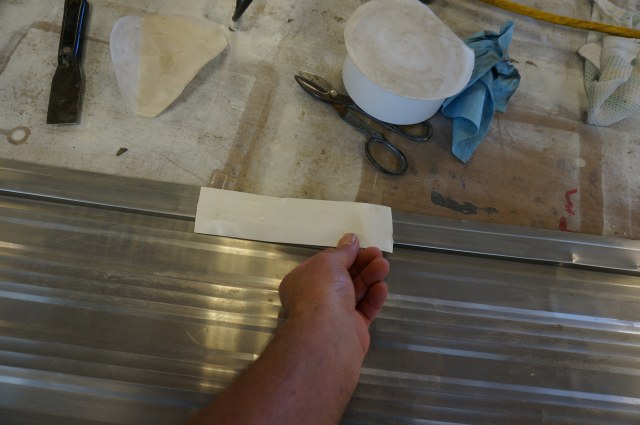
Use a putty knife to fold and tuck under the siding joint. Do this every 2 to 3 inches as you peel back release liner and press and stick.
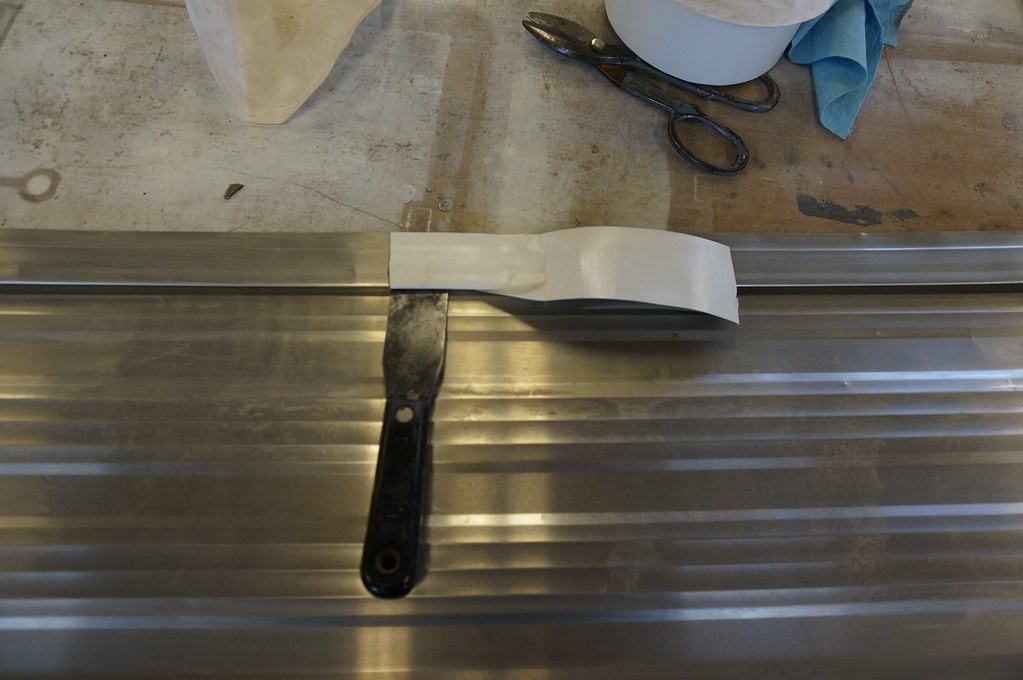
Area completed
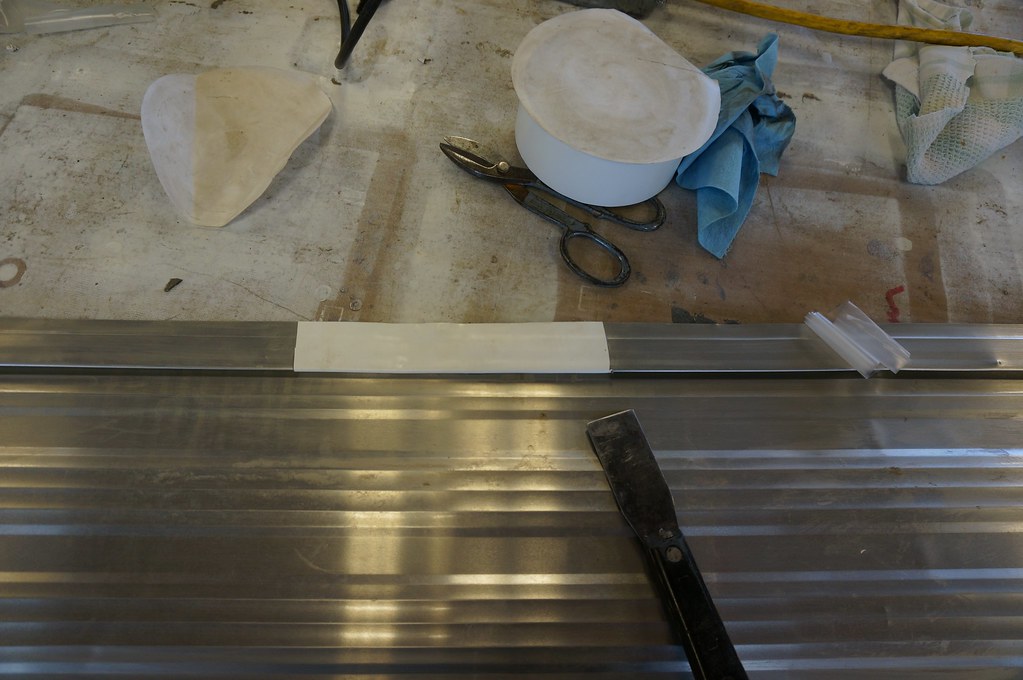
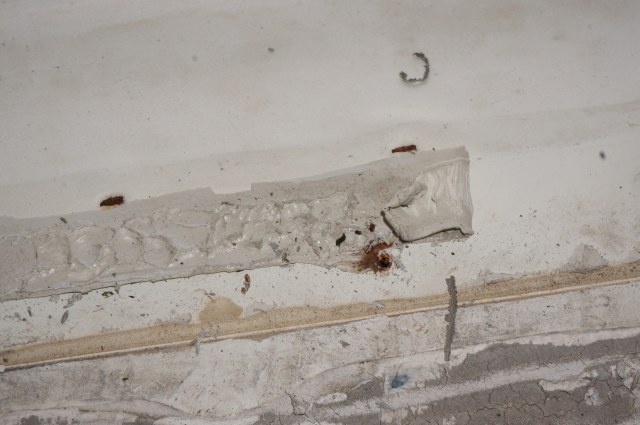
The area under the front window that was so wet, repaired.
The siding staple area repaired
__________________
Current Sunlines: 2004 T310SR, 2004 T1950, 2004 T2475, 2007 T2499, 2004 T317SR
Prior Sunlines: 2004 T2499 - Fern Blue
2005 Ford F350 Lariat, 6.8L V10 W/ 4.10 rear axle, CC, Short Bed, SRW. Reese HP trunnion bar hitch W/ HP DC
Google Custom Search For Sunline Owners Club
|
|
|
|
|
08-01-2018, 08:43 PM
|
#27
|
|
Moderator
Join Date: Nov 2006
Location: Ohio
Posts: 12,654
SUN #89
|
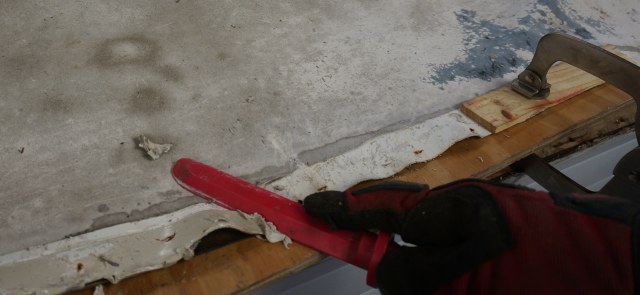
Getting old butyl sealing tape off of a rubber membrane:
This is a tedious task. I continue to try new ways to make this go faster and easier and this is the results of many failed trials. The rubber being so pliable and fragile to not put a hole in it makes this more complex. On the front roof seam, a large part of the seam was still stapled to the rafter and I had no need to upset this. On the ends the rubber and bud board was loose. Both areas have different challenges.
Temperature is a large factor of this being easy or not. Too hot, humid hot 90F summer days is not good and overheating with a heat gun is not good. The butyl is too soft and goes into taffy too quick. A 10F (80F) degree lower temp day is a large difference. I have done this in the winter at freezing temps and there are other issues as it too cold. Too cold it does not want to move much at all. Then warming with a heat gun helps.
First try it at ambient temp for the time of year and location you are at. If it is too cold, adding some heat from a heat gun helps. If the day it too hot, adding heat makes it worse wait for the next morning when it is cooler. It is a trial and error method to see how it responds.
Scraping it off directly (press and push) with a metal or plastic does not work well. Your odds of digging into the rubber are higher also. I found the best so far is to have the “right” temperature and friction slice it off.
Like this. Using a plastic scraper with an edge (not sharp, more dull), place the edge to a side of the butyl.
Start like this
Then the scraper at an edge
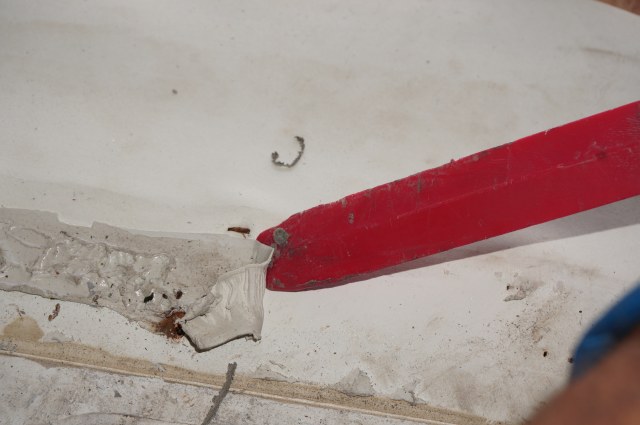
Move the scraper on an angle across the butyl. Gently pulling the butyl helps, do not pull to hard or it will taffy out on you.
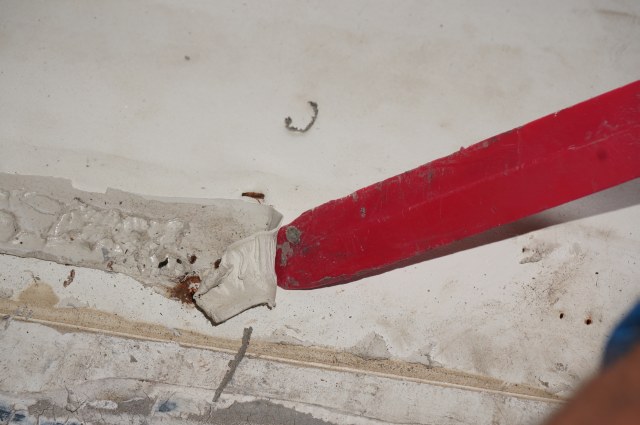
Shear some more

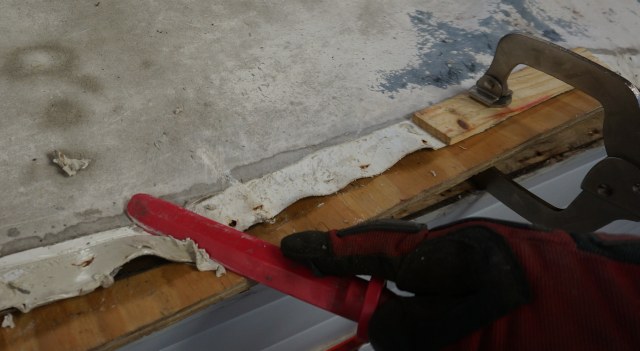
That effort took about 1/8” of butyl up and not affect the rubber and skimmed it clean against the rubber. Keep repeating the process 1/8” peeling at a time. Yes, 1/8” and the camper is 96” wide. This is not a fast process, grin and bear it, in 20 to 30 minutes you will be across the roof and this is over.
What little butyl is left will come up with mineral spirits on a rag rubbed in spot treatment followed by wiping dry and then using a high flash cleaner to get the mineral spirits off.
Here is the rear roof seam, this area was totally lifted during a repair. The same shearing process was used but this area I could do much faster due to the setup and temperaure.
Start with a board under the rubber/budboard so you can press down and not hurt the rubber. This is the major difference in the back working faster. Notice the wood and clamps holding the rubber taught and the heat gun.
The temps on this day was cooler. Approx. 70F and adding a little heat helped soften and allowed the shearing action to work much better.
Start at an angle with the scraper
Press down and pull (shear) on an angle to the butyl
Complete the shear. Now about 3/16 to the most 1/4" has sheared off including any Dicor caulk.
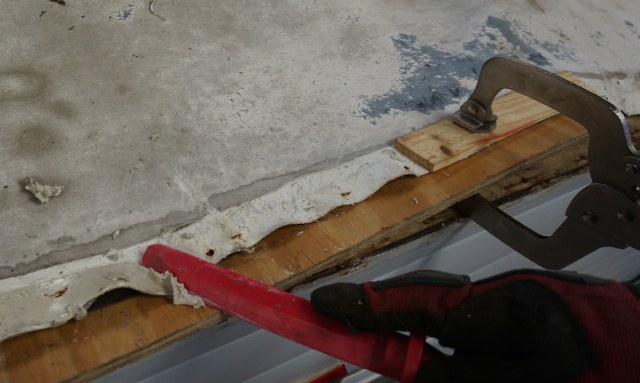
These conditions allowed for twice as fast as the front to remove the full rear seam. The temperature was better and the rubber stiffer with the plywood board under it to allow the scraper to be pressed down harder while drawing the scraper back at an angle to shear the butyl clean off the rubber.
The siding corners need to be flattened and cleaned as well.
Starting with a plastic hammer or a wood block and a steel hammer, fold over any raised corner edges and then flatten with a metal hammer any sharp raised screw holes.
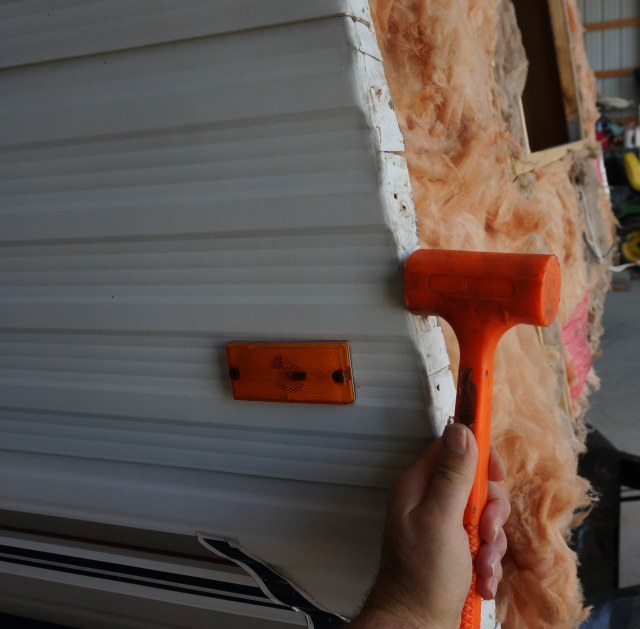
Then clean with the mineral spirits, wipe dry followed by a high flash cleaner to get the mineral spirits residue off.
The corner and all the moldings need to be cleaned and then all screw deformations flattened.
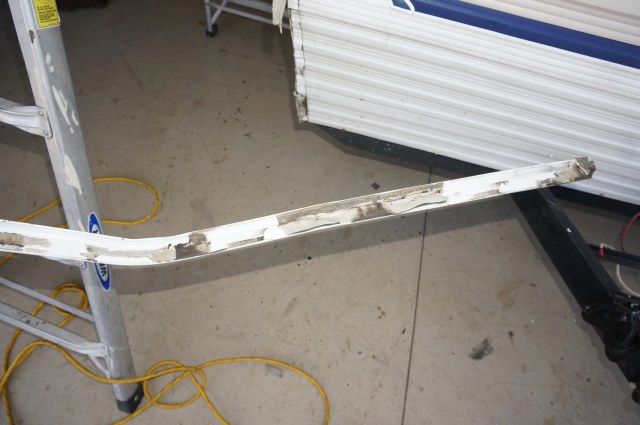
An anvil setup to flatten the screw deformations.
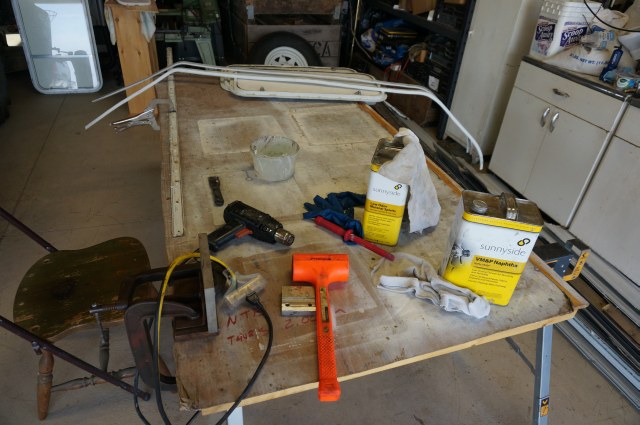
For more detail & pics on molding cleaning and flattening, see this link to another repair post. It will drop you into the correct location within the post for molding cleaning.
T264SR roof repair
This completes the cleaning process. Next up, insulation and siding install.
__________________
Current Sunlines: 2004 T310SR, 2004 T1950, 2004 T2475, 2007 T2499, 2004 T317SR
Prior Sunlines: 2004 T2499 - Fern Blue
2005 Ford F350 Lariat, 6.8L V10 W/ 4.10 rear axle, CC, Short Bed, SRW. Reese HP trunnion bar hitch W/ HP DC
Google Custom Search For Sunline Owners Club
|
|
|
|
|
08-02-2018, 07:48 AM
|
#28
|
|
Moderator
Join Date: Dec 2006
Location: Michigan
Posts: 6,155
SUN #123
|
Awesome description, John! Another thing where the key to good results is all in the prep.
I'm curious, why is the high flash cleaner needed unless you are reassembling right away?
__________________
2007 T-286SR Cherry/Granola, #6236, original owner, current mileage: 9473.8 (as of 6/18/21)
1997 T-2653 Blue Denim, #5471
1979 12 1/2' MC, Beige & Avocado, #4639
Past Sunlines: '97 T-2653 #5089, '94 T-2251, '86 T-1550, '94 T-2363, '98 T-270SR
|
|
|
|
|
08-02-2018, 06:54 PM
|
#29
|
|
Moderator
Join Date: Nov 2006
Location: Ohio
Posts: 12,654
SUN #89
|
Insulation and Darco wrap:
The insulation install is fairly straight forward. A few tips,
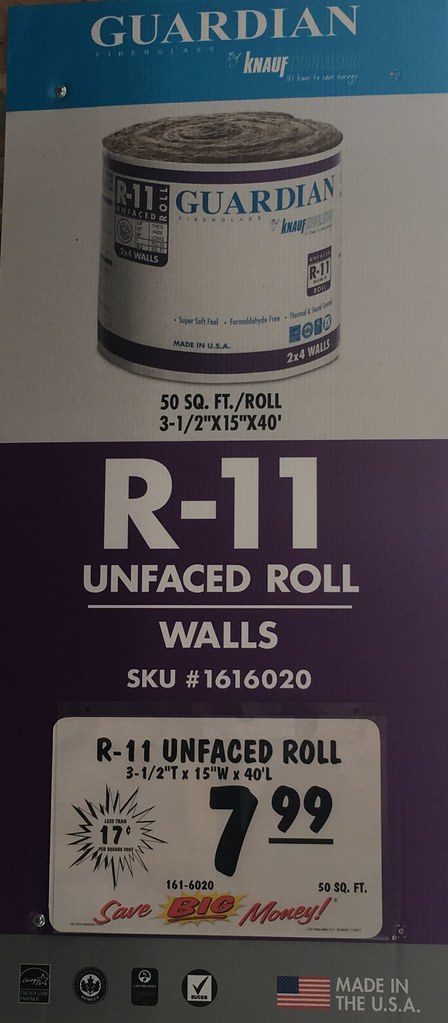
Where to get insulation?
Buying 1 ½ thick batt insulation is not common in the lumber yards. What I did was by 3 ½ thick unfaced and split it in half. Here is the role I bought at Menards.
To cut the insulation to size I use: - Using a long board (4 to 8 ft long) that is about 3/8 to 1 1/2 thick and can be scared by a sheet rock knife.
- Get a sheetrock knife with a new blade and a thin straight edge from 2ft to 6 ft long.
- Place the insulation you want to cut on top of the cutting board.
- Measure off the size of insulation you want.
- Press the straight edge down tight against the board at the distance you want compressing the insulation as much as you can.
- Draw the sheetrock knife and it cut clean.
On the camper, insert the insulation into each wall, ceiling or floor cavity and staple in place as needed so it wont fall out. The staples go into the side of the studs, not the siding mounting face.
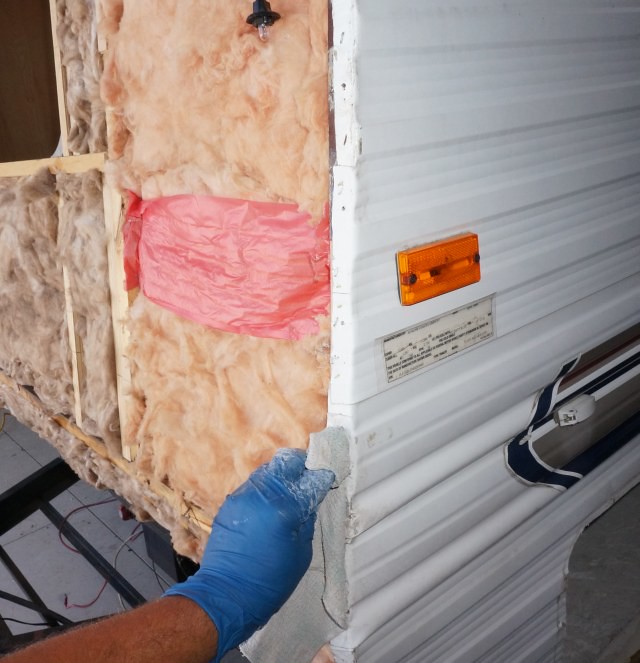
I will note that Sunline did not insulate the front wall crevice at the knee area on the last 3 campers I had the front wall apart. Meaning the angle transition from the front window area the 2 ft lower wall behind the battery. See here the red arrow. This was as I was taking the siding off.
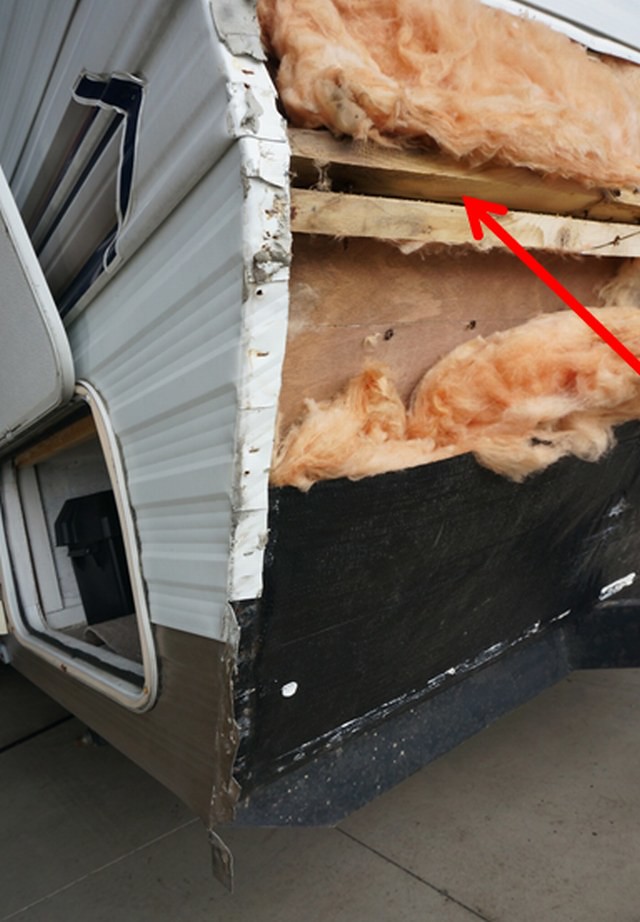
The problem is, if you winter camp or camp in very cool weather, that small strip of wall board will sweat inside the camper when the heat is on as it is colder than the rest of the wall. Especially with a front bedroom and sleeping overnight in that room. I filled that cavity with insulation to help that problem. Have no real good reason Sunline left it uninsulated.
Here is some of the insulation in progress. You can tell by the color the new insulation. The Sunline original was pink.
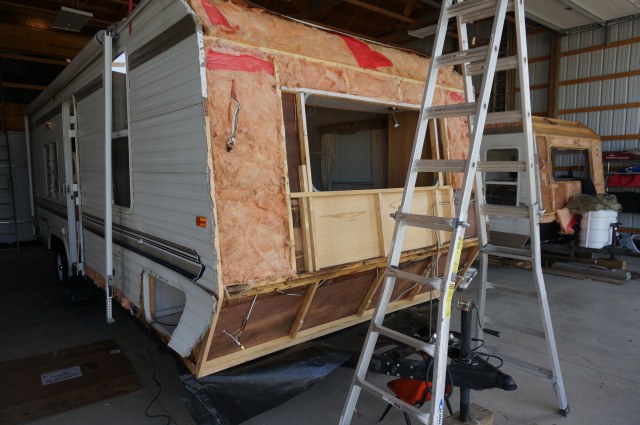
When the insulation is done, there is Darco (the black plastic bottom membrane) to wrap tight at the corners and the sides and to make sure there are no exposed holes. To seal old staple holes or tears I use the Flex Mend or Gorilla tape (accept no substitutes). You have to clean the surface with a high flash cleaner and then tape them up. I use a heat gun when applied to warm and then press it tight to create a permanent seal. This was mainly for the Flex Mend but I found it helps the Gorilla tape too.
I have converted to stainless staples where they are exposed to the outside. I keep finding that all the exposed galvanized staples Sunline used are corroded to almost nothing over time. This includes the lower gold siding that on these smaller campers that is staple up from the bottom.
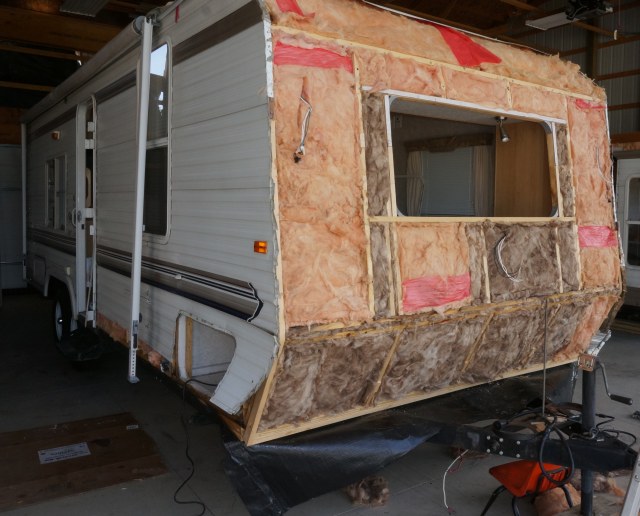
First wrap the side wall up and staple in place.
Then work your way to the corner. Hopefully you took good pic's or notes on how Sunline folded that corner. I repeated the process and then taped over it.
Then you start putting the siding back on the wall sides first and fold over the corner tabs to the front wall.
Then the side gold siding goes on and it stapled up from the bottom. This Darco area had many holes in it from the prior staples. I taped all of this area before putting the siding back on and used the stainless staples in this area. All the prior staples corroded completely off leaving that bottom piece of siding sort of just hanging.
Next is the front wall siding install.
__________________
Current Sunlines: 2004 T310SR, 2004 T1950, 2004 T2475, 2007 T2499, 2004 T317SR
Prior Sunlines: 2004 T2499 - Fern Blue
2005 Ford F350 Lariat, 6.8L V10 W/ 4.10 rear axle, CC, Short Bed, SRW. Reese HP trunnion bar hitch W/ HP DC
Google Custom Search For Sunline Owners Club
|
|
|
|
|
08-02-2018, 07:04 PM
|
#30
|
|
Moderator
Join Date: Nov 2006
Location: Ohio
Posts: 12,654
SUN #89
|
Quote:
Originally Posted by Sunline Fan
Awesome description, John! Another thing where the key to good results is all in the prep.
I'm curious, why is the high flash cleaner needed unless you are reassembling right away?
|
Hi Jon,
Thanks for the good words.
When working on the rubber roof area, you do not want to leave the left over mineral spirits film on the rubber. While a few minutes left on is OK, lots of minutes to hours is a risk of affecting the rubber. So the high flash cleaner directly after mineral spirit cleaning on the rubber is standard practice for me to insure I removed that oil film layer left by the spirits.
Mineral spirits is a good deep cleaner (cuts dirt) and it dissolves butyl and Dicor in thin amounts. But it has the attribute of an oily film that can remain behind even if wiped dry. The high flash cleaner does some of this cleaning too but not as good and deep as the mineral spirits. So you cannot always get away with just using the high flash cleaner.
Thanks
John
__________________
Current Sunlines: 2004 T310SR, 2004 T1950, 2004 T2475, 2007 T2499, 2004 T317SR
Prior Sunlines: 2004 T2499 - Fern Blue
2005 Ford F350 Lariat, 6.8L V10 W/ 4.10 rear axle, CC, Short Bed, SRW. Reese HP trunnion bar hitch W/ HP DC
Google Custom Search For Sunline Owners Club
|
|
|
|
|
08-02-2018, 07:36 PM
|
#31
|
|
Senior Member
Join Date: Sep 2010
Location: Michigan
Posts: 854
SUN #1546
|
I am just reading this amazed...What a great how to write up!
__________________
 Joan & Miss Emme Lu Who
Full Timing in T-1950 2005 Anniversary Model
1997 6.5L Chevy Turbo Diesel Truck
"Pure Michigan"
Facebook: Apackof2 for the Rd
|
|
|
|
|
08-03-2018, 08:49 AM
|
#32
|
|
Moderator
Join Date: Dec 2006
Location: Michigan
Posts: 6,155
SUN #123
|
Good to know, thanks John! I have noticed the oily residue with mineral spirits, but wasn't sure if it's something that would just dry after a little while or would actually hang around. What are some other high flash cleaning options besides naphtha?
__________________
2007 T-286SR Cherry/Granola, #6236, original owner, current mileage: 9473.8 (as of 6/18/21)
1997 T-2653 Blue Denim, #5471
1979 12 1/2' MC, Beige & Avocado, #4639
Past Sunlines: '97 T-2653 #5089, '94 T-2251, '86 T-1550, '94 T-2363, '98 T-270SR
|
|
|
|
|
08-03-2018, 05:53 PM
|
#33
|
|
Moderator
Join Date: Nov 2006
Location: Ohio
Posts: 12,654
SUN #89
|
Quote:
Originally Posted by Sunline Fan
Good to know, thanks John! I have noticed the oily residue with mineral spirits, but wasn't sure if it's something that would just dry after a little while or would actually hang around. What are some other high flash cleaning options besides naphtha?
|
Yes, mineral spirits does hang around, especially if it gets soaked into butyl tape or putty tape. If you are cleaning edge molding (any kind, cargo door, corner molding etc.) with mineral spirits to later put Dicor non leveling over it, you really need to wait over night or longer. If you put the Dicor on too soon after using mineral spirits, the sprites starts to gas off under the Dicor. It will turn the putty tape or butyl goo'ie and bubble the Dicor. Learned that this spring.
Types of high flash cleaners, which in this context means, it works fast, does what you need it too and then evaporates off fast and does not leave a residue. I will list ones I have tried or used. A main thing on the "need" list is the cleaner will "not" lift the paint on aluminium molding or the siding. For sure do "not" use acetone (which is a high flash cleaner) where it will come into contact with any kind of camper painted aluminum. It will strip the paint back to shiny aluminum.
I started using PPG DX-330. This is used on cars to de-grease them before painting. It for sure works very well. However even with a discount it costs $68 a gallon. While a gallon goes a long ways on a camper and can be justified, I eventually stopped using it other then for real hard to get spaces. I still have a part of a gallon for those special times. The main active ingredient is Naphtha which lead me to trying that straight.
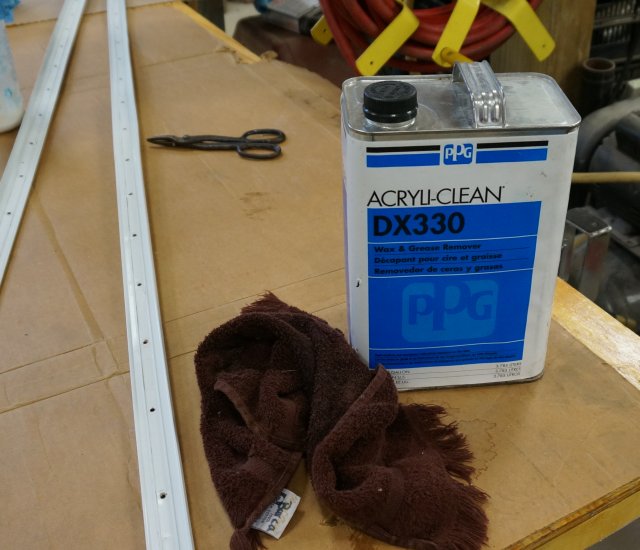
The Naphtha for about $11.00 a gallon at the box box stores (Menards) works well too. It will cut butyl and putty tape, just not as good as mineral spirits but it will clean up any little left overs maybe missed by the mineral spirits treatment. Maybe not as good as the DX-330 but for the price I can live with that. (more elbow grease)
(Hard to see the can wording but it is called VM&P Naphtha).
EternaPrime packaged by Eternabond is a good high flash cleaner. It works like brake cleaner even smells like it. I have not tried brake cleaner. This is however not a great application for it due to cost and the aerosol spray can. You will waste a lot with the cleaner from overspray versus a rag you can dip in a liquid and only use what is needed.
Denatured Alcohol, I have heard of this being used for this purpose, even Mark Polk on his RV videos uses it. I bought a small can and tried it and it does work. Oddly though my can stated it was stove fuel and not to be used as a cleaner. Do not know the context of the word "cleaner" but the can did not go into details. I would consider it an option if I ran out of Naphtha.
Standard home Isopropyl alcohol. This works too. I have not tried to buy it in a gallon can before, I only see it in the pints or quarts for home use.
Lacquer thinner. This fits in the category as it will evaporate off fast and not hurt the paint. I do use this to remove Eternaprime on the rubber roof when needed I just have not used it to take off mineral spirits. It does not hurt the paint.
Each of the above cleaners has a different base to them and they work differently. All of the ones listed will take off the mineral spirits but they will not all work to dissolve off thin streaks of butyl or putty tape left over. Lacquer thinner falls in that group and maybe the alcohols, it will take off the mineral spirits film but it will not touch taking much of any dirt or last few streaks of butyl or putty tape. Point is, if you 100% have it clean with the mineral spirits, then any of the ones listed will work. If you still have very small pieces of butyl or putty tape left, then the DX-330 or the Naptha fits the bill better.
I am sure there are others out there, just I have not used them and do not know if they will lift the paint or leave some kind of residue like the mineral sprites. Turpentine for example, that is not really a high flash cleaner it is more in the family the mineral spirits and it will leave a residue film.
Hope this helps
Thanks
John
__________________
Current Sunlines: 2004 T310SR, 2004 T1950, 2004 T2475, 2007 T2499, 2004 T317SR
Prior Sunlines: 2004 T2499 - Fern Blue
2005 Ford F350 Lariat, 6.8L V10 W/ 4.10 rear axle, CC, Short Bed, SRW. Reese HP trunnion bar hitch W/ HP DC
Google Custom Search For Sunline Owners Club
|
|
|
|
|
08-04-2018, 09:54 PM
|
#34
|
|
Moderator
Join Date: Dec 2006
Location: Michigan
Posts: 6,155
SUN #123
|
Thanks John! I didn’t realize Naphtha is that readily available. In that case, no reason not to use it!
__________________
2007 T-286SR Cherry/Granola, #6236, original owner, current mileage: 9473.8 (as of 6/18/21)
1997 T-2653 Blue Denim, #5471
1979 12 1/2' MC, Beige & Avocado, #4639
Past Sunlines: '97 T-2653 #5089, '94 T-2251, '86 T-1550, '94 T-2363, '98 T-270SR
|
|
|
|
|
08-05-2018, 01:17 PM
|
#35
|
|
Junior Member
Join Date: Aug 2017
Location: Ontario
Posts: 14
SUN #9753
|
Oh my gosh.....you are doing us a wonderful favour by illustrating all the work you are doing. I have a 2004 T2753 that we purchased last year...it's in very good shape and I hope it stays that way. We know we have to re-chalked it but I Pray that we don't have any major repairs coming our way....we're getting too old to do them..Hubby will be 75 next year and we don't have an enclosed garage to do the work....it would of been something he'd like to have done years ago...putter around....keep up the Great Work...I'm paying close attention....
Arlene
__________________
|
|
|
|
|
08-06-2018, 08:26 PM
|
#36
|
|
Moderator
Join Date: Nov 2006
Location: Ohio
Posts: 12,654
SUN #89
|
Hi Arlene,
Thanks for the good words. The hope is this post (still in progress) will help others to be able to fix their camper, learn how campers leak, be able to spot leaks better, and get a better handle on what it could take to fix these kinds of problems.
More yet to come.
Thanks
John
__________________
Current Sunlines: 2004 T310SR, 2004 T1950, 2004 T2475, 2007 T2499, 2004 T317SR
Prior Sunlines: 2004 T2499 - Fern Blue
2005 Ford F350 Lariat, 6.8L V10 W/ 4.10 rear axle, CC, Short Bed, SRW. Reese HP trunnion bar hitch W/ HP DC
Google Custom Search For Sunline Owners Club
|
|
|
|
|
04-27-2019, 07:54 AM
|
#37
|
|
Junior Member
Join Date: May 2018
Location: New Jersey
Posts: 2
SUN #10563
|
Hi John,
Great work and many of your posts have been helpful as I did some repairs on the rear of my trailer.
This post has been great to read through, but has stopped just at the point that I am most interested in... any chance you can explain or show the next few steps with the siding replacement?
I am about to start a similar repair as yours on my front, but would like to know more about how to properly seal and attach the front siding and the corners seams. I am not 100% happy with my butyl tape application in the rear, so wanted to see and/or read about how you did it on the front.
Thanks for any help and your great step by step projects.
-Jay
__________________
|
|
|
|
|
04-28-2019, 05:39 PM
|
#38
|
|
Moderator
Join Date: Nov 2006
Location: Ohio
Posts: 12,654
SUN #89
|
Quote:
Originally Posted by LelandJF
I am about to start a similar repair as yours on my front, but would like to know more about how to properly seal and attach the front siding and the corners seams. I am not 100% happy with my butyl tape application in the rear, so wanted to see and/or read about how you did it on the front.
|
Hi Jay, first off Welcome to Sunline Owners Club! Glad the thread was helpful. And yes, I did sort of stall out on finishing it. It is on the "to do list" but things seem to keep coming up! Having someone needing more on this helps the push to get it back up and going.
To get you some info quickly while I get back onto this "How To" thread, I have done front wall reassembly on other campers and I can link those topics here.
For your question above,
This link will take you posting #35 in a roof repair thread. Post 35 talks about the butyl between the side tabs and the front wall siding. It also talks about the need to use butyl caulk between the front siding joints to keep driving water out during towing.
http://www.sunlineclub.com/forums/f7...tml#post130979
This link to post # 71, shows how we put diamond plate upgrade on the lower section of the front. You may be using the standard siding.
http://www.sunlineclub.com/forums/f7...tml#post131682
This link to post #79 talks about cleaning and straightening the corner moldings.
http://www.sunlineclub.com/forums/f7...tml#post131768
If your camper has a front window, this link to # 80 can help on how to apply the butyl and trim it on windows.
http://www.sunlineclub.com/forums/f7...tml#post131769
This link to post #90 talks about the butyl at the corners and putting it on.
http://www.sunlineclub.com/forums/f7...tml#post131986
This one, #98 covers the vinyl trim insert.
http://www.sunlineclub.com/forums/f7...tml#post132016
Something that can also help, this link will take you to my Flicker Photo site
https://www.flickr.com/photos/camper...7695439321135/
There are 284 pics of the T2475 in the "T2475 Front Wall Repair" folder. There are pics in there that can help, I never made it to adding the words here on the forum, but those are the pics what will be used in it.
Some materials help.
The butyl caulk, I use SureBond - SB-140. I have bought it at 2 places.
Amazon https://www.amazon.com/SUREBOND-Skyl...r=8-1-fkmrnull
Best Materials https://www.bestmaterials.com/detail.aspx?ID=21791
Check the freight on each place.
Butyl Sealing tape. After being burned with the wrong kind of butyl, I found 2 sources of quality and I talked direct to the manufacturers of both.
Permatite 250-H Butyl 250-H Butyl Tape | Permatite
This is good butyl sealing tape. However trying to buy it can be a challenge. I by it by the case since I use so much. Amazon sells it by the case, but the thickness and widths are not always available. I ended up going factory direct however the cost was a lot higher.
GSSI Sealants MB-10A. GSSI Sealants, Inc. I also buy this by the case and what I now use in place of the Permatite. I see it as good if not better. I get the 1" wide x 1/8" thick x 50 ft rolls. I buy it from Best Materials. They do sell it by the roll or the case. https://www.bestmaterials.com/Search...s=tape%2010897
I also see their are sellers on Amazon of GSSI products, just I have not bought this tape from them. Getting it shipped and it not all damaged is an issue. Which is also partly why I buy it by the case as GSSI packs it right at the factory to withstand UPS and FED shipping.
I also suggest you do the Dicor non leveling seal over the exposed edge of the butyl so dirt does not stick and it gives you a 2nd layer of water infection projection. See this post on what to buy and how to use it. http://www.sunlineclub.com/forums/f7...tml#post137746
That should get you going. If you have any other questions until I get the info posted in this thread, just ask away.
Hope this helps
John
__________________
Current Sunlines: 2004 T310SR, 2004 T1950, 2004 T2475, 2007 T2499, 2004 T317SR
Prior Sunlines: 2004 T2499 - Fern Blue
2005 Ford F350 Lariat, 6.8L V10 W/ 4.10 rear axle, CC, Short Bed, SRW. Reese HP trunnion bar hitch W/ HP DC
Google Custom Search For Sunline Owners Club
|
|
|
|
|
04-28-2019, 06:30 PM
|
#39
|
|
Junior Member
Join Date: May 2018
Location: New Jersey
Posts: 2
SUN #10563
|
Thanks John!
It really is amazing how much effort you put into helping and giving such detailed answers, I've seen it repeatedly throughout the forum.
I've been using the butyl tape I got at Camping World because it's close and I pick the one that looks the best... also, I'm tarped in the driveway trying to get it done. I used the same stuff last year and just last week tried to clean up some of the squeeze out, the stuff is still VERY sticky and messy, hope that means it works well enough.
Before I read your reply, I ordered this:
Red Devil 06970I Rd Pro Butyl Rubber Sealant
Hope it works fine. Reviews said that it stayed tacky long after the original application
I will be covering front and rear corner seam repairs with Dicor Non-Sagging Lap Sealant
Again, thanks SO much for the detailed response, I would have been happy if you just suggested a post to read through on my own.
-Jay
__________________
|
|
|
|
|
04-29-2019, 10:36 PM
|
#40
|
|
Moderator
Join Date: Nov 2006
Location: Ohio
Posts: 12,654
SUN #89
|
Thanks for the kind words Jay.
On the Red Devil butyl caulk, if you are using that on the front siding joints in place of the Surebond SB-140, I would says it would be OK.
If you are looking for butyl sealing tape locally, here is another source. If there are any commercial building supply places in your area that sell products for steel siding on buildings etc., they should have commercial butyl. Folks putting up steel sided buildings are wanting 30 plus year on their sealants. And good butyl put on correctly can last that long. And amazingly it doesn't cost that much more than the RV stuff.
Thanks
John
__________________
__________________
Current Sunlines: 2004 T310SR, 2004 T1950, 2004 T2475, 2007 T2499, 2004 T317SR
Prior Sunlines: 2004 T2499 - Fern Blue
2005 Ford F350 Lariat, 6.8L V10 W/ 4.10 rear axle, CC, Short Bed, SRW. Reese HP trunnion bar hitch W/ HP DC
Google Custom Search For Sunline Owners Club
|
|
|
|
|
|
|
Currently Active Users Viewing This Thread: 1 (0 members and 1 guests)
|
|
|
 Posting Rules
|
You may not post new threads
You may not post replies
You may not post attachments
You may not edit your posts
HTML code is Off
|
|
|
|
 » Recent Sunline Discussions
 |
|
|
|
|
|
|
|
|
|
|
|
|
|
|
|
|
|
|
|
|
|
|
|


 Linear Mode

