 |
|
 06-14-2017, 08:18 PM
|
#21
|
|
Moderator
Join Date: Nov 2006
Location: Ohio
Posts: 12,649
SUN #89
|
Progress update for Day 7.
This was a short work day. Finished up cleaning out the last 2 wet insulation bays and started cleaning up the barn.
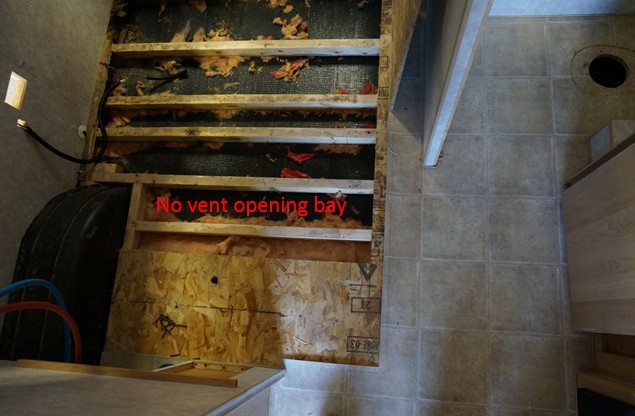
I had to cut out one more opening in the camper left side floor outer frame for access to push/pull out the insulation under the bath room. This is the last insulation bay under the bathroom that in not in the wheel well area.
I pushed out the wet insulation and went in to check the floor area with the moisture meter to make sure I have it all. Scanning the floor there was one more insulation bay that was picking up some moisture but it was over by the end of the bath door swing. Next to the floor cutout joint, it was not high moisture but it was end of the door swing. It was at 22% and that is concerning.

Seeing this, that insulation bay is between the wheel wells and the ends of the bay is closed by the wheel well. We cannot push out the insulation like we did on the other with the left side floor beam cut out.
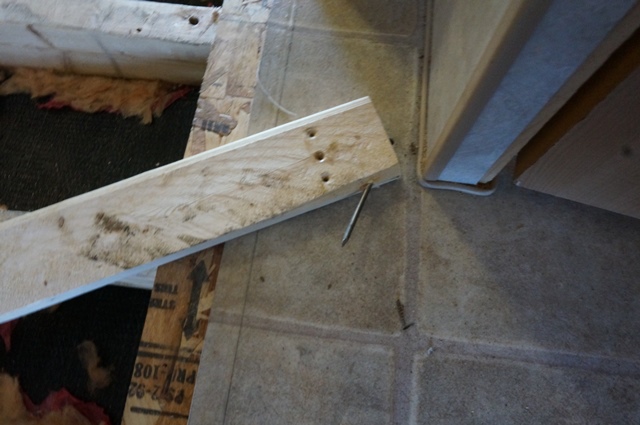
So I made a hook on the end of an old piece of furring strip. A nail in the end on an angle and we went fishing

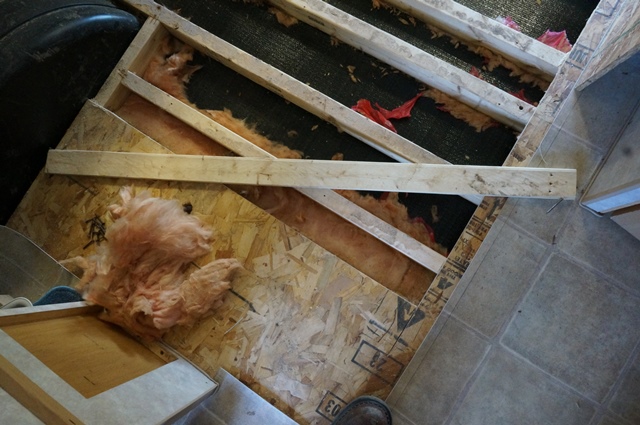
It worked to hook out the insulation. This then completed getting all the wet insulation out. The floor OSB board was still having wet readings and some of it was this white growth of something on the bottom in the insulation bay. The bath area by the toilet was high 48%

I created a moisture map of each bay starting on 6-11-17 as a base line. I can track the change or lack of moisture reduction per bay.

I went back tonight and re-did those same locations. All bays dropped but 1. The bay that has no open end due to the wheel wells is still reading 11% where there other bays dropped. Will have to keep watching this one area and do something different if it does not dry out. Here is 6-14-17 data, 2 days later.

This completed the starting goal of getting all the wet insulation out and get the camper opened up to let it dry out. My plan is then to store the camper in the barn letting it keep drying out. Later this year we will pick this project back up and start the next phase of rebuilding it. This post will go sort of dormant with new work until later in the year. I have one too many house projects to do and we have camping to do!!! YEH.  If anyone has questions, ask away anytime.
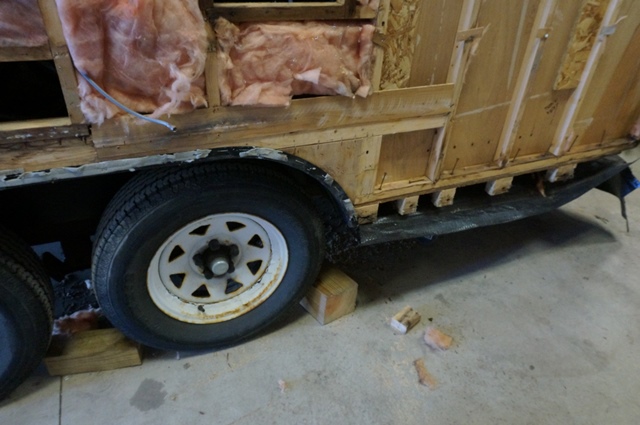
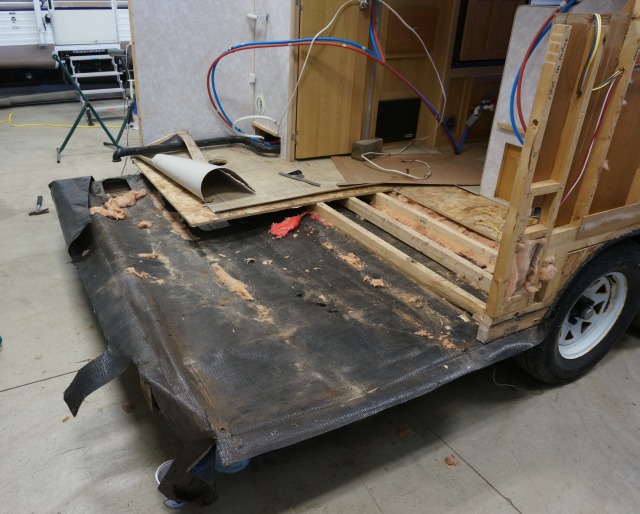
Here is the camper pulled out of the barn as I cleaned up to allow it to be backed it into its drying location for the next several months. Sort of a sad looking camper about now


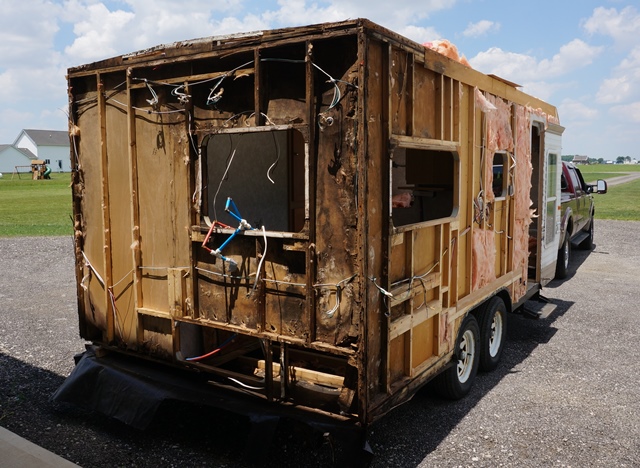

Here is the tally on time as we go into wait and dry out mode. 43 hours of labor to get to this point.
This completes Day 7 of the repair.
6/11/17, 1 worker for 2.5 hours = 2.5 labor work hours
43.0 labor work hours accumulated to date on the total repair
$0.00 in materials.
Thanks for looking.
John
__________________
Current Sunlines: 2004 T310SR, 2004 T1950, 2004 T2475, 2007 T2499, 2004 T317SR
Prior Sunlines: 2004 T2499 - Fern Blue
2005 Ford F350 Lariat, 6.8L V10 W/ 4.10 rear axle, CC, Short Bed, SRW. Reese HP trunnion bar hitch W/ HP DC
 Google Custom Search For Sunline Owners Club
|

|

|
|
06-16-2017, 02:29 PM
|
#22
|
|
Moderator
Join Date: Dec 2006
Location: Michigan
Posts: 6,155
SUN #123
|
It's crazy to think, that at RV shop rates, you're at almost a rough value of this trailer already in just labor, and you haven't even started reassembly yet!
I'm glad to hear you're taking the summer off though, not only for being able to go out camping, but I'm sure it gets quite warm in the barn!
__________________
__________________
2007 T-286SR Cherry/Granola, #6236, original owner, current mileage: 9473.8 (as of 6/18/21)
1997 T-2653 Blue Denim, #5471
1979 12 1/2' MC, Beige & Avocado, #4639
Past Sunlines: '97 T-2653 #5089, '94 T-2251, '86 T-1550, '94 T-2363, '98 T-270SR

|
|
|
|
|
06-16-2017, 06:11 PM
|
#23
|
|
Moderator
Join Date: Nov 2006
Location: Ohio
Posts: 12,649
SUN #89
|
Quote:
Originally Posted by Sunline Fan

It's crazy to think, that at RV shop rates, you're at almost a rough value of this trailer already in just labor, and you haven't even started reassembly yet!
I'm glad to hear you're taking the summer off though, not only for being able to go out camping, but I'm sure it gets quite warm in the barn!
|
Yes, at normal shop rates this is not something one could not afford to do. I'm sure this is why many dealers do not want to even talk about fixing an older camper. The cost is too great in comparison for what the camper can sell for.
Hot.... yes today is was over 90. Tomorrow supposed to be even hotter. That said, in January when it is 15F out, everything in the barn is 15F. Cold tools are as bad as hot... 
__________________
Current Sunlines: 2004 T310SR, 2004 T1950, 2004 T2475, 2007 T2499, 2004 T317SR
Prior Sunlines: 2004 T2499 - Fern Blue
2005 Ford F350 Lariat, 6.8L V10 W/ 4.10 rear axle, CC, Short Bed, SRW. Reese HP trunnion bar hitch W/ HP DC
Google Custom Search For Sunline Owners Club
|
|
|
|
|
06-21-2017, 07:20 PM
|
#24
|
|
Member
Join Date: Mar 2017
Location: New Jersey
Posts: 65
SUN #9129
|
I was inspired by your background information and really liked the idea of creating a moisture map of the interior. I can use this when looking for my next trailer and will definitely plan to make a detailed drawing with moisture readings in the same way that you did above. Even if they seem ok now I can always refer back to them when I suspect an area has started leaking to see what the baseline numbers were. It's probbaly also a good maintenance item to annually make an updated map and compare to baseline. I also picked up an IR temp gage for reading bearing temps while traveling.

Thanks for all the help and info John,
Mark
__________________
2003 Ford Expedition EB 5.4L
|
|
|
|
|
06-29-2017, 07:46 PM
|
#25
|
|
Moderator
Join Date: Nov 2006
Location: Ohio
Posts: 12,649
SUN #89
|
Hi Mark,
Just made it back from camping.!!! Yeh....
Good deal on the IR gun and the moisture meter. Yes, the more I use the moisture meter, the more valuable it becomes. Both are good tools and help you stay on top of things. My IR gun is in the seat behind me in the truck. Hot wheels/brake are not good... And taking a reading helps tell real world, real quick. I have unfortunately needed it too many times lately. 
Thanks
John
__________________
Current Sunlines: 2004 T310SR, 2004 T1950, 2004 T2475, 2007 T2499, 2004 T317SR
Prior Sunlines: 2004 T2499 - Fern Blue
2005 Ford F350 Lariat, 6.8L V10 W/ 4.10 rear axle, CC, Short Bed, SRW. Reese HP trunnion bar hitch W/ HP DC
Google Custom Search For Sunline Owners Club
|
|
|
|
|
07-11-2017, 04:41 AM
|
#26
|
|
Member
Join Date: Mar 2017
Location: New Jersey
Posts: 65
SUN #9129
|
Quote:
Originally Posted by JohnB
Hi Mark,
Just made it back from camping.!!! Yeh....
Good deal on the IR gun and the moisture meter. Yes, the more I use the moisture meter, the more valuable it becomes. Both are good tools and help you stay on top of things. My IR gun is in the seat behind me in the truck. Hot wheels/brake are not good... And taking a reading helps tell real world, real quick. I have unfortunately needed it too many times lately.
Thanks
John |
JohnB- Have you done any moisture mapping using the moisture meter on the exterior of a fiberglas trailer? I'm interested to see how the measurements reacted to the fiberglas exterior walls as opposed to the interior walls? Any thoughts or experience? I know that major water damage would be shown by de-lamination but it would interesting to see how sensitive the gage is to detect water damage before it gets to that point.
Thanks Mark
__________________
2003 Ford Expedition EB 5.4L
|
|
|
|
|
07-12-2017, 08:16 PM
|
#27
|
|
Moderator
Join Date: Nov 2006
Location: Ohio
Posts: 12,649
SUN #89
|
Quote:
Originally Posted by mcj7247
JohnB- Have you done any moisture mapping using the moisture meter on the exterior of a fiberglas trailer? I'm interested to see how the measurements reacted to the fiberglas exterior walls as opposed to the interior walls? Any thoughts or experience? I know that major water damage would be shown by de-lamination but it would interesting to see how sensitive the gage is to detect water damage before it gets to that point.
Thanks Mark
|
Hi Mark,
For Sunline campers, the moisture meter will still work inside the camper on a fiberglass sided camper like it does on aluminium sided camper. So you can still check a wet wall this way. Odds are high, if you have delam, then the inside of the wall is wet too. Technically you can have delam and not have a wet wall, but odds are not high it will come out that way the way Sunline built them.
What I have not "yet" tested is placing the meter on a fiberglass wall on the outside. However I may learn this in the future. My neighbor just bought a motor-home and he has a large de-lamination area and you can see it on the outside. On the inside, I could feel bubbled vinyl wall paper and pointed it out to my neighbor. Again, he did not know about campers and bought a wet one. I may help him over the winter repair it.
You have my curiosity up now. I will do some testing this weekend on a fiberglass cargo hole door. I never tested one of them yet how the meter responds. This may help answer the question on the siding.
Thanks
John
__________________
Current Sunlines: 2004 T310SR, 2004 T1950, 2004 T2475, 2007 T2499, 2004 T317SR
Prior Sunlines: 2004 T2499 - Fern Blue
2005 Ford F350 Lariat, 6.8L V10 W/ 4.10 rear axle, CC, Short Bed, SRW. Reese HP trunnion bar hitch W/ HP DC
Google Custom Search For Sunline Owners Club
|
|
|
|
|
07-13-2017, 04:20 AM
|
#28
|
|
Member
Join Date: Mar 2017
Location: New Jersey
Posts: 65
SUN #9129
|
Quote:
Originally Posted by JohnB
Hi Mark,
What I have not "yet" tested is placing the meter on a fiberglass wall on the outside. However I may learn this in the future. My neighbor just bought a motor-home and he has a large de-lamination area and you can see it on the outside. On the inside, I could feel bubbled vinyl wall paper and pointed it out to my neighbor. Again, he did not know about campers and bought a wet one. I may help him over the winter repair it.
|
John- I was thinking it might be easier access to the entire wall without obstruction from the inside by tables, beds frames, appliances etc. Also testing from the outside allows you to target obvious intrusion areas like below marker lights, appliance access doors, storage doors etc. But you may also have a larger influence from external environmental humidity changes on the surface of the fiberglas. Just a thought- Mark
__________________
2003 Ford Expedition EB 5.4L
|
|
|
|
|
07-13-2017, 08:34 AM
|
#29
|
|
Moderator
Join Date: Nov 2006
Location: Ohio
Posts: 12,649
SUN #89
|
Quote:
Originally Posted by mcj7247
John- I was thinking it might be easier access to the entire wall without obstruction from the inside by tables, beds frames, appliances etc. Also testing from the outside allows you to target obvious intrusion areas like below marker lights, appliance access doors, storage doors etc. But you may also have a larger influence from external environmental humidity changes on the surface of the fiberglas. Just a thought- Mark
|
Good point. Odds are favorable the meter will work through the fiberglass as I used it to see through the shower stall which is about 1/16" thick plastic of some type. However I have never tested this theory on a fiberglass walled camper. I will report back when I do. My neighbors motor-home would be a perfect example just it may have aluminum wall studs which will trick the meter but I can work around that.
Thanks
John
__________________
Current Sunlines: 2004 T310SR, 2004 T1950, 2004 T2475, 2007 T2499, 2004 T317SR
Prior Sunlines: 2004 T2499 - Fern Blue
2005 Ford F350 Lariat, 6.8L V10 W/ 4.10 rear axle, CC, Short Bed, SRW. Reese HP trunnion bar hitch W/ HP DC
Google Custom Search For Sunline Owners Club
|
|
|
|
|
07-17-2017, 05:11 AM
|
#30
|
|
Member
Join Date: Mar 2017
Location: New Jersey
Posts: 65
SUN #9129
|
Quote:
Originally Posted by JohnB
Good point. Odds are favorable the meter will work through the fiberglass as I used it to see through the shower stall which is about 1/16" thick plastic of some type.
Thanks
John
|
I did just that during my walk through over the weekend. The shower stall showed really high readings right through the wall and there was a confirmed huge leak from the skylight. The gage definitely seems to work fine through flat smooth plastic like the shower stall.
__________________
2003 Ford Expedition EB 5.4L
|
|
|
|
|
07-17-2017, 03:53 PM
|
#31
|
|
Moderator
Join Date: Nov 2006
Location: Ohio
Posts: 12,649
SUN #89
|
Quote:
Originally Posted by mcj7247
I did just that during my walk through over the weekend. The shower stall showed really high readings right through the wall and there was a confirmed huge leak from the skylight. The gage definitely seems to work fine through flat smooth plastic like the shower stall.
|
Great!!! Good to know the meter can repeat the findings I found when used by others. Thanks for reporting back.
__________________
Current Sunlines: 2004 T310SR, 2004 T1950, 2004 T2475, 2007 T2499, 2004 T317SR
Prior Sunlines: 2004 T2499 - Fern Blue
2005 Ford F350 Lariat, 6.8L V10 W/ 4.10 rear axle, CC, Short Bed, SRW. Reese HP trunnion bar hitch W/ HP DC
Google Custom Search For Sunline Owners Club
|
|
|
|
|
12-08-2019, 08:14 PM
|
#32
|
|
Moderator
Join Date: Nov 2006
Location: Ohio
Posts: 12,649
SUN #89
|
Looking at the dates of my last work post on this thread, Wow  , where does time go. Since the camper has been drying out for two years in the barn, it’s safe to say; it's dry!
BenB and I today were able to start back up again working on the T1950. Over the winter, we will work on this on and off, mostly on weekends. I also have my truck fix-it project to work on (frame rust and maintenance), so it will be a busy winter.
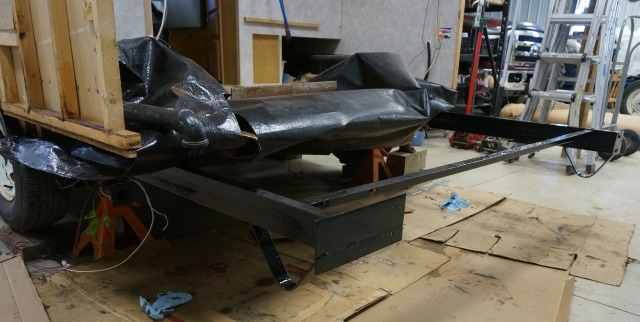
Here are some pics as to where we started today. It took us at least 2 ½ hours to clean out the camper and get all the parts situated for the restoration. I used to store all its components inside.


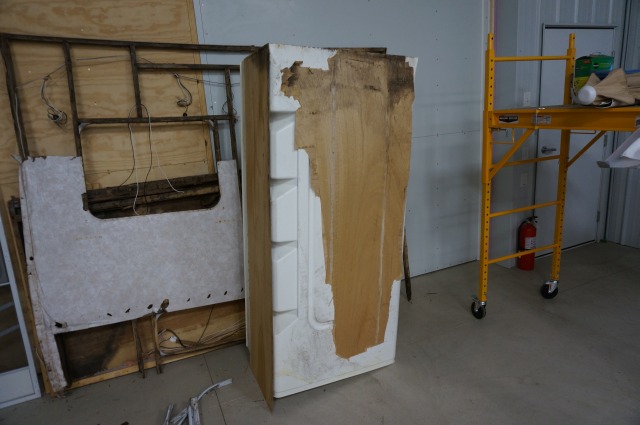
The back of the camper inside

And a very sun-faded shower. It seems many ABS plastics have this issue unless they have extra UV inhibitors in them. Campers sitting in the sun for years and not covering the shower dome inside allowing this to happen.

The last 4 foot of ceiling board is bad, several roof rafters, part of the right side wall, the rear floor area across the full with of the camper, the entire back wall, the lower band board on the LH, RH walls, and several floor joists.
We started to take the back of the camper apart and soon found out, to save the welt bead around the walls, we need to take ceiling and rafters off first. We cut the roof framing in an good area beyond the ceiling board splice. We will rebuild this whole section.
We lifted the roof section off and staged it on the scaffold, then lowered it to the ground.


A top view. This adds a whole new meaning to adding a “skylight”.

Then to the back wall. The shower surround is glued to the wallboard on three sides. This glue setup makes taking the rear wall off complex. Since the floor under the shower was rotted needing replacement along with the back wallboard totally deteriorated, we had to separate the wall stud framing from the wallboard at the shower area.
The rear wall stud framing, or what’s left to it.

Then came getting the shower surround out, which was complex. After several attempts with different methods to sever the wallboard glue bond from the surround, it became evident a new shower surround would be needed. I could repair the ABS plastic damage from getting it out, but the sun damage would still be there along with the complexity of matching the colors of the ABS repair to the shower walls. I elected to replace the shower surround and basin. We removed the shower surround with the wall panel still glued to it.
Here is the shower surround out of the camper.

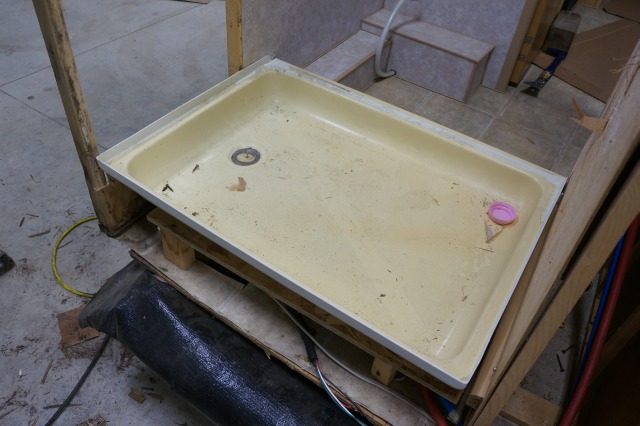
The shower basin. Notice the 1” high lip around the 3 sides of the basin. The wall surround fits over the 1” high lip. The flexing basin is made to move independent of the rigid wall surround with very little caulking.

The OSB shower platform

The basin platform support blocks with the shower wall removed.


Next was to remove the right side wallboard and the cabinet next to the galley area. I bought new wallboard (more on this in a separate post) for the bedroom area. To make it all match, we will be redoing the right side wall to the galley wall. And we will redo the wallboard on the shower inside wall.

The cabinet and part of the RH side wallboard off.

Here is the tally on time including today's work. 50.5 hours of labor to get to this point.
This completes Day 8 of the repair.
12/8/19, 2 workers for 3.75 hours = 7.5 labor hours
50.5 work hours accumulated to date on the total repair
$0.00 in materials.
That was it for the day. A good re-start into the project. More as the work continues. Thanks for looking.
John
__________________
Current Sunlines: 2004 T310SR, 2004 T1950, 2004 T2475, 2007 T2499, 2004 T317SR
Prior Sunlines: 2004 T2499 - Fern Blue
2005 Ford F350 Lariat, 6.8L V10 W/ 4.10 rear axle, CC, Short Bed, SRW. Reese HP trunnion bar hitch W/ HP DC
Google Custom Search For Sunline Owners Club
|
|
|
|
|
12-15-2019, 06:40 PM
|
#33
|
|
Senior Member
Join Date: Nov 2015
Location: Ohio
Posts: 141
SUN #7990
|
When working on the T1950 I noticed on the outside wall where some insulation fell off Sunline had marked 1950 #11. I was curious if anyone knew (Sunline Fan maybe) what this might mean. All the other panels we have had apart didn't have anything on them, but we have never really had a door side center wall apart. I think the siding might be off there on the T317SR now but it is currently stored about 4" from the T2499, so to check if it has the same marking under the insulation isn't easy. On the T1950 it is located above the small window that is over the kitchen sink. My original thought was maybe it was the 11th built T1950 for that model year? 20191214_140455.jpg
__________________
Current Camper: 2006 Sunline T-264SR
Previous Camper: 1998 Coleman Mesa
Tow Vehicle: 2002 Chevrolet Avalanche 2500, 8.1L, 4X4
DirecLink Brake Controller, Draw-Tite Ultra Frame Receiver, Reese HP Trunnion Bar Hitch W/ HP DC
|
|
|
|
|
12-22-2019, 10:30 PM
|
#34
|
|
Moderator
Join Date: Nov 2006
Location: Ohio
Posts: 12,649
SUN #89
|
We made some more progress on the camper both last weekend and today.
From last weekend, we did more work taking the camper apart. The right rear wall needed to come apart where it rotted on the top and bottom. We will rebuild this section.
Before we removed the RH rear wall,


After the RH wall portion removed

We had to take out a portion of the left rear wall. This section was a simple remove and will be rebuilt.
Before,

After,

The outer band board on the right rear and left rear rotted out, so they came out. Also noticed we have some floor joist rot.

The work above completed last weekends progress.
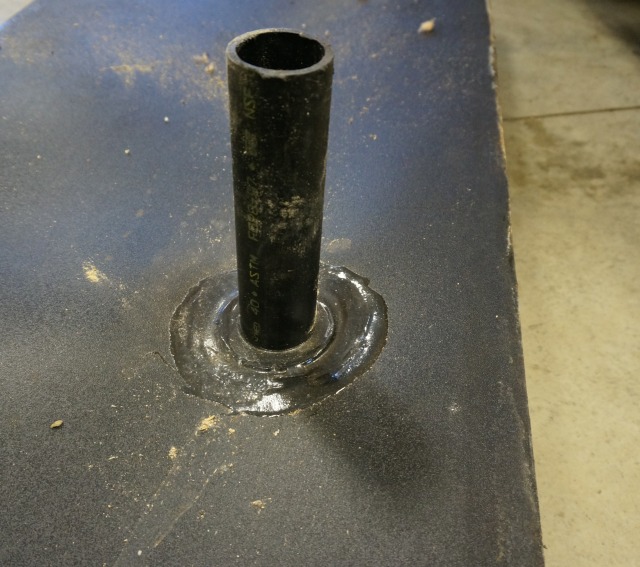
Today we started completing the remainder of the rot removal for the most part. The black tank vent pipe was cut in a location where it could be easily re-coupled when the shower wall goes back in. The black tank needed to come out as the floor joists supporting the tank were rotted and needed to be changed out.
Here is the black tank out of the camper.

For those curious on the vent pipe attachment, they solvent welded the pipe into that tank. At least on this 2004 vintage.
With the black tank out, we could remove the bad floor joists.
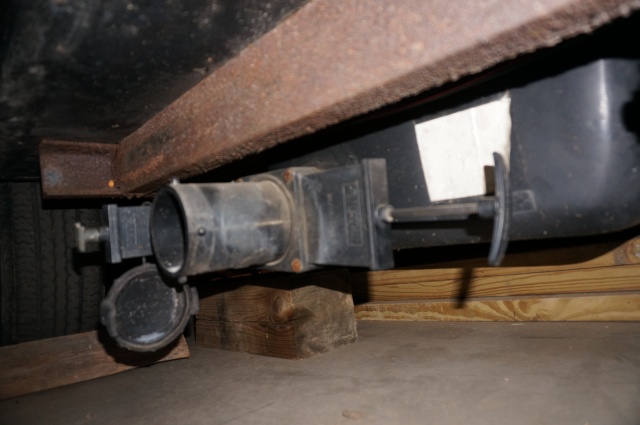
With the joist out, and the waterproof membrane (Darco is the trade name) lifted up, we can see the frame rust and the frozen up stabilizer. We took the stabilizer out and will deal with getting it working later.

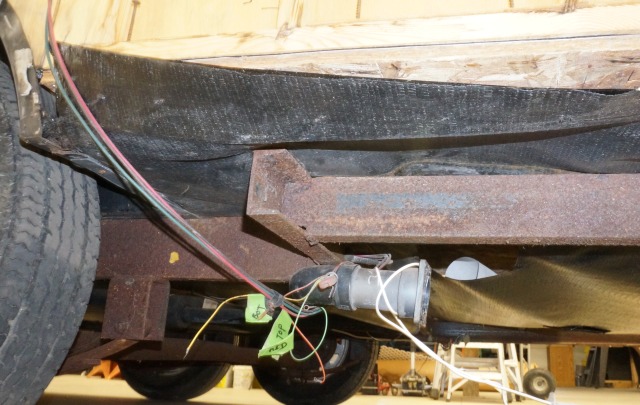
Seeing the frame and bumper mounts out in the open, we noticed they had cracked on both sides. The right side had the start of a crack. 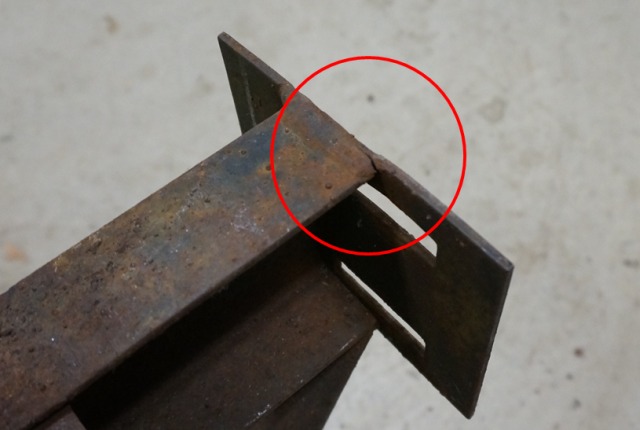
The left side was more concerning. The pic does not show it well, but the cracks are top-down and bottom-up.
It is hard to see the cracks in these pictures. The circled area rust lines show the crack locations.

I will correct both of these mounts as part of the next steps before putting the floor back in. It is all out in the open now, and welding it up is much easier. I will also address the frame rust in the back section before putting the floor back on. It is straightforward to clean up the frame with the rear bedroom floor out.
About midafternoon, we stopped taking things apart and started new repair work. Yeh!!!!
I created 5, 2 x 3s sawed from 2 x 12s for the rear floor. Very disappointed. These are southern pine which should be a better board, has very little to no knots, but they warped badly in two directions. We put weight on them to help straighten them. I will see if this works or have to start over.

We did get to repair the holes in the bottom waterproof membrane using Flex Mend repair tape. You can see the darker black shinny tape on the outer edges, that is the Flex Mend tape.

The tally on time, including today's work. 67.6 hours of labor to get to this point.
Work completes Day 9 & 10 of the repair.
12/14/19, 2 workers for 2.58 hours = 5.16 labor hours
12/22/19, 2 workers for 5.97 hours = 11.94 labor hours
67.6 work hours accumulated to date on the total repair
$27.24 in materials. 52 of 4 flex mend & 32 of 6 flex mend
Thanks for looking.
John
__________________
Current Sunlines: 2004 T310SR, 2004 T1950, 2004 T2475, 2007 T2499, 2004 T317SR
Prior Sunlines: 2004 T2499 - Fern Blue
2005 Ford F350 Lariat, 6.8L V10 W/ 4.10 rear axle, CC, Short Bed, SRW. Reese HP trunnion bar hitch W/ HP DC
Google Custom Search For Sunline Owners Club
|
|
|
|
|
12-23-2019, 11:07 PM
|
#35
|
|
Senior Member
Join Date: Sep 2010
Location: Michigan
Posts: 854
SUN #1546
|
Wow! Since I have a 1950 I am complaining enthralled with your project John
I have looked at every picture!
Awesome job!
__________________
 Joan & Miss Emme Lu Who
Full Timing in T-1950 2005 Anniversary Model
1997 6.5L Chevy Turbo Diesel Truck
"Pure Michigan"
Facebook: Apackof2 for the Rd
|
|
|
|
|
12-24-2019, 06:34 PM
|
#36
|
|
Moderator
Join Date: Nov 2006
Location: Ohio
Posts: 12,649
SUN #89
|
Today I corrected the cracked rear bumper mounts.
In case someone wants to check their T1950, here are some more pics of the cracks.
The left side mount is a much longer plate. This longer plate is due to the unique nature of the camper frame and the T1950 floor plan. The camera (more like the cameraman) was not cooperating today, so these pics are not the greatest but I outlined there the cracks are.


You can see the cracks here where cutting fluid is weeping through the cracks. This plate is more than 50% cracked through.

The right side bumper mount. A very short plate, but a tear in the weld start.
Here is the issue. The toilet is in the left rear against the left wall, and the black tank directly under creating a main frame interference with the dump pipe if the main 4 frame extended to the back wall of the camper. The main frame is 4 channel iron on the 2004s and older. The 2005s are 5 I beam. The main frame rail on the left side then jogs over to the left wall and the main frame rail is reduced to a 3 channel iron to allow the dump pipe to pass under the frame. Ground clearance is minimal in this area due to the dump pipe hanging down. Im assuming Sunline choose to deal with this clearance issue by not lowering the dump pipe anymore and created more frame clearance.


Here is the frame jog. The main frame rail goes from 4 to 3 channel

There is a 3 channel that spans the width of the camper, this also creates the jog over to the left wall.

And here is the problem area. The 3 channel that spans the width of the camper can flex a reasonable amount. That flexing allows the back of the frame at the bumper to move up and down where the spare tire is mounted. Channel iron can handle a lot of weight when loaded from the top down with the full 3 width being vertical. However, that structural shape does not have a lot of twist resistance due to the thin cross-section of the smaller channel sizes.
This area is where a large part of the frame flexing is occurring, right in the frame jog area.

Since I have my camper all apart, I will add a brace in this jog area to stiffen up this area. The actual floor system does give some level of stiffness to the camper frame, however not enough to stop the bouncing fatigue created in the long bumper mounting plate by the spare tire hanging from the back of the camper. More on this brace after I make it and install it.
Here is the repair on the bumper mount. This 1/8 thin plate was already over 50% cracked through. I decided to cut it off and add a whole new plate and increase the thickness to 3/16, a 50% strength increase.
Off with the old plate. The right grinder with a cut off wheel makes short work of getting the plate off.

I could not find 4 or 5 flat bar stock at the local farm store and I didnt want to make a trip to the local fab shop I buy from 1 ½ away to get a wider plate. I welded a 3 and a 1 ½ wide plate together to make a wider one.
I test fit the bumper before tack welding the new plate on to ensure it all fits in the mounting holes.

Then removed the bumper and finished welding the plate to the frame rail.

It was a short workday but a good one.
The tally on time, including today's work. 69.77 hours of labor to get to this point.
Work completes Day 11 of the repair.
12/24/19, 1 worker for 2.17 hours = 2.17 labor hours
69.77 work hours accumulated to date on the total repair
$27.24 in materials. 52 of 4 flex mend & 32 of 6 flex mend
$12.00 in materials, bumper mount steel, and weld rod.
Thanks for looking.
John
__________________
Current Sunlines: 2004 T310SR, 2004 T1950, 2004 T2475, 2007 T2499, 2004 T317SR
Prior Sunlines: 2004 T2499 - Fern Blue
2005 Ford F350 Lariat, 6.8L V10 W/ 4.10 rear axle, CC, Short Bed, SRW. Reese HP trunnion bar hitch W/ HP DC
Google Custom Search For Sunline Owners Club
|
|
|
|
|
12-24-2019, 06:34 PM
|
#37
|
|
Moderator
Join Date: Nov 2006
Location: Ohio
Posts: 12,649
SUN #89
|
Quote:
Originally Posted by apackoftwo
Wow! Since I have a 1950 I am complaining enthralled with your project John
I have looked at every picture!
Awesome job!
|
Thanks Joan, there is lots more to come!
__________________
Current Sunlines: 2004 T310SR, 2004 T1950, 2004 T2475, 2007 T2499, 2004 T317SR
Prior Sunlines: 2004 T2499 - Fern Blue
2005 Ford F350 Lariat, 6.8L V10 W/ 4.10 rear axle, CC, Short Bed, SRW. Reese HP trunnion bar hitch W/ HP DC
Google Custom Search For Sunline Owners Club
|
|
|
|
|
12-29-2019, 05:21 PM
|
#38
|
|
Senior Member
Join Date: Jul 2012
Location: Ohio
Posts: 1,125
SUN #4040
|
I hope you remember where all the pieces and parts go. With no left overs.
__________________
Jim and DW Darlene
2001 T-2553 Sunline Solaris
2006 GMC Sierra Duramax 2500HD 4X4
Firestone Transforce AT tires
Reese Dual Cam Sway Control
|
|
|
|
|
12-31-2019, 03:34 PM
|
#39
|
|
Moderator
Join Date: Nov 2006
Location: Ohio
Posts: 12,649
SUN #89
|
Quote:
Originally Posted by jim44646
I hope you remember where all the pieces and parts go. With no left overs.
|
Remember, h'mm, left overs, h'mm
Well, all I can say to the remembering part is, take lots of pics! The digital camera is the best thing that ever happened to those of us having frequent senior moments... I take a lot of pics.
Left overs, na, we call them "spare parts"
Amazingly, they all go back together. It takes lots of steps, thinking and time, but they all go back together. If you do enough of these, they aren't that bad figuring them out.
__________________
Current Sunlines: 2004 T310SR, 2004 T1950, 2004 T2475, 2007 T2499, 2004 T317SR
Prior Sunlines: 2004 T2499 - Fern Blue
2005 Ford F350 Lariat, 6.8L V10 W/ 4.10 rear axle, CC, Short Bed, SRW. Reese HP trunnion bar hitch W/ HP DC
Google Custom Search For Sunline Owners Club
|
|
|
|
|
12-31-2019, 10:33 PM
|
#40
|
|
Moderator
Join Date: Nov 2006
Location: Ohio
Posts: 12,649
SUN #89
|
Some more progress. I treated the limited remaining water stained wood in the rear floor areas that was but still good wood, with CPES from Rot Doctor. This seals and encapsulates any dry rot fungus from ever growing.
Since the back end of the camper frame was wide open, I took advantage of the easy access to deal with the frame rust. I am using a new frame rust treatment which I now feel, is the best I have tried. BenB came upon it and has been using it on an off over a few years. Some of it ended up on my dirt blade for the big tractor which sits outside all the time. For the last 3 years of living outside all the time, it is still holding up well.
The product is, Rust Seal by KBS coatings. These folks. https://www.kbs-coatings.com/ I bought mine from Jegs.com.
It is a 3 step process. They have many types of coatings for the car restoration market and other markets where rusted metal on equipment is an issue. The outcome yields a hard, durable, yet flexible, and permanent rust protection over bare or rusted steel. The process is simple, but falls into the tedious category. Dont be in rush, just follow the directions and the results will be good without the need for a lot of high end tools.
Prep work is critical, as it is for any rust restoration product. First you need to get the loose rust off. You do not have to go back to bare metal, but if bare metal is exposed, it is OK. A paint scraper and wire brush did most of the work in the pictures below. I started with a power wire brush on a 4 ½ grinder, and stopped quickly as the shapes and corners of this small frame did not allow me to do much with it. The scraper and brush worked, just it is a tedious process. I did the last 5 feet of the frame, up to the rear wheels. The rest of the frame will come in time.
I put the camper up on jack stands to gain some more working room. Here is the frame scraped down with the rust pile under it.


Once you are past the scraping process, air blow or wipe off as much rust/dirt as you can. Here is the rust pile from this small area.

Then comes the prep work for the KBS Rust Seal. You start by degreasing/cleaning the frame. I used the KBS Klean which is a water based cleaner. It comes concentrated and you dilute it with water, add to a hand pump spray bottle, and squirt it on. Then scrub the metal and apply more cleaner as needed. Do not let it dry on the metal, keep it wet as you go. They have a suggested wait/soak time for lightly greasy areas of 10 minutes, more for others. With all the scrubbing going on in the hard to reach places, there was no issue with time elapsing before the rinse. I had to rewet a few times. You then rinse with water, I used a separate squirt bottle with only water in it and a tub to collect it in. The water runoff was all rust water. I put cardboard down on the floor to protect it from the rust drips. Then it has to totally dry, I left it overnight.

There is a 2nd step uses a product called KBS Blast, which etches the metal to even clean it deeper and put a zinc film on it. I did not do this step on the camper frame. I will when I do my truck frame in a few months.
The 3rd part is actual Rust Seal coating. This stuff sticks to whatever it touches. It will not bond to some plastics, but will bond on anything metal, skin or clothes it touches. I used disposable coveralls, long sleeve heavy grade nitrile gloves, a hat, an organic fumes respirator, safety glasses with either goggles over them, or a full face shield. You do not want this coating to fall onto on your face when you are under the camper painting overhead. It must immediately be removed from your skin or you will have to wear it off. This is stated in the instructions. Lacquer thinner will cut it if you use it within a few minutes of contact on steel or skin. If you prepare for this, it is not that bad. These precautions should be standard practice for most oil based coatings.
KBS recommends a minimum of two thin coats and there is a dry time limit between coats. It takes about 2 to 3 hours pending temperatures, to dry to touch and not leave a fingerprint, to allow the second coat. It is still not fully cured, but dry enough for an additional coat. If you let it dry overnight and totally cure, you need to sand it to allow the second coat to bond correctly. Rust Seal can be left as the final coating, or top coated. You can top coat with paint if wanted, just the timing applies to a top coat as the final Rust Seal coating. It will dull if left long time exposed to sunlight, but it will not affect the rust protection. I will top coat the camper A frame hitch with Rust-o-leum black paint, but not the main frame.
The first coat takes time. It took me 2 ½ hours to do these areas. Then a waiting period, 2.5 hrs. at 65F for me, and apply the 2nd coat which goes much faster, only 1.25 hrs. The results sure look good.

The tally on time and materials to get to this point.
Work time for Day 12 & 13 of the repair.
12/26/19, 1 worker for 3.5 hours = 3.5 labor hours
12/27/19, 1 worker for 4.5 hours = 4.5 labor hours
77.77 work hours accumulated to date on the total repair
New material use: 12/27/19
$45.03 1 qt KBS Rust Seal. Used ½ can.
$27.87 1 gallon KBS Klean. Used 1 qt.
$38.95 1 qt CPES resin
$0.60 2, 1 chip brushes
$10.72 1 disposable painting suit
---------
$123.17 work day subtotal. 12/27/19
$39.24 prior material subtotal
¬-------
$162.41 Materials Subtotal to date
Thanks for looking.
John
__________________
Current Sunlines: 2004 T310SR, 2004 T1950, 2004 T2475, 2007 T2499, 2004 T317SR
Prior Sunlines: 2004 T2499 - Fern Blue
2005 Ford F350 Lariat, 6.8L V10 W/ 4.10 rear axle, CC, Short Bed, SRW. Reese HP trunnion bar hitch W/ HP DC
Google Custom Search For Sunline Owners Club
|
|
|
|
|
|
|
Currently Active Users Viewing This Thread: 1 (0 members and 1 guests)
|
|
|
| Thread Tools |
Search this Thread |
|
|
|
| Display Modes |
 Linear Mode Linear Mode
|
 Posting Rules
|
You may not post new threads
You may not post replies
You may not post attachments
You may not edit your posts
HTML code is Off
|
|
|
|
 » Recent Sunline Discussions
 |
|
|
|
|
|
|
|
|
|
|
|
|
|
|
|
|
|
|
|
|
|


