 |
|
 06-01-2017, 07:29 PM
|
#41
|
|
Senior Member
Join Date: Aug 2015
Location: Connecticut
Posts: 164
SUN #7710
|
Quote:
Originally Posted by gypsyRN

I'm not sure it's mighty dirty, what would I use to strip it?
Sent from my iPhone using Tapatalk
|
It depends on what the roof is made of. When you pull down a section of that interior closet you will be able to tell if it is aluminum or rubber. If it is rubber, they make a special cleaner for it so you don't mess it up. Others may have other ideas on how they cleaned theirs without causing issues. We can figure out what to do with the trim once we know what the roof is.
Steve
__________________
__________________
Steve P
|

|

|
|
06-01-2017, 09:08 PM
|
#42
|
|
Moderator
Join Date: Nov 2006
Location: Ohio
Posts: 12,654
SUN #89
|
Quote:
Originally Posted by gypsyRN
I found a whole to the left of the window in the master or back bedroom, any idea or suggestions on how to fix? I have some metal flashing tape thought I did put that on the inside but what about the outside?I'm ordering supplies don't really see anything that might do it?
|
There are places that make RV siding. The piece in your pic looks small, they may have a short piece verses a real long one. Many may make what ever your need is.
See these links. I have never bought from any of them, but saving the links in case I needed to reside a camper.
https://www.hemetvalleyrv.net/
Custom RV*& Limousine Parts | Specialty Vehicle & Concession Products
Mac's Aluminum Products
Interstate RV Metal & Supply
Hope this helps
John
__________________
__________________
Current Sunlines: 2004 T310SR, 2004 T1950, 2004 T2475, 2007 T2499, 2004 T317SR
Prior Sunlines: 2004 T2499 - Fern Blue
2005 Ford F350 Lariat, 6.8L V10 W/ 4.10 rear axle, CC, Short Bed, SRW. Reese HP trunnion bar hitch W/ HP DC
 Google Custom Search For Sunline Owners Club
|
|
|
|
|
06-02-2017, 08:14 AM
|
#43
|
|
Member
Join Date: Apr 2017
Location: Virginia
Posts: 61
SUN #9248
|
Quote:
Originally Posted by JohnB
|
Thank you JohnB this does help
Sent from my iPhone using Tapatalk
__________________
|
|
|
|
|
06-02-2017, 08:19 AM
|
#44
|
|
Member
Join Date: Apr 2017
Location: Virginia
Posts: 61
SUN #9248
|

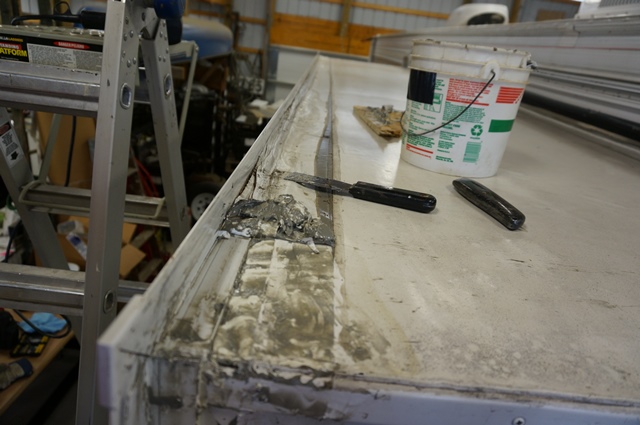
Inside closet roof looks aluminum to me? So how do I strip the crap off the exterior?? Any suggestions will be greatly appreciated!!

View from the top this is a problem spot.. again any suggestion will be greatly appreciated [emoji4]
Sent from my iPhone using Tapatalk
__________________
|
|
|
|
|
06-02-2017, 07:35 PM
|
#45
|
|
Moderator
Join Date: Nov 2006
Location: Ohio
Posts: 12,654
SUN #89
|
Hi,
You are correct, what you have is a metal roof. Aluminum to be exact. This is for sure "not" the Sunline rubber roof.
These seams are really not good. I'm sure you have realized this. Ideally you need to get the roof sound and leak free before starting inside restorations. If the roof leaks, all your good hard work inside will be reinfected. The metal roofs are good as a raw materiel for roofing. The problems come with sealing of the edges of the metal roof to the camper or a vent pipe or any other penetration in the metal or termination of the metal to a wall.


I myself have not (yet anyway), dealt with rebuilding the metal roofs. I have on the rubber roofs so I do not know the exact way Sunline made the original joints from the metal roof to the rest of the camper. If it is an overlap with putty tape and screws like the rubber roofs, then I know what you are up against.
That goop that a prior owner put on, we have no good way of knowing what it is. But I have a possible way to maybe get it off.
Using a metal scraper that you have sanded and dulled all the edges so it will not dig into the metal, use that scraper and a heat gun. Warm the goop and see if it becomes pliable. Do not cook it by standing in one spot a long time, just warm it. If it becomes pliable, then you stand a chance to warm and scrape it off.
I use this heat gun and scraper method a lot on the newer campers to lift up old sealants and it works well as a start to get it off. Warm a place to start and once warm, then start pushing the scraper in the same direction as the heat is blowing. You will find what amount of heat is needed and what is too much when it turns molten. The heat can be regulated by how far away the heat gun is, the travel speed and if you are waff'ing the gun back and forth. Keep the heat moving ahead of you while you scrape. You may only be able to do 1 foot at a time, but if it works, it is the start of a method. This is going to be a long tedious job.
The heat and scraper will not get off 100% of the goop off, if it does soften and this works then I'll estimate it takes 90% of it off. To get the last 10% of the fine stuff off, then a chemical cleaning will hopefully dissolve out the rest of it. Again if we knew what you had we could suggest something to maybe cut it with a solvent that would not take off all paint of the camper.
Mineral Spirits and a rag may cut the last 10% if it has a petroleum base to the goop. The mineral spirits will not take off the tan paint but will leave a oily residue that then later needs to be cleaned off with a high flash cleaner like lacquer thinner, an alcohol based product or some form of household cleaner to that cuts grease.
If you can try the heat gun and it works, then this helps tell us something about what you have.
My heat gun is a simple 1,500 watt older Black & Decker. They sell many new ones of many brands and are not that expensive. Some are under $20. Suggest using a 1" wide scraper as if you go too wide it is harder to push when peeling up. And I use an old rough board to scrape the old hot goop off the putty knife. Wear gloves for sure and safety glasses.
This is mine in action pealing up Eternabond tape.
The heat gun itself

Heating and peeling up the old tape
And the goop board and can to scrape off the putty knife

Hope this helps
John
__________________
Current Sunlines: 2004 T310SR, 2004 T1950, 2004 T2475, 2007 T2499, 2004 T317SR
Prior Sunlines: 2004 T2499 - Fern Blue
2005 Ford F350 Lariat, 6.8L V10 W/ 4.10 rear axle, CC, Short Bed, SRW. Reese HP trunnion bar hitch W/ HP DC
Google Custom Search For Sunline Owners Club
|
|
|
|
|
06-02-2017, 07:55 PM
|
#46
|
|
Member
Join Date: Apr 2017
Location: Virginia
Posts: 61
SUN #9248
|
Quote:
Originally Posted by JohnB
Hi,
You are correct, what you have is a metal roof. Aluminum to be exact. This is for sure "not" the Sunline rubber roof.
These seams are really not good. I'm sure you have realized this. Ideally you need to get the roof sound and leak free before starting inside restorations. If the roof leaks, all your good hard work inside will be reinfected. The metal roofs are good as a raw materiel for roofing. The problems come with sealing of the edges of the metal roof to the camper or a vent pipe or any other penetration in the metal or termination of the metal to a wall.
I myself have not (yet anyway), dealt with rebuilding the metal roofs. I have on the rubber roofs so I do not know the exact way Sunline made the original joints from the metal roof to the rest of the camper. If it is an overlap with putty tape and screws like the rubber roofs, then I know what you are up against.
That goop that a prior owner put on, we have no good way of knowing what it is. But I have a possible way to maybe get it off.
Using a metal scraper that you have sanded and dulled all the edges so it will not dig into the metal, use that scraper and a heat gun. Warm the goop and see if it becomes pliable. Do not cook it by standing in one spot a long time, just warm it. If it becomes pliable, then you stand a chance to warm and scrape it off.
I use this heat gun and scraper method a lot on the newer campers to lift up old sealants and it works well as a start to get it off. Warm a place to start and once warm, then start pushing the scraper in the same direction as the heat is blowing. You will find what amount of heat is needed and what is too much when it turns molten. The heat can be regulated by how far away the heat gun is, the travel speed and if you are waff'ing the gun back and forth. Keep the heat moving ahead of you while you scrape. You may only be able to do 1 foot at a time, but if it works, it is the start of a method. This is going to be a long tedious job.
The heat and scraper will not get off 100% of the goop off, if it does soften and this works then I'll estimate it takes 90% of it off. To get the last 10% of the fine stuff off, then a chemical cleaning will hopefully dissolve out the rest of it. Again if we knew what you had we could suggest something to maybe cut it with a solvent that would not take off all paint of the camper.
Mineral Spirits and a rag may cut the last 10% if it has a petroleum base to the goop. The mineral spirits will not take off the tan paint but will leave a oily residue that then later needs to be cleaned off with a high flash cleaner like lacquer thinner, an alcohol based product or some form of household cleaner to that cuts grease.
If you can try the heat gun and it works, then this helps tell us something about what you have.
My heat gun is a simple 1,500 watt older Black & Decker. They sell many new ones of many brands and are not that expensive. Some are under $20. Suggest using a 1" wide scraper as if you go too wide it is harder to push when peeling up. And I use an old rough board to scrape the old hot goop off the putty knife. Wear gloves for sure and safety glasses.
This is mine in action pealing up Eternabond tape.
The heat gun itself

Heating and peeling up the old tape

And the goop board and can to scrape off the putty knife

Hope this helps
John |
Thank you JohnB, now I have a plan... I'll let you know how it goes going to take a while,it's a 29.6 foot mess
Sent from my iPhone using Tapatalk
__________________
|
|
|
|
|
06-03-2017, 01:33 PM
|
#47
|
|
Senior Member
Join Date: Aug 2010
Location: Virginia
Posts: 210
SUN #1340
|
Whew! Tammy, you've really got yourself a challenge! It looks to me like the previous owner applied the "I dont know where it leaks so I'll just tar the whole roof," approach to this old Sunline. I don't think there is a one of us on this forum who wouldn't agree with John B on most anything he says, and when he says the roof is your first priority, it is another example of him being right!
. The reason I asked earlier if you were going on the road with this trailer or if you were just going to use it, as I use my old 88 Seville, as a permanent place to camp, is because how you restore it depends on that decision. If you take it on the road you must consider all kinds of things...tires, light wiring, whether your a/c/ d/c refrigerator works properly (mine didn't) whether you've got a big enough truck to tow your trailer...and lots more. If you leave it parked, there are some things that you can do to save some money and have fewer headaches...especially if you have a sewer to hook into and electricity to hook up to.
I admire folks who tackle the kind of job you have undertaken, and if I had had the time and money I would have liked to have fixed up my trailer to look like she looked when she was new. Sadly, I didn't and still don't ! So if you have the time and money, by all means, fix her up to be road worthy because that was what she was designed for.
All that being said, yes tackle the roof first. Buy a tarp or several tarps and keep them lashed down tight over the roof when you are not working on it.
I have no idea what that stuff is on there, but it looks like it is on there pretty thick. One thing is for certain...the seams around the entire perimeter of the trailer roof are the first thing to tackle because they are the most likely place to leak unless the middle of the roof has been damaged. I have not had a single leak in the middle of my aluminum roof but I have had several around the edge seams. I'd start at a corner with a putty knife, remembering that you've got soft metal under that stuff you are clearing away, and see how you get along. Once you get an idea of where the seams actually are along that gunked up edge make sure you clean the surrounding area well and reseal the seam. Because these trailers are subject to motion when they are towed the manufactures used special caulking that can give and take and still hold a seal. Since my trailer is stationary, I use regular caulking, 20 year silicone stuff, and it has worked fine for 6 years now.
Good luck with this...hope it helps.
__________________
 '88 T3200
Permanently situated in Charlotte County VA
|
|
|
|
|
06-04-2017, 07:51 AM
|
#48
|
|
Senior Member
Join Date: Jun 2016
Location: New York
Posts: 102
SUN #8474
|
I needed to replace the bathroom floor of my 1989 T1661. I have to admit it wasn't as easy as I hoped. The 2x2 floor joists were rotted from a plumbing leak. Once repaired though, it held up great. You will end up with a great trailer. Best of luck.
__________________
|
|
|
|
|
06-04-2017, 08:02 AM
|
#49
|
|
Member
Join Date: Apr 2017
Location: Virginia
Posts: 61
SUN #9248
|
Quote:
Originally Posted by jsm5394
I needed to replace the bathroom floor of my 1989 T1661. I have to admit it wasn't as easy as I hoped. The 2x2 floor joists were rotted from a plumbing leak. Once repaired though, it held up great. You will end up with a great trailer. Best of luck.
|
Thank you jsm, it's a challenge and an adventure, I love a good challenge, I did not have a clue how to even begin till bumped into this site, I feel it has greatly enhanced my outcome! I too have some wood rot in some small areas but I'm going follow the advice of the one that have gone before me and I'm starting at the roof then the seams make it water tight then I will move inside. This site has given me a plan and I know it will be a great home for my assignments away from home!
Sent from my iPhone using Tapatalk
__________________
|
|
|
|
|
06-05-2017, 08:50 AM
|
#50
|
|
Moderator
Join Date: Nov 2006
Location: Ohio
Posts: 12,654
SUN #89
|
Hi Tammy,
I found an older post on more siding places for another member and they might be an option in case you need them.
See this post.
http://www.sunlineclub.com/forums/f6...86-a-8464.html
Thanks
John
__________________
Current Sunlines: 2004 T310SR, 2004 T1950, 2004 T2475, 2007 T2499, 2004 T317SR
Prior Sunlines: 2004 T2499 - Fern Blue
2005 Ford F350 Lariat, 6.8L V10 W/ 4.10 rear axle, CC, Short Bed, SRW. Reese HP trunnion bar hitch W/ HP DC
Google Custom Search For Sunline Owners Club
|
|
|
|
|
06-05-2017, 09:11 AM
|
#51
|
|
Member
Join Date: Apr 2017
Location: Virginia
Posts: 61
SUN #9248
|
Quote:
Originally Posted by JohnB
|
Hi JohnB
Thank you for the info, will check it out, was thinking about using the auto body filler and the flashing tape, I believe you mentioned in another post, working on the roof first
Thanks again Tammy
Sent from my iPhone using Tapatalk
__________________
|
|
|
|
|
06-06-2017, 11:51 AM
|
#52
|
|
Senior Member
Join Date: Apr 2007
Location: Pennsylvania
Posts: 932
SUN #246
|
Tammy..I havent seen this point mentioned yet--be aware these roofs were not meant for you to stand on! Use a piece of wood large enough to span the rafters even to sit or kneel on. something 4' by 2' should suffice...Janalee
__________________
1981 Sunline1350
'86 & '87 Sunline1661
'85 2100& '87 2262 Sunlines
'96 2553 & '95 1950 Sunlines
'95 and '98 Solaris 2653's
2002 Solaris T-2363
|
|
|
|
|
06-06-2017, 08:11 PM
|
#53
|
|
Member
Join Date: Apr 2017
Location: Virginia
Posts: 61
SUN #9248
|
Quote:
Originally Posted by Janalee
Tammy..I havent seen this point mentioned yet--be aware these roofs were not meant for you to stand on! Use a piece of wood large enough to span the rafters even to sit or kneel on. something 4' by 2' should suffice...Janalee
|
Hi Janalee, I have been working from a ladder with a heat gun, gently scraping and scrubbing what I think is a roofing tar mixed with a silicone goop and it doesn't take much to realize that these roofs are very fragile, I have a couple 2X6 10 feet long my only fear is losing my balance and tumbling through and making more work or being disabled and the renovation be put on hold, thanks for the great input, I feel someone on here, I believe JohnB mentioned I had to investigate a see if the roof would hold
Thanks Tammy
Sent from my iPhone using Tapatalk
__________________
|
|
|
|
|
06-06-2017, 08:51 PM
|
#54
|
|
Moderator
Join Date: Nov 2006
Location: Ohio
Posts: 12,654
SUN #89
|
Hi Tammy,
Working off a 2 x 6... oh boy...
See this post, it is on rubber roofs but scroll to the end of the 1st posting. There is a plywood sheet setup there which is what Janalee is talking about. Good for her to mention this. http://www.sunlineclub.com/forums/f7...1-a-11508.html
If your ceiling inside is taken down, can you see the rafters? If you can look up at the rafters look for heavy rot in them. A concern is rotted rafters even with the 2 ft x 4 ft plywood sheets. The rafters can hold you when the 4 foot wide sheet will span 3 to 4 rafters, but if 2 of them are rotted, that is not good.
If they are really gone, they will not even feel solid like the rest of them when you press on the roof in that area. I'm sure by now you have felt (we hope) what a good rafter feels like as it moves very little. Just a friendly heads up, feel for good and bad rafters and plan around the bad ones.
Is the heat gun & scrapper working? It sounds like from your last response it may be. I know, slow going but as long as it is going, that is a sign of hope.
You mentioned the words silicone goop, oh boy.... we need to start hunting around around to see what chemical will cut that for after you get done with the scrapper/heat gun. It all has to go to good clean metal when you put the new sealant on. One of the issues of silicone is it is so slippery, nothing really wants to stick to it and any film left just causes headaches later on.
Your doing great! Keep up the good work.
John
__________________
Current Sunlines: 2004 T310SR, 2004 T1950, 2004 T2475, 2007 T2499, 2004 T317SR
Prior Sunlines: 2004 T2499 - Fern Blue
2005 Ford F350 Lariat, 6.8L V10 W/ 4.10 rear axle, CC, Short Bed, SRW. Reese HP trunnion bar hitch W/ HP DC
Google Custom Search For Sunline Owners Club
|
|
|
|
|
06-08-2017, 05:47 AM
|
#55
|
|
Member
Join Date: Apr 2017
Location: Virginia
Posts: 61
SUN #9248
|
Quote:
Originally Posted by JohnB
Hi Tammy,
Working off a 2 x 6... oh boy...
See this post, it is on rubber roofs but scroll to the end of the 1st posting. There is a plywood sheet setup there which is what Janalee is talking about. Good for her to mention this. http://www.sunlineclub.com/forums/f7...1-a-11508.html
If your ceiling inside is taken down, can you see the rafters? If you can look up at the rafters look for heavy rot in them. A concern is rotted rafters even with the 2 ft x 4 ft plywood sheets. The rafters can hold you when the 4 foot wide sheet will span 3 to 4 rafters, but if 2 of them are rotted, that is not good.
If they are really gone, they will not even feel solid like the rest of them when you press on the roof in that area. I'm sure by now you have felt (we hope) what a good rafter feels like as it moves very little. Just a friendly heads up, feel for good and bad rafters and plan around the bad ones.
Is the heat gun & scrapper working? It sounds like from your last response it may be. I know, slow going but as long as it is going, that is a sign of hope.
You mentioned the words silicone goop, oh boy.... we need to start hunting around around to see what chemical will cut that for after you get done with the scrapper/heat gun. It all has to go to good clean metal when you put the new sealant on. One of the issues of silicone is it is so slippery, nothing really wants to stick to it and any film left just causes headaches later on.
Your doing great! Keep up the good work.
John |
Hi John
I have been investigating the roof and I have identified a couple rafters that will have to be replaced one is in the back end, right along the seam, I'm thinking I need to remove the screws along the seam and replace the whole rafter, I have not attempted to get on the roof yet I have been working on what I can get to from the ladder, heat gun and scraper has been working, it's going to take some time! 
The 2 X 6s are and idea but I think I'm going to get a sheet of plywood for when I climb aboard [emoji4]

I have not yet seen and water infection in the rest of the ceiling I'm going to invest in one of the meters you reported on
My 7 days off went by to fast, had to leave my favorite happy place to go to work at my other happy place, to support my many expensive habits [emoji4]

Thank you so much for your help
Sent from my iPhone using Tapatalk
__________________
|
|
|
|
|
06-08-2017, 05:59 AM
|
#56
|
|
Moderator
Join Date: Nov 2006
Location: Ohio
Posts: 12,654
SUN #89
|
Hi Tammy,
Ah, yup, your right... You for sure have a need to replace the missing rafter in this area. That one is beyond repair no questions asked...

Glad the heat gun is at least part of the solution to get the goop up.
Your happy place looks really nice! And yes I know how work gets in the way of our Sunny habits... It is one of those give and take things. You give to work, and hopefully there is enough left over you can take some of what work gave you and give it to your Sunny...
Your doing great! Keep up the good work.
John
__________________
Current Sunlines: 2004 T310SR, 2004 T1950, 2004 T2475, 2007 T2499, 2004 T317SR
Prior Sunlines: 2004 T2499 - Fern Blue
2005 Ford F350 Lariat, 6.8L V10 W/ 4.10 rear axle, CC, Short Bed, SRW. Reese HP trunnion bar hitch W/ HP DC
Google Custom Search For Sunline Owners Club
|
|
|
|
|
06-08-2017, 06:01 AM
|
#57
|
|
Member
Join Date: Apr 2017
Location: Virginia
Posts: 61
SUN #9248
|
Quote:
Originally Posted by JohnB
Hi Tammy,
Ah, yup, your right... You for sure have a need to replace the missing rafter in this area. That one is behind repair no questions asked...
Glad the heat gun is at least part of the solution to get the goop up.
Your happy place looks really nice! And yes I know how work gets in the way of our Sunny habits... It is one of those give and take things. You give to work, and hopefully there is enough left over you can take some of what work gave you and give it to your Sunny...
Your doing great! Keep up the good work.
John |
Thanks would never have gotten this far with out the help of you and this site!!
Sent from my iPhone using Tapatalk
__________________
|
|
|
|
|
06-08-2017, 06:14 AM
|
#58
|
|
Member
Join Date: Apr 2017
Location: Virginia
Posts: 61
SUN #9248
|
Quote:
Originally Posted by JohnB
Hi Tammy,
Ah, yup, your right... You for sure have a need to replace the missing rafter in this area. That one is behind repair no questions asked...
Glad the heat gun is at least part of the solution to get the goop up.
Your happy place looks really nice! And yes I know how work gets in the way of our Sunny habits... It is one of those give and take things. You give to work, and hopefully there is enough left over you can take some of what work gave you and give it to your Sunny...
Your doing great! Keep up the good work.
John |
Thanks would never have gotten this far with out the help of you and this site!!
Sent from my iPhone using Tapatalk
__________________
|
|
|
|
|
06-08-2017, 01:53 PM
|
#59
|
|
Member
Join Date: Apr 2017
Location: Virginia
Posts: 61
SUN #9248
|
[QUOTE=JohnB;137493]Hi Tammy,
Ah, yup, your right... You for sure have a need to replace the missing rafter in this area. That one is behind repair no questions asked...
Glad the heat gun is at least part of the solution to get the goop up.
Your happy place looks really nice! And yes I know how work gets in the way of our Sunny habits... It is one of those give and take things. You give to work, and hopefully there is enough left over you can take some of what work gave you and give it to your Sunny...
Your doing great! Keep up the good work.
Wondering how do you cut the rotten wood out without cutting the exterior??
Sent from my iPhone using Tapatalk
__________________
|
|
|
|
|
06-08-2017, 05:33 PM
|
#60
|
|
Moderator
Join Date: Nov 2006
Location: Ohio
Posts: 12,654
SUN #89
|
Quote:
Originally Posted by gypsyRN
Wondering how do you cut the rotten wood out without cutting the exterior??
|
Hi Tammy,
Odds are high the seal between the roof and the front siding has issues which is where the leak came from. I have not been into the metal roofs yet so to help we need some pics of the top of the seam outside and some of the inside to figure out the seam. Or a member who has been into this can help.
Point being, odds are high you need to take up the roof in the front to fix the leaking sealant between the roof metal and the siding. I do not know if they did this with butyl or putty tape like the rubber roofs or not. But there should be a sealant of something. The sealant looks black ozzing out between the connection of the roof to the siding in the area of the rafter that is rotted away and the screws are hanging in the pic you posted.
When you fix that seal and the roof is open, then the rafter can come out and a new one go in. And no need to cut it out with the roof in place.
If you find you really need to get the rafter out with the roof on, one of the vibrating tools with a saw blade can buzz up and cut the rafter out. You can control the tool before it comes close to the metal and crack off the last little bit of rafter. Do you have one of the vibrating tools? Or can borrow one from a friend?
Hope this helps
John
__________________
__________________
Current Sunlines: 2004 T310SR, 2004 T1950, 2004 T2475, 2007 T2499, 2004 T317SR
Prior Sunlines: 2004 T2499 - Fern Blue
2005 Ford F350 Lariat, 6.8L V10 W/ 4.10 rear axle, CC, Short Bed, SRW. Reese HP trunnion bar hitch W/ HP DC
Google Custom Search For Sunline Owners Club
|
|
|
|
|
|
|
Currently Active Users Viewing This Thread: 1 (0 members and 1 guests)
|
|
|
 Posting Rules
|
You may not post new threads
You may not post replies
You may not post attachments
You may not edit your posts
HTML code is Off
|
|
|
|
 » Recent Sunline Discussions
 |
|
|
|
|
|
|
|
|
|
|
|
|
|
|
|
|
|
|
|
|
|
|
|


 Linear Mode

