 |
|
 08-30-2018, 06:05 PM
|
#61
|
|
Moderator
Join Date: Nov 2006
Location: Ohio
Posts: 12,649
SUN #89
|
Hi Holmzie,
Been out doing what all good campers do, camp! so been off line a bit.
We want to thank you for taking the time to post these pics! Thank You!!!! There is a lot we can learn from them. Meaning how the camper was made in the finer details back in the 1990 models.
I can see several differences then the campers built in the year 2000's. Do not know yet what years between 90 and 2,000 that the changed. Learning the more we see rebuilds.
A few things I picked up in construction differences.
1. The metal roof joints at the wall corners looked to be folded over roof metal over the top of the wall siding. Is this correct?
Then a cap molding or awning rail added with a sealing tape between the roof metal and the molding. The front transition from front and rear roof to wall and the front and rear roof seam wall siding are all continuous metal. The days of rubber roofs on the newer camper did the joint the same on the side walls, but the rubber has design issues that the metal does not. A big one is the front and rear wall seam to the roof. On the rubber roofs that seam can be a big leak infiltration point when the caulking deteriorates and the rubber material shrinks. The metal roof while it still used caulking and sealing tape, it did not rely on it like the rubber roofs as much. The metal roofs can still fail due to a leak from a sealant leak, but it could take longer for it to occur verses a rubber roof.
2. The side walls attached to the side of the floor system. The newer campers the walls rest on top of the floor. I like the newer system better. During a rot situation the new system will take longer for the entire wall to break off as the floor joists are holding the wall up by being left to right.
3. The floor joists run front to back. The new campers the floor joists run left to right. I actually prefer the new left to right system for strength and for helping slow down a rear or front wall leak spreading water to the entire camper floor. On the newer campers a floor joist can rest on top of a metal cross member. Then creates a pinched dike across the camper to trap water behind it and not let it free flow across the entire floor so easy.
4. It looks like the floor joists are thinner in size and more of them. A camper the size of your's in the new design uses 2 x 3's nominals. (1 1/2 x 2 1/2" actual)
I will have to study the pics more to see some other changes but those 4 came up first.
Two questions to help since your's is so far all apart....
1. On the black and gray tanks, the roof vent pipe attaches to the top of the tank. How did they attach the vent pipe to the tank? Was it a 1 1/2" pipe solvent welded in a fitting in the tank or did the vent pipe push into a rubber grommet in the top of the tank wall?
2. Do you recall the actual size of the floor joists and their spacing? This pic shows them

Thanks
John
__________________
Current Sunlines: 2004 T310SR, 2004 T1950, 2004 T2475, 2007 T2499, 2004 T317SR
Prior Sunlines: 2004 T2499 - Fern Blue
2005 Ford F350 Lariat, 6.8L V10 W/ 4.10 rear axle, CC, Short Bed, SRW. Reese HP trunnion bar hitch W/ HP DC
 Google Custom Search For Sunline Owners Club
|

|

|
|
08-31-2018, 08:37 AM
|
#62
|
|
Member
Join Date: Jun 2018
Location: New Jersey
Posts: 71
SUN #10636
|
I'm in Bradley right now, going to Farmingdale, may still have a chunk of floor around or a shadow of the flooring arrangement may remain on the top of the metal frame, if it hasn't been washed off by todays rain. I think the floor joists measured about 2" x 2" actual. Be back 2 u.
I have all the aluminum, so I can reverse-engineer it and tell you for sure, but I think you are right about the lapping of the corners and the rest of your queries.
__________________
__________________
"The above comments are my opinion only."
"I will not be held responsible for any wrong facts, misleading statements or nonsensical ludicrousity contained therein."
|

|
|
|
08-31-2018, 10:27 AM
|
#63
|
|
Member
Join Date: Jun 2018
Location: New Jersey
Posts: 71
SUN #10636
|
So Long, chum... Hello Star Ray flat bed
On my way to the refuse center. Took long time to load and unload. Between the flatbed and the pickup I got most of it to Mazza, 940 Lbs weight. Cost about $50.00 to dump. Not including AC and Tanks, window, aluminum, converter, pump.
So I put Lights up about 18", easily unbolted for loading, etc.
Found trouble: Spring shackles and pivots are rusted and bound. Gave them all plenty of Blaster when I first towed her home, thought everything would shake loose, but oh nooo...
That me with 1/2" breaker bars. Took half a day to loosen 'e, up. Had to stand on the breaker bar to break torque. Soaked with plenty of holy water...used Seafoam's penetrate this time. My arms are aching! Finshed with some spray lithium grease.
The winch is mounted now, went to Fazzio's metals to get hardware, found perfect 3/8" U bolts for the side rails, perfectly straddled the shackle pivot mount!
__________________
"The above comments are my opinion only."
"I will not be held responsible for any wrong facts, misleading statements or nonsensical ludicrousity contained therein."
|
|
|
|
|
08-31-2018, 10:35 AM
|
#64
|
|
Member
Join Date: Jun 2018
Location: New Jersey
Posts: 71
SUN #10636
|
WhichWinchWentWhere?
OK, why would I mount a winch on the side rail?
1) The tower is lying down with the top accessible.
2) The base of the tower is at the far end of access, and is the much heavier than the top part.
3) The TOWER'S winch is presently 3" off the ground and it sticks out from the body of the tower. Therefore the tower is staged 20" off the ground by two tree trunks. Otherwise I would crush the tower's winch. In order to put the tower on the trailer in any fashion, It needs to be rotated 120 degrees counter-clockwise (as you are facing the top of the tower).
How will I do this?
I will roll the empty trailer by hand so that it is parallel to the left side of the tower, and that the tower's base is almost even with the front of the fork. The base of the tower needs to be as far forward as possible, inches from the jack. That's why I bought the wheel for the jack.
I will wind the strap clockwise around the tower directly opposing the trailer's winch. When I winch in the tower, the trailer will slide laterally, and end up abutting against the trailer's right tires, (protected by some timber). At this point the tower can no longer move laterally, so the strap being wound around the top will rotate the tower counter-clockwise over the tires. As the tower is pulled over the tires, it will flop on the 4 timbers waiting across the bed of the trailer. I can add some guidance and adjust the height of the timbers so the tower doesn't rotate another 120 degrees! I can make sure it is centered by hand. The tower's winch will be safely in an upright position.
Then I strap 'r down and bring her to Farmingdale.
Here are some pics of the 5000 lb winch i rigged up.
Be Back Soon...
holmzie N2EXG
__________________
"The above comments are my opinion only."
"I will not be held responsible for any wrong facts, misleading statements or nonsensical ludicrousity contained therein."
|
|
|
|
|
09-01-2018, 10:29 AM
|
#65
|
|
Member
Join Date: Jun 2018
Location: New Jersey
Posts: 71
SUN #10636
|
JohnB: Have some measurments & info...
The side rails are 60.5" apart, inside to inside, and are of 2" x 3" rectangular steel channel. For clairification, that means the outside measurement left - right is 64.5"
The "Z" crossmember channels have a 3/8" hole in the center of each one, and they are accurately drilled, verified at 30 1/4" from inside of each side rail.
I will call this wooden framing over the steel trailer frame "floor joists". I verified 7 insidethe side rails. There is a joist (centered?) over each side rail, that the inside of the fenders attach to. Finally the outside floor joists are attached to the steel frame "wings" for a total of 11. Most run continuously front-to-back, and some are broken up to box in the toilet and the shower drains and vents, as well as the sink vent. And of course, the outside joists stop at the wheels so you can change a tire!
Using the available light from the sky above, and changing angles, and taking multiple "samples", noting the shadows, rust stains and other clues, I determined the following measurements with reasonable certainty, having a high degree of confidence:
The center joist is bolted to each cross "z" rail hole, running front to back. Each succeeding joist is 8-3/4" center-to-center equidistant from the center one. So from the center one, being 0" ,the next ones are at 8-3/4" , 17-1/2" , 26-1/4". Then its ABOUT 5" to the next joist over the side rail. Then its ABOUT 8=3/4" to the wing joist. The wing joist hole seems to line up, and there is about 3/4" overhang that I suppose the wall framing sits on, which would make sense.
This trailer was constructed slightly askew, all the holes didn't exactly hit the center of all the joists, but "you can't see it from the street". Attachment bolts (3/8"?)are on each of the "wings, including the slide-out steps; at the center of the 4 "Z" channel cross members, and 5 more across the front; two of which align with the wings/steps, and 3 more between the fork.
__________________
"The above comments are my opinion only."
"I will not be held responsible for any wrong facts, misleading statements or nonsensical ludicrousity contained therein."
|
|
|
|
|
09-01-2018, 10:35 AM
|
#66
|
|
Member
Join Date: Jun 2018
Location: New Jersey
Posts: 71
SUN #10636
|
A little more for JohnB and all...
The Frame Mounting Bolts were all corroded to some amount, but many of the ones in the rotted areas were almost gone.
The tanks are solvent welded everywhere. I found the toilet and vent connection to the black tank cracked about an inch or so from the connections, as they had been flexed upon removal, my bad. Repairable. The gray tank has a hole neatly drilled through it by an errant exterminator, also repairable. I have no plans (yet) od disposing of the tanks or toilet and shower.
Well, that it for now, hope it's helpful. I would of drawn a sketch, and i still could with it so fresh in my mind,
It's off to the tower site. I am all ready and loaded to pull the tower onto the trailer.
holmzie N2EXG
__________________
"The above comments are my opinion only."
"I will not be held responsible for any wrong facts, misleading statements or nonsensical ludicrousity contained therein."
|
|
|
|
|
09-01-2018, 10:44 AM
|
#67
|
|
Member
Join Date: Jun 2018
Location: New Jersey
Posts: 71
SUN #10636
|
OH Yesss...
The floor joists are 1-1/2' high by 1-5/16 wide. check the photos above.
h
__________________
"The above comments are my opinion only."
"I will not be held responsible for any wrong facts, misleading statements or nonsensical ludicrousity contained therein."
|
|
|
|
|
09-01-2018, 12:50 PM
|
#68
|
|
Member
Join Date: Jun 2018
Location: New Jersey
Posts: 71
SUN #10636
|
Trailer frame pics
I realize I neglected to post som good pics of the trailer frame, this is before I mounted the winch. in one of them you can see the holes in the center of the "Z" cross-members.
__________________
"The above comments are my opinion only."
"I will not be held responsible for any wrong facts, misleading statements or nonsensical ludicrousity contained therein."
|
|
|
|
|
09-01-2018, 03:58 PM
|
#69
|
|
Moderator
Join Date: Nov 2006
Location: Ohio
Posts: 12,649
SUN #89
|
Hi Holmzie,
Thank you for the pics and info! Much appreciated. This is good stuff to know.
The black and gray tank vents all solvent welded in. That is what I thought. Makes assembly at the factory quick and leak free. Having to drop a tank later in the field becomes more challenging. One would have to cut the vent pipe in a place to get it out and then re-couple when reinstalling either using a Fernco rubber union, solvent weld union or other joint connection.
Quote:
Originally Posted by holmzie

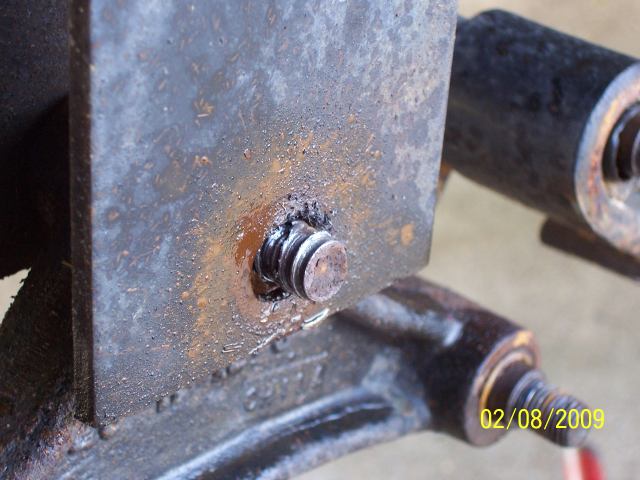
Found trouble: Spring shackles and pivots are rusted and bound. Gave them all plenty of Blaster when I first towed her home, thought everything would shake loose, but oh nooo...
That me with 1/2" breaker bars. Took half a day to loosen 'e, up. Had to stand on the breaker bar to break torque. Soaked with plenty of holy water...used Seafoam's penetrate this time. My arms are aching! Finshed with some spray lithium grease.
|

On your shackles, all rusted up. Yes I can see that happening.
Do not know if your older spring/shackle bolts are made like this but on most all of the newer trailers the bolt head has serrations in it next to the head for anti spin. Looks like this. Having a grease fitting is an upgrade to what is called a "wet bolt". However the sertions next to the bolt head are the same. The serrations bite into the spring hangers or the shackle links.
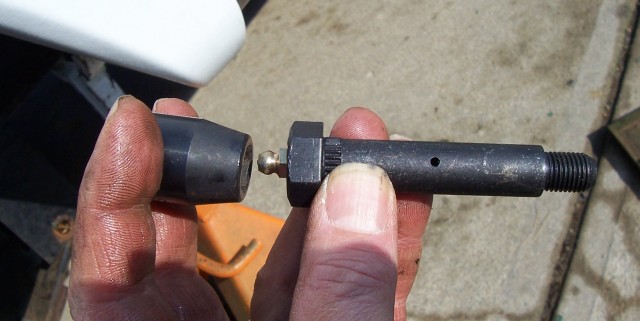
To remove this, you add a wrench on the bolt head to prevent the head from rotating. If not it will strip out hanger or the shackle from the serrations. Then while holding the bolt head from turning, unscrew the nut.
When the nut gets all froze up, well it strips itself sometimes coming off.
When that happens all one can do is replace the spring/shackle pin. They are not expensive and available from many trailer supply places.
I would of thought your pins were made like this. But maybe not. The pin does not really want to spin while towing or over time it will waller out the shackle of the spring hanger. The wear part is the pin and the plastic bushing in the spring. And in many cases the thin shackle link elongates out the holes. In heavy wear the link cracks the end off and lets the trailer drop. Your plastic spring bushings are most likely shot. It is a common issue. less than 10,000 miles and they can be worn through. They do have upgrades to either bronze with a wet bolt for grease or now, Never Fail super polymer bushing guaranteed for life of the trailer and tested over 100K miles.
Hope this helps
John
__________________
Current Sunlines: 2004 T310SR, 2004 T1950, 2004 T2475, 2007 T2499, 2004 T317SR
Prior Sunlines: 2004 T2499 - Fern Blue
2005 Ford F350 Lariat, 6.8L V10 W/ 4.10 rear axle, CC, Short Bed, SRW. Reese HP trunnion bar hitch W/ HP DC
Google Custom Search For Sunline Owners Club
|
|
|
|
|
09-02-2018, 12:56 PM
|
#70
|
|
Member
Join Date: Jun 2018
Location: New Jersey
Posts: 71
SUN #10636
|
Yes, JohnB, they were serrated pins. When reading a while back, I brushed by this, perhaps in the Axle brochure or here in a post somewhere. But I was completely oblivious. And I finally saw what must of been plastic bushings. Sort of white-ish.
What I did was unnecessary and destructive. he NUTS came off with about 100 ft-lbs. I didn't even take off the tires to get at the nuts, Duh. The shackles and pivots were likely bound by rust only at the edges, as plastic over the pin doesn't rust, unless the laws of physics have been changed. All I had to do is drive the pin out the rest of the way, with the nut backed up to the edge to protect the threads. Grease 'er up, replace, torque 'er up, and move to the next one. DUH.
"Hey, holmzie, dont be so hard on yourself...We'll do that!
When I started to have trouble, that's when I had pressure to remove the tower from the property, I should of searched the forum, or reach out and asked you or someone. Good thing I didn't get out the torch!
Don't know if I had a choice for times sake. It seems that the pins' serrations sort of smoothed off, but I may of been looking at donor metal that I took off, filling in the groves.
I will look into replacements when I get the tower off the trailer.
h.
__________________
"The above comments are my opinion only."
"I will not be held responsible for any wrong facts, misleading statements or nonsensical ludicrousity contained therein."
|
|
|
|
|
09-02-2018, 03:39 PM
|
#71
|
|
Member
Join Date: Jun 2018
Location: New Jersey
Posts: 71
SUN #10636
|
Finale: Chapter 2: Prepairing the Trailer and Fetching tower
Chapter One should be "Fetching and Stripping down the Sunline Star Ray Trailer"
To the Group: beside stripping my shackle pins, the whole procedure of moving the towerto the trailer went off without a hitch. I surprised myself.
Referring to my 8/31 post "Which Winch Went Where?" The following pics are of me "polling" the now vacant trailer into position, with the fork in front, (inaccessible by tow vehicle for any practical purpose). Did that after I polled and rolled the 1250 lb tower on the log-trunks, to reposition the front and steer it away from the building on the left. There is a dumpster which I had to leave a generous amount of clearance, per chance it would be struck by the trash removal truck! I finally had roughly 6" clearance to the building when I finished. I wired the timbers to keep 'em in position when the tower flops down on the trailer, otherwise would be mostly impossible to reposition properly afterwards. Two timbers are over the rear/front frame, and 2 are over Z bars, which sagged just a bit from the load.
Continued....
__________________
"The above comments are my opinion only."
"I will not be held responsible for any wrong facts, misleading statements or nonsensical ludicrousity contained therein."
|
|
|
|
|
09-02-2018, 03:43 PM
|
#72
|
|
Member
Join Date: Jun 2018
Location: New Jersey
Posts: 71
SUN #10636
|
Finale Chapter 2 cont.
I ended up with two inches of clearance from the back of the fork jack. Since the trailer winch was attached near the center of the tower, I could jockey the tower around and re-positioned the rigging a bit as I drew it as I snugged it up into position.
Cont...
__________________
"The above comments are my opinion only."
"I will not be held responsible for any wrong facts, misleading statements or nonsensical ludicrousity contained therein."
|
|
|
|
|
09-02-2018, 04:20 PM
|
#73
|
|
Member
Join Date: Jun 2018
Location: New Jersey
Posts: 71
SUN #10636
|
Finale Chapter 2 (almost last)
So, There she is, it's dark, yep. It was aproaching sunset as I realized my strapping just wasn't gonna work. So off to Har-ber Fright I go for some big yellows, and the triangular magnetic flashing red light for $4.00. And it didn't fall off!
Finished strapping down at 9:30, and pulled the trailer out it's perch next to the house. One little thing I didn't notice was a very slight incline toward me. I used a rigging strap on my front bumper tow hook, and like a ballet dancer, the trailer kept creeping toward me, and I frantically tried to avoid it by making my planned turn to the right. It turns out the incline also goes to the right.
So a 1 ton tower with a trailer on it bumped the front of my truck. I had timbers I could of staged on the blacktop, every few feet, but ohhh nooo, not me. If it wasn't so stupid I would say it was almost beautiful, graceful, hilarious, and the trailer eventually stopped in the exact position it was supposed to be. It popped off my left side plastic bumper panel, and pushed in my license plate a bit, very minor.
But there she is safe at home, about 8 miles away.
How did I get those big logs to the tower site in the first place? So many folks asked me that. The answer is in the last pics!
__________________
"The above comments are my opinion only."
"I will not be held responsible for any wrong facts, misleading statements or nonsensical ludicrousity contained therein."
|
|
|
|
|
09-02-2018, 04:29 PM
|
#74
|
|
Member
Join Date: Jun 2018
Location: New Jersey
Posts: 71
SUN #10636
|
Finale Chapter 2 (at last)
The trip to Farmingdale was uneventful, thankfully. The trailer hand about 25 lbs tongue weight before I loaded the boom and some other miscellaneous metal pieces as near to the front as possible. Im guessing about 75 lbs tongue weight when I finished, far to little. But she handled surprising well despite the improper balance.
Sso here is some pics of the trailer on my messy yard which I am to clean up tomorrow. Notice the 2" clearance to from the base to the jack? Right on the money, baby.
Gonna watch the Richmond nascar race now!
Enjoy your Labor Day Weekend!
holmzie N2EXG
__________________
"The above comments are my opinion only."
"I will not be held responsible for any wrong facts, misleading statements or nonsensical ludicrousity contained therein."
|
|
|
|
|
09-02-2018, 08:03 PM
|
#75
|
|
Member
Join Date: Jun 2018
Location: New Jersey
Posts: 71
SUN #10636
|
Why did they put a Darlington NASCAR race in place of my Richmond race?
Duh. To be expected.
h.
__________________
"The above comments are my opinion only."
"I will not be held responsible for any wrong facts, misleading statements or nonsensical ludicrousity contained therein."
|
|
|
|
|
09-02-2018, 08:11 PM
|
#76
|
|
Moderator
Join Date: Nov 2006
Location: Ohio
Posts: 12,649
SUN #89
|
WOW.... That was quite the adventure... Where their is a will, there is a way... 
Glad you made it back home all OK. New seeing close ups on the tower, that is a rugged tower. And heavy. I somehow think some trailer frame reinforcements will be in order during the mounting process.
The shackle and pins, not to worry those parts are not that costly to replace. Odds are high the pin serrations wallered out the hole in the shackle. Standard shackles do not cost much. They can be found at most trailer parts supply places or on line. You need the pin diameter, the hole to hole center and the thickness to match them up.
Cool pics, Thanks for sharing.
John
__________________
Current Sunlines: 2004 T310SR, 2004 T1950, 2004 T2475, 2007 T2499, 2004 T317SR
Prior Sunlines: 2004 T2499 - Fern Blue
2005 Ford F350 Lariat, 6.8L V10 W/ 4.10 rear axle, CC, Short Bed, SRW. Reese HP trunnion bar hitch W/ HP DC
Google Custom Search For Sunline Owners Club
|
|
|
|
|
09-03-2018, 08:54 AM
|
#77
|
|
Member
Join Date: May 2017
Location: New Jersey
Posts: 35
SUN #9421
|
Quote:
Originally Posted by JohnB
WOW.... That was quite the adventure... Where their is a will, there is a way...
Glad you made it back home all OK. New seeing close ups on the tower, that is a rugged tower. And heavy. I somehow think some trailer frame reinforcements will be in order during the mounting process.
The shackle and pins, not to worry those parts are not that costly to replace. Odds are high the pin serrations wallered out the hole in the shackle. Standard shackles do not cost much. They can be found at most trailer parts supply places or on line. You need the pin diameter, the hole to hole center and the thickness to match them up.
Cool pics, Thanks for sharing.
John |
I have a spare set of shackle hangers that came with my replacement double axle kit ; I also have the original complete axles from my Sunny (with mission impossible brake parts). You are more than welcome to any of them parts. Im just over the river from Philadelphia, so about a 90 minute driver (w/o idiots and NJs finest).
__________________
|
|
|
|
|
09-03-2018, 09:36 AM
|
#78
|
|
Member
Join Date: Jun 2018
Location: New Jersey
Posts: 71
SUN #10636
|
JohnB, follow up on some of ur questiions:
Partial quote:
"1. The metal roof joints at the wall corners looked to be folded over roof metal over the top of the wall siding. Is this correct?"
Yes. But as the roof met the siding, there was leaking at the rear wall corners. Because the roof conversion to rear walls is a curve, there is a no-man's land where water could be blown in a failed corner molding seal. The rear of the roof bent over the side walls on top, but converted to under the side walls at the curve, having slits cut and lapping the flaps from the bottom up. The rear of the side walls likewise had similar slits/flaps also bent over at the radius and therefore the roof flaps as to allow water to drip off. In the front, the front and the roof were both folded over the side walls the whole way up. The curved section at the front roof/wall transition had the needed cuts on the roof edges so each little "flap" could fold over the radius of the curve. It worked. The only small leak in the front was around the window, which showed some RTV silicone applied at some point.
Whew! JohnB, the only other detail is that the slits/flaps at both curved radius's were cut on an angle, making a rombic, with the point directed away from the wind , and downward.
----------------------
"The front transition from front and rear roof to wall and the front and rear roof seam wall siding are all continuous metal."
Yes. That is not to say there are no joints. The joints are double lapped and all but possibly one at the right rear (cant tell, could be the corner ya know) were in good shape. You can see the pics of the rolled up aluminum siding, shows the edged and the seams.
----------------------
"2. The side walls attached to the side of the floor system. The newer campers the walls rest on top of the floor."
Yes. The sidewall framing, and therefore the inside wall, went all the way down, resting on the metal framing wings, (having nominally 3/4" sticking out beyond the floor joists). Same along the front wall, but the Darco folded up to protect the front bottom, under the aluminum skin.
Hope this helps.
holmzie N2EXG
__________________
"The above comments are my opinion only."
"I will not be held responsible for any wrong facts, misleading statements or nonsensical ludicrousity contained therein."
|
|
|
|
|
09-03-2018, 11:52 AM
|
#79
|
|
Member
Join Date: Jun 2018
Location: New Jersey
Posts: 71
SUN #10636
|
UNIXdude: Axles? Hmmm. and JohnB...again. Just some thoughts.
Quote:
Originally Posted by UNIXdude
I have a spare set of shackle hangers that came with my replacement double axle kit ; I also have the original complete axles from my Sunny (with mission impossible brake parts). You are more than welcome to any of them parts. Im just over the river from Philadelphia, so about a 90 minute driver (w/o idiots and NJs finest).
|
Wow, whats the size of the Sunny GVWR, Capacity, axle length, etc?), I guess you meant there are unavailable parts, being "mission impossible"? I heard my drums and shoes re no longer available. Mine are rusty, but look unworn, I can clean 'em up, doesn't bother me. But will consider gracious offer.
Pressure is off me now for this project. Gonna finish cleaning up and mow the lawns, then get back to the house in Summit.
JohnB, of course, you are right: Yah, the trailer now weighs less than the tower. I have lots of different ideas, and I am into pilfering ideas, but one thing for sure: I got the tower HERE! YESSS! ATTABOY, holmzie!
I had considered borrowing or renting a boat trailer to move the tower, and searched craigs list for any possibility. But I notice a few travel trailers and frames in the same searches.
The side frame is of 2" x 3" rectangular stock, and there is no real substance to the "Z" rails cross members of course. Commercial 70' tower trailers are built with 6000 GWVR (2x3000 lb axles) and use more substantial framing. The frame I would build is much like the commercial versions, with substantial forward and cross bracing.
I have one dimension, mentioned much earlier, that is fixed: The pivot height for converting the tower to the horizontal position is 8' from the road, nominally. That would make the top of the "triangle" about 9'8" high from the road, for transport. The original height of the trailer not including the AC, etc, was about 8' from the road?. An appreciable amount of the load was on the sides, and the AC on top. In my example, I have a more consolidated load centered on the longitudinal mid-line of the trailer. In other words, it is a little more "top heavy".
One of the things I decided on early is: 1) I don't have to get a building permit to roll a an "emergency" preparedness mobile communications platform and use it on my property. This allows me to have a tower on my property, and they can't say much about it. 2) I don't have to have such a robust and substantial trailer that would be fit to go cross country on the interstate. Conversely, if I were to have a tower/trailer that I could move under reduced speed with the flashers on, for local/regional events, that would be acceptable too. 3) It is not a requirement to fully deploy the full height of the tower, I can go 40' easily with one set of guys.
An advantage that I will pay for a registration for a non-RV utility trailer under 4500 lbs. That's attractive to me. And I have the title in my possession. All pluses.
Playing around on paper to make THIS trailer work in some minimal way: I can move the axle ass'ys rearward, to get the balance point/front clearance right without disturbing the fork. If I am going to do that, I could consider getting heavier axles suspension and wheels.
I am not opposed to just finding another free Trailer that is longer and Just a little wider.
holmzie N2EXG
__________________
"The above comments are my opinion only."
"I will not be held responsible for any wrong facts, misleading statements or nonsensical ludicrousity contained therein."
|
|
|
|
|
09-04-2018, 08:10 PM
|
#80
|
|
Moderator
Join Date: Nov 2006
Location: Ohio
Posts: 12,649
SUN #89
|
Hi holmzie
Thanks for taking the time to detail out the roof joints. Much apprecaited.
After seeing and repairing enough rubber roof campers, the metal roof campers still have a common weak point with the rubber roof counterpart. The sealants used wherever there is a seam that requires a sealant. As FYI, RTV is not good in this application. There are other sealants made for this.
And the rolling RV down the road is not a easy application to be leak free for "years" many years. The first few years is not so much a problem but starting around year 3 if the RV lived outside all the time, the sealants start degrading. And UV exposure from the sun greatly accelerates this. If the RV owner knows about how campers fail and leak they can stay ahead of the issues. Or at least try to. Unfortunately many good folks just do not that campers can leak as they do not see any water inside the camper. But it can be inside the walls, ceiling and floor for a really long time before they see it (years worth). No one ever explained it to them about how campers leak and if they bought it from a Dealer, this topic does not come up unless they are directly asked. And if you do not know to ask it, well.... . So we try here on Sunline Club to help folks and explain how campers leak and how to help prevent it. All for free!
Back to the metal roof... A key point to be noted, the metal roof concept has fewer seams relying on sealants. This lowers the odds of a leak. It does not eliminate it, but lower its. The actual rubber on a rubber roof is very good, but again when it comes to the sealants, the rubber roof seams count on those sealants to work to prevent water intrusion between the rubber and the siding.
There are sealant ways to help the rubber roof situation and the metal roof too. They cost more $$ and they take more time to apply. But they last a lot longer. Hopefully someday the RV industry will at least offer these upgrades when selling them new.
Thanks
John
__________________
__________________
Current Sunlines: 2004 T310SR, 2004 T1950, 2004 T2475, 2007 T2499, 2004 T317SR
Prior Sunlines: 2004 T2499 - Fern Blue
2005 Ford F350 Lariat, 6.8L V10 W/ 4.10 rear axle, CC, Short Bed, SRW. Reese HP trunnion bar hitch W/ HP DC
Google Custom Search For Sunline Owners Club
|
|
|
|
|
|
|
Currently Active Users Viewing This Thread: 1 (0 members and 1 guests)
|
|
|
 Posting Rules
|
You may not post new threads
You may not post replies
You may not post attachments
You may not edit your posts
HTML code is Off
|
|
|
|
 » Recent Sunline Discussions
 |
|
|
|
|
|
|
|
|
|
|
|
|
|
|
|
|
|
|
|
|
|


 Linear Mode

