 |
 08-30-2009, 01:12 PM
|
#1
|
|
Member
Join Date: Feb 2009
Posts: 97
SUN #784
|
Pics of some more mods completed......
At the risk of being nerdie, or wierd, here are a few more mods I have completed. My wife, and others (many), think I am wierd because I am posting pics of things I have done to our TT. I am posting anyways...I like to see what others have done, I have used alot of what I have seen on this site, so I figured it would be fun to return to the site what I have done.
These all are additions/changes to make this TT our own and more functional for our camping experience. I did some of these mods in the spring when we first got the Sunline, and others are from these last few days. I am just posting finished pics, but if anyone wants more detail/ideas let me know.

Where do you store your spring bars? For years I have put them where ever I placed them...to rust, to get dirty, greasy...etc. So I reinforced the propane bottle cover and added storage tubes. Now, thanks to my JohnB education that the bars should always be used on the same side, the driver side bar is only accessible from the drivers side and the passenger from the passenger side.


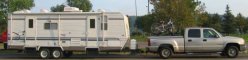
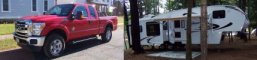
Rear storage...a must for me! I had done this years ago to our previous TT and loved it, so I had to add to Sunline. My last TT I fabricated and welded directly to the frame. Sunline has a nice bolt on bumper, so I expanded on that idea and fabricated this structure to bolt onto Sunlines bumper structure, mounted the tool box, and allowed for the bumper to be bolted onto my new extension. Now the toolbox and extension can be removed in minutes and the bumper re-installed. I also included 2 spots for water fill totes when dry camping. I dont keep them filled back there, just carry the empty totes ready to be filled.


The 264SR model has a really nice outside storage area. One of the problems with the storage area though is it has a lot of vertical space so to be able to use the entire space I built some custom shelfing and added some of those cheap plastic drawer sets. It works great...


Added sewer hose storage back by the waste valves. Fabricated metal brackets, welded to frame, and bolted on storage tube. Another recycle from previous TT. The storage tube is from Camping World.


New bath faucet...pretty boring, sorry. The one that came with the TT didnt allow you to get your hands under the water, way to low.

The 264SR model came with a really cool built in laundry hamper. it was hinged at the bottom. Pull the handle and the bin tipped out so you could add dirty laundry. Problem, for us, a family of 4, it got filled in no time because it was so small. So in need of more storage space, I removed the laundry bin structure, moved the hinges to the side of the door, and added shelfing.


I built a stove top cover with some leftover wood. Adds to valuable countertop real estate. Take it off, flip it over, and it become a serving tray.

Never used, or intended on using the TV shelf in the bedroom, so I removed it, cut it down, re-shaped, and re-mounted in the kitchen. It's now going to be a spot to put the coffee maker...I just need to add some velcro straps or something to keep the coffee maker secure in transit


Ohh..the food pantry....we had the really nice white wire slide out that we loved, well thought we loved it until we actually tried to use it. The closet itself is 9" wide, the doorway opening is on 7" wide, and the wire shelfing was only is only 5" wide. While in theory it's nice to access the full depth of the panty with the slide out shelfing...BUT you cant fit anything on the shelf it's too narrow. Very dissapointing, but this is a solution made in the fast to get us by for a 1 1/2 week trip we recently completed. Anyone have a better idea???

__________________
Joe
2005 Sunline 264SR
2005 Chevy 1500HD 4X4 6.0 4WS
|

|

|
|
08-30-2009, 01:48 PM
|
#2
|
|
Moderator
Join Date: Dec 2006
Location: Pennsylvania
Posts: 2,285
SUN #128
|
NICE mods. We all start drooling when we see that someone has posted their mods! Now for a question. How did you reinforce your propane bottle cover to add the spring bar storage tubes?
__________________
__________________
Pam
Lance 1475 "Snoopy"
2012 GMC Sierra 3500HD 4x4 D/A
2012 Arctic Fox 30U, SUNLINES - 2006 2753 "Tweety", 2007 QUE "QUEtSE", 2364, 1660
|
|
|
|
|
08-30-2009, 06:22 PM
|
#3
|
|
Senior Member
Join Date: Nov 2006
Location: New York
Posts: 2,909
SUN #93
|
Not nerdie at all.....we all love to see mods completed by others and try to incorporate them into our on model of TT!
Thanks for the great pics!
__________________
Kathy & Leo SUN 093
Central Adirondacks of New York
2013 Rubicon 2900 Toy Hauler
We loved our 2007 T-2499
2010 Ford F-350 4x4 Lariat Super Crew Dually Diesel

|
|
|
|
|
08-30-2009, 08:12 PM
|
#4
|
|
Moderator
Join Date: Nov 2006
Location: Ohio
Posts: 12,649
SUN #89
|
Re: Pics of some more mods completed......
Quote:
|
Originally Posted by jsms264
At the risk of being nerdie, or wierd, here are a few more mods I have completed. My wife, and others (many), think I am wierd because I am posting pics of things I have done to our TT. I am posting anyways...I like to see what others have done, I have used alot of what I have seen on this site, so I figured it would be fun to return to the site what I have done.
|
Joe
Well you have joined the right club  We like seeing your mods, trust me. Pics are cool!!!  And you do nice work. So does that make us nerdy too
. 
H'mm the stove cover tray. I'm going to build on that one. Thanks!
The pantry, I'm assuming you may have had the newer one that is center hung, correct? I saw them and they seemed harder to get thing in and out of.
We have the older style that is canter livered from one side. And trust me we would be in real trouble without it. This is one in the T2499 but the T310SR has the same one. And as packed.


The only down side to this side mounted type is the wire trays can crack at the welds and quick. The 1st and 2nd camping trip out we cracked 2 trays. And we even bought 2 extras when Sunline was still in bussinees. I fixed that problem with tye wraps and now in 5 years we have not had any more problems. Don't know if ours is slightly wider then yours.
Your shelves look nice.
Keep pics of your handy work coming. We like to see and build off of them. I have a bunch of little ones myself I need to get up.
Thanks for sharing
John
__________________
Current Sunlines: 2004 T310SR, 2004 T1950, 2004 T2475, 2007 T2499, 2004 T317SR
Prior Sunlines: 2004 T2499 - Fern Blue
2005 Ford F350 Lariat, 6.8L V10 W/ 4.10 rear axle, CC, Short Bed, SRW. Reese HP trunnion bar hitch W/ HP DC
 Google Custom Search For Sunline Owners Club
|
|
|
|
|
08-31-2009, 07:16 AM
|
#5
|
|
Senior Member
Join Date: May 2008
Location: Pennsylvania
Posts: 212
SUN #599
|
Thanks for all the pics and description of the mods you performed. Please don't feel like you're being 'nerdy'. I can speak for myself and probably a few others, it's a highlight of my day coming on here and reading about what folks have done to improve their camping!
Small word of caution on the rear bumper tool box mod. The original bolt on rear bumper was only designed to hold 100lbs. If you haven't improved the tie in to the main frame you might have a problem depending on what you keep in there when you're traveling. Also, as you probably know, the weight loaded here directly affects your tongue weight and weight distribution set up. JohnB can tell you a lot more than I can on the proper precautions as he's done this mod twice on Sunlines.
Take care,
Lode
|
|
|
|
|
09-01-2009, 06:26 AM
|
#6
|
|
Member
Join Date: Feb 2009
Posts: 97
SUN #784
|
Thank you everyone for the kind words. I get killed here by family and friends because of my "addiction" to this forum. My habits usually are in the morning while having coffee and getting ready for work I read the forum and occassionaly post....how can that be an addiction? I enjoy it, camping/RVing is one of my passions, so I appreciate being involved in this Forums family in my small way! 
Tweety,
Spring bar storage....Sunline is in storage so I cant take any pics right now, but what I did was cut 2 pieces of 3/8" plywood to 5 1/2" x 18" and placed them horizonially on the inside of the propane cover to fit in the wide "grooves". I cut 1 piece of a 1" x 18" and again place it on the inside of the cover on the very bottom horizonially as well. Then on the outside I have 2 pices of pressure treated 3/4 x 19 placed vertically and then screwed through the cover into the horizontal pieces on the inside. This created a very strong frame to screw the storage tubes onto. The tubes are just PVC railing posts I purchased from Home Depot for like $10 each. I need to get 2 of those bumper sewer hose doors that are hinged as the end caps that are shown in the pics are just setting there loose.
JohnB,
I have the same style wire pantry slide as you. But mine was so narrow you could fit very little on them. When we bring food for 4 there just in not enough shelf space. Maybe someday when the kids dont go with us anymore I can put it back in as we wont need to bring as much?
Lode,
I did the bumper extension in the spring and have traveled maybe 2,000 miles as shown in the pics, it works great, and Sunline tows great. Weight wise, everything I added weights about 80 pounds, and what I store in there (hoses, electrical cords, weberQ gas grill, and awning carpet) dont weight very much. I have maybe 120 pounds total (structure, tool box, and contents) back there at most. As for the 100 pound bumper limit I can totally see why, the bumber tube itself is by far the weak point, it made from guage steel probabely poor quatity steel as well. The 4 x 2 stub Sunline welded to the frame and the plate welded to the stub are solid. I cant speak for the what qualtity or spec steel they used, so taking the bumper out of the picture this now becomes the week point. But Sunline welded all along all connecting surfaces with some really nice welds. I am no engineer but I am sure they will take way more than 100#. What I fabricated was a "ladder" to accept the tool box, (much more than just 2 frame extensions) made with nominal high qualtity steel (hot rolled tube, angle, flat bar), then 1/4" fillet MIG welded what I fabricated. My brother has been in the steel business for 24 years, so I get all my steel for basically free. :P The bolts I used are hardened to a 8,000 pound sheer strength. I do appreciate the words of caution....I hope I never find out the hard way, but I am confident what is there will not be going anywhere for a great many years.
__________________
Joe
2005 Sunline 264SR
2005 Chevy 1500HD 4X4 6.0 4WS
|
|
|
|
|
09-01-2009, 08:01 AM
|
#7
|
|
Senior Member
Join Date: Apr 2007
Location: New York
Posts: 1,846
SUN #264
|
I was told that the weak point of the Sunline rear bumper is the vertical weld that holds the mounting stub to the 4" square bumper stock. Basically it was designed to break if the load exceeded a certain weight. Since they rate the bumper at 100#, I'd venture a guess that they want the weld to break at 150# or so.
IMHO, it's more likely that the weld would break if the bumper is subject to a rotational torque (like the bike mounts that bolt to the bumper and extend straight out horizontally) rather than weight placed directly on top of the bumper. It's harder to break something like that in straight vertical shear, but it'll tear much easier when rotational force is applied.
I considered doing some kind of similar extension, but since there is a compartment door in the center of the backend of the TT, I can't place anything back there without blocking the compartment.
__________________
'12 F250 4x4 Super Duty PowerStroke 6.7 diesel
2011 to present: '11 Cougar 326MKS
1999 to 2011: '99 Sunline T-2453
SUN264 * Amateur Radio kd2iat monitoring 146.52
|
|
|
|
|
09-01-2009, 05:15 PM
|
#8
|
|
Member
Join Date: Feb 2009
Posts: 97
SUN #784
|
Steve Collins...
If the weld is designed to break at a certain load, than that is not something I anticipated and possibly could be a disaster if true.  I never heard that one but you sure have my attention with it. Boy, the welds there sure look strong? I thought for sure the weak point was the bumper tube? I'll have to have my brother talk to some of the professional welders he knows and varify if that is even possible? I'll report back what info he can gather for me. If anyone out there reading this can confirm please post. Maybe I'll have to remove (cut/grind) what sunline has there and fabricate my own.
On a side note...Steve I grew up on a farm in Avon (almost Livonia) and spent alot of time on Honoeye Lake. I know a bunch of really nice folks in Honoeye.
__________________
Joe
2005 Sunline 264SR
2005 Chevy 1500HD 4X4 6.0 4WS
|
|
|
|
|
09-01-2009, 05:54 PM
|
#9
|
|
Senior Member
Join Date: Apr 2007
Location: New York
Posts: 1,846
SUN #264
|
Joe,
On my trailer, the stub that inserts into the slot on the frame is fastened to a 2" wide by 4" tall plate which is then welded to the trailer side vertical surface of the bumper tube. That plate is only welded on the top and bottom edges. Seems to me if they wanted that connection to be stronger, they would have welded that plate on all four edges. And the plate is fairly thin material.
The stub (which is sheet stock bent into a C shape) is welded to the plate, but the welds are only on the inside of the C. Again, if they truly wanted a strong bumper to trailer connection, it seems to me that they would have welded both the inside and outside of the C.
A stronger mounting for the bumper would likely have used thicker stock for both the plate and the stub in addition to being welded on all sides of all connections.
I took the bumper off and laid it on the ground with the mounting stub pointing upward.

Here are close-ups of the stub and plate from several views:


[IMG]
The dealer we bought the trailer from almost 10 years ago is the one who told me about the bumper being intentionally weak. He gave us a lot of other detailed information about Sunline and their products which was all correct so I have no reason to think that he would have mislead us on this one point.
You mentioned that all Sunline connections were welded on all sides On your bumper. That is a clear difference from how my '99 is done. That alone may move you back into a safe zone.
__________________
'12 F250 4x4 Super Duty PowerStroke 6.7 diesel
2011 to present: '11 Cougar 326MKS
1999 to 2011: '99 Sunline T-2453
SUN264 * Amateur Radio kd2iat monitoring 146.52
|
|
|
|
|
09-01-2009, 07:40 PM
|
#10
|
|
Moderator
Join Date: Dec 2006
Location: Michigan
Posts: 6,155
SUN #123
|
Steve,
The difference between the older style mounts like yours and my '07 is huge. I have not looked under personally, but I do recall seeing bolts from the outside that couldn't be seen before. I actually thought the older style bumpers weren't removable without cutting them off.
We did have a bumper almost come off on us on our first '97 2653. We never had anything on the bumper at all besides the spare tire, which the dealer mounted in the center. The rotational force, combined with our lovely Michigan roads, broke the welds and almost caused the bumper to fall off. Fortunately when it happened we were coming back from a trip with friends who were following us, so they let us know as soon as it really started bouncing, which was only about 10 miles from home.
If no one else can pics of their new style bumper mounts, I can get some pictures of mine this weekend.
Jon
__________________
2007 T-286SR Cherry/Granola, #6236, original owner, current mileage: 9473.8 (as of 6/18/21)
1997 T-2653 Blue Denim, #5471
1979 12 1/2' MC, Beige & Avocado, #4639
Past Sunlines: '97 T-2653 #5089, '94 T-2251, '86 T-1550, '94 T-2363, '98 T-270SR

|
|
|
|
|
09-01-2009, 07:54 PM
|
#11
|
|
Senior Member
Join Date: Apr 2007
Location: New York
Posts: 1,846
SUN #264
|
Quote:
|
Originally Posted by Sunline Fan
The difference between the older style mounts like yours and my '07 is huge. I have not looked under personally, but I do recall seeing bolts from the outside that couldn't be seen before. I actually thought the older style bumpers weren't removable without cutting them off.
|
Jon,
On mine, each "stub" was held in its slot by 3 machine screws. They were a bear to remove. I replaced them with a single bolt that goes all the way through the frame member, stub, and slot. Much easier to disassemble and yet still as strong. Uh, as strong as that bumper can be... 
__________________
'12 F250 4x4 Super Duty PowerStroke 6.7 diesel
2011 to present: '11 Cougar 326MKS
1999 to 2011: '99 Sunline T-2453
SUN264 * Amateur Radio kd2iat monitoring 146.52
|
|
|
|
|
09-01-2009, 09:07 PM
|
#12
|
|
Moderator
Join Date: Nov 2006
Location: Ohio
Posts: 12,649
SUN #89
|
Hi Folks
Here is a 2004 bumper. They bored 4 large holes in the 1/8" think bumper to clear the head of a carriage bolt. 2 on each end.
They then welded left and right, leaving top and bottom unwelded on purpose, on a 1/16" sheet metal plate. The thin plate had square punched holes to stop the carriage bolt from rotating. Since the head of the carriage bolt sticks into the large clearance hole in the mount bumper tube, the 1/16" thick plate is the holding surface.
If you rotate the 4" tube too far, the 1/16" tab will bend out on the top with out all too much effort. In this case the bumper will bend down about 15 to 20 degrees from the 1/16 thin plate buckling. If it is a mild load the bending will let you know you have a problem and may not yet totally fall off. But if you are in the 120 to 150# area, well you might just torque the entire thing off. Especially with a top mounted bike rack that creates a 6 foot lever.


And here is the 1/8 thick mounting plate welded to the back of the T310SR frame.


On mine I cut off the tab and bolted on 3 x 3 x 1/4 angle iron 2 foot down the frame. Mine uses a different mounting concept.

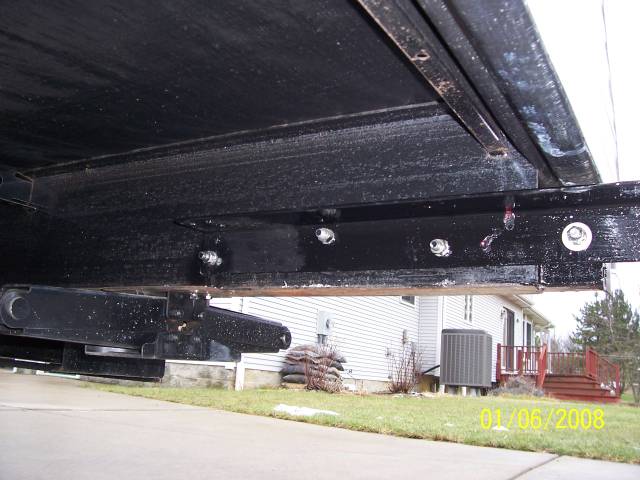
Joe, if you have concerns, have your brother weigh in too as he is there looking at it, I am not. If needed, a possible strengthening can be to bolt on an angle or 1 / 4 thick by 3 or 4 wide plate along the outside of your tube extensions to span the joint. Bolt to the TT frame and then bolt to your extension tubes. Ideally go down the main TT frame a good distance and almost full length of your extension. A plate on each left and right side of the TT will add considerable strength if needed. I cannot tell by your pics but on my T310 Sunline welded on a 2 x 4 tube to the I beam. That created a spaced out effect from the main frame. You may have to fill that area upstream of the short tube they have with some wide spacers to allow your add on plate to reach way down the frame. I went 24 down the frame. Your brother may have some of that tube size to create a spacer from.
Good luck and hope this helps.
John
__________________
Current Sunlines: 2004 T310SR, 2004 T1950, 2004 T2475, 2007 T2499, 2004 T317SR
Prior Sunlines: 2004 T2499 - Fern Blue
2005 Ford F350 Lariat, 6.8L V10 W/ 4.10 rear axle, CC, Short Bed, SRW. Reese HP trunnion bar hitch W/ HP DC
Google Custom Search For Sunline Owners Club
|
|
|
|
|
09-01-2009, 09:42 PM
|
#13
|
|
Member
Join Date: Feb 2009
Posts: 97
SUN #784
|
Hey John,
Yes, mine is exactly as your 04' pics show, thank you. I did bolt to sunlines factory plate as your pic shows. I'll consult with my brother, I have a bunch of the 4 x 2 steel left so I think this weekend I'll be adding some longer support further down the frame on the inside just to be sure. Should be fairly easy to add, and I would rather be safe than sorry! I'll get some pics and post as well.
Steve and Lode...Thank you for the caution, we may have avoided a tool box passing me on the highway!
__________________
__________________
Joe
2005 Sunline 264SR
2005 Chevy 1500HD 4X4 6.0 4WS
|
|
|
|
|
|
Currently Active Users Viewing This Thread: 1 (0 members and 1 guests)
|
|
|
| Thread Tools |
Search this Thread |
|
|
|
| Display Modes |
 Linear Mode Linear Mode
|
 Posting Rules
|
You may not post new threads
You may not post replies
You may not post attachments
You may not edit your posts
HTML code is Off
|
|
|
|
 » Recent Sunline Discussions
 |
|
|
|
|
|
|
|
|
|
|
|
|
|
|
|
|
|
|
|
|
|


