 |
|
 11-09-2010, 02:35 PM
|
#1
|
|
Member
Join Date: Oct 2010
Posts: 86
SUN #1635
|
 Changing Out Jackknife Sofa for Two Reclining Chairs T-286SR
Hello, Everybody,
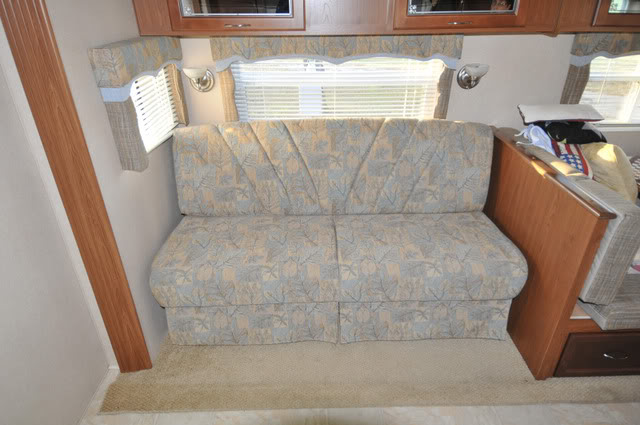
We wanted to share our experience, completing our project to remove
the jackknife sofa from its place in the slide room, and replace it with two
reclining chairs. Most of us are probably familiar with the jackknife sofa: not
very comfortable, either to sleep on or to sit on.
Several member here online suggested that I could do the work myself,
and taking them up on it, I did the work, and this is the story.
Jon (Sunline Fan) has offered to help me with the posting of the photos
after I've posted this. Between he and I, we'll get it done, but it WILL be a
work in progress.
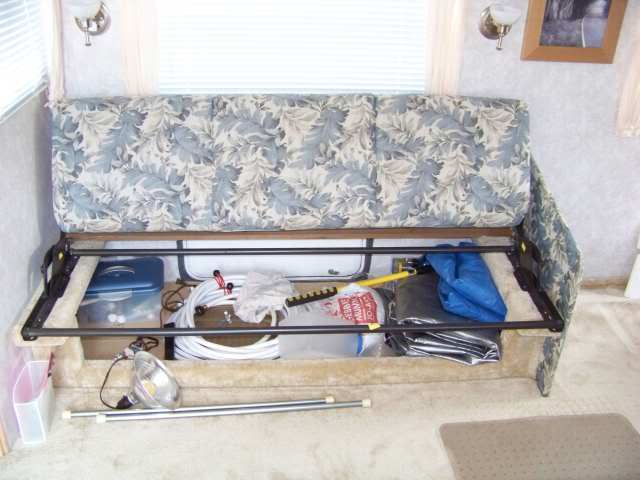
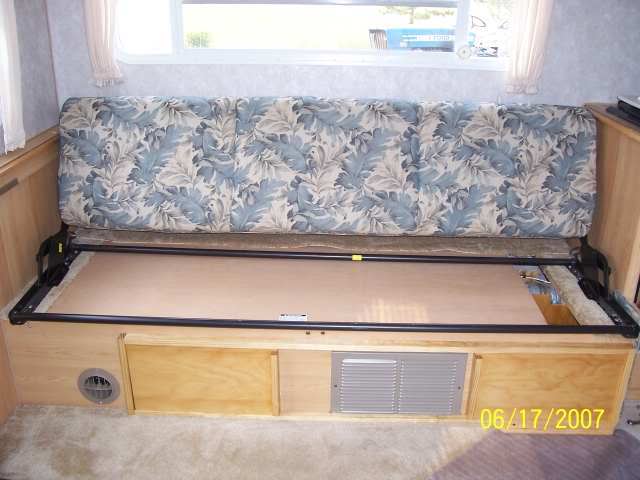
Here is the offending sofa. Let's get rid of it:
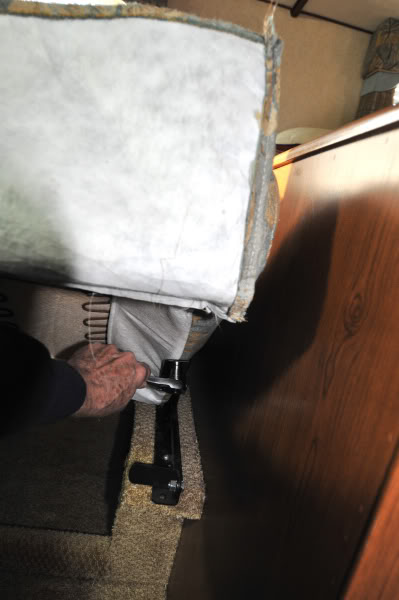
The easiest way to start is to remove the lower cushion. The cushion is
held on by 4 bolts, two on each end. (See arrow.) The cushion had to be
held up in the half-way position to reach the bolts.
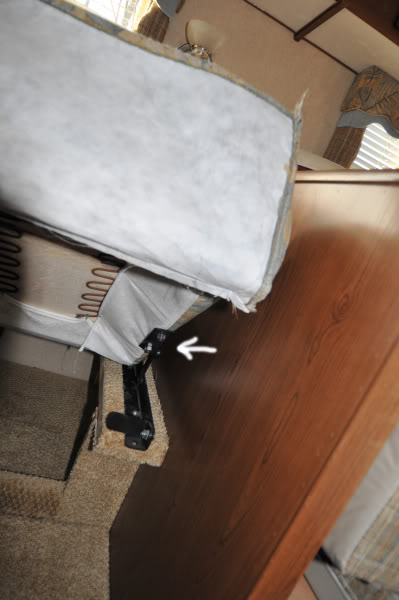
Once the nuts are removed from the bolts, the bottom cushion lifts up, off
and out of the way.
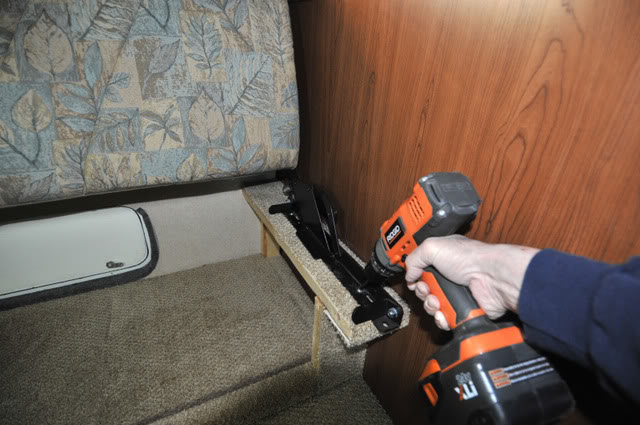
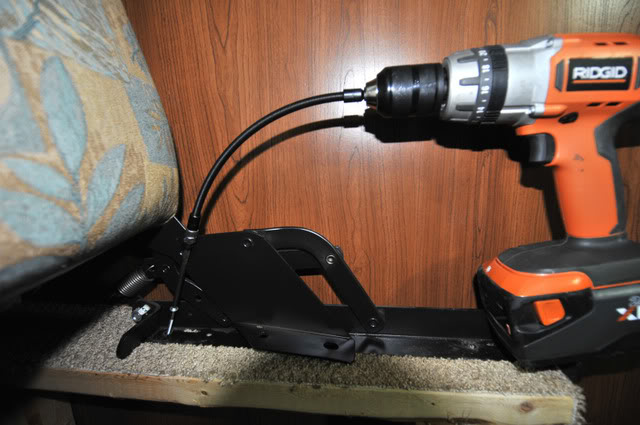
With the lower cushion off, the steel frame of the sofa is exposed. The
steel side frames are mounted to the wooden under frame by 4 screws,
2 on each end. The front screw is easily accessed by a screwdriver or drill.
The screws are the typical RV square-driver type. The rear screws were
inserted at an odd angle, and required a flexible drill bit extender to reach into
them.
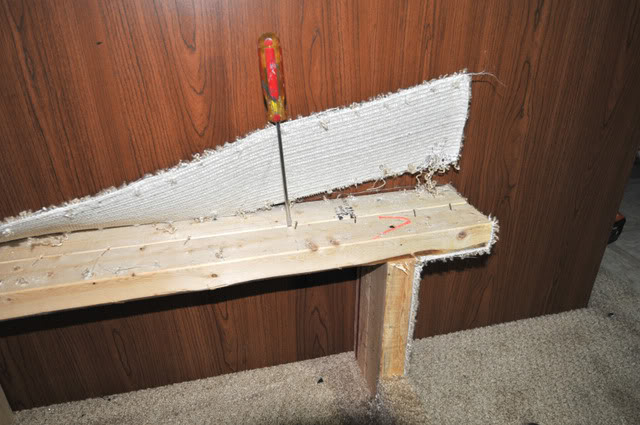
With both the bottom and top cushions removed, the wooden under frame
is completely exposed. The wooden frame is wrapped in carpet, and the
screws that hold the frame to the side walls and the dinette wall are hidden
under the carpet. The carpet strips are attached to the wooden frame with
umpteen dozen carpet staples. There appeared to be some adhesive applied,
also. The carpet staples do not remove easily, so we found that the only
quick way to remove the carpet was to pry it up with a sturdy screwdriver.
We had to rip the carpet loose from each staple, and at several points had
to cut the carpet away with a box cutter.
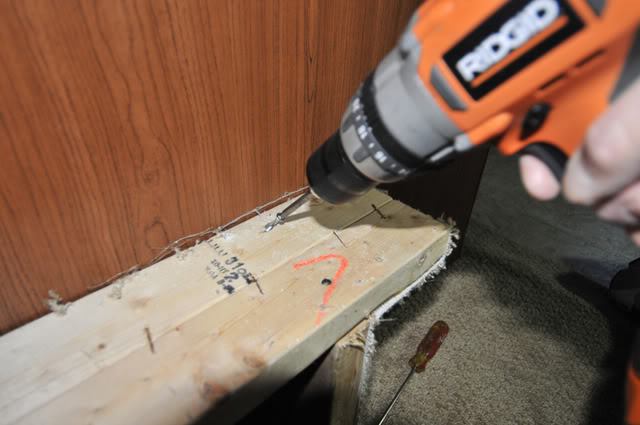
With the carpet removed, all the wood screws were exposed. For the
most part, they backed out easily. In one case, two screws had been driven
into the same hole. It took some doing to get them out. The head of one
screw was stripped, and required a tedious extraction, twisting it out with a
vise grip (locking pliers).
With the screws and the wooden frame removed, there were several small
screw holes left in the walls. Once the chairs were installed, the holes were
covered up. At some point next spring, I intend to caulk them over with
bronze and beige silicone.
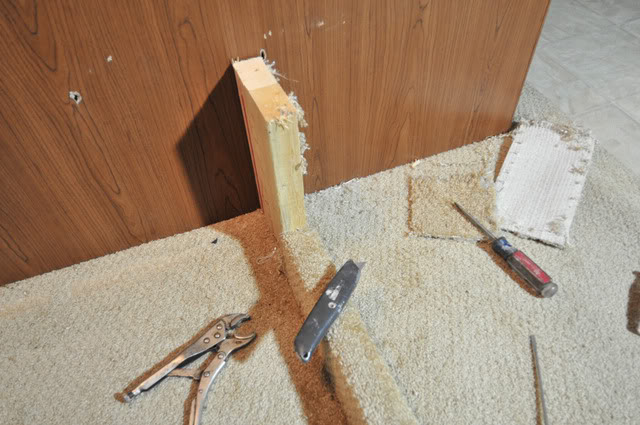
Once all the screws were removed, the wooden framework lifted out
pretty easily. There did seem to be more of that adhesive that had to be
broken loose, but was not a problem. We were happy to discover that the
entire wooden frame work was mounted on top of the floor carpet. It was a
continuous sheet from front to back. No carpet fixing was required. At this
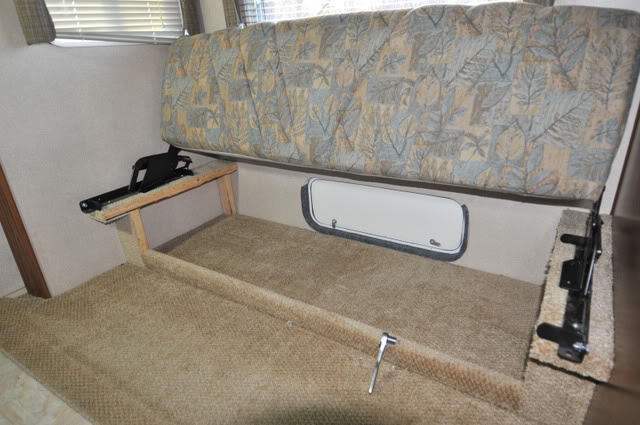
point, it became obvious that the cargo hatch door was pretty exposed. The
chairs cover the hatch, but the hatch is not insulated. In the spring, we plan
on covering the hatch with a cut-to-fit piece of furniture foam covered with
upholstery fabric, with a strap-style handle attached. The handle will allow us
to pull the foam snug against the door opening from outside. And we
discovered that, in this configuration, there is still just a little bit of storage
space behind the chairs. So the cargo hatch door is not completely useless.
(Think "Sewer Slinky", for example.)

With the sofa cleared out of the way, it took us about 30 minutes to
unload the chairs from the truck, situate them in their spots, and install the
backs. We angled them toward each other, leaving room on the right side for
the handle that operate the recliner mechanism. The fit was perfect, as
though they were designed for the space. The one modification that we felt
we needed was to remove the lower portion of the window valances. The
lower portion of the valances would have allowed the back of the chairs to
strike them, we thought. We could have fudged on that a little, moving the
chair frame a couple inches forward, to where they overhung the edge of the
slide-room floorboard. It probably wouldn't have hurt anything, but we
decided to go without the valances for now.
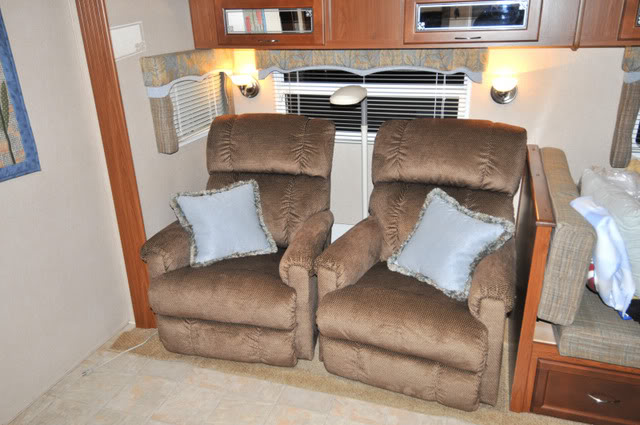
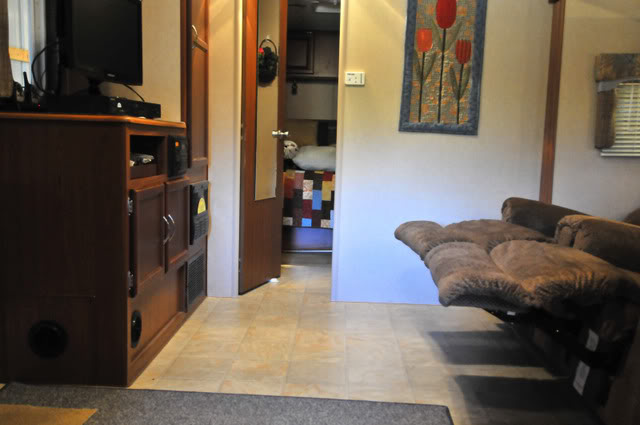
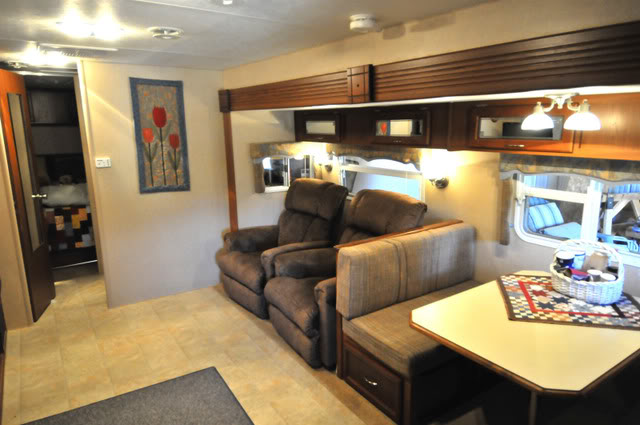
The chair installation seemed to enlarge the room, in that it put that
corner of the slider to better use. Our zero-gravity chairs used to clutter up
the living space, and are now gone, opening up the area. The chairs are
super comfortable, and watching TV and napping are great, now.

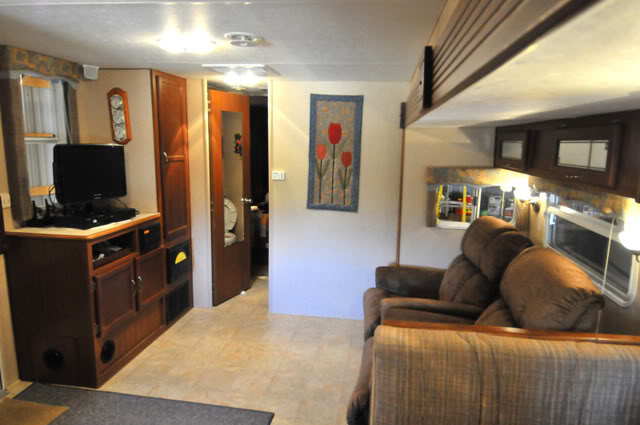
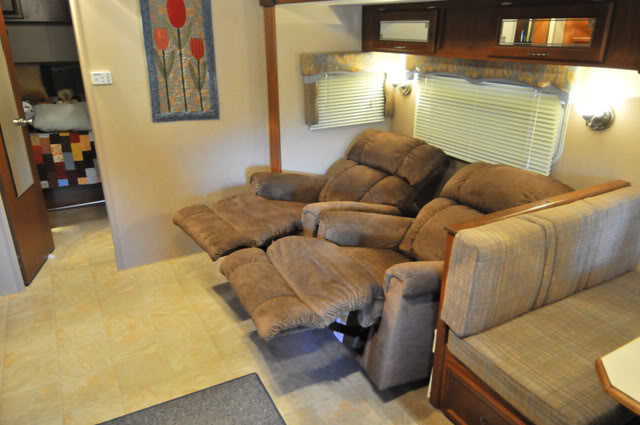
We were somewhat concerned with whether the legrests would extend
too far into the room, making it difficult to walk by. Turns out there is plenty
of room for walking.
Some of you may wonder if this mod has any weight issues. We didn't
weigh the chairs, exactly, but our best guess is, the two chairs outweigh the
old sofa by double. Guessing, again, that it would probably be equivalent to
the fold-out converta-bed that Sunline advertised as an option in this model.
We operated the slide room after the installation, and it operated normally.
With these improvements, itnow appears that there is a need for
additional 110 v. receptacles, for additional lighting and laptop computer
power. That will be the subject of a future post.
We'd like to give credit to several SOC members who encouraged me
to try to do this work on my own. It turns out not to have been very
technical at all, just requiring patience and persistance.
Special thanks to JohnB who posted something similar to this a couple
weeks ago, and who gave me good ideas. This will throw in my 2 cents
worth. Considering that General RV charges $111 an hour for labor, I figure
we saved over $200. That's a good chunk of diesel fuel! 
Thanks for the advice. Enjoy the pics.
Dennis
__________________
Dennis & Marie
2007 T-286SR, slider awning, Maxx Air Vents, Fantastic, Twin La-Z-Boys, Hensley Arrow Hitch.
2003-2500 Dodge CTD, 4 x 4, Club Cab, PacBrake, TransferFlow 75 gal. aux tank. Edge Juice w/ Attitude
Two cats, Arty and Tobi: The May/December romance.
|

|

|
|
11-09-2010, 05:03 PM
|
#2
|
|
Senior Member
Join Date: Nov 2006
Location: New York
Posts: 2,909
SUN #93
|
Dennis....glad everything worked out for you and the chairs look GREAT!!!! One thing is for sure, SOC members are here to help each other - no back stabbing like on some other forums.....
Anyway - have you considered a small framed cabinet around the hatch door? You could access it from inside or out......and use it for a small end table????? I personally don't think I would want the stinky slinky inside the TT!!!!
Just a suggestion!
Be proud it looks great!!!!
__________________
__________________
Kathy & Leo SUN 093
Central Adirondacks of New York
2013 Rubicon 2900 Toy Hauler
We loved our 2007 T-2499
2010 Ford F-350 4x4 Lariat Super Crew Dually Diesel

|
|
|
|
|
11-09-2010, 08:31 PM
|
#3
|
|
Senior Member
Join Date: Sep 2010
Location: Michigan
Posts: 854
SUN #1546
|
WOW great job!
__________________
 Joan & Miss Emme Lu Who
Full Timing in T-1950 2005 Anniversary Model
1997 6.5L Chevy Turbo Diesel Truck
"Pure Michigan"
Facebook: Apackof2 for the Rd
|
|
|
|
|
11-09-2010, 08:44 PM
|
#4
|
|
Moderator
Join Date: Nov 2006
Location: Ohio
Posts: 12,654
SUN #89
|
Dennis
WOW, GREAT!!!! Good for you! Looks good. You have now become and official Sunline DIY'er... 
I also see Steel Flex or Sunline changed the way the jack knife couch is made. In 2004 they had 2 long bars going left to right across the frame work.
See here.
Yours:

Mine
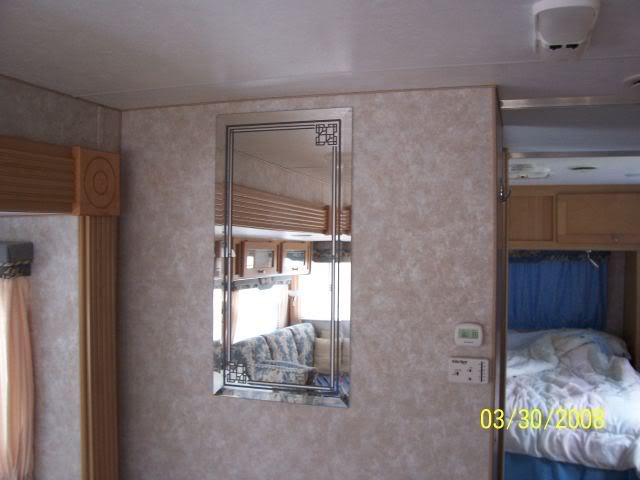
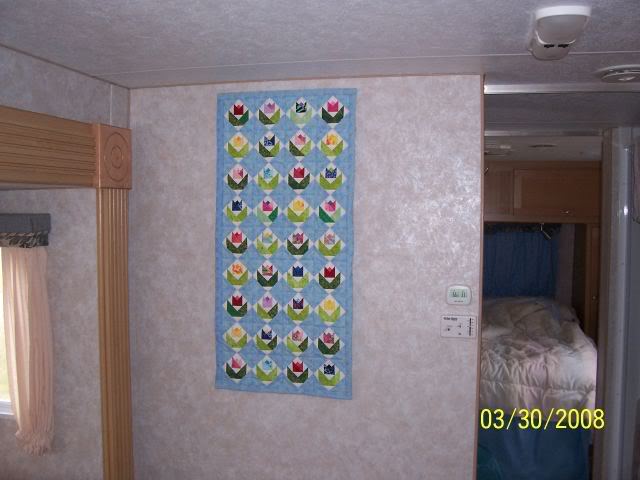
I also noticed your mirror and the very nice cover over it. I take it the Mrs. is not a mirror person.... Ask me how I know...
Here is your beautiful cover.
See what Cindy did over ours?

While I work with wood and steel on the camper, Cindy works with cloth and thread. I'm still amazed at her talent in this crafty work.
Was yours custom made as well?
Thanks for sharing your upgrade. Very nice.
John
__________________
Current Sunlines: 2004 T310SR, 2004 T1950, 2004 T2475, 2007 T2499, 2004 T317SR
Prior Sunlines: 2004 T2499 - Fern Blue
2005 Ford F350 Lariat, 6.8L V10 W/ 4.10 rear axle, CC, Short Bed, SRW. Reese HP trunnion bar hitch W/ HP DC
 Google Custom Search For Sunline Owners Club
|
|
|
|
|
11-09-2010, 08:56 PM
|
#5
|
|
Moderator
Join Date: Dec 2006
Location: Michigan
Posts: 6,155
SUN #123
|
Quote:
Originally Posted by JohnB

Dennis
WOW, GREAT!!!! Good for you! Looks good. You have now become and official Sunline DIY'er...
I also see Steel Flex or Sunline changed the way the jack knife couch is made. In 2004 they had 2 long bars going left to right across the frame work.
I also noticed your mirror and the very nice cover over it. I take it the Mrs. is not a mirror person.... Ask me how I know... |
John,
Is your sofa a 66" or 74"? If it's a 74, that extra length could explain the braces compared to our little 66's. Other than a color difference, Dennis and I have the same sofa and same construction of the frame.
BTW, I knew the minute I saw the mirror cover in the photo that you'd be commenting on that. We need to get Cindy to start making some custom Sunline covers for the mirrors!
Dennis, I just thought of something. Do you, or have you, ever had a problem with your storage door right there by the chairs sticking when you have to open/close it? Mine sticks like crazy when the slide is in, I have to pull the door out with the key and grabbing onto the thumb latch too, and then I have to tap it shut with my fist. However, when the slide is out, it works just fine.
Jon
__________________
2007 T-286SR Cherry/Granola, #6236, original owner, current mileage: 9473.8 (as of 6/18/21)
1997 T-2653 Blue Denim, #5471
1979 12 1/2' MC, Beige & Avocado, #4639
Past Sunlines: '97 T-2653 #5089, '94 T-2251, '86 T-1550, '94 T-2363, '98 T-270SR

|
|
|
|
|
11-09-2010, 09:05 PM
|
#6
|
|
Moderator
Join Date: Nov 2006
Location: Ohio
Posts: 12,654
SUN #89
|
Quote:
Originally Posted by Sunline Fan
John,
Is your sofa a 66" or 74"? If it's a 74, that extra length could explain the braces compared to our little 66's. Other than a color difference, Dennis and I have the same sofa and same construction of the frame.
BTW, I knew the minute I saw the mirror cover in the photo that you'd be commenting on that. We need to get Cindy to start making some custom Sunline covers for the mirrors!
Jon
|
Jon, well in 2004, both the 66 and the 74" jack knife had the bars.
Here is the 74" in the 2004 T2499.
And here is the 66 in the 2004 T310SR

Cindy wishes we had the 74 as she is the couch person. I'm the swivel rocker guy... Plus I would gain some more storage under the couch.
The mirror cover manufacturing.... I'll pass that along and then duck.... The Cindy version is a lot of little pieces. I "think" they call it "paper piecing"
John
__________________
Current Sunlines: 2004 T310SR, 2004 T1950, 2004 T2475, 2007 T2499, 2004 T317SR
Prior Sunlines: 2004 T2499 - Fern Blue
2005 Ford F350 Lariat, 6.8L V10 W/ 4.10 rear axle, CC, Short Bed, SRW. Reese HP trunnion bar hitch W/ HP DC
Google Custom Search For Sunline Owners Club
|
|
|
|
|
11-09-2010, 09:10 PM
|
#7
|
|
Moderator
Join Date: Dec 2006
Location: Michigan
Posts: 6,155
SUN #123
|
Oh ok, I checked the brochure and it said a 66" for you, but I wasn't sure if it still had it with the free-standing. Interesting that both had the bars though.
Does that bar serve as the rest for the bottom cushion in the front? I'm less than excited about the small L-bracket they have on the newer style as a stop. Maybe Sunline got a deal on these??
Anyone else out there with a 2005 or 2006 who could confirm if you do or don't have this bar?
Jon
__________________
2007 T-286SR Cherry/Granola, #6236, original owner, current mileage: 9473.8 (as of 6/18/21)
1997 T-2653 Blue Denim, #5471
1979 12 1/2' MC, Beige & Avocado, #4639
Past Sunlines: '97 T-2653 #5089, '94 T-2251, '86 T-1550, '94 T-2363, '98 T-270SR
|
|
|
|
|
11-09-2010, 09:30 PM
|
#8
|
|
Moderator
Join Date: Nov 2006
Location: Ohio
Posts: 12,654
SUN #89
|
Quote:
Originally Posted by Sunline Fan
Does that bar serve as the rest for the bottom cushion in the front? I'm less than excited about the small L-bracket they have on the newer style as a stop. Maybe Sunline got a deal on these??
Jon
|
The bar does act as a stop but only on the very ends. The middle touches air under the couch. I think Steel Flex had a cost savings idea. Once the thing is bolted down the bar is not doing much other then the ends stop against the cushion frame.
PS Kitty did a couch mod too on her T2499, or at least the HW heater bypass valve access door. I remember she some how yanked out the whole couch intact not realizing the lower cushion came off. I think her's was a 06. There are pic's on here somewhere under her mod.
__________________
Current Sunlines: 2004 T310SR, 2004 T1950, 2004 T2475, 2007 T2499, 2004 T317SR
Prior Sunlines: 2004 T2499 - Fern Blue
2005 Ford F350 Lariat, 6.8L V10 W/ 4.10 rear axle, CC, Short Bed, SRW. Reese HP trunnion bar hitch W/ HP DC
Google Custom Search For Sunline Owners Club
|
|
|
|
|
11-09-2010, 09:43 PM
|
#9
|
|
Moderator
Join Date: Dec 2006
Location: Michigan
Posts: 6,155
SUN #123
|
Yes, it was an '06 and an early one too.
I just tried to look for a picture of the bracket, couldn't find anything  Of all the pictures I took with taking that whole thing apart, none of it even shows the whole thing. It's essentially like 3/16" plate steel bent on a 90 degree angle and bolted to the side frame there, about where your bar bolts at. Then the bottom edge of the bottom cushion sits on the edge of that plate sticking over there.
What is nice about this is that once each cushion is unbolted from the frame, the frame just consists of the two hinge pieces on each side.
__________________
2007 T-286SR Cherry/Granola, #6236, original owner, current mileage: 9473.8 (as of 6/18/21)
1997 T-2653 Blue Denim, #5471
1979 12 1/2' MC, Beige & Avocado, #4639
Past Sunlines: '97 T-2653 #5089, '94 T-2251, '86 T-1550, '94 T-2363, '98 T-270SR
|
|
|
|
|
11-10-2010, 07:29 AM
|
#10
|
|
Member
Join Date: Oct 2010
Posts: 86
SUN #1635
|
Re: Chair Mods, 286SR
Good Morning,
Kathy and Leo, thank you so much for the good words. We remembered
that you'd be looking for this. Glad you enjoyed it.
After I wrote the bit about the "Sewer Slinky", I thought to myself:
"Hmmm, that may not go over so well!" LOL. I guess my point was,
something The Size Of a sewer slinky, small compact objects. The good
news is, there is still some room back there. Will check out your idea about
the small cabinet. In most of the photos, Marie's reading lamp (a floor lamp)
doesn't show. That restricts the available space. I also intend to install
a 110 v. receptacle back there (for the lamp), restricting it even more.
Always another idea, eh? Thanks for the kind words.
Joan, Thank You for the kind words.
JohnB: you are correct: now an official DIY'er. Like I mentioned, not
too hard, once I knew what I was getting into. Thank's to your tutorial, I
had a pretty good idea, and it went as smooth as could be expected. And,
Marie truely does love it. (Well, so do I!) During the 4 days we were at the
trailer after the install, I think we only ate at the dinette one time. The rest
was in the La-Z-Boys.
Speaking of which, we were surpised to find that one of those compact
fold-down plastic tables fit exactly between the legrest and the bathroom
wall. About a half-inch to spare. Another one of those "Gee-whizz, how
could it fit so perfectly".
I see the difference between your model sofa and ours. The design of
yours is much more of an affair. Looks more buiky and heavy, which one
could consider a good thing. Weight and strength, good stuff. In our
version, (can't tell if this part would be different from yours) the steel frame
appears to be incorporated into the actual cushion itself. I was a little
surprised to find steel in there instead of wood.
The disassembled sofa has been stored away for now. After a couple of
trips, if it looks like this arrangement is good for the long haul, we'll but
the sofa up for sale.
You can tell Cindy that Marie is a quilter, and the mirror covering is,
indeed, a custom, hand-made job. There is a story to tell here: Marie is
fond of make quilt pieces of all sizes, from King to small wall hangings. She
saw the space on that wall as better suited for one of her pieces, than a
mirror. There are mirrors all over the place in a 286, already. So, she
designed the piece that you see there, but figured that she wanted to mirror
off the wall first.
Well, that didn't go so well. We removed the adhesive with a wire, but
a lot of the wall covering came off with it! Well, now, you see, a hanging
piece is required in that location.
Marie identified a kindred spirit the moment that she saw Cathy's piece.
And, Marie says she is working on ANOTHER piece for that spot. When its
done, we'll post it.
Thanks again, everybody.
Dennis
__________________
Dennis & Marie
2007 T-286SR, slider awning, Maxx Air Vents, Fantastic, Twin La-Z-Boys, Hensley Arrow Hitch.
2003-2500 Dodge CTD, 4 x 4, Club Cab, PacBrake, TransferFlow 75 gal. aux tank. Edge Juice w/ Attitude
Two cats, Arty and Tobi: The May/December romance.
|
|
|
|
|
11-10-2010, 07:51 AM
|
#11
|
|
Moderator Emeritus
Join Date: Aug 2006
Location: West Virginia
Posts: 2,289
SUN #17
|
My custom ordered '06 T-2499 was like Jon said, a very early model. Below is a pic of my sofa while I had it removed to raise it up. Sorry the pic does not show much of the frame, but maybe you guys can determine if it was a full frame or not. I did this mod to raise the sofa up 2 inches so it was more comfortable to sit on, and I could easily remove the entire sofa buy removing the 4 snap hooks so I could work on things under it if I needed to.

__________________
Sunny #18 2003 F-344SR #8157
Sunny #19 1997 T-2653 #5485
1999 Ford F350XLT DRW Crew Cab, Long bed 7.3 PSD
2002 VW Jetta TDI.. AKA: Kitty's Kruiser

|
|
|
|
|
11-10-2010, 08:01 AM
|
#12
|
|
Member
Join Date: Oct 2010
Posts: 86
SUN #1635
|
Sticking Cargo Door
Jon,
Yes, I've had a little sticking on the cargo hatch door. But have never
noticed that it made a difference between the slider being in or out. It almost
always sticks when opening it for the first time after a period of inactivity. I
always figured it was the rubber seal sticking. But, no, I have never had any
trouble getting the door to close. It always closes tightly on the first try. In
fact, I have almost no complaints of any kind regarding the build and fit of this unit. One item that I've often wondered about is the fender flair pieces
over the wheels. They always look to me like they are "sticking out", away
from the body of the trailer. I've never looked under there to see if there
is a better way to secure them, but it would probably take a little doing.
Now that I think of it, we DID have an issue on our first trip: on our way
to Yellowstone, we ran into a real "frog-drownder" of a rainstorm in
Wisconsin. When we pulled over next time, we found dirty water all over
the floor. The water had come in under the slider floor, and had apparently
been thrown up off the wheels. Quite apparently, the outside slider seals
were not working.
We cleaned that up as much as we could, but had it happen again, only
a smaller amount, before we got back from the trip. We took it back to
General, obviously unhappy. They determined, for whatever reason, that the
seals weren't making, as delivered from the factory. They installed a second
seal over the top of the first. They showed us how the extra thickness
closed the gap, and made the seal tight. I can say that we haven't had any
trouble with it since, although, we haven't encountered any more "frog-
drownders", either.
JohnB: my apologies. Will you please insert "Cindy" anywhere I might
have typed "Cathy". Sorry.
Dennis
__________________
Dennis & Marie
2007 T-286SR, slider awning, Maxx Air Vents, Fantastic, Twin La-Z-Boys, Hensley Arrow Hitch.
2003-2500 Dodge CTD, 4 x 4, Club Cab, PacBrake, TransferFlow 75 gal. aux tank. Edge Juice w/ Attitude
Two cats, Arty and Tobi: The May/December romance.
|
|
|
|
|
11-10-2010, 03:02 PM
|
#13
|
|
Moderator
Join Date: Dec 2006
Location: Michigan
Posts: 6,155
SUN #123
|
Dennis, it seems Sunline had a big problem with these slides. For our units being built at very different times in the model year (very early vs. very late), we both have had that issue with the slide. Unfortunately (or fortunately), we brought it home from NJ in quite a rainstorm. PA was mostly dry but all of Ohio certainly made up for it. I opened it at one point when we pulled off and found the floor was sopping wet. I'm sure Pam can remember how upset I was because we had met them on the way down to get it, so I called her and asked her to look up what caused this as I thought I remembered someone had a problem with this before. We did the best we could to seal it temporarily in a Flying J parking lot still in PA, but we still pulled off at like every other service plaza in Ohio to dry up what did come one. I guess I was fortunate because this happened before I put any stuff inside.
The fix was relatively simple. The slide wasn't leaking all the way around, it was just leaking on the bottom. When the room comes in, there is a metal plate that sticks down from the bottom of the slide floor and that plate comes into contact under pressure with a rubber bulb seal mounted to the main floor edge of the coach. This plate was mounted about 3" farther out from where it should have been. Just took a couple quick measurements, unscrewed it, mounted it farther in, and then sealed up the old holes. You may want to look under there at some point to make sure that General sealed up the old holes...these slide floors like to absorb water, and those holes would be a prime spot for entry.
I think your experience with that baggage door is the same I have with the rear doors, I wish it were that easy for the slide baggage door.
Jon
__________________
2007 T-286SR Cherry/Granola, #6236, original owner, current mileage: 9473.8 (as of 6/18/21)
1997 T-2653 Blue Denim, #5471
1979 12 1/2' MC, Beige & Avocado, #4639
Past Sunlines: '97 T-2653 #5089, '94 T-2251, '86 T-1550, '94 T-2363, '98 T-270SR
|
|
|
|
|
11-10-2010, 03:04 PM
|
#14
|
|
Moderator
Join Date: Dec 2006
Location: Michigan
Posts: 6,155
SUN #123
|
Hmm, Kitty, it looks like you do have the new style. I see that L-bracket bolted on up front there, it has the bolt with the lock washer/nut on it.
__________________
2007 T-286SR Cherry/Granola, #6236, original owner, current mileage: 9473.8 (as of 6/18/21)
1997 T-2653 Blue Denim, #5471
1979 12 1/2' MC, Beige & Avocado, #4639
Past Sunlines: '97 T-2653 #5089, '94 T-2251, '86 T-1550, '94 T-2363, '98 T-270SR
|
|
|
|
|
11-10-2010, 06:13 PM
|
#15
|
|
Member
Join Date: Oct 2010
Posts: 86
SUN #1635
|
Slider Seals
Jon,
I'm with you 100%. Once there's a problem, it bears watching over time.
It was pretty upsetting to come in and see all that water, and we sure don't
want to have to go through that again.
General has our service records, so they know what's been done. Before
our next long trip, we'll swing by and have them do an inspection and/or
adjustment to the slider.
As with everything, they are a compromise. Its great to have to extra
room, but it comes at a cost, eh?
I'll also check for those holes you mentioned. The main service tech
at Birch Run seems like a thorough and dedicated guy. He claims that all he
had to do was double up on the seal thickness. Anyway, I'll go under there
and check it myself, and have them give it a once over as well. Our next
trip will probably 6- or 7,000 miles. Don't need any trouble on a trip of that
length. (While the trailer is in the barn would be a good time to crawl under
there and look. Concrete beats wet dirt any day!)
Dennis
__________________
Dennis & Marie
2007 T-286SR, slider awning, Maxx Air Vents, Fantastic, Twin La-Z-Boys, Hensley Arrow Hitch.
2003-2500 Dodge CTD, 4 x 4, Club Cab, PacBrake, TransferFlow 75 gal. aux tank. Edge Juice w/ Attitude
Two cats, Arty and Tobi: The May/December romance.
|
|
|
|
|
11-10-2010, 10:05 PM
|
#16
|
|
Moderator
Join Date: Nov 2006
Location: Ohio
Posts: 12,654
SUN #89
|
Quote:
Originally Posted by vanhakke
JohnB: my apologies. Will you please insert "Cindy" anywhere I might
have typed "Cathy". Sorry.
Dennis
|
Dennis, no worries. I knew what you meant.
Since Marie is a handy craft person too, have her see this post if she has not already. Which reminds me, Cindy has some new stuff already done and I'm behind on posting....oh boy
http://www.sunlineclub.com/forums/f6...pics-9735.html
Thanks
John
__________________
Current Sunlines: 2004 T310SR, 2004 T1950, 2004 T2475, 2007 T2499, 2004 T317SR
Prior Sunlines: 2004 T2499 - Fern Blue
2005 Ford F350 Lariat, 6.8L V10 W/ 4.10 rear axle, CC, Short Bed, SRW. Reese HP trunnion bar hitch W/ HP DC
Google Custom Search For Sunline Owners Club
|
|
|
|
|
11-11-2010, 07:24 AM
|
#17
|
|
Member
Join Date: Oct 2010
Posts: 86
SUN #1635
|
Fabric and Color
John,
Wow! Cindy has been a busy girl! That was quite a presentation that
you guys put on. She's got all kinds of ideas that we never thought of.
We were just talking last time about how to keep morning sun from
coming in the bedroom door's window. The curtain on rod is the obvious
solution, but it never even occured to us! And would be so easy to do.
Once again, thank both of your for the good ideas.
But a question: what do the ceiling vent covers do? Are they for
insulation, or to keep out light? We've never seen that before. (But, there
again, we haven't seen much!)
One of these days, I'll be putting up a post about how best to run
more electric into the far end of the slider room. I'll be doing that pretty
soon.
More later. Dennis
__________________
Dennis & Marie
2007 T-286SR, slider awning, Maxx Air Vents, Fantastic, Twin La-Z-Boys, Hensley Arrow Hitch.
2003-2500 Dodge CTD, 4 x 4, Club Cab, PacBrake, TransferFlow 75 gal. aux tank. Edge Juice w/ Attitude
Two cats, Arty and Tobi: The May/December romance.
|
|
|
|
|
11-11-2010, 09:09 PM
|
#18
|
|
Moderator
Join Date: Nov 2006
Location: Ohio
Posts: 12,654
SUN #89
|
Quote:
Originally Posted by vanhakke
John,
But a question: what do the ceiling vent covers do? Are they for
insulation, or to keep out light? We've never seen that before. (But, there
again, we haven't seen much!)
Dennis |
Thanks Dennis, I'll pass the kind comments onto Cindy. I'm sure she would like to see Maire's quilting projects too.
The vent cushion. Yes, it is there for light reduction, heat loss and cool loss in the summer. Since we winter camp there is one lot of heat that goes out the vent plastic and the shower dome.
And it acts to keep the sun out of the camper when in non use fading every thing the sun rays do.
Yes, seeing every ones little things they do is a great part of SOC.  We all take away different things from the pics.
John
__________________
Current Sunlines: 2004 T310SR, 2004 T1950, 2004 T2475, 2007 T2499, 2004 T317SR
Prior Sunlines: 2004 T2499 - Fern Blue
2005 Ford F350 Lariat, 6.8L V10 W/ 4.10 rear axle, CC, Short Bed, SRW. Reese HP trunnion bar hitch W/ HP DC
Google Custom Search For Sunline Owners Club
|
|
|
|
|
11-14-2010, 07:52 PM
|
#19
|
|
Member
Join Date: Sep 2006
Location: Pennsylvania
Posts: 52
SUN #61
|
Changing Out Jackknife Sofa
Hi Dennis,
We did the same thing back in March 08, removed the jack knife and part of the dinette table and added a Flair sleep sofa w/ air mattress, below is the link of the steps we did in the removal. Since March we have completely removed the dinette and replaced w/ a free standing table, I have to dig up the pic. and post.
Looks good.
http://www.sunlineclub.com/forums/f63/slide-room-8859-3.html#post68639
__________________
2008 Toyota Tundra SR5 Crewmax
2006 Solaris SR 276

|
|
|
|
|
11-15-2010, 08:21 AM
|
#20
|
|
Member
Join Date: Oct 2010
Posts: 86
SUN #1635
|
 Slider Mods
Hello, Hoffmavl,
Thanks for the reply, the post, and the link. I went over there (to your post)
and you were giving me deja vu, or were you giving ME deja vu? 
The work that you and I did was extremely similar, but you did take it
further in the removal of the dinette wall. DW and I discussed what you
had done, but decided that we liked the storage under the dinette bench.
However, it seems that every project that gets posted has at least one new
idea for me. In this case, its using finish trim strips to cover up the screw
holes. Excellant idea! I was thinking of just using caulk, but cherry-wood,
in our case. So, I'll be using your idea instead.
We were also interested, in your photos, that you have 110 v. receptacle
on the slider wall, at the far end. We have none there, and now that the
chairs are intalled, there is certainly a need for a plug-in there. Did yours
come from the factory that way, or did you install it? If you installed it,
how hard was it to run the wires behind the wall? A tough project, I'm
guessing. My plan is to just attach conduit to the surface of the wall.
The finsihed project looks very savvy and professional. Good job.
Will look for your other posts.
Thanks, Dennis.
__________________
Dennis & Marie
2007 T-286SR, slider awning, Maxx Air Vents, Fantastic, Twin La-Z-Boys, Hensley Arrow Hitch.
2003-2500 Dodge CTD, 4 x 4, Club Cab, PacBrake, TransferFlow 75 gal. aux tank. Edge Juice w/ Attitude
Two cats, Arty and Tobi: The May/December romance.
|
|
|
|
|
|
|
Currently Active Users Viewing This Thread: 1 (0 members and 1 guests)
|
|
|
 Posting Rules
|
You may not post new threads
You may not post replies
You may not post attachments
You may not edit your posts
HTML code is Off
|
|
|
|
 » Recent Sunline Discussions
 |
|
|
|
|
|
|
|
|
|
|
|
|
|
|
|
|
|
|
|
|
|
|
|


 Linear Mode

