 |
 06-13-2007, 03:40 PM
|
#1
|
|
Moderator
Join Date: Nov 2006
Location: New York
Posts: 1,920
SUN #98
|
Black / Gray Tank Flushing Kits
I installed the Tornado Tank Flushing kit on the Gray and Black tanks for our previous Sunline T-2670.

Previous to its installation, I was having problems with the level gauges of the gray tank and had tried all different types of level gauge cleaners with no success. Once I installed the tank flushing kit and ran it the first time to rinse out the tank, the level gauges started working correctly and I had not problems with them after that. We never had a problem with the black tank gauges, but I believe that was because we regularly cleaned out the black tank with a tank wand.

Our new Sunline T-280SR came within a Black tank flush kit installed at the factory, but I wanted to install tank flushing kits in both gray tanks right from the start. Our T-280SR has 2 gray tanks, one for the galley (kitchen sink) and one for the bathroom (sink & shower).
Because of the room needed to drill the hole through the tank, I installed the Galley Gray Tank Tornado Flush kit on the side & center of the tank near the outlet pipe.
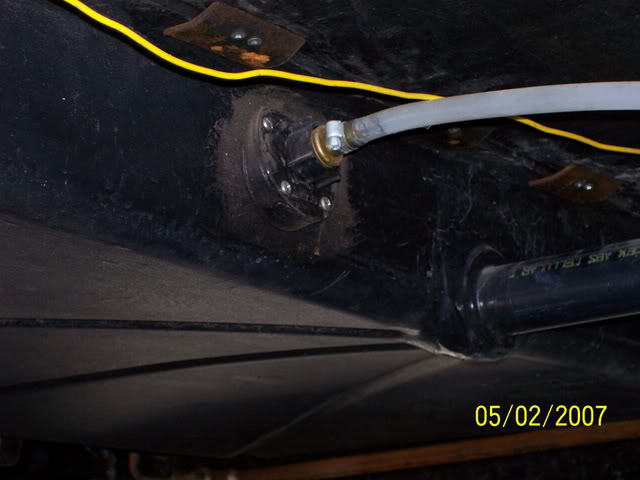
They recommend it be installed opposite the outlet, but there wasnt sufficient room to install it there.
I then ran the hose to the Door Side of the trailer and secured the hose with plastic tie wraps to the trailers frame.
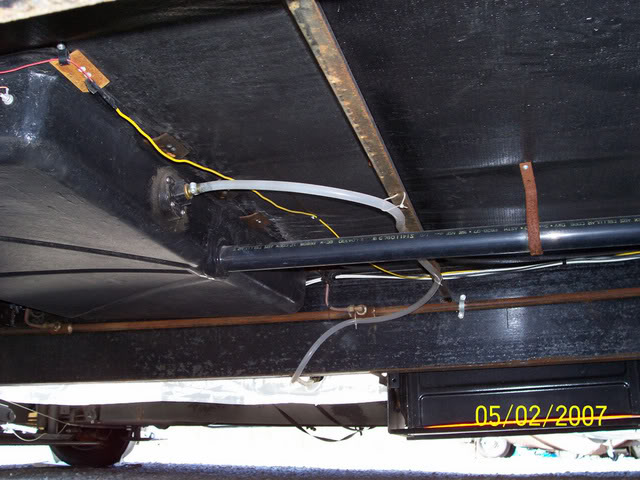
I ran the hose to the door side because the length of hose was not long enough to reach to the back Opposite Door Side (ODS) by the sewer outlet and the slide was also located on the ODS where the hose would reach. Plus I figured I wouldnt be using the rinsing kit each and every time I dump, like I do the black tanks rinse kit.
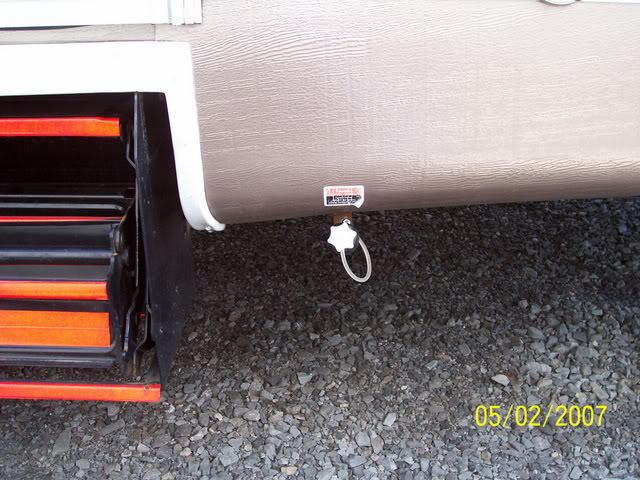
I have the Galleys gray tank rinse kits access located just in front of the steps to the main door. I attached it using one of the trailers existing body panel screws.
For the Bathroom Gray Tank, I installed the rinse kit in the center side toward the back of the trailer, again because it provided sufficient room for the installation process.
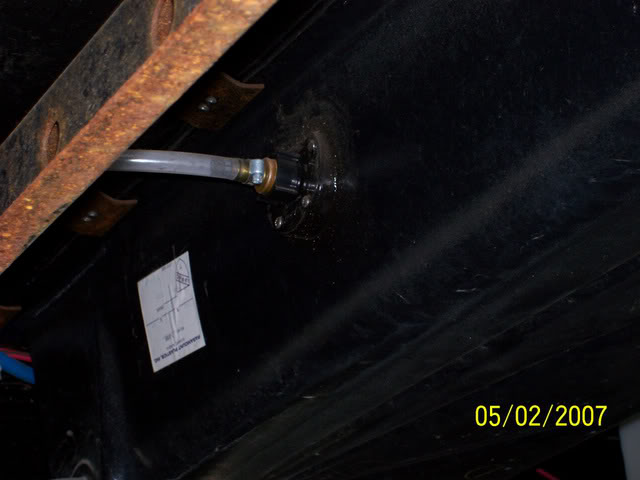
This time, because of the bathroom gray tank being located toward the back of the trailer I was able to run the hose to the ODS near the sewer outlet valves. Again using plastic tie wraps to secure the hose to keep it from flopping around.
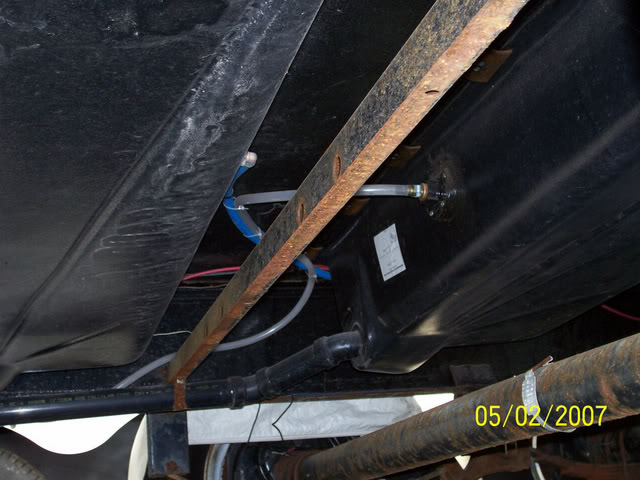
Now I was able to locate the access to the bathroom gray tank rinse kit by the sewer outlet valves. Again I was able to position it so that I was able to use one of the existing trailers body panel screws.

The installation was quite simple. I have to admit, the installation was easier on the T-280SR than the T-2670, just because the T-280SR sits a lot higher than the T-2670 did, more room to move around underneath the trailer  .
I bought some black silicon sealant and a 1¾ hole saw, every thing else needed for the installation was included in the kit (besides basic tools). The hole and drill template provided with the kit is excellent and made the installation process very simple.
We use the blank tank rinse every time we dump. I use the gray tank rinse about every other time. So far we havent had any problems with the level gauges.
If you install one of these tank rinsing kits yourself, just make sure you empty and clean out the tanks before installing one of these kits. Dont want to get any surprises when you drill the hole into the tank  .
__________________
Mary & Tom (aka Hutch)
2015 Jayco Eagle Premier 361REQS
2014 GMC Sierra 3500HD 4x4 CC D/A
Sunlines: 2005 Solaris T-280SR; 1999 Solaris T-2670; 1998 Saturn T-24A
|

|

|
|
06-13-2007, 05:16 PM
|
#2
|
|
Senior Member
Join Date: Sep 2006
Location: Pennsylvania
Posts: 347
SUN #62
|
I recently installed the tornado in my black tank,I must say that after using the flush king for the past few years,the tornado is a real time saver.
__________________
__________________
05 sunline 267sr
01 F-250 V-10 4x4 Lariat supercab SB auto 4:30 LS
draw-tite 1200# trunnion wd,friction sway control,prodigy
happy camping Rich,Maryellen,Josh and Jake
https://www.campingpa.com/
|
|
|
|
|
06-13-2007, 06:45 PM
|
#3
|
|
Moderator
Join Date: Nov 2006
Location: Ohio
Posts: 12,654
SUN #89
|
Hutch
Nice work and thanks for sharing. You must of read my mind, have a few questions.
I have internal tank sprayers in both the gray and black. I added them myself when new and bought them direct from Sunline. They are like a heavier duty version of the Quickie flush. The spray straight ahead. I installed them directly opposite the tank outlet fittings so they would spray the tank long ways.
They are a must in my book and well worth the time and $$. The rotary ones where not offered at that time and I must admit I wish I had one of them instead as "I think" the coverage may be better and use less water doing so as you can flush and dump quicker to get no more paper coming out.
Now to the questions....
Did you ever plug one of those in to a hose out in the open to see the spray pattern? If so what was it?
I am thinking of adding a rotary one in the side of the black tank and use it along with the straight sprayer I already have spraying straight down the end of the tank. I can hook the water supply piping into what I have now already.
I'm figuring it will splash all over better to help the paper flush out faster.
Before I go to adding one, and doing it real soon, wanted to get you take on the spray pattern.
Oh one thing to add to your post, Sunline told me to use stainless steel sheet metal screws. So I went to the local hardware store to get them. That along with the best outdoor silicon to seal the tank fitting.
Having used the tank sprayer of any kind is a great aide. I only pull out the wand non heavy days and now that I use washing soda to soften the water, I do not even have to do that.
John
__________________
Current Sunlines: 2004 T310SR, 2004 T1950, 2004 T2475, 2007 T2499, 2004 T317SR
Prior Sunlines: 2004 T2499 - Fern Blue
2005 Ford F350 Lariat, 6.8L V10 W/ 4.10 rear axle, CC, Short Bed, SRW. Reese HP trunnion bar hitch W/ HP DC
 Google Custom Search For Sunline Owners Club
|
|
|
|
|
06-13-2007, 06:54 PM
|
#4
|
|
Senior Member
Join Date: Dec 2006
Location: Pennsylvania
Posts: 272
SUN #139
|
I have not yet used the factory installed black tank flush kit on my 2553. The decal by the hose connect states that you must have the tank valves open to use it. I cannot imagine the line of people at the dump station waiting patiently while I hook up a hose to flush my tank - even if I could find a dump station with a hose connection. Most of the dump stations I've used have a hose connected to rinse your sewer hose, but no provisions for you to hook a hose to your flush kit. Where do you find an opportunity to use the flush kit? I've considered installing an RV sewer hookup to my septic tank to dump/flush my tanks at home.
__________________
Al
1985 T-1550
1993 T-2051
2007 T-2553
2003 Silverado 1500
|
|
|
|
|
06-13-2007, 07:46 PM
|
#5
|
|
Senior Member
Join Date: Sep 2006
Location: Ontario
Posts: 503
SUN #43
|
Quote:
|
Originally Posted by Al in PA
Most of the dump stations I've used have a hose connected to rinse your sewer hose, but no provisions for you to hook a hose to your flush kit.
|
For those campgrounds that do not have a connector on the end of the hose at dump stations, I carry two different sizes of brass hose ends. I then select the appropriate hose fitting to fit the hose and push it into the end of hose. I then use a pair of vise grips to hold the hose onto the connect. By doing this I can then connect the hose to my black tank rinse hose fitting. Once I am done with rinsing the tanks I just remove the vise grips and the hose connector for next time I need it. The cost of these brass fittings are about $2 each. I felt this was a cheap investment to allow me to be able to rinse my black tank at any dump station whether or not te dump station hose has the necessary hose connector.
__________________
|
|
|
|
|
06-13-2007, 08:31 PM
|
#6
|
|
Moderator
Join Date: Nov 2006
Location: Ohio
Posts: 12,654
SUN #89
|
Quote:
|
Originally Posted by Al in PA
I cannot imagine the line of people at the dump station waiting patiently while I hook up a hose to flush my tank - even if I could find a dump station with a hose connection.
|
Al,
Being a courteous camper I plan my flushings.  Seriously, when I am in line I just dump quickly and drive out. I would not hold up the line with me dumping/flushing.
When this occurs the first thing I do at home is back the camper up next to my aerator tanks and start the flushing process while I unload. I'm fortunate to have that setup.
At camp I wait until the line leaves and then I flush or come home.
I also happen to camp on off days. Like travel home on Monday when the line is like 3 people all day verses 200 on Sunday...
On the fittings. Some parks do some parks don't. On the don't I do it at home.
I agree it is not camper like to spend 15 minutes dumping and flushing with a line. Campers are a lot more courteous than most and I' dont press the subject.
If you ever went to a public boat launch on a Sunday during pull puts, you can see what waiting an extra 5 seconds does to people who have to make an extra pass at backing up. It makes road rage look polite. Ramp rage has really gotten real ugly around here to the point I only use my canoe in the lake. No boat ramp needed.
John
__________________
Current Sunlines: 2004 T310SR, 2004 T1950, 2004 T2475, 2007 T2499, 2004 T317SR
Prior Sunlines: 2004 T2499 - Fern Blue
2005 Ford F350 Lariat, 6.8L V10 W/ 4.10 rear axle, CC, Short Bed, SRW. Reese HP trunnion bar hitch W/ HP DC
Google Custom Search For Sunline Owners Club
|
|
|
|
|
06-14-2007, 05:18 AM
|
#7
|
|
Moderator
Join Date: Nov 2006
Location: New York
Posts: 1,920
SUN #98
|
John,
Not sure of the spray pattern of the Tornado. Never thought about doing that, but its a good idea. From its sound, it is definitely spraying 360°, its a completely different sound than the factory installed rinse, which I believe that is just a straight spray.
We typically get full hook-ups when we camp, so we have the luxury of taking our time and thoroughly cleaning out the tanks. I usually fill up the black tank with 1 or 2 rinses, where I will use the flush kit to fill up the tank to ¾ full than dump. This usually gets any stubborn paper and/or solid waste out.
However, if we need to use the dump station, its a completely different process, depending on the line and water connections. We try and wait until there a no lines so we can take our time. I feel the black tank is the most important one to get as clean as possible. So I will dump that first, than fill it up with a rinse while I'm dumping the other two gray tanks. By the time the gray tanks are dumped, the black tank rinse is ready to be dumped. This seams to work faster and doesn't take too much more time.
During trips of extended travel when we werent dumping at every campground, when we needed to dump I would use the dump station when we arrived at the campground, not when leaving.
Al,
I agree, lines a dump stations and hoses without connectors can inhibit the time cleaning out the tanks. Besides the suggestions that John provided and if you dont have the capability to flush at home, you can check out RV Dump Stations web site to see if there is a dump station near you that you can use.
__________________
Mary & Tom (aka Hutch)
2015 Jayco Eagle Premier 361REQS
2014 GMC Sierra 3500HD 4x4 CC D/A
Sunlines: 2005 Solaris T-280SR; 1999 Solaris T-2670; 1998 Saturn T-24A
|
|
|
|
|
06-14-2007, 06:57 AM
|
#8
|
|
Senior Member
Join Date: Dec 2006
Location: Pennsylvania
Posts: 272
SUN #139
|
Thanks for the suggestions. The only place I normally have sewer hookups on site is when we go to the beach. Our favorite campground only has water, electric and cable at the sites: Also, they only have one dump station - a nice smaller campground in a beautiful area. I think dumping into my septic tank would be the most convenient way to use the flush kit after most trips.
__________________
Al
1985 T-1550
1993 T-2051
2007 T-2553
2003 Silverado 1500
|
|
|
|
|
06-15-2007, 04:55 AM
|
#9
|
|
Senior Member
Join Date: Sep 2006
Location: Pennsylvania
Posts: 347
SUN #62
|
before installing my tornado I hooked the hose up to it and it does cover a full 360 deg. area,it sprays all different directions out the tip then out the side which rotates.nice job on the install pt
__________________
05 sunline 267sr
01 F-250 V-10 4x4 Lariat supercab SB auto 4:30 LS
draw-tite 1200# trunnion wd,friction sway control,prodigy
happy camping Rich,Maryellen,Josh and Jake
https://www.campingpa.com/
|
|
|
|
|
06-15-2007, 03:14 PM
|
#10
|
|
Moderator
Join Date: Nov 2006
Location: Ohio
Posts: 12,654
SUN #89
|
Quote:
|
Originally Posted by rich2500
before installing my tornado I hooked the hose up to it and it does cover a full 360 deg. area,it sprays all different directions out the tip then out the side which rotates.nice job on the install pt
|
Rich
Thanks for the spray pattern. That was what I was after. Both rotary and out the tip in a rotary action.
I have one of the rotary hand held wands that you put do0nw the tank by hand, but the spray is more circular and not flying out the tip as well.
I'm going to order one and add. I'll report back.
Thanks
John
__________________
Current Sunlines: 2004 T310SR, 2004 T1950, 2004 T2475, 2007 T2499, 2004 T317SR
Prior Sunlines: 2004 T2499 - Fern Blue
2005 Ford F350 Lariat, 6.8L V10 W/ 4.10 rear axle, CC, Short Bed, SRW. Reese HP trunnion bar hitch W/ HP DC
Google Custom Search For Sunline Owners Club
|
|
|
|
|
06-16-2007, 08:11 AM
|
#11
|
|
Junior Member
Join Date: Aug 2006
Posts: 6
SUN #20
|
I won't hold a line up at the dump station either, but when used regularly it only takes a minute or two on each tank for the water to run clear. I have also noticed that turning the water off/on couple of times will allow more paper pieces to rinse out of the black tank. Again, I only do this extensive of a rinse when I am not holding other campers up.
For the hose connection, I have had success using a Water Thief from camping world. 
We have had the tornado on our camper for 2-3 years and they (black & grey) now leak behind the mounting plate where the hose hooks up. Does anybody have an idea how to repair/replace these without purchasing whole new kits? These are definitely worth having, in fact I still use mine even though I get a bit of spray while rinsing.
__________________
|
|
|
|
|
|
Currently Active Users Viewing This Thread: 1 (0 members and 1 guests)
|
|
|
 Posting Rules
|
You may not post new threads
You may not post replies
You may not post attachments
You may not edit your posts
HTML code is Off
|
|
|
|
 » Recent Sunline Discussions
 |
|
|
|
|
|
|
|
|
|
|
|
|
|
|
|
|
|
|
|
|
|
|
|


 Linear Mode

